Page 357 of 448

&Replacing the air cleaner element
Replace the air cleaner element according
to the maintenance schedule in the“ Warranty and Maintenance Booklet ”. Un-
der extremely dusty conditions, replace it
more frequently. It is recommended that
you always use genuine SUBARU parts. ! Non-turbo models
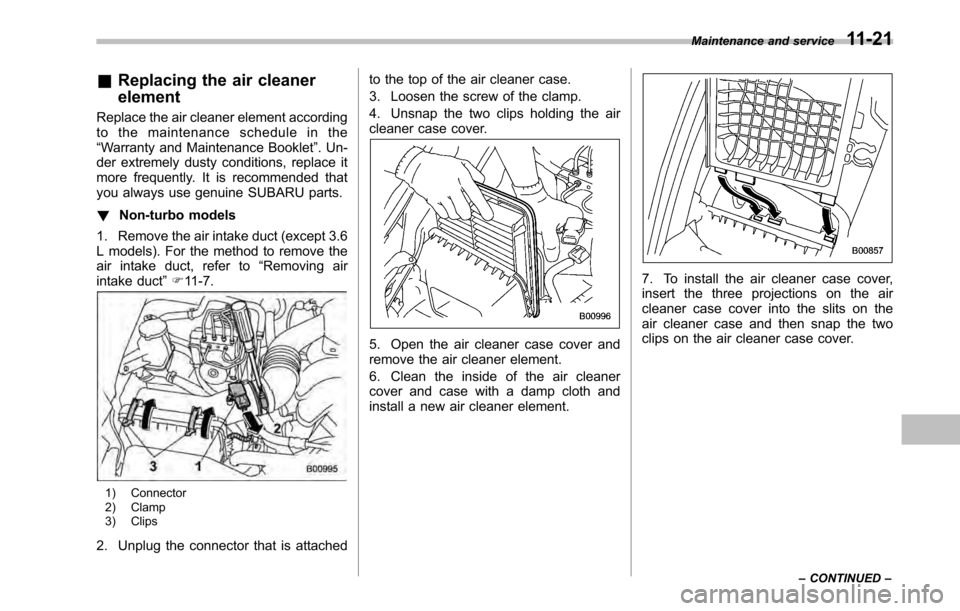
1. Remove the air intake duct (except 3.6
L models). For the method to remove the
air intake duct, refer to “Removing air
intake duct ”F 11-7.
1) Connector
2) Clamp
3) Clips
2. Unplug the connector that is attached to the top of the air cleaner case.
3. Loosen the screw of the clamp.
4. Unsnap the two clips holding the air
cleaner case cover.
5. Open the air cleaner case cover and
remove the air cleaner element.
6. Clean the inside of the air cleaner
cover and case with a damp cloth and
install a new air cleaner element.
7. To install the air cleaner case cover,
insert the three projections on the air
cleaner case cover into the slits on the
air cleaner case and then snap the two
clips on the air cleaner case cover.
Maintenance and service
11-21
– CONTINUED –
Page 358 of 448
11-22Maintenance and service
!Turbo models
1. Unsnap the two clamps holding the air
cleaner case cover.
2. Open the air cleaner case cover and
remove the air cleaner element. 3. Clean the inside of the air cleaner
cover and case with a damp cloth and
install a new air cleaner element.
4. Snap the two clamps on the air cleaner
case cover.
Spark plugs
It may be difficult to replace the spark
plugs. It is recommended that you have
the spark plugs replaced by your
SUBARU dealer.
The spark plugs should be replaced
according to the maintenance schedule
in the
“Warranty and Maintenance Book-
let ”.
& Recommended spark plugs
2.5 L non-turbo models: SIFR6A11 (NGK)
2.5 L turbo models: SILFR6B8 (NGK)
3.6 L models: SILFR6C11 (NGK)
Page 362 of 448
11-26Maintenance and service
Continuously variable trans-
mission fluid
There is no continuously variable trans-
mission fluid level gauge. It is unneces-
sary to check the continuously variable
transmission fluid level. However, if ne-
cessary, we recommend that you consult
your SUBARU dealer for inspection. Front differential gear oil
(AT and CVT models) &
Checking the oil level
NOTE
There are no differential oil level
gauges for CVT models.
1) Yellow handle
1. Park the vehicle on a level surface and
stop the engine.
2. Pull out the level gauge, wipe it clean,
and insert it again.
1) Upper level
2) Lower level
3. Pull out the level gauge again and
check the oil level on it. If it is below the
lower level, add oil to bring the level up to
the upper level.
CAUTION
Be careful not to spill front differ-
ential gear oil when adding it. If oil
touches the exhaust pipe, it may
cause a bad smell, smoke, and/or a
fire. If oil gets on the exhaust pipe,
be sure to wipe it off.
Page 363 of 448
&Recommended grade and viscosity
Each oil manufacturer has its own base
oils and additives. Never use different
brands together.
Oil grade: API classification GL-5
SAE viscosity No. and applicable tempera- ture Rear differential gear oil &
Checking the gear oil level
CVT models (Legacy)
1) Filler plug
2) Drain plug 3) Oil level
Maintenance and service
11-27
– CONTINUED –
Page 364 of 448
11-28Maintenance and service
3.6 L models
1) Filler plug
2) Drain plug
3) Oil levelOthers
1) Filler plug
2) Drain plug
3) Oil level
Remove the plug from the filler hole and
check the oil level. The oil level should be
kept even with the bottom of the filler hole. If the oil level is below the bottom edge of
the hole, add oil through the filler hole to
raise the level.
CAUTION
. Be careful not to spill rear differ-
ential gear oil when adding it. If
rear differential gear oil touches
the exhaust pipe, it may cause a
bad smell, smoke, and/or a fire. If
rear differential gear oil gets on
the exhaust pipe, be sure to wipe
it off.
. If the vehicle requires frequent
refilling, there may be an oil leak.
If you suspect a problem, have
the vehicle checked at your
SUBARU dealer.
& Recommended grade and viscosity
Each oil manufacturer has its own base
oils and additives. Never use different
brands together.
Oil grade: API classification GL-5
Page 367 of 448

Check the fluid level on the outside of the
reservoir. If the level is below“MIN ”, add
the recommended brake fluid to “MAX ”.
Use only brake fluid from a sealed
container.
& Recommended brake fluid
FMVSS No. 116, fresh DOT 3 or 4 brake fluid
CAUTION
Never use different brands of brake
fluid together. Also, avoid mixing
DOT 3 and DOT 4 brake fluids even if
they are the same brand. Clutch fluid (MT models) &
Checking the fluid level
WARNING
Never let clutch fluid contact your
eyes because clutch fluid can be
harmful to your eyes. If clutch fluid
gets in your eyes, immediately flush
them thoroughly with clean water.
For safety, when performing this
work, wearing eye protection isadvisable.
CAUTION
. Clutch fluid absorbs moisture
from the air. Any absorbed moist-
ure can cause improper clutchoperation.
. If the vehicle requires frequent
refilling, there may be a leak. If
you suspect a problem, have the
vehicle checked at your SUBARU
dealer.
. Never use different brands of
clutch fluid together.
. When clutch fluid is added, be
careful not to allow any dirt into
the tank. .
Never splash the clutch fluid over
painted surfaces or rubber parts.
Alcohol contained in the clutch
fluid may damage them.
. Be careful not to spill clutch fluid
when adding it. If clutch fluid
touches the exhaust pipe, it may
cause a bad smell, smoke, and/or
a fire. If clutch fluid gets on the
exhaust pipe, be sure to wipe itoff.
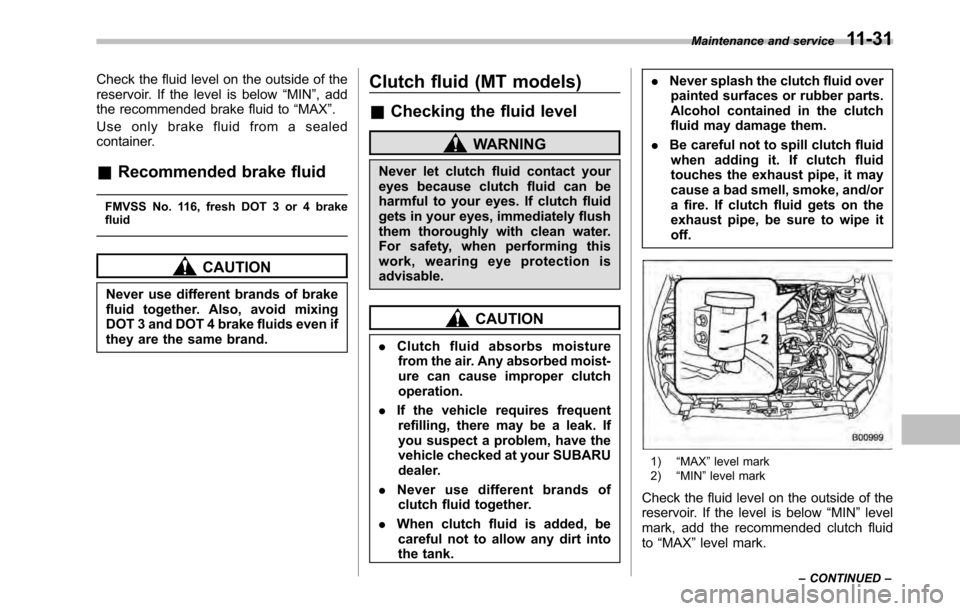
1) “MAX ”level mark
2) “MIN ”level mark
Check the fluid level on the outside of the
reservoir. If the level is below “MIN ”level
mark, add the recommended clutch fluidto “MAX ”level mark.
Maintenance and service
11-31
– CONTINUED –
Page 371 of 448

Tires and wheels &Types of tires
You should be familiar with type of tires
present on your vehicle. ! All season tires
The factory-installed tires on your new
vehicle except 2.5 L turbo models are all
season tires.
All season tires are designed to provide
an adequate measure of traction, handling
and braking performance in year-round
driving including snowy and icy road
conditions. However all season tires do
not offer as much traction performance as
winter (snow) tires in heavy or loose snow
or on icy roads.
All season tires are identified by “ALL
SEASON ”and/or “M+S ”(Mud & Snow) on
the tire sidewall. ! Summer tires
The factory-installed tires on your new 2.5
L turbo models are summer tires. Summer
tires are high-speed capability tires best
suited for highway driving under dryconditions.
Summer tires are inadequate for driving
on slippery roads such as on snow-
covered or icy roads.
If you drive your vehicle on snow-covered or icy roads, we strongly recommend the
use of winter (snow) tires.
When installing winter tires, be sure to
replace all four tires. !
Winter (snow) tires
Winter tires are best suited for driving on
snow-covered and icy roads. However
winter tires do not perform as well as
summer tires and all season tires on roads
other than snow-covered and icy roads.
& Tire pressure monitoring
system (TPMS) (if equipped)
The tire pressure monitoring system pro-
vides the driver with a warning message
by sending a signal from a sensor that is
installed in each wheel when tire pressure
is severely low. The tire pressure monitor-
ing system will activate only when the
vehicle is driven. Also, this system may
not react immediately to a sudden drop in
tire pressure (for example, a blow-out
caused by running over a sharp object).
If you adjust the tire pressures in a warm
garage and will then drive the vehicle in
cold outside air, the resulting drop in tire
pressures may cause the low tire pressure
warning light to illuminate. To avoid this
problem when adjusting the tire pressures
in a warm garage, inflate the tires to
pressures higher than those shown on the tire placard. Specifically, inflate them by an
extra 1 psi (6.9 kPa, 0.07 kgf/cm2) for
every difference of 10 8F (5.6 8C) between
the temperature in the garage and the
temperature outside. By way of example,
the following table shows the required tire
pressures that correspond to various out-
side temperatures when the temperature
in the garage is 60 8F (15.6 8C).
Example:
Tire size: P215/70R16 99S, P225/60R17 98T
Standard tire pressures:
Front: 32 psi (220 kPa, 2.2 kgf/cm
2)
Rear: 30 psi (210 kPa, 2.1 kgf/cm2)
Garage temperature: 60 8F (15.6 8C)
Outside
temperature Adjusted pressure
[psi (kPa, kgf/cm
2)]
Front Rear
30 8F( �18C) 35 (240, 2.4) 33 (230, 2.3)
10 8F( �12 8C) 37
(255, 2.55) 35
(240, 2.4)
� 10 8F
( � 23 8C) 39 (270, 2.7)
37 (255, 2.55)
Example:
Tire size: P205/60R16 91V, P215/50R17
90V, P225/50R17 93V, 225/45R18 91W
Standard tire pressures:
Front: 33 psi (230 kPa, 2.3 kgf/cm
2)
Maintenance and service
11-35
– CONTINUED –
Page 416 of 448

13-6Consumer information and Reporting safety defects
! Vehicle placard
The vehicle placard is affixed to the driver ’s side B-pillar.
Example:
U.S.-spec. models
Canada-spec. models
The vehicle placard shows original
tire size, recommended cold tire
inflation pressure on each tire at
maximum loaded vehicle weight,
seating capacity and loading infor-mation. ! Adverse safety consequences
of under-inflation
Driving at high speeds with exces-
sively low tire pressures can cause
the tires to flex severely and to
rapidly become hot. A sharp in-
crease in temperature could cause
tread separation, and failure of the
tire(s). Possible resulting loss of vehicle control could lead to anaccident.
! Measuring and adjusting air
pressure to achieve proper in- flation
Check and, if necessary, adjust the
pressure of each tire (including the
spare) at least once a month and
before any long journey. Check the
tire pressures when the tires are
cold. Use a pressure gauge to
adjust the tire pressures to the
specific values. Driving even a
short distance warms up the tires
and increases the tire pressures.
Also, the tire pressures are affected
by the outside temperature. It is
best to check tire pressure out-
doors before driving the vehicle.
When a tire becomes warm, the air
inside it expands, causing the tire
pressure to increase. Be careful not
to mistakenly release air from a
warm tire to reduce its pressure.