2010 SUBARU LEGACY parking brake
[x] Cancel search: parking brakePage 316 of 448

9-6In case of emergency
Flat tires
If you have a flat tire while driving, never
brake suddenly; keep driving straight
ahead while gradually reducing speed.
Then slowly pull off the road to a safeplace. &Changing a flat tire
WARNING
. Do not jack up the vehicle on an
incline or a loose road surface.
The jack can come out of the
jacking point or sink into the
ground and this can result in a
serious accident.
. Use only the jack provided with
your vehicle. The jack supplied
with the vehicle is designed only
for changing a tire. Never get
under the vehicle while support-
ing the vehicle with this jack. .
Always turn off the engine before
raising the flat tire off the ground
using the jack. Never swing or
push the vehicle supported with
the jack. The jack can come out
of the jacking point due to a jolt
and this can result in a seriousaccident.
1. Park on a hard, level surface, when-
ever possible, then stop the engine.
2. Apply the parking brake securely and
shift the shift lever in reverse (MT models)
or the select lever in the “P ”(Park) position
(AT and CVT models).
3. Turn on the hazard warning flasher
and have everyone get out of the vehicle.
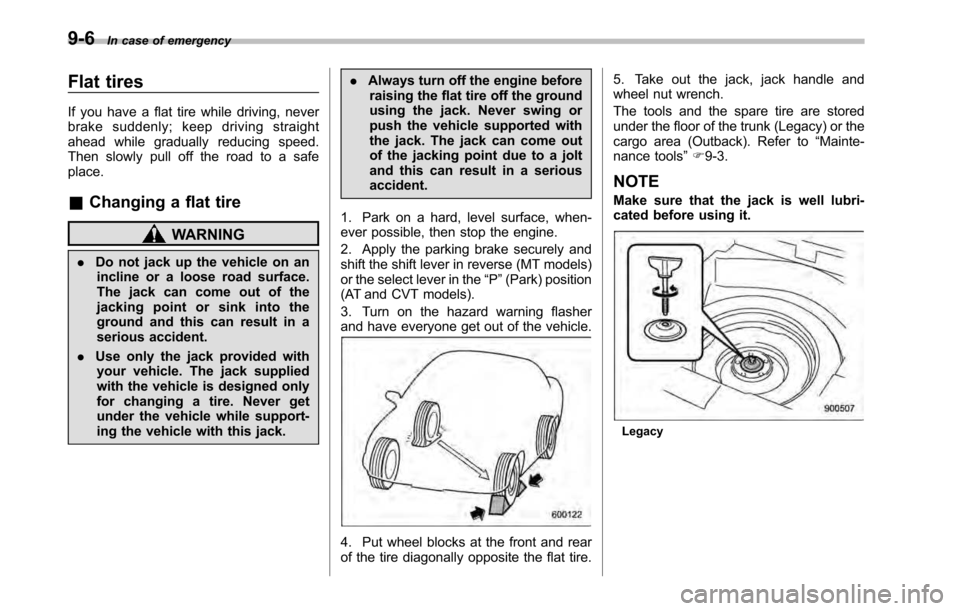
4. Put wheel blocks at the front and rear
of the tire diagonally opposite the flat tire. 5. Take out the jack, jack handle and
wheel nut wrench.
The tools and the spare tire are stored
under the floor of the trunk (Legacy) or the
cargo area (Outback). Refer to
“Mainte-
nance tools ”F 9-3.
NOTE
Make sure that the jack is well lubri-
cated before using it.
Legacy
Page 325 of 448

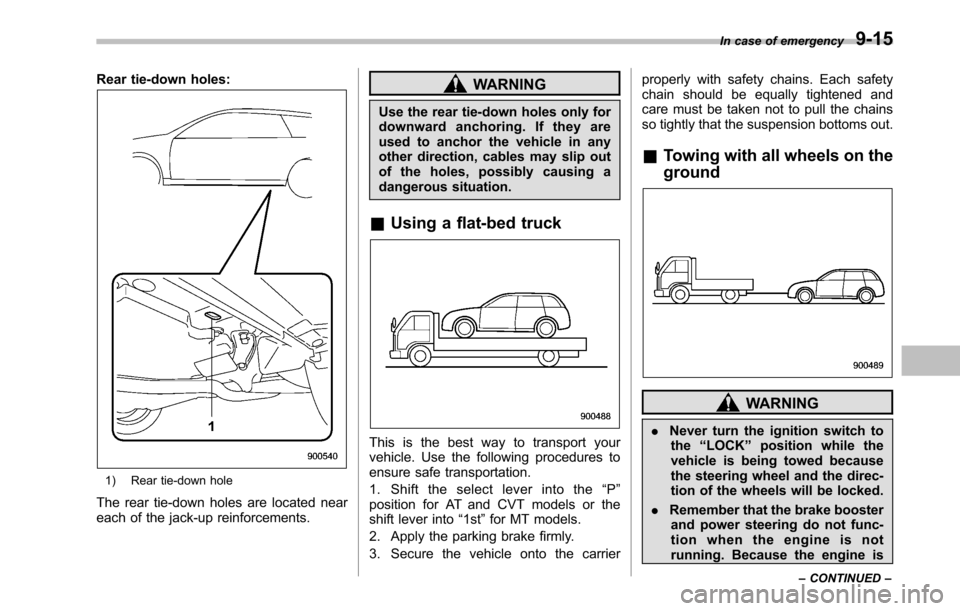
Rear tie-down holes:
1) Rear tie-down hole
The rear tie-down holes are located near
each of the jack-up reinforcements.
WARNING
Use the rear tie-down holes only for
downward anchoring. If they are
used to anchor the vehicle in any
other direction, cables may slip out
of the holes, possibly causing a
dangerous situation.
& Using a flat-bed truck
This is the best way to transport your
vehicle. Use the following procedures to
ensure safe transportation.
1. Shift the select lever into the “P ”
position for AT and CVT models or the
shift lever into “1st ”for MT models.
2. Apply the parking brake firmly.
3. Secure the vehicle onto the carrier properly with safety chains. Each safety
chain should be equally tightened and
care must be taken not to pull the chains
so tightly that the suspension bottoms out.
& Towing with all wheels on the ground
WARNING
. Never turn the ignition switch to
the “LOCK ”position while the
vehicle is being towed because
the steering wheel and the direc-
tion of the wheels will be locked.
. Remember that the brake booster
and power steering do not func-
tion when the engine is not
running. Because the engine is In case of emergency
9-15
– CONTINUED –
Page 326 of 448

9-16In case of emergency
turned off, it will take greater
effort to operate the brake pedal
and steering wheel.
CAUTION
. If transmission failure occurs,
transport your vehicle on a flat-
bed truck.
. Do not run the engine while being
towed using this method. Trans-
mission damage could result if
the vehicle is towed with the
engine running.
. For AT and CVT models, the
traveling speed must be limited
to less than 20 mph (30 km/h) and
the traveling distance to less
than 31 miles (50 km). For greater
speeds and distances, transport
your vehicle on a flat-bed truck.
1. Check the transmission and differen-
tial oil levels and add oil to bring it to the
upper level if necessary.
2. Release the parking brake and put the
transmission in neutral.
3. The ignition switch should be in the “ Acc ”position while the vehicle is being
towed.
4. Take up slack in the towline slowly to prevent damage to the vehicle.
Electronic parking brake–if
the electronic parking brake
cannot be releasedWARNING
. When the electronic parking
brake cannot be released, the
electronic parking brake system
may malfunction. Driving in such
conditions may cause an unex-
pected accident. Contact your
SUBARU dealer for inspection
as soon as possible.
. You can release the electronic
parking brake by using the elec-
tronic parking brake release tool
in case of an emergency. How-
ever, after releasing the electro-
nic parking brake by using the
electronic parking brake release
tool, contact your SUBARU deal-
er for inspection as soon aspossible.
. Release the electronic parking
brakebyusingtheelectronic
parking brake release tool on a
level road. Otherwise, the vehicle
may move, which could cause anaccident.
Page 327 of 448

.When releasing the electronic
parking brake by using the elec-
tronic parking brake release tool,
always perform the followingitems. – Shift the shift lever in the “1 ”
or “R ” position (MT models).
– Shift the select lever in the “P ”
position (AT and CVT models).
– Use tire stops under the tires.
. When releasing the electronic
parking brake by using the elec-
tronic parking brake release tool,
make sure that the ignition
switch is in the “LOCK ”position.
Otherwise, the electronic parking
brake system may operate and
the electronic parking brake re-
lease tool may rotate and unex-
pected accident may occur.
CAUTION
. Under certain weather conditions
(rain, snow, sandstorm, etc.), do
not release the electronic parking
brakebyusingtheelectronic
parking brake release tool. If
water or dust enters the device,
the device may malfunction. .
If the cap cannot be removed,
contact your SUBARU dealer for inspection.
. After releasing the electronic
parking brake by using the elec-
tronic parking brake release tool,
make sure that the cap is rein-
stalled to the parking brake re-
lease device. If the cap is not
reinstalled, water or dust enters
the device and the device maymalfunction.
NOTE
It may be difficult to release the elec-
tronic parking brake by using the
electronic parking brake release tool.
Have your SUBARU dealer release the
electronic parking brake if necessary.
In the event that you cannot release the
electronic parking brake by pulling the
electronic parking brake switch or by
depressing the accelerator pedal, you
can release the electronic parking brake
manually by using the electronic parking
brake release tool.
1. Shift the shift lever in the “1 ” or “R ”
position (MT models) or the select lever in the “P ”position (AT and CVT models).
2. Turn the ignition switch to the “LOCK ”
position. 3. Make sure that the brake system
warning light and the indicator light on
the parking brake switch have turned off.
4. Use tire stops under the tires to
prevent the vehicle from moving.
5. Take out the electronic parking brake
release tool. Refer to
“Maintenance tools ”
F 9-3. In case of emergency
9-17
– CONTINUED –
Page 328 of 448

9-18In case of emergency
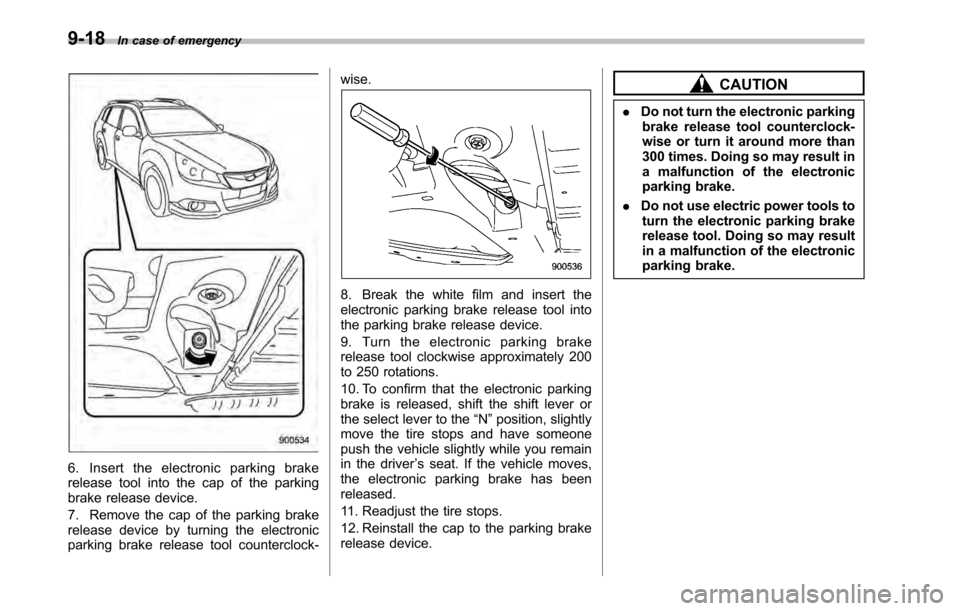
6. Insert the electronic parking brake
release tool into the cap of the parking
brake release device.
7. Remove the cap of the parking brake
release device by turning the electronic
parking brake release tool counterclock- wise.
8. Break the white film and insert the
electronic parking brake release tool into
the parking brake release device.
9. Turn the electronic parking brake
release tool clockwise approximately 200
to 250 rotations.
10. To confirm that the electronic parking
brake is released, shift the shift lever or
the select lever to the
“N ”position, slightly
move the tire stops and have someone
push the vehicle slightly while you remain
in the driver ’s seat. If the vehicle moves,
the electronic parking brake has beenreleased.
11. Readjust the tire stops.
12. Reinstall the cap to the parking brake
release device.
CAUTION
. Do not turn the electronic parking
brake release tool counterclock-
wise or turn it around more than
300 times. Doing so may result in
a malfunction of the electronic
parking brake.
. Do not use electric power tools to
turn the electronic parking brake
release tool. Doing so may result
in a malfunction of the electronic
parking brake.
Page 340 of 448

11-4Maintenance and service
guard against getting oil or fluids
in your eyes. If something does
get in your eyes, thoroughly
wash them out with clean water.
. Do not tamper with the wiring of
the SRS airbag system or seat-
belt pretensioner system, or at-
tempt to take its connectors
apart, as that may activate the
system or it can render it inop-
erative. NEVER use a circuit
tester for these wiring. If your
SRS airbag or seatbelt preten-
sioner needs service, consult
your nearest SUBARU dealer. &
Before checking or servicing
in the engine compartment
WARNING
. Always stop the engine and set
the parking brake firmly to pre-
vent the vehicle from moving.
. Always let the engine cool down.
Engine parts become very hot
when the engine is running and
remain hot for some time after
the engine is stopped.
. Do not spill engine oil, engine
coolant, brake fluid or any other
fluid on hot engine components.
This may cause a fire.
. Always remove the key from the
ignition switch. When the ignition
switch is in the “ON ”position,
thecoolingfanmayoperate
suddenly even when the engine
is stopped.
. Before performing any servicing
on a vehicle equipped with a
remote engine start system tem-
porarily place that system in the
service mode to prevent it from
unexpectedly starting the engine. &
When checking or servicing
in the engine compartment
(2.5 L non-turbo models)
CAUTION
Do not contact the belt cover while
checking the components in the
engine compartment. Doing so may
cause your hand to slip off the belt
cover and result in an unexpected
injury.
Page 360 of 448

11-24Maintenance and service
1) Upper level
2) Lower level
3. Pull out the level gauge again and
check the oil level on it. If it is below the
lower level, add oil through the level
gauge hole to bring the level up to the
upper level.
CAUTION
Be careful not to spill manual trans-
mission oil when adding it. If oil
touches the exhaust pipe, it may
cause a bad smell, smoke, and/or a
fire. If oil gets on the exhaust pipe,
be sure to wipe it off. &
Recommended grade and viscosity
Each oil manufacturer has its own base
oils and additives. Never use different
brands together.
Oil grade: API classification GL-5SAE viscosity No. and applicable tempera- ture Automatic transmission fluid &
Checking the fluid level
The automatic transmission fluid expands
largely as its temperature rises; the fluid
level differs according to fluid temperature.
Therefore, there are two different scales
for checking the level of hot fluid and cold
fluid on the level gauge.
Though the fluid level can be checked
without warming up the fluid on the“ COLD ”range, we recommend checking
the fluid level when the fluid is at operatingtemperature. ! Checking the fluid level when the
fluid is hot
Check the fluid level monthly.
1. Drive the vehicle several miles to raise
the temperature of the transmission fluid
up to normal operating temperature; 158
to 176 8F (70 to 80 8C) is normal.
2. Park the vehicle on a level surface and
set the parking brake.
3. First shift the select lever in each
position. Then shift it in the “P ” position,
and run the engine at idling speed.
Page 370 of 448

11-34Maintenance and service
&Checking the clutch pedal
free play
1) 0.19 –0.44 in (5 –11 mm)
Lightly press the clutch pedal down with
your finger until you feel resistance, and
check the free play.
If the free play is not within proper
specification, contact your SUBARU deal-
er. Replacement of brake pad
and lining
CAUTION
If you continue to drive despite the
scraping noise from the audible
brake pad wear indicator, it will
result in the need for costly brake
rotor repair or replacement.
The right front disc brake and the right rear
disc brake have audible wear indicators
on the brake pads. If the brake pads wear
close to their service limit, the wear
indicator makes a very audible scraping
noise when the brake pedal is applied.
If you hear this scraping noise each time you apply the brake pedal, have the brake
pads serviced by your SUBARU dealer as
soon as possible.
& Breaking-in of new brake
pads and linings
When replacing the brake pad or lining,
use only genuine SUBARU parts. After
replacement, the new parts must be
broken in as follows: ! Brake pad and lining
While maintaining a speed of 30 to 40
mph (50 to 65 km/h), step on the brake
pedal lightly. Repeat this five or moretimes. ! Parking brake lining
The break-in maintenance for the parking
brake linings should be performed at a
SUBARU dealer.