2010 SUBARU FORESTER Ac System
[x] Cancel search: Ac SystemPage 284 of 402

install the conventional tire as soon as
possible because the spare tire is de-
signed only for temporary use.
Check the inflation pressure of the tem-
porary spare tire periodically to keep the
tire ready for use. The correct pressure is
60 psi (420 kPa, 4.2 kg/cm
2).
When using the temporary spare tire, note
the following. . Do not exceed 50 mph (80 km/h).
. Do not put a tire chain on the temporary
spare tire. Because of the smaller tire size,
a tire chain will not fit properly. . Do not use two or more temporary
spare tires at the same time.. Do not drive over obstacles. This tire
has a smaller diameter, so road clearance
is reduced.
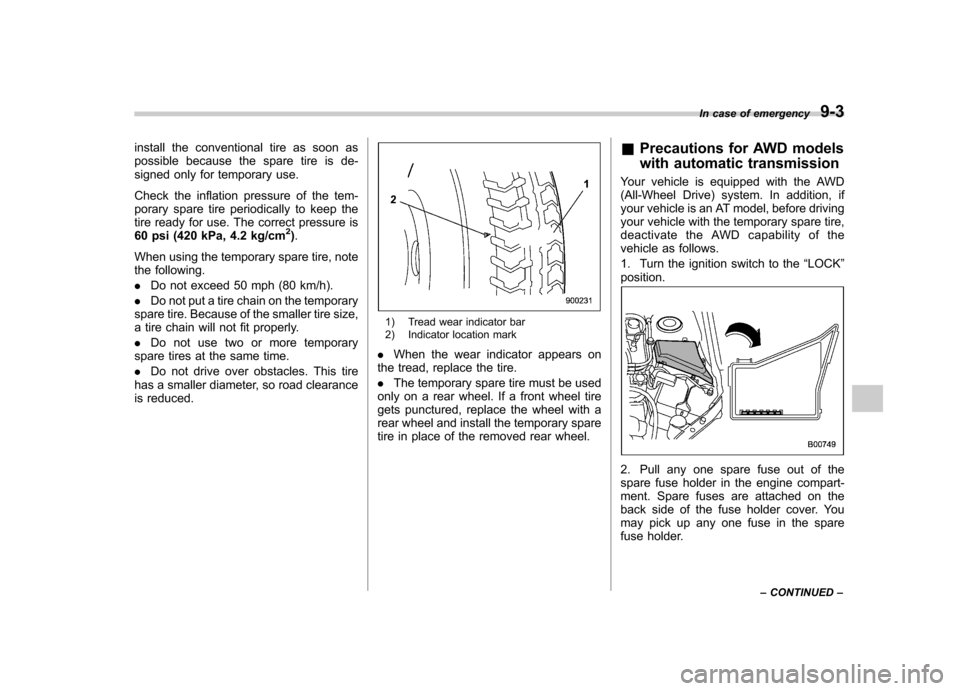
1) Tread wear indicator bar
2) Indicator location mark
. When the wear indicator appears on
the tread, replace the tire. . The temporary spare tire must be used
only on a rear wheel. If a front wheel tire
gets punctured, replace the wheel with a
rear wheel and install the temporary spare
tire in place of the removed rear wheel. &
Precautions for AWD models
with automatic transmission
Your vehicle is equipped with the AWD
(All-Wheel Drive) system. In addition, if
your vehicle is an AT model, before driving
your vehicle with the temporary spare tire,
deactivate the AWD capability of the
vehicle as follows.
1. Turn the ignition switch to the “LOCK ”
position.
2. Pull any one spare fuse out of the
spare fuse holder in the engine compart-
ment. Spare fuses are attached on the
back side of the fuse holder cover. You
may pick up any one fuse in the spare
fuse holder. In case of emergency
9-3
– CONTINUED –
Page 290 of 402

&Tire pressure monitoring
system (TPMS) (U.S.-spec. models)
The tire pressure monitoring system pro-
vides the driver with the warning message
indicated by sending a signal from a
sensor that is installed in each wheel
when tire pressure is severely low.
The tire pressure monitoring system will
activate only when the vehicle is driven.
Also, this system may not react immedi-
ately to a sudden drop in tire pressure (for
example, a blow-out caused running over
a sharp object).
WARNING
If the low tire pressure warning light
illuminates while driving, never brake suddenly and keep driving
straight ahead while gradually redu-
cing speed. Then slowly pull off the
road to a safe place. Otherwise an
accident involving serious vehicle
damage and serious personal injury
could occur.
Check the pressure for all four tires
and adjust the pressure to the COLD
tire pressure shown on the vehicle
placard on the door pillar on thedriver
’s side. If this light still illumi-
nates while driving after adjusting
the tire pressure, a tire may have
significant damage and a fast leak
that causes the tire to lose air
rapidly. If you have a flat tire, replace
it with a spare tire as soon aspossible.
When a spare tire is mounted or a
wheel rim is replaced without the
original pressure sensor/transmitter
being transferred, the low tire pres-
sure warning light will illuminate
steadily after blinking for approxi-
mately one minute. This indicates
the TPMS is unable to monitor all
four road wheels. Contact your
SUBARU dealer as soon as possible
for tire and sensor replacement and/
or system resetting.
Do not inject any tire liquid or aerosol tire sealant into the tires, as
this may cause a malfunction of the
tire pressure sensors.
If the light illuminates steadily after
blinking for approximately one min-
ute, promptly contact a SUBARU
dealer to have the system inspected.
In case of emergency
9-9
Page 294 of 402

&Towing and tie-down hooks
The towing hooks should be used only in
an emergency (e.g., to free a stuck vehicle
from mud, sand or snow).
CAUTION
. Use only the specified towing
hook and tie-down hook. Never
use suspension parts or other
parts of the body for towing or
tie-down purposes.
. To prevent deformation to the
front bumper and the towing
hook, do not apply excessive
lateral load to the towing hook.
Front towing hook:
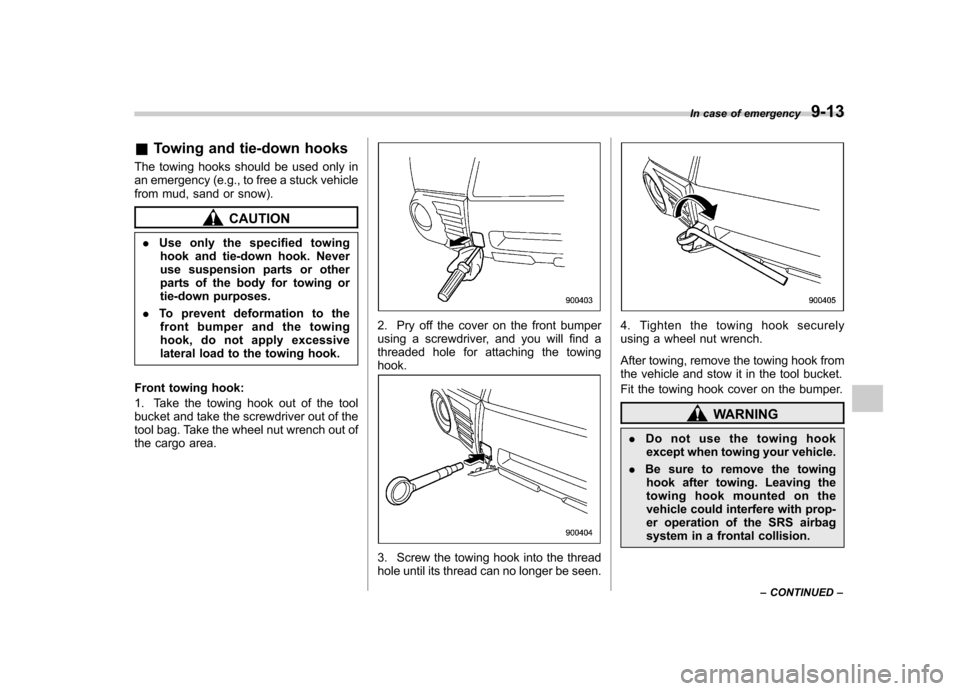
1. Take the towing hook out of the tool
bucket and take the screwdriver out of the
tool bag. Take the wheel nut wrench out of
the cargo area.
2. Pry off the cover on the front bumper
using a screwdriver, and you will find a
threaded hole for attaching the towinghook.
3. Screw the towing hook into the thread
hole until its thread can no longer be seen.
4. Tighten the towing hook securely
using a wheel nut wrench.
After towing, remove the towing hook from
the vehicle and stow it in the tool bucket.
Fit the towing hook cover on the bumper.
WARNING
. Do not use the towing hook
except when towing your vehicle.
. Be sure to remove the towing
hook after towing. Leaving the
towing hook mounted on the
vehicle could interfere with prop-
er operation of the SRS airbag
system in a frontal collision. In case of emergency
9-13
– CONTINUED –
Page 298 of 402

Rear gate–if the rear gate
cannot be opened
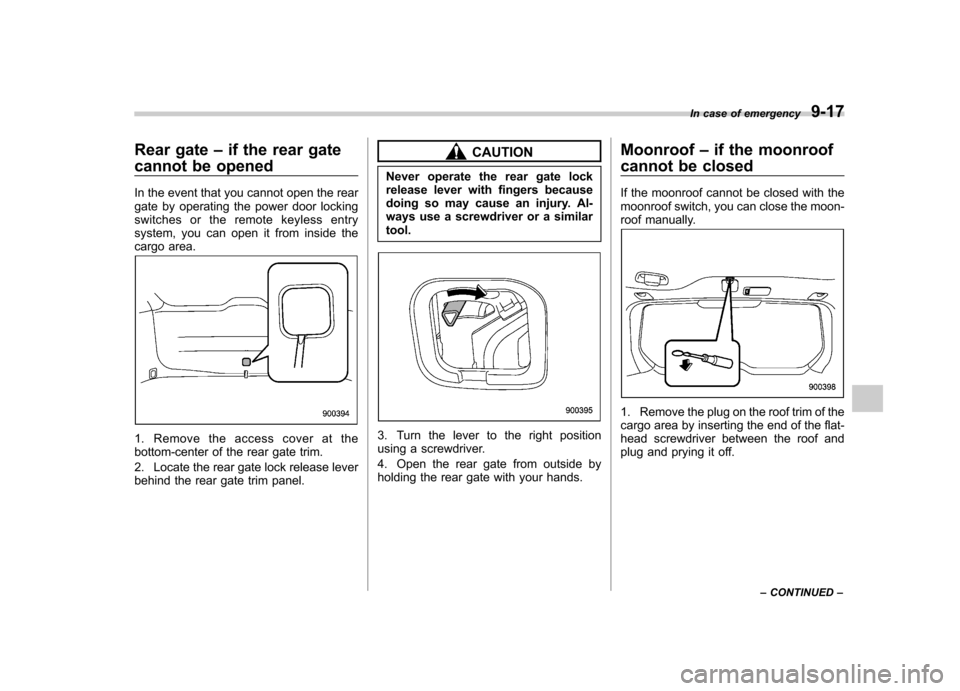
In the event that you cannot open the rear
gate by operating the power door locking
switches or the remote keyless entry
system, you can open it from inside the
cargo area.
1. Remove the access cover at the
bottom-center of the rear gate trim.
2. Locate the rear gate lock release lever
behind the rear gate trim panel.
CAUTION
Never operate the rear gate lock
release lever with fingers because
doing so may cause an injury. Al-
ways use a screwdriver or a similartool.
3. Turn the lever to the right position
using a screwdriver.
4. Open the rear gate from outside by
holding the rear gate with your hands. Moonroof
–if the moonroof
cannot be closed
If the moonroof cannot be closed with the
moonroof switch, you can close the moon-
roof manually.
1. Remove the plug on the roof trim of the
cargo area by inserting the end of the flat-
head screwdriver between the roof and
plug and prying it off. In case of emergency
9-17
– CONTINUED –
Page 301 of 402

10-2Appearance care
Exterior care &Washing
CAUTION
. When washing the vehicle, the
brakes may get wet. As a result,
the brake stopping distance will
be longer. To dry the brakes,
drive the vehicle at a safe speed
while lightly pressing the brake
pedal to heat up the brakes.
. Do not wash the engine compart-
ment and area adjacent to it. If
water enters the engine air in-
take, electrical parts or the power
steering fluid reservoir, it will
cause engine trouble or faulty
power steering respectively.
. Since your vehicle is equipped
with a rear wiper, automatic car-
wash brushes could become
tangled around it, damaging the
wiper arm and other compo-
nents. Ask the automatic car-
wash operator not to let the
brushes touch the wiper arm or
to fix the wiper arm on the rear
window glass with adhesive tape
before operating the machine. NOTE
When having your vehicle washed in
an automatic car wash, make sure
beforehand that the car wash is of
suitable type.
The best way to preserve your vehicle
’s
beauty is frequent washing. Wash the
vehicle at least once a month to avoid
contamination by road grime.
Wash dirt off with a wet sponge and plenty
of lukewarm or cold water. Do not wash
the vehicle with hot water and in direct sunlight.
Salt, chemicals, insects, tar, soot, tree
sap, and bird droppings should be washed
off by using a light detergent, as required.
If you use a light detergent, make certain
that it is a neutral detergent. Do not use
strong soap or chemical detergents. All
cleaning agents should be promptly
flushed from the surface and not allowed
to dry there. Rinse the vehicle thoroughly
with plenty of lukewarm water. Wipe the
remaining water off with a chamois or softcloth. ! Washing the underbody
Chemicals, salts and gravel used for
deicing road surfaces are extremely cor-
rosive, accelerating the corrosion of un-
derbody components, such as the exhaust system, fuel and brake lines, brake
cables, floor pan and fenders, and sus-pension.
Thoroughly flush the underbody and in-
side of the fenders with lukewarm or cold
water at frequent intervals to reduce the
harmful effects of such agents.
Mud and sand adhering to the underbody
components may accelerate their corro-sion.
After driving off-road or on muddy or
sandy roads, wash the mud and sand off
the underbody. Carefully flush the suspen-
sion and axle parts, as they are particu-
larly prone to mud and sand buildup. Do
not use a sharp-edged tool to remove
caked mud. NOTE
Be careful not to damage brake hoses,
sensor harnesses, and other parts
when washing suspension compo-nents. !
Using a warm water washer
. Keep a good distance of 12 in (30 cm)
or more between the washer nozzle and
the vehicle. . Do not wash the same area continu-
ously.. If a stain will not come out easily, wash
Page 303 of 402

10-4Appearance care
Corrosion protection
Your SUBARU has been designed and
built to resist corrosion. Special materials
and protective finishes have been used on
most parts of the vehicle to help maintain
fine appearance, strength, and reliableoperation. &Most common causes of corrosion
The most common causes of corrosion are:
1. The accumulation of moisture retain-
ing dirt and debris in body panel sections,
cavities, and other areas.
2. Damage to paint and other protective
coatings caused by gravel and stone
chips or minor accidents.
Corrosion is accelerated on the vehicle when:
1. It is exposed to road salt or dust
control chemicals, or used in coastal
areas where there is more salt in the air,
or in areas where there is considerable
industrial pollution.
2. It is driven in areas of high humidity,
especially when temperatures range just
above freezing.
3. Dampness in certain parts of the
vehicle remains for a long time, even though other parts of the vehicle may be
dry.
4. High temperatures will cause corro-
sion to parts of the vehicle which cannot
dry quickly due to lack of proper ventila-tion.
& To help prevent corrosion
Wash the vehicle regularly to prevent
corrosion of the body and suspension
components. Also, wash the vehicle
promptly after driving on any of the
following surfaces. . roads that have been salted to prevent
them from freezing in winter. mud, sand, or gravel
. coastal roads
After the winter has ended, it is recom-
mended that the underbody be given a
very thorough washing.
Before the beginning of winter, check the
condition of underbody components, such
as the exhaust system, fuel and brake
lines, brake cables, suspension, steering
system, floor pan, and fenders. If any of
them are found to be rusted, they should
be given an appropriate rust prevention
treatment or should be replaced. Contact
your SUBARU dealer to perform this kind
of maintenance and treatment if you need assistance.
Repair chips and scratches in the paint as
soon as you find them.
Check the interior of the vehicle for water
and dirt accumulation under the floor mats
because that could cause corrosion.
Occasionally check under the mats to
make sure the area is dry.
Keep your garage dry. Do not park your
vehicle in a damp, poorly ventilated
garage. In such a garage, corrosion can
be caused by dampness. If you wash the
vehicle in the garage or put the vehicle
into the garage when wet or covered with
snow, that can cause dampness.
If your vehicle is operated in cold weather
and/or in areas where road salts and other
corrosive materials are used, the door
hinges and locks, and hood latch should
be inspected and lubricated periodically.
Page 306 of 402

Maintenance schedule....................................... 11-3
Maintenance precautions ................................... 11-3
Before checking or servicing in the engine compartment .................................................... 11-4
When you do checking or servicing in the engine compartment while the engine is running .......... 11-4
Engine hood ....................................................... 11-5
Engine compartment overview .......................... 11-6
Non-turbo models .............................................. 11-6
Turbo models ..................................................... 11-7
Engine oil ............................................................ 11-8
Checking the oil level ......................................... 11-8
Changing the oil and oil filter .............................. 11-9
Recommended grade and viscosity .................. 11-11
Recommended grade and viscosity under severe driving conditions ............................... 11-12
Synthetic oil ..................................................... 11-12
Cooling system ................................................ 11-12
Cooling fan, hose and connections ................... 11-12
Engine coolant ................................................. 11-13
Air cleaner element .......................................... 11-15
Replacing the air cleaner element ..................... 11-16
Spark plugs ...................................................... 11-18
Recommended spark plugs .............................. 11-18
Drive belts ........................................................ 11-18
Manual transmission oil .................................. 11-19
Checking the oil level ....................................... 11-19
Recommended grade and viscosity .................. 11-20
Automatic transmission fluid .......................... 11-20
Checking the fluid level .................................... 11-20 Recommended fluid
......................................... 11-21
Front differential gear oil (AT models) ........... 11-21
Checking the oil level ...................................... 11-21
Recommended grade and viscosity .................. 11-22
Rear differential gear oil .................................. 11-22
Checking the gear oil level ............................... 11-22
Recommended grade and viscosity .................. 11-22
Power steering fluid ........................................ 11-23
Checking the fluid level .................................... 11-23
Recommended fluid ......................................... 11-24
Brake fluid ........................................................ 11-24
Checking the fluid level .................................... 11-24
Recommended brake fluid ............................... 11-25
Clutch fluid (MT models) ................................. 11-25
Checking the fluid level .................................... 11-25
Recommended clutch fluid ............................... 11-26
Brake booster .................................................. 11-26
Brake pedal ...................................................... 11-27
Checking the brake pedal free play .................. 11-27
Checking the brake pedal reserve distance....... 11-27
Clutch pedal (MT models) ............................... 11-27
Checking the clutch function ............................ 11-27
Checking the clutch pedal free play .................. 11-28
Hill start assist system (MT models) .............. 11-28
Replacement of brake pad and lining ............ 11-28
Breaking-in of new brake pads and linings ....... 11-29
Parking brake stroke ....................................... 11-29
Tires and wheels .............................................. 11-30
Types of tires ................................................... 11-30
Maintenance and service
11
Page 307 of 402

Maintenance and serviceTire pressure monitoring system (TPMS)(U.S.-spec. models) ........................................ 11-30
Tire inspection ................................................. 11-32
Tire pressures and wear ................................... 11-32
Wheel balance .................................................. 11-34
Wear indicators ................................................ 11-34
Tire rotation direction mark .............................. 11-35
Tire rotation ..................................................... 11-35
Tire replacement .............................................. 11-36
Wheel replacement ........................................... 11-36
Wheel covers (if equipped) ............................... 11-37
Aluminum wheels ............................................. 11-37
Windshield washer fluid .................................. 11-38
Replacement of wiper blades .......................... 11-39
Windshield wiper blade assembly ..................... 11-40
Windshield wiper blade rubber ......................... 11-40
Rear window wiper blade assembly .................. 11-41Rear window wiper blade rubber ...
................... 11-42
Battery .............................................................. 11-43
Fuses ................................................................ 11-44
Main fuse .......................................................... 11-45
Installation of accessories .............................. 11-46
Replacing bulbs ............................................... 11-46
Headlights (models with HID headlights) ........... 11-46
Headlights (models without HID headlights) ...... 11-46
Position light ................................................... 11-49
Front turn signal light ...................................... 11-49
Rear combination lights ................................... 11-49
License plate light ........................................... 11-50
Dome light, map light, cargo area light and door step light ............................................... 11-50
Other bulbs ..................................................... 11-51