Page 172 of 216

XUse a suitable tool to loosen the
corresponding license plate lamp unit at
jacking point 0046.XCarefully unclip the license plate lamp
unit.XDetach electrical connectors 0047.XRemove bulb 008A.XInsert the new bulb.XAttach electrical connectors 0047.XFit the license plate lamp unit on the
right and press gently on the left.
The license plate lamp unit must audibly
engage.
Replacing the interior lighting
You need a 12 V 10 W bulb.
XRemoving: Use a flat object to pry the
lamp lens off from the passenger side.XDetach electrical connector 0046 from the
interior lamp.XRemove bulb 0047 from its mount 008A.XInstalling: Insert the new bulb.XAttach electrical connector 0046 to the
interior lamp.XFit the lamp lens on the left in the
opening and press gently on the right.
The lamp lens must audibly engage.
Replacing wiper blades
About replacing wiper blades
GWarning!
For safety reasons, switch off the wipers
and remove the key from the starter switch
before replacing a wiper blade. The
windshield wipers could otherwise be set
in motion and cause injury.
GWarning!
Wiper blades are components that are
subject to wear and tear. Replace the wiper
blades at least twice a year, preferably in
the spring and fall. Otherwise the windows
will not be properly wiped. As a result, you
may not be able to observe surrounding
traffic conditions and could cause an
accident.
! Hold on to the wiper when folding the
wiper arm back. If released, the force of
the impact from the windshield wiper
tensioning spring could crack the
windshield.
Do not allow the wiper arms to contact the
windshield glass without a wiper blade
inserted.
We recommend that you have this work
carried out at an authorized smart
center.
170Replacing wiper blades>> Practical hints.
451_AKB; 3; 22, en-USd2ureepe,Version: 2.11.8.12009-07-27T09:36:34+02:00 - Seite 170
Page 181 of 216

XPosition jack 0046 under take-up
bracket 0047 so that it is always vertical
as seen from the side, even if the vehicle
is parked on an incline.
The take-up brackets are identified by
the embossed recesses in the area of the
door sills.
! Only position the jack on the
designated take-up brackets. Otherwise,
the vehicle could be damaged.
XJack up the vehicle until the wheel is a
maximum of 1.2 in (3 cm) from the ground.XUnscrew and remove the wheel bolts.
! Do not place wheel bolts in sand or dirt.
This could result in damage to the wheel
bolts and wheel hub threads.
XRemove the wheel.
Mounting the wheel
GWarning!
Always replace wheel bolts that are
damaged or rusted.
Never apply oil or grease to wheel bolts.
Damaged wheel hub threads should be
repaired immediately. Do not continue to
drive under these circumstances! Contact
an authorized smart Center or call
Roadside Assistance.
Incorrect wheel bolts or improperly
tightened wheel bolts can cause the wheel
to come off. This could cause an accident.
Be sure to use the correct wheel bolts.GWarning!
Only use genuine smart wheel bolts. Other
wheel bolts may come loose.
Do not tighten the wheel bolts when the
vehicle is raised. Otherwise the vehicle
could fall off the jack.
XClean contact surfaces of wheel and wheel
hub.
! To avoid paint damage, place wheel flat
against hub and hold it there while
installing first wheel bolt.
XGuide the wheel onto the wheel hub and
push it on.XInsert two wheel bolts and tighten them
slightly.XVehicles with wheel trim cap on steel
rim: Attach the wheel trim cap so that it
is held by the two wheel bolts.XInstall last wheel bolt and tighten it
slightly.XLower the vehicle until the vehicle is
resting fully on its own weight.XRemove the jack.XTighten the wheel bolts. Observe a
tightening torque of 80 lb-ft (110 Nm).GWarning!
Have the tightening torque checked after
changing a wheel. The wheels could come
Wheel change179>> Practical hints.451_AKB; 3; 22, en-USd2ureepe,Version: 2.11.8.12009-07-27T09:36:34+02:00 - Seite 179Z
Page 206 of 216

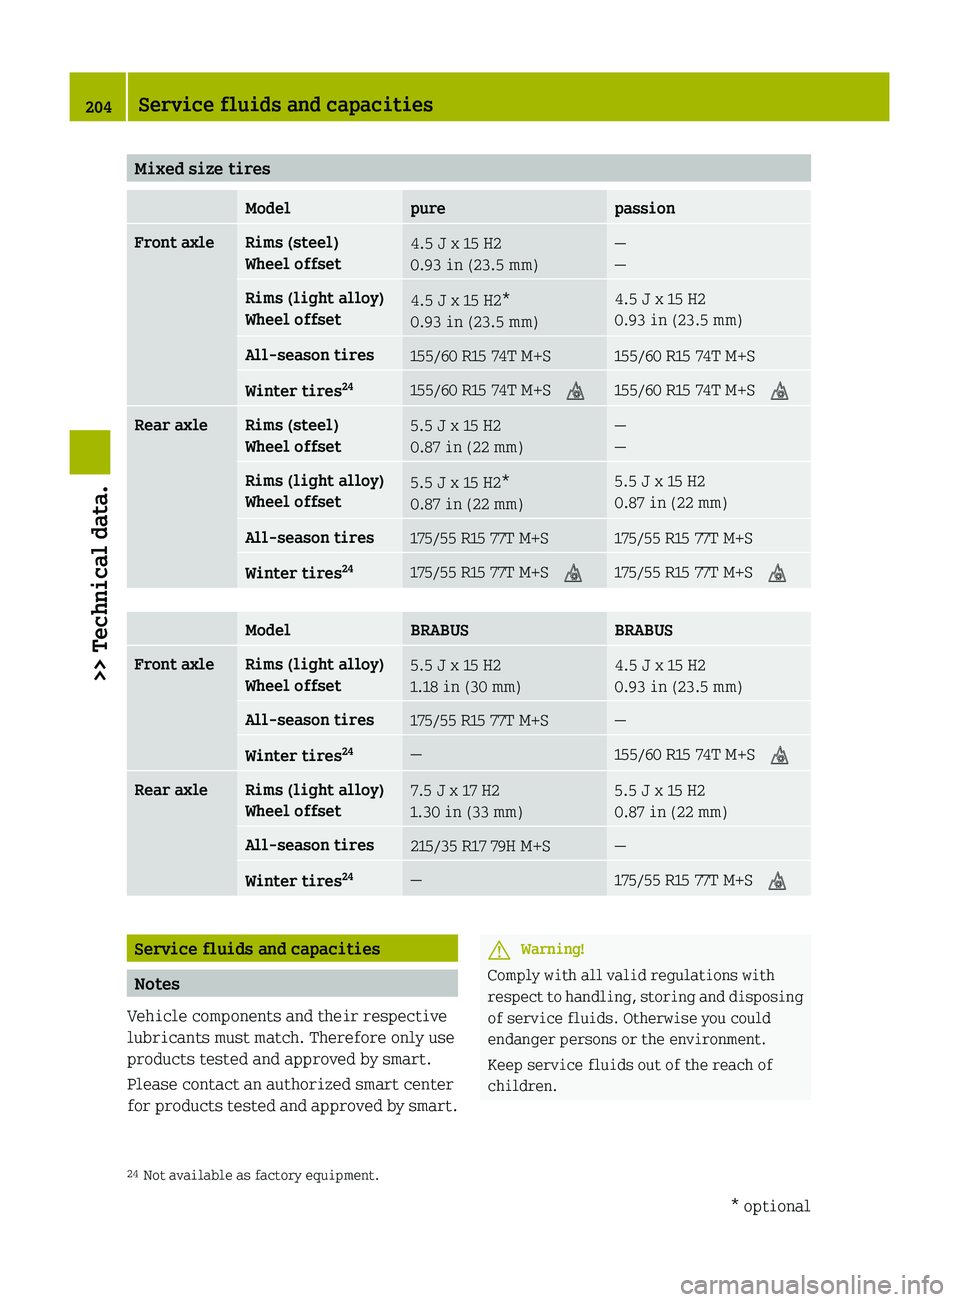
Mixed size tiresModelpurepassionFront axleRims (steel)
Wheel offset4.5 J x 15 H2
0.93 in (23.5 mm)—
—Rims (light alloy)
Wheel offset4.5 J x 15 H2*
0.93 in (23.5 mm)4.5 J x 15 H2
0.93 in (23.5 mm)All-season tires155/60 R15 74T M+S155/60 R15 74T M+SWinter tires 24155/60 R15 74T M+S
004D155/60 R15 74T M+S 004DRear axleRims (steel)
Wheel offset5.5 J x 15 H2
0.87 in (22 mm)—
—Rims (light alloy)
Wheel offset5.5 J x 15 H2*
0.87 in (22 mm)5.5 J x 15 H2
0.87 in (22 mm)All-season tires175/55 R15 77T M+S175/55 R15 77T M+SWinter tires 24175/55 R15 77T M+S
004D175/55 R15 77T M+S 004DModelBRABUSBRABUSFront axleRims (light alloy)
Wheel offset5.5 J x 15 H2
1.18 in (30 mm)4.5 J x 15 H2
0.93 in (23.5 mm)All-season tires175/55 R15 77T M+S—Winter tires 24—155/60 R15 74T M+S
004DRear axleRims (light alloy)
Wheel offset7.5 J x 17 H2
1.30 in (33 mm)5.5 J x 15 H2
0.87 in (22 mm)All-season tires215/35 R17 79H M+S—Winter tires 24—175/55 R15 77T M+S
004DService fluids and capacities
Notes
Vehicle components and their respective
lubricants must match. Therefore only use
products tested and approved by smart.
Please contact an authorized smart center
for products tested and approved by smart.
GWarning!
Comply with all valid regulations with
respect to handling, storing and disposing
of service fluids. Otherwise you could
endanger persons or the environment.
Keep service fluids out of the reach of
children.
24 Not available as factory equipment.204Service fluids and capacities>> Technical data.* optional451_AKB; 3; 22, en-USd2ureepe,Version: 2.11.8.12009-07-27T09:36:34+02:00 - Seite 204