2010 SKODA YETI lock
[x] Cancel search: lockPage 209 of 271
Inspecting and replenishing
208
Inspecting the coolant levelThe coolant expansion bottle is located in the engine compartment on the right.
– Switch the engine off.
– Open the bonnet page 203.
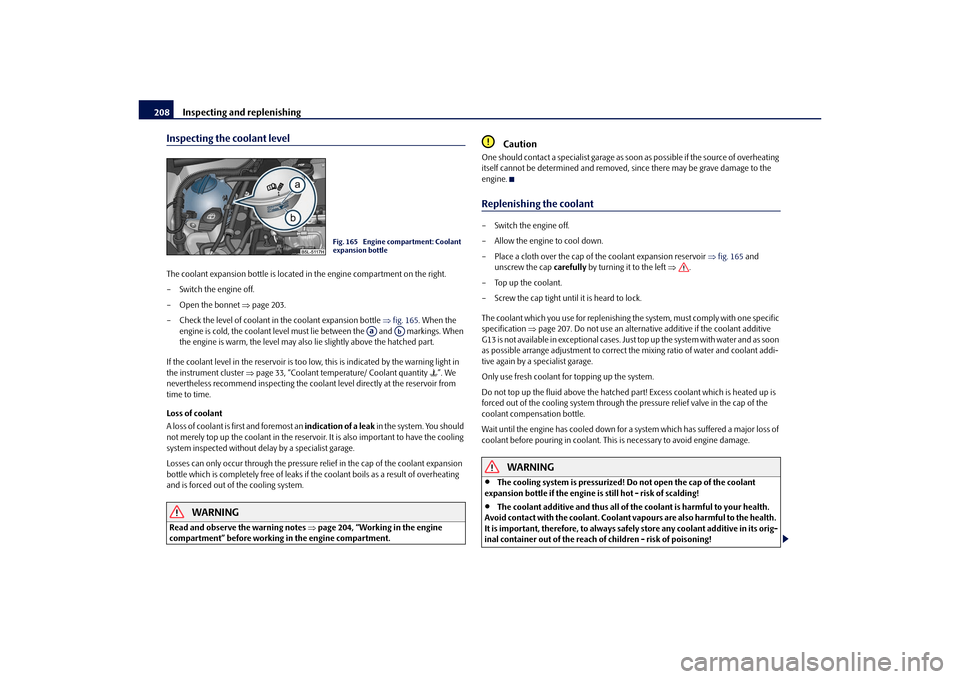
– Check the level of coolant in the coolant expansion bottle fig. 165 . When the
engine is cold, the coolant level must lie between the and markings. When
the engine is warm, the level may also lie slightly above the hatched part.
If the coolant level in the reservoir is too lo w, this is indicated by the warning light in
the instrument cluster page 33, “Coolant temperature/ Coolant quantity ”. We
nevertheless recommend inspecting the cool ant level directly at the reservoir from
time to time.
Loss of coolant
A loss of coolant is first and foremost an indication of a leak in the system. You should
not merely top up the coolant in the reservoir. It is also important to have the cooling
system inspected without delay by a specialist garage.
Losses can only occur through the pressure relief in the cap of the coolant expansion
bottle which is completely free of leaks if the coolant boils as a result of overheating
and is forced out of the cooling system.
WARNING
Read and observe the warning notes page 204, “Working in the engine
compartment” before working in the engine compartment.
Caution
One should contact a specialist garage as s oon as possible if the source of overheating
itself cannot be determined and removed, since there may be grave damage to the
engine.Replenishing the coolant– Switch the engine off.
– Allow the engine to cool down.
– Place a cloth over the cap of the coolant expansion reservoir fig. 165 and
unscrew the cap carefully by turning it to the left .
–Top up the coolant.
– Screw the cap tight until it is heard to lock.
The coolant which you use for replenishing the system, must comply with one specific
specification page 207. Do not use an alternative additive if the coolant additive
G13 is not available in exceptional cases. Just top up the system with water and as soon
as possible arrange adjustment to correct the mixing ratio of water and coolant addi-
tive again by a specialist garage.
Only use fresh coolant for topping up the system.
Do not top up the fluid above the hatched pa rt! Excess coolant which is heated up is
forced out of the cooling system through the pressure relief valve in the cap of the
coolant compensation bottle.
Wait until the engine has cooled down for a system which has suffered a major loss of
coolant before pouring in coolant. This is necessary to avoid engine damage.
WARNING
The cooling system is pressurized! Do not open the cap of the coolant
expansion bottle if the engine is still hot - risk of scalding!
The coolant additive and thus all of the coolant is harmful to your health.
Avoid contact with the coolant. Coolant vapours are also harmful to the health.
It is important, therefore, to always safely store any coolant additive in its orig-
inal container out of the reach of children - risk of poisoning!
Fig. 165 Engine compartment: Coolant
expansion bottle
Aa
Ab
s2ug.6.book Page 208 Friday, April 9, 2010 2:24 PM
Page 211 of 271

Inspecting and replenishing
210
If the fluid level has dropped below the MIN marking, do not drive any
further - risk of accident! Obtain professional assistance.
Replacing brake fluidBrake fluid absorbs moisture. This causes the fluid to absorb moisture from the
surrounding air over a period of time. Excessive water in the brake fluid may be the
cause of corrosion in the brake system. The water content also lowers the boiling point
of the brake fluid.
One may only use new genuine brake fluid from Škoda Auto. The brake fluid must
comply with one of the following standards or specifications:
VW 50114
FMVSS 116 DOT4
DIN ISO 4925 CLASS 4
We recommend that you have the brake fluid replaced by an authorised Škoda
Service Partner as part of an Inspection Service.
WARNING
Using old brake fluid can result in severe stress on the brakes because of the
formation of vapour bubbles in the br ake system. This greatly impairs the
braking efficiency and thus also the safety of your vehicle.
Caution
Brake fluid damages the paintwork of the vehicle.
For the sake of the environment
In view of the problems involved with proper disposal of brake fluid, the special tools
and the professional knowledge required, you should have the brake fluid replaced by
authorised Škoda Service Partners.
BatteryWorking on the batteryFig. 167 Engine compartment: Polyester cover of the vehicle battery / plastic cover of the
vehicle batteryThe battery is located in the engine compartment in a polyester cover fig. 167 - left,
or in a plastic cover* fig. 167 - right.
– Open the battery cover in direction of arrow or press the interlock on the side of the battery cover in direction of arrow fig. 167 , fold the cover up and
remove the battery.
– The installation of the battery co ver takes place in the reverse order.
The edge of the polyester battery cover fig. 167 - left is inserted between the battery
and the side wall of the battery cover when working on the battery.
Removal and installation of the battery is not recommended since it can, under certain
circumstances, lead to major dama ge. Contact a specialist garage.
There is a risk of injuries, scalding, accidents and burns when carrying out any work on
the battery and on the electrical system. For th is reason, it is essential to comply with
the warning instructions stated below and with the general applicable rules of
safety.
WARNING
The battery acid is strongly corrosive and must, therefore, be handled with
the greatest of care. Always wear prot ective gloves, eye and skin protection
WARNING (continued)
A1
A2
s2ug.6.book Page 210 Friday, April 9, 2010 2:24 PM
Page 222 of 271
Wheels and Tyres221
Using the system
Safety
Driving Tips
General Maintenance
Breakdown assistance
Technical Data
Valid for vehicles wi
th four-wheel drive
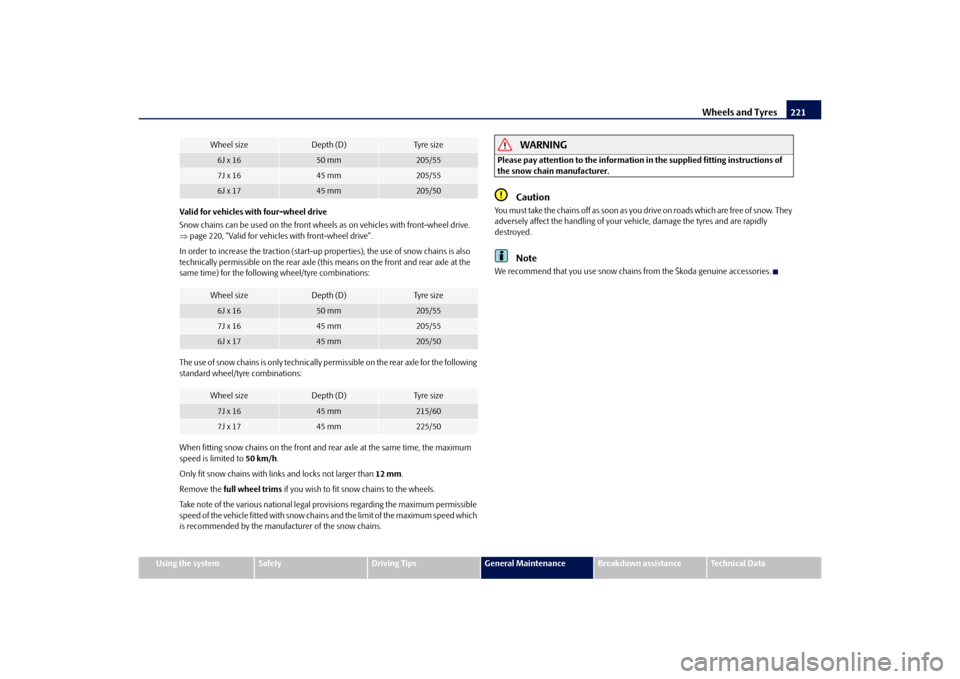
Snow chains can be used on the front wheels as on vehicles with front-wheel drive.
page 220, “Valid for vehicles with front-wheel drive”.
In order to increase the traction (start-up pr operties), the use of snow chains is also
technically permissible on the rear axle (this means on the front and rear axle at the
same time) for the following wheel/tyre combinations:
The use of snow chains is only technically pe rmissible on the rear axle for the following
standard wheel/tyre combinations:
When fitting snow chains on the front and rear axle at the same time, the maximum
speed is limited to 50 km/h.
Only fit snow chains with links and locks not larger than 12 mm.
Remove the full wheel trims if you wish to fit snow chains to the wheels.
Take note of the various national legal provisions regarding the maximum permissible
speed of the vehicle fitted with snow chains and the limit of the maximum speed which
is recommended by the manufacturer of the snow chains.
WARNING
Please pay attention to the information in the supplied fitting instructions of
the snow chain manufacturer.
Caution
You must take the chains off as soon as you drive on roads which are free of snow. They
adversely affect the handling of your vehicle, damage the tyres and are rapidly
destroyed.
Note
We recommend that you use snow chains from the Škoda genuine accessories.
Wheel size
Depth (D)
Ty re s i z e
6J x 16
50 mm
205/55
7J x 16
45 mm
205/55
6J x 17
45 mm
205/50
Wheel size
Depth (D)
Ty re s i z e
6J x 16
50 mm
205/55
7J x 16
45 mm
205/55
6J x 17
45 mm
205/50
Wheel size
Depth (D)
Ty re s i z e
7J x 16
45 mm
215/60
7J x 17
45 mm
225/50
s2ug.6.book Page 221 Friday, April 9, 2010 2:24 PM
Page 225 of 271

Breakdown assistance
224
head of the towing device*. The box is secured with a strap. The placement of the
vehicle tool kit can vary depe nding on the vehicle equipment.
The vehicle tool kit contains the following parts (depending on equipment fitted):
Wire clamps for removing the full wheel trims,
Wheel wrench*,
To w i n g e y e ,
Adapter for the wheel bolts lock*,
Replacement bulb set*
14),
To r x s c r e w d r i v e r.
Before placing the lifting jack back in its storage area, screw in the arm of the lifting jack
fully.
WARNING
The factory-supplied lifting jack is only intended for your model of vehicle.
On no account attempt to lift a heavier vehicle or other loads - risk of injury!
Ensure that the vehicle tool kit is safely attached in the luggage compart-
ment.Note
Ensure that the box is always secured with the strap.Tyre repair kit*The tyre repair kit is intended for the repair of minor tyre defects. The tyre repair kit
contains a compressor, inflation bottle, operating instructions and accessories.
The repair with the tyre repair kit is not at all intended to replace a permanent repair
on the tyre, this repair only serves to reach the next specialist garage. The repair can be
undertaken on the vehicle immediately. Please read the attached instructions care-
fully before the repair. The tyre repair kit is located in
a box in the luggage compartment page 223, fig. 174.
The placement of the tyre repair kit can vary depending on the vehicle equipment.
Spare wheel*The spare wheel is stowed in the luggage compartment in the area below the variable
loading floor* and is secured with a special screw fig. 175 .
One should check the inflation pressure in the spare wheel (at best when generally
checking the tyre air pressures - see sign on the fuel filler flap page 216) to ensure
that the spare wheel is always ready to use.
Temporary spare wheel
A yellow warning label is displayed on the rim of the temporary spare wheel.
Please observe the following notes when driving with a temporary spare wheel:
The warning label must not be covered after installing the wheel.
Do not drive faster than 80 km/h with this spare wheel and pay particular attention
while driving. Avoid accelerating at full throttle, sharp braking and fast cornering.
The inflation pressure for this spare wheel is identical to the maximum inflation
pressure of the standard tyres.
Use this spare wheel only to reach the nearest specialist garage as it is not intended
for continuous use.
14)Depending on the vehicle equipment.
Fig. 175 Luggage compartment: Spare
wheel
s2ug.6.book Page 224 Friday, April 9, 2010 2:24 PM
Page 226 of 271

Breakdown assistance225
Using the system
Safety
Driving Tips
General Maintenance
Breakdown assistance
Technical Data
Changing a wheelPreliminary workThe following steps should be carried ou t before actually changing the wheel.
– If it is necessary to change a wheel, park the vehicle as far away as possible from
the traffic flow. The place you choose should be level.
–Have all the occupants get out. While changing a wheel, the occupants of the
vehicle should not stand on the road (e.g. behind a crash barrier).
– Apply the handbrake firmly.
–Engage 1st gear or if your vehicle is fitted with an automatic gearbox, position the
selector lever into position P .
– If a trailer is coupled, uncouple it.
–Take the vehicle tool kit page 223 and the spare wheel* page 224 out of the
luggage compartment.
WARNING
If you find yourself in flowing traffic switch on the hazard warning lights
system and place the warning triangle on the side of the road at the prescribed
distance from your vehicle while observing all national legal provisions. In this
way you are protecting not only yourself but also other road users.
Never start the engine with the vehicle si tting on the raised jack - danger of
suffering injury.Caution
If you have to change a wheel on a slope first block the opposite wheel with a stone or
similar object in order to secure the vehicle from unexpectedly rolling away.
Note
Comply with the national legal regulations.
Changing a wheelAlways change a wheel on a level surface as far as possible.
– Take off the full wheel trim* page 226 or the wheel trim cap page 227 or the
caps page 226.
– In the case of light alloy wheels remove the wheel trim cap page 227.
– First of all slacken the safety wheel bolt * and afterwards the other wheel bolts page 227.
– Jack up the vehicle until the wheel to be changed is clear of the ground
page 227.
– Unscrew the wheel bolts and place them on a clean surface (cloth, paper etc.).
– Take off the wheel.
– Fit on the spare wheel and tighten the wheel bolts slightly.
– Lower the car.
– Tighten the wheel bolts firmly, alternatel y and diagonally using the wheel wrench
(crosswise) and last the safety wheel bolt* page 227.
– Mount the full wheel trim/wheel trim cap or the caps.
Note
All bolts must be clean and must turn easily.
You must never grease or oil the wheel bolts!
When fitting on unidirectiona l tyres, ensure that the tyres rotate in the correct
direction page 216.
Subsequent stepsAfter changing the wheel, you mu st perform the following steps.
– Stow and attach the replaced wheel in the spare wheel well using a special screw
page 224, fig. 175.
– Stow the vehicle tool kit in the space provided.
– Check the tyre pressure on the spare wheel just mounted as soon as possible.
s2ug.6.book Page 225 Friday, April 9, 2010 2:24 PM
Page 227 of 271

Breakdown assistance
226
– Have the tightening torque of the wheel bolts checked with a torque wrench as
soon as possible. Steel and light alloy wh eels must be tightened to a tightening
torque of 120 Nm .
– Change the damaged wheel or consult a specialist garage about possibilities for getting repairs done.
WARNING
It is necessary to observe the guidelines given on page 218 if the vehicle is
subsequently fitted with tyres which are different to those it was fitted with at
the works.
Note
If you find, when changing the wheel, that the wheel bolts are corroded and diffi-
cult to turn, the bolts must be replaced before checking the tightening torque.
Drive cautiously and only at a moderate speed to a workshop where the tightening
torque can be checked.
Full wheel trim*Pulling off– Hook the clamp found in the vehicle tool kit into the reinforced edge of the full
wheel trim.
– Push the wheel key through the clamp, support the wheel key at the tyre and pull off the wheel trim.Installing– First press the full wheel trim onto the wheel at the valve opening provided. Then
press the full wheel trim into the wheel in such a way that its entire circumference
locks correctly in place.
Caution
Use the pressure of your hand, do not knock on the full wheel trim! Heavy knocks
mainly on the points where the full wheel trim has not been inserted into the wheel,
can result in damage to the guide and centering elements of the full wheel trim.
Check for yourself that the safety wheel bolt is located in the hole in the area of the
valve before fitting the full wheel trim onto a steel wheel which is attached with a safety
wheel bolt page 228.
Wheel bolts with caps*Pulling off– Push the plastic clip sufficie ntly far onto the cap until the inner catches of the clip
are positioned at the collar of the cap and detach the cap.Installing– Push the caps fully onto the wheel bolts.
The caps are located in the well of the luggage compartment.
Fig. 176 Removing the cap.
s2ug.6.book Page 226 Friday, April 9, 2010 2:24 PM
Page 229 of 271

Breakdown assistance
228
– Align the lifting jack* so that its claw grasps the web of the lower sill at the height
of the marking on the plasti c cover and the base plate is resting flat with its
complete surface ag ainst firm ground.
– Turn the lifting jack* up further until the wheel is just clear of the ground.
Ground below the lifting jack which is soft and slippery can cause the vehicle to slip
off the jack. It is therefore always necessary to place the lifting jack* on a solid surface
or use a wide and stable base. Use a non-sl ip base (e.g. a rubber foot mat) if the
surface is smooth , such as cobbled stones, a tiled floor, etc.
WARNING
Always raise the vehicle with the doors closed - risk of injury!
Take suitable measures to prevent the base of the lifting jack from slipping
off - risk of injury!
Not positioning the lifting jack at the specified points can result in damage
to the vehicle. The jack can also slip off if it does not have sufficient grip - risk of
injury!
It is important to support the vehicle with suitable supporting blocks if you
wish to work under the lifted vehicle - risk of injury!
Securing wheels against being stolen*
You need a special adapter for sl ackening the safety wheel bolts.– Pull off the full wheel trim/cap from the wheel hub or cap from the safety wheel
bolt. – Insert the adapter with its toothed side into the inner toothing of the head of
the safety wheel bolt fig. 180 .
– Insert the wheel wrench fully onto the adapter .
– Slacken the wheel bolt, or tighten it firmly page 227.
– Reinstall the full wheel trim/wheel cap after removing the adapter or place the cap onto the safety wheel bolt.
– Have the tightening torque checked with a torque wrench as soon as possible.
Steel and light alloy wheels must be tightened to a tightening torque of 120 Nm.
The safety wheel bolts on vehicles fitted with them (one safety wheel bolt per wheel)
can only be loosened or tighten up by using the adapter provided.
It is meaningful to note th e code number hammered into the rear side of the adapter
or the rear side of the safety wheel bolts. You can obtain a replacement adapter from
an authorised Škoda Service Partner, if necessary, by quoting this number.
We recommend that you always carry the ad apter for the wheel bolts with you in the
vehicle. It should be stow ed in the vehicle tool kit.
Caution
Damage can occur to the adapter and safety wh eel bolt if the safety wheel bolt is tight-
ened up too much.
Note
The set of safety wheel bolts can be obta ined from an authorised Škoda Service
Par tner.Jump-startingInitial stepsYou can use the battery of another vehicle fo r jump-starting yours if the engine does
not start because the battery on your vehicle is flat. You will require jump-start cables
for this purpose.
AAAB
Fig. 180 Safety wheel bolt with adapter
ABAA
AB
s2ug.6.book Page 228 Friday, April 9, 2010 2:24 PM
Page 230 of 271

Breakdown assistance229
Using the system
Safety
Driving Tips
General Maintenance
Breakdown assistance
Technical Data
Both batteries must have a rated voltage of 12 V. The
capacity (Ah) of the battery
supplying the power must not be significantly less than the capacity of the discharged
battery in your vehicle.
Jump-start cables
Only use jump-start cables which have an adequately large cross-section and insu-
lated terminal clamps. Plea se pay attention to the manufacturer's instructions.
Positive cable - colour coding in the majority of cases red.
Negative cable - colour coding in the majority of cases black.
WARNING
A discharged battery may already freeze at temperatures just below 0°C. In
case of frozen battery carry out no jump-starting - risk of explosion!
Please pay attention to the warning instructions relating to working in the
engine compartment page 204, “Working in the engine compartment”.Note
There must not be any contact between the two vehicles otherwise current may
flow as soon as the negati ve terminals are connected.
The discharged battery must be properly connected to the system of the vehicle.
Switch off any mobile phone, pay attention to the instructions for use of the mobile
phone in such a situation.
We recommend that you purchase the jump-starting cable in the specialist shops
of the battery manufacturers.
Start engineIt is important to connect the jump-start cables in the correct order.Connecting positive terminals– Attach one end to the positive terminal fig. 181 of the discharged battery
.
– Attach the other end to the positive te rminal of the battery supplying the power
.Connecting negative term inal and engine block– Attach one end to the negative termin al of the battery supplying the power .
– Attach the other end to a solid metal part which is connected firmly to the
engine block, or to the engine block itself.Starting the engine– Start the engine of the vehicle providing current and run the engine at idling speed.
– Now start the engine of the vehicle with the discharged battery.
– Interrupt the attempt at starting an engine after 10 seconds if it does not start right away and wait for about 30 seconds before repeating the attempt.
– Disconnect the cables on the engine in exactly the reverse order they were
connected up.
Fig. 181 Jump-starting using the battery
from another vehicle: A - flat vehicle
battery, B - battery providing current
A1
AA
A2
AB
A3
AB
A4
s2ug.6.book Page 229 Friday, April 9, 2010 2:24 PM