2010 SKODA ROOMSTER lights
[x] Cancel search: lightsPage 79 of 231
Heating and air conditioning system
78
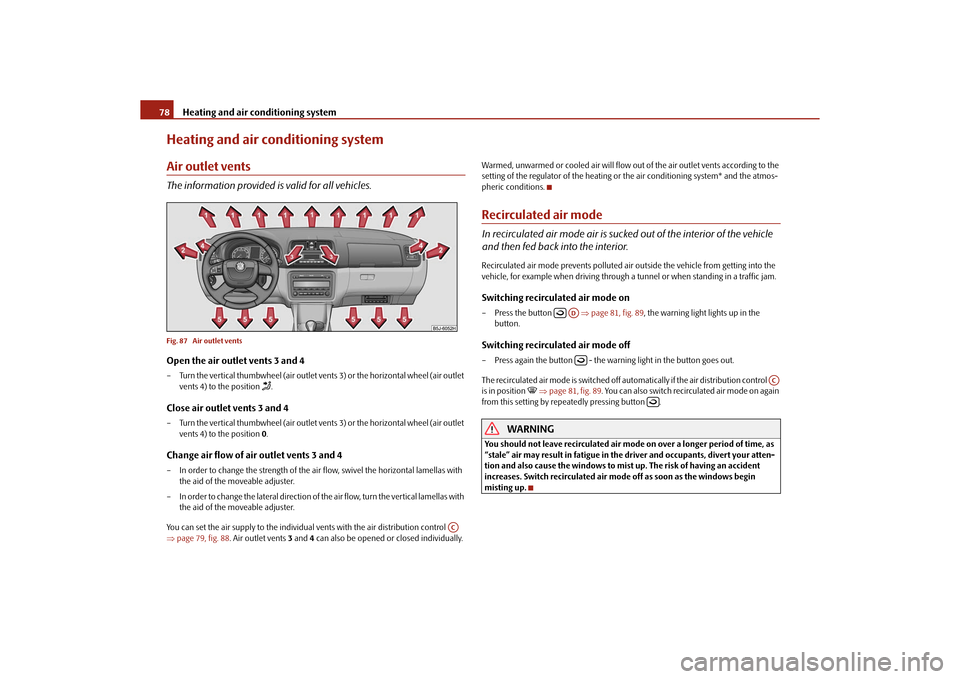
Heating and air conditioning systemAir outlet ventsThe information provided is valid for all vehicles.Fig. 87 Air outlet ventsOpen the air outlet vents 3 and 4– Turn the vertical thumbwheel (air outlet vents 3) or the horizontal wheel (air outlet
vents 4) to the position
.
Close air outlet vents 3 and 4– Turn the vertical thumbwheel (air outlet vents 3) or the horizontal wheel (air outlet
vents 4) to the position 0.Change air flow of air outlet vents 3 and 4– In order to change the strength of the ai r flow, swivel the horizontal lamellas with
the aid of the moveable adjuster.
– In order to change the lateral direction of the air flow, turn the vertical lamellas with the aid of the moveable adjuster.
You can set the air supply to the individual vents with the air distribution control
page 79, fig. 88 . Air outlet vents 3 and 4 can also be opened or closed individually. Warmed, unwarmed or cooled air will flow out of the air outlet vents according to the
setting of the regulator of the heating or the air conditioning system* and the atmos-
pheric conditions.
Recirculated air modeIn recirculated air mode air is sucked out of the interior of the vehicle
and then fed back into the interior.Recirculated air mode prevents polluted air outside the vehicle from getting into the
vehicle, for example when driving through a tunnel or when standi
ng in a traffic jam.Switching recirculated air mode on– Press the button page 81, fig. 89 , the warning light lights up in the
button.Switching recirculated air mode off– Press again the button - the warning light in the button goes out.
The recirculated air mode is switched off automatically if the air distribution control
is in position
page 81, fig. 89. You can also switch recirc ulated air mode on again
from this setting by repe atedly pressing button .
WARNING
You should not leave recirculated air mode on over a longer period of time, as
“stale” air may result in fatigue in the driver and occupants, divert your atten-
tion and also cause the windows to mist up. The risk of having an accident
increases. Switch recirculated air mo de off as soon as the windows begin
misting up.
AC
AD
AC
s16g.4.book Page 78 Wednesda y, February 10, 2010 3:53 PM
Page 83 of 231
Heating and air conditioning system
82
Setting temperature
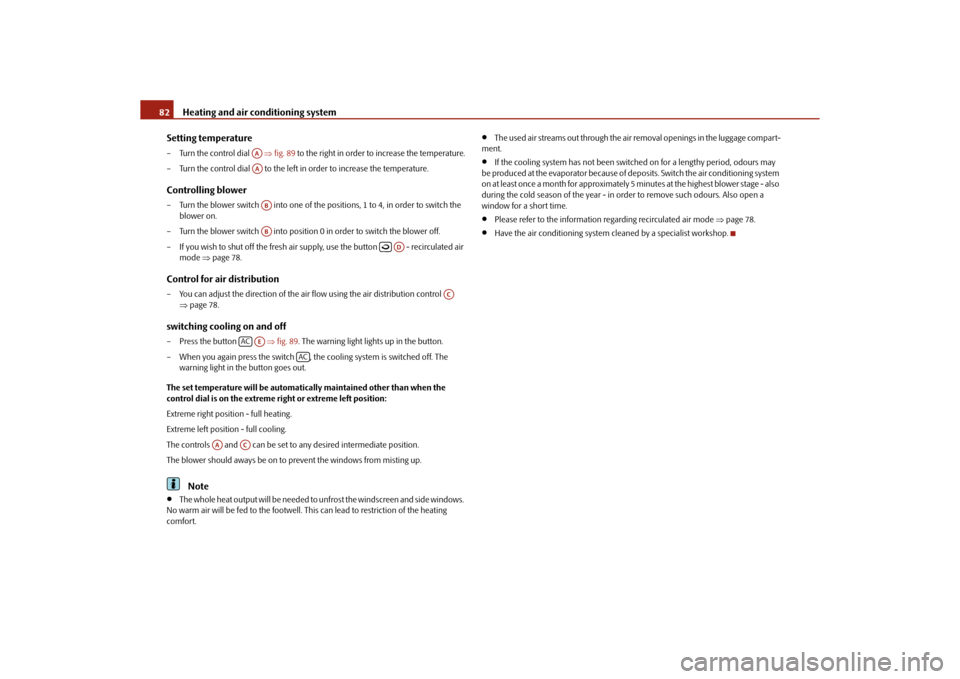
– Turn the control dial fig. 89 to the right in order to increase the temperature.
– Turn the control dial to the left in order to increase the temperature.Controlling blower– Turn the blower switch into one of the po sitions, 1 to 4, in order to switch the
blower on.
– Turn the blower switch into position 0 in order to switch the blower off.
– If you wish to shut off the fresh air supp ly, use the button - recirculated air
mode page 78.Control for air distribution– You can adjust the direction of the air flow using the air distribution control
page 78.switching cooling on and off– Press the button fig. 89 . The warning light lights up in the button.
– When you again press the switch , the cooling system is switched off. The warning light in the button goes out.
The set temperature will be automatically maintained other than when the
control dial is on the extreme right or extreme left position:
Extreme right position - full heating.
Extreme left position - full cooling.
The controls and can be set to any desired intermediate position.
The blower should aways be on to prevent the windows from misting up.
Note
The whole heat output will be needed to unfrost the windscreen and side windows.
No warm air will be fed to the footwell. This can lead to restriction of the heating
comfort.
The used air streams out through the air removal openings in the luggage compart-
ment.
If the cooling system has not been switched on for a lengthy period, odours may
be produced at the evaporator because of de posits. Switch the air conditioning system
on at least once a month for approximately 5 minutes at the highest blower stage - also
during the cold season of the year - in order to remove such odours. Also open a
window for a short time.
Please refer to the information regarding recirculated air mode page 78.
Have the air conditioning system cleaned by a specialist workshop.
AAAAABAB
AD
AC
AC
AE
AC
AA
AC
s16g.4.book Page 82 Wednesda y, February 10, 2010 3:53 PM
Page 89 of 231

Starting-off and Driving
88
You should not switch on any major elec trical components during the heating
period otherwise the vehicle battery will be drained unnecessarily.
- start engine
Applies to all models:
Position
To lock the steering , with the ignition key withdrawn, turn the steering wheel until the
steering locking pin is heard to engage. You should always lock the steering as a general
rule if you leave your vehicle. This acts as a deterrent against possible theft of your
vehicle .
Position
Move the steering wheel back and forward a little if the ignition key cannot, or cannot
easily be turned into this position, in order to release the steering lock.
Position
The engine is started in this position. At th e same time switched on low beam or main
beam or other electrical components wi th major power consumption are briefly
switched off. The ignition key moves back into position when one releases the key.
The ignition key must be turned back into position each time before starting the
engine again. The starter repeat lock in th e ignition lock prevents the starter being
engaged when the engine is r unning and thus getting damaged.
WARNING
When driving, the ignition key must always be in the position (ignition
switched on) without the engine running. This position is indicated by the
warning lights coming on. If this is not the case, it could result in unexpected
locking of the steering wh eel - risk of accident!
Do not withdraw the ignition key from the lock until the vehicle has come to
a stop. The steering lock can engage immediately - risk of accident!
Always withdraw the ignition key if you are going to leave the vehicle, even
for a short time. This is particularly important if children are left in the vehicle.
The children might otherwise start the en gine or operate electrical equipment
(e.g. power windows) - risk of injury!
Starting the engineGeneral
You can only start the engine only using an original ignition key.
Place the gearshift lever into neutral and put on the handbrake firmly before
starting the engine.
The clutch pedal should be fully depressed when starting the engine - the starter
then only has to crank the engine.
Let go of the key as soon as the engine starts otherwise there may be damage to
the starter.
The engine running noises may louder at first be louder for a short time after starting
the cold engine until oil pressure can be built up in the hydraulic valve clearance
compensation. This is quite normal and is not an operating problem.
If the engine does not start ...
You can use the battery of anothe r vehicle as a jump-start aid page 186.
It is only possible to tow-start vehicles fi tted with a manual gearbox. The tow-starting
distance must not be more than 50 metres page 189.
WARNING
Never run the engine in non ventilated or enclosed areas. The exhaust gases
of the engine contain besides the odorless and colourless carbon monoxide a
poisonous gas - hazard! Carbon mono xide can cause unconsciousness and
death.
Never leave your vehicle unattended with the engine running.Caution
The starter may only be operated (ignitio n key position ), if the engine is not
running. If the starter is imme diately operated after switchin g off the engine, the starter
or the engine can be damaged.
Avoid high engine revolutions, full throttle and high engine loads as long as the
engine has not yet reached its normal oper ating temperature - risk of damaging the
engine!
A3
A1A2A3
A2
A1
A2
A3
s16g.4.book Page 88 Wednesda y, February 10, 2010 3:53 PM
Page 91 of 231
Starting-off and Driving
90
switch on again after some time if the co olant temperature rises because of an accu-
mulation of heat in the engine or if the engine is warm and the engine compartment is
additionally heated by strong sunlight.
This is why particular care is required when carrying out any work in the engine
compartment page 162, “Working in the engine compartment”.
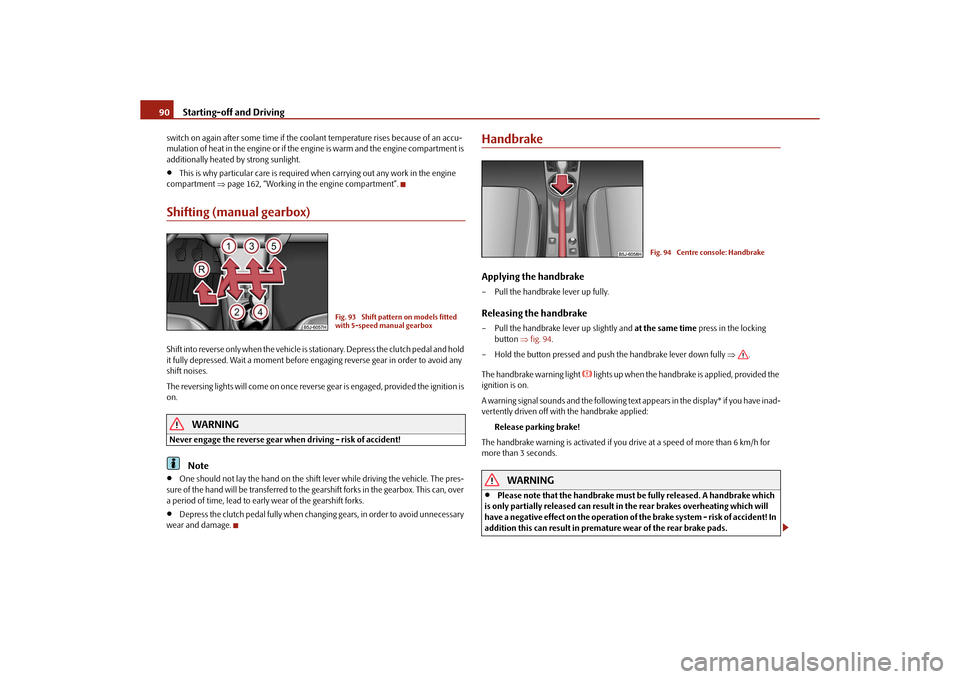
Shifting (manual gearbox)Shift into reverse only when the vehicle is stationary. Depress the clutch pedal and hold
it fully depressed. Wait a moment before en gaging reverse gear in order to avoid any
shift noises.
The reversing lights will come on once reverse gear is engaged, provided the ignition is
on.
WARNING
Never engage the reverse gear when driving - risk of accident!
Note
One should not lay the hand on the shift lever while driving the vehicle. The pres-
sure of the hand will be transferred to the gearshift forks in the gearbox. This can, over
a period of time, lead to early wear of the gearshift forks.
Depress the clutch pedal fully when changi ng gears, in order to avoid unnecessary
wear and damage.
HandbrakeApplying the handbrake– Pull the handbrake lever up fully.Releasing the handbrake– Pull the handbrake lever up slightly and at the same time press in the locking
button fig. 94 .
– Hold the button pressed and push the handbrake lever down fully .
The handbrake warning light
lights up when the handbrak e is applied, provided the
ignition is on.
A warning signal sounds and the following text appears in the display* if you have inad-
vertently driven off with the handbrake applied:
Release parking brake!
The handbrake warning is activated if you drive at a speed of more than 6 km/h for
more than 3 seconds.
WARNING
Please note that the handbrake must be fully released. A handbrake which
is only partially released can result in the rear brakes overheating which will
have a negative effect on the operation of the brake system - risk of accident! In
addition this can result in premature wear of the rear brake pads.
Fig. 93 Shift pattern on models fitted
with 5-speed manual gearbox
Fig. 94 Centre console: Handbrake
s16g.4.book Page 90 Wednesda y, February 10, 2010 3:53 PM
Page 97 of 231
Automatic gearbox
96
the right. In the positions D and S the gear you have already engaged will be addition-
ally displayed on the display.
- Parklock
The driven wheels are locked mechanically in this position.
The Parklock must only be engage d when the vehicle is stationary .
If you wish to move the selector lever into or out of this position, you must press the
Shiftlock button in the handle of the selector lever and at the same time depress the
brake pedal.
- Reverse gear
Reverse gear must only be engaged when the vehicle is stationary and the engine
idling .
The brake pedal must be depressed and at the same time the Shiftlock must be
pressed, if you wish to obtain the selector lever positions R, P or N.
When the ignition is switched on an d the selector lever is in position R, the reverse
lights will come on.
- Neutral
The transmission is in Neutral in this position.
The brake pedal must be depressed (if the le ver is in its position for longer than 2
seconds) in order to move the selector lever out of the position N into the position D,
with the ignition switched on, on a vehicle travelling at less than 5 km/hour or on a
stationary vehicle.
- Position for driving forward
When the selector lever is in this position , the forward gears are shifted up and down
automatically in line with engine lo ad, vehicle speed and the dynamic shift
programme.
You must depress the brake pedal if you wish to move into position D from N when the
vehicle is travelling at less th an 5 km/hour or is stationary .
In certain circumstances (e.g. when driving in mountainous regions or when towing a
trailer) it may be beneficial to select the manual shift programme page 98 for a short
time in order to adapt the gearbox rati os manually to the driving situations. - Position for sporty style of driving
Shifting up later into a higher gear makes it possible to fully exploit the power potential
of the engine. The gearbox also then shifts down at higher engine speeds as in the posi-
tion D.
The gearbox does not shift into the 6th gear in the position S, because the maximum
speed is reached with the 5th gear
9).
The Shiftlock on the selector lever grip mu st be pressed when moving the selector
lever out of the position D into the position S.
WARNING
Never move the selector lever into position R or P when driving - risk of an
accident!
When the engine is running and the vehi cle is stationary, it is necessary to
hold the car with the brake pedal in all the positions of the selector lever (except
P and N) since the power transmission is never completely interrupted, also not
when the engine is idling - the vehicle creeps.
You must on no account unintentionally operate the throttle (e.g. by hand
from the engine compartment) if a driv e position is engaged when the car is
stationary. The vehicle would otherwise immediately start off - also when the
handbrake is firmly applied - risk of an accident!
You must move the selector lever into position P and firmly apply the hand-
brake first before you or any other person opens the bonnet and starts working
on the engine when it is running - risk of accident! It is also essential to observe
all warnings page 162, “Working in the engine compartment”.
Selector lever lockAutomatic selector lever lock
With the ignition on, the selector lever is locked when it is in the positions P and N. You
must first of all depress the brake pedal in or der to move the selector lever out of this
position. The warning light
page 30 lights up in the instrument cluster as a
reminder for the driver when the selector lever is in position P or N.
APARANAD
9)Not valid for vehicles with automatic gearbox DSG.AS
s16g.4.book Page 96 Wednesda y, February 10, 2010 3:53 PM
Page 101 of 231

Communication
100
CommunicationMultifunction steering wheel*Operate radio und navigation on the multifunction steering wheel
The buttons for setting the basic functions of the factory-fitted radio and navigation
system are located on the multifunction steering wheel* fig. 100 .
You can of course operate the radio and navi gation at the appliance. You will find a
description in the operating instructions of your radio.
If the side lights are switched on, the buttons on the multifunction steering wheel are
also illuminated except the symbols
and
.
By pressing or turning the buttons, yo u can carry out the following functions.
Fig. 100 Multifunction steering wheel:
control buttons
Button
Action
Radio, traffic information
CD / MP3
Navigation
press briefly
a)
Switch off/on tone
press for a long
period of time
a)
Swich the unit on / off
turn upwards
Increase volume
turn downwards
Decrease volume
press briefly
Changing to the next stored radio station
Changing to the next stored traffic information Interrupting the traffic report
Changing to the next title
press button for a
long time
Interruption of the traffic report
fast forward
press briefly
Changing to the previously stored radio station
Changing to the previously stored traffic information Interrupting the traffic report
Changing to the previous title
press button for a
long time
Interruption of the traffic report
fast rewind
A1A1A1A1A2A2A3A3
s16g.4.book Page 100 Wednesda y, February 10, 2010 3:53 PM
Page 103 of 231

Communication
102
To ensure an optimum signal transmission, always leave the telephone with the
adapter* in the telephone mount.
Furthermore the volume can be changed indivi dually during the call at any time with
the button for setting the radio* or navigation system* or with the buttons on the
multifunction steering wheel*.
WARNING
Pay attention primarily to the traffic situation! As the driver you are fully
responsible for road safety. Use the teleph one system only to such an extent, so
that you are in full control of your vehicle at any time.
Note
Please also refer to the additional instructions page 101.
Should you have any questions, please contact an authorised Škoda Service
Par tner.
Phone PhonebookA phone phonebook is part of the mobile ph one preinstallation with voice control. In
the phone phonebook there are 2 500 free memory locations available. This phone
phonebook can be used in line with the mobile telephone.
After the first connection of the telephone, the system begins to load the phone book
from the phone and the SIM card into the memory of the control unit.
Each time the telephone has established a new connection with the handsfree-system,
an update of the relevant phone book is performed. The updating can take a few
minutes. During this time the phone book, which was stored after the last update was
completed, is available. Newly stored te lephone numbers are only shown after the
updating has ended.
If the number of contacts loaded exceed s 2 500, the phone book is not complete.
If a telephone event (e.g. incoming or outgoing call, dialogue of the voice control)
occurs during the updating pr ocedure, the updating is interrupted. After the telephone
event has ended, the updating starts anew.
Note
It a yellow or red warning symbol lights up in the information display, the menu phone-
book cannot be selected.Connection of the mobile phone with the handsfree-systemIn order to connect a mobile phone with the handsfree-system, it is necessary to
connect the telephone to the handsfree-system. Detailed information on this is
provided in the operating instructions of your mobile phone. The following steps must
be carried out for the connection:
– Activate the Bluetooth
® in your telephone and the visibility of the mobile phone.
– Switch on the ignition.
– Select the menu Phone - Phone search in the information display and wait until
the control unit has ended the search.
– Select your mobile phone in the menu of the units found.
–Confirm the PIN (as standard 1234).
– If the hands-free system announces (as standard Skoda UHV) on the display of the
mobile phone, enter the PIN (as standard 1234) within 30 seconds and wait until
the connection is established.
11)
– After ending the connection, confirm in the information display that a new user profile was created.
If no more free space is available for creating a new user profile, delete an existing user
profile.
If you have not managed to connect your mobile phone with the hands-free system
within 3 minutes after switching on the ignition, switch the ignition off and then again
on. The visibility of the hands-free system is established again for 3 minutes. The visi-
bility of the Bluetooth
® device is automatically switched off if the vehicle starts off or
if the mobile phone connects to the device.
11)Some mobile phones have a menu, in which the authorization for establishing a Bluetooth
®
connection is performed via the input of a code. If the input for the authorization is necessary, it
must always be performed when re-e stablishing the Bluetooth connection.
s16g.4.book Page 102 Wednesday, February 10, 2010 3:53 PM
Page 105 of 231
Communication
104Caution
Taking the mobile phone out of the adapter du ring the call can lead to interruption of
the connection. When taking out the mobile phone, the connection to the factory-
fitted antenna is interrupted, this reduces the quality of the transmitting and receiving
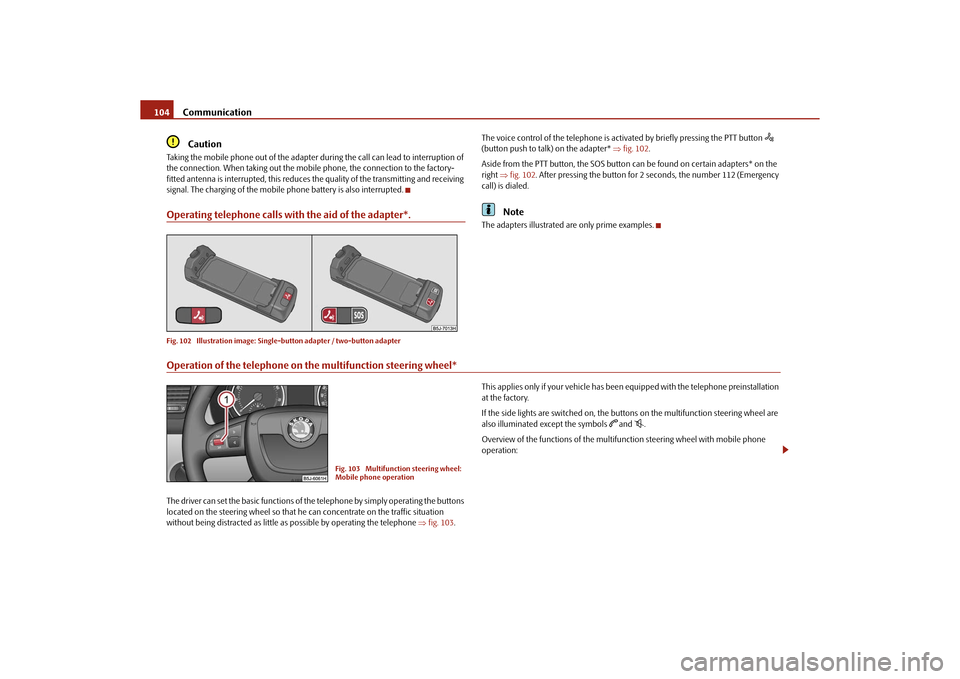
signal. The charging of the mobile phone battery is also interrupted.Operating telephone calls with the aid of the adapter*.Fig. 102 Illustration image: Single -button adapter / two-button adapter
The voice control of the telephone is acti vated by briefly pressing the PTT button
(button push to talk) on the adapter* fig. 102 .
Aside from the PTT button, the SOS button can be found on certain adapters* on the
right fig. 102 . After pressing the button for 2 seconds, the number 112 (Emergency
call) is dialed.
Note
The adapters illustrated are only prime examples.
Operation of the telephone on the multifunction steering wheel*The driver can set the basic functions of the telephone by simply operating the buttons
located on the steering whee l so that he can concentrate on the traffic situation
without being distracted as little as possible by operating the telephone fig. 103 . This applies only if your vehicle has been equipped with the telephone preinstallation
at the factory.
If the side lights are switched on, the buttons on the multifunction steering wheel are
also illuminated except the symbols
and
.
Overview of the functions of the multifunction steering wheel with mobile phone
operation:
Fig. 103 Multifunction steering wheel:
Mobile phone operation
s16g.4.book Page 104 Wednesda y, February 10, 2010 3:53 PM