2010 SKODA OCTAVIA TOUR wheel size
[x] Cancel search: wheel sizePage 53 of 199
Seats and Stowage
52
Seats and StowageFront seatsBasic informationThe front seats have a wide range of differ ent settings and can thus be matched to the
physical characteristics of the driver and front passenger. Correct adjustment of the
seats is particularly important for:
safely and quickly reaching the controls,
a relaxed, fatigue-free body position,
achieving the maximum protection offered by the seat belts and the airbag
system.
WARNING
Never transport more occupants than the maximum seating in the vehicle.
Each occupant must correctly fasten the seat belt belonging to the seat.
Children must be fastened page 103, “Transporting children safely” with a
suitable restraint system.
The front seats and the head restraints must always be adjusted to match
the body size of the seat occupant as well as the seat belts must always be
correctly fastened in order to provide an optimal protection for you and your
occupants.
Keep your feet in the footwell at al l times while driving. Never place your
feet on the dash panel, out of the window or on the seats. This is particularly
important for the front seat passenger. You will be exposed to increased risk of
injury if it becomes necessary to apply the brake or in the event of an accident.
If an airbag is deployed, you may suffer fatal injuries when adopting an incor-
rect seated position!
It is important for the driver and front passenger to maintain a distance of at
least 25 cm from the steering wheel or dash panel. Not maintaining this
minimum distance will mean that the airbag system will not be able to properly
protect you - hazard! The front seats and the head restraints must always also
be correctly adjusted to match the body size of the occupant.
Ensure that there are no objects in the footwell as any objects may get
behind the pedals during a driving or braking manoeuvre. You would then no
longer be able to operate the clutch, to brake or accelerate.
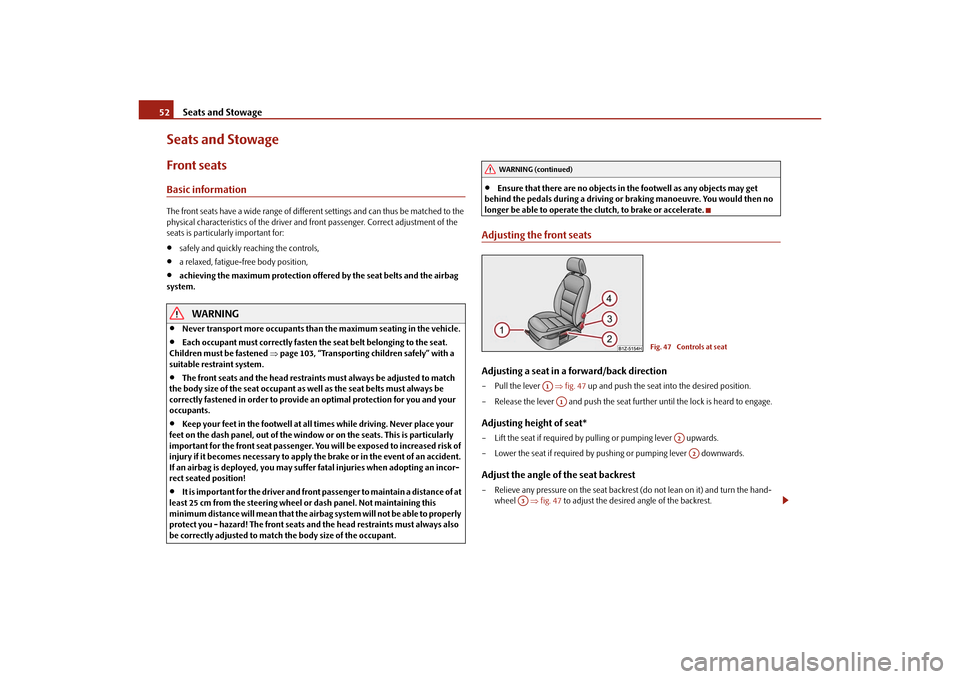
Adjusting the front seatsAdjusting a seat in a forward/back direction– Pull the lever fig. 47 up and push the seat into the desired position.
– Release the lever and push the seat further until the lock is heard to engage.Adjusting height of seat*– Lift the seat if required by pu lling or pumping lever upwards.
– Lower the seat if required by pushing or pumping lever downwards.Adjust the angle of the seat backrest– Relieve any pressure on the seat backrest (do not lean on it) and turn the hand- wheel fig. 47 to adjust the desired angle of the backrest.
WARNING (continued)
Fig. 47 Controls at seat
A1A1
A2A2
A3
s2bs.2.book Page 52 Monday, September 27, 2010 9:53 AM
Page 54 of 199

Seats and Stowage53
Using the system
Safety
Driving Tips
General Maintenance
Breakdown assistance
Technical Data
Adjusting lumbar support*– Turn the wheel until you have set the most comfortable curvature of the seat
upholstery in the area of your spine.
The driver's seat should be adjusted in such a way that the pedals can be fully pressed
to the floor with slightly bent legs.
The seat backrest on the driver's seat should be adjusted in such a way that the upper
point of the steering wheel can be easi ly reached with slightly bent arms.
WARNING
Only adjust the driver seat when the vehicle is stationary - risk of injury!
Take care when adjusting the seat! Adjusting the seat without care can lead
to bruises or injuries.
The seat backrests must not be angled too far back when driving otherwise
this will affect proper operation of the se at belts and of the airbag system - risk
of injury!
Head restraintsFig. 48 Adjusting head restraint/pulling outBest protection is achieved if the top edge of the head restraint is at the same level as
the upper part of your head.
Adjusting the height of a head restraint– Grasp the side of the head restraint with both hands and push the head restraint up
or down in direction of arrow fig. 48 .
– Move the head restraint downwards if required by pressing the locking button with one hand in direction of arrow and by pressing with the other hand the head
restraint downwards.Removing and installing a head restraint– Pull the head restraint up out of the seat backrest as far as the stop (on the rear
head restraints fold forward the seat backrest).
– Press the locking button in the direction of arrow fig. 48 and pull the head
restraint out.
– To re-insert the head restraint, push it do wn into the seat backrest far enough until
you hear the locking button engage.
The position of the front and rear outer head restraints is adjustable in height. The
middle rear head restraint* is adjustable in two positions.
The head restraints must be adjusted to ma tch the size of the seat occupant. Correctly
adjusted head restraints together with the seat belts offer effective protection for the
occupants page 86, “Correct seated position”.
WARNING
The head restraints must be correctly adjusted in order to offer effective
protection for the occupants in the event of an accident.
Do not drive under any circumstance with removed head restraints - risk of
injury!
If the rear seats are occupied, the rear head restraint must not be in the
lower position.
A4
A1A2
A2
s2bs.2.book Page 53 Monday, September 27, 2010 9:53 AM
Page 87 of 199
Passive Safety
86
Ensure that all the windows offer a good visibility to the outside.
Safely attach the items of luggage page 57, “Loading the luggage compartment”.
Ensure that no objects can obstruct the pedal.
Adjust the mirror, the front seat and the head restraint to match your body size.
Point out to your occupants that the head restraints must be adjusted to match
their body size.
Protect the children in suitable child seats with correctly fastened seat belts
page 103, “Transporting children safely”.
Adopt the correct seated position page 86, “Correct seated position”. Also
inform your occupants to adopt the correct seated position.
Fasten the seat belt correctly. Also inform your occupants to properly fasten the
seat belts page 91, “How are seat belts correctly fastened?”.
What influences the driving safety?
The driving safety is primarily determined by the style of driving and the
personal behaviour of all the occupants.The driver is fully responsible for himself an d his occupants. If your driving safety is
effected, you place yourself and the oncomi ng traffic at risk. Please refer to the
following guidelines.
Do not get distracted from concentrating on the traffic situation, e.g. by your occu-
pants or mobile phone calls.
Never drive when your driving ability is impaired, e.g. through medication, alcohol,
drugs.
Keep to the traffic regulations and the permissible speed limit.
Adjust the driving speed at all times to the road condition as well as to the traffic
and weather conditions.
Take regular breaks on long journe ys - at the latest every two hours.
Correct seated positionCorrect seated position for the driver
Correct seated position for the driver is important for safe and relaxed
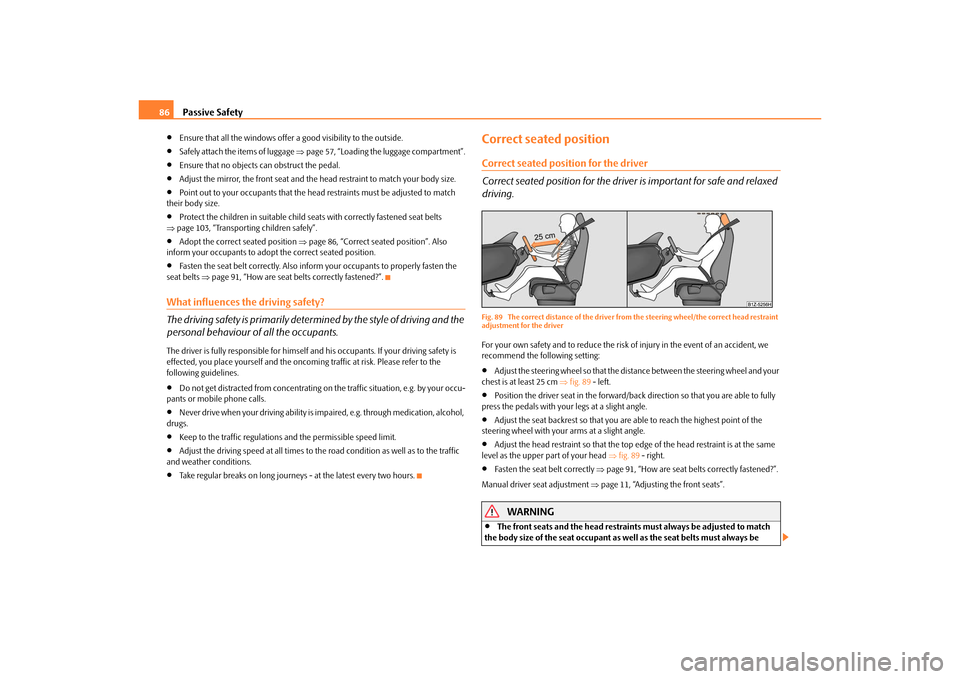
driving.Fig. 89 The correct distance of the driver fr om the steering wheel/the correct head restraint
adjustment for the driverFor your own safety and to reduce the risk of injury in the event of an accident, we
recommend the following setting:
Adjust the steering wheel so that the distance between the steering wheel and your
chest is at least 25 cm fig. 89 - left.
Position the driver seat in the forward/back direction so that you are able to fully
press the pedals with your legs at a slight angle.
Adjust the seat backrest so that you are able to reach the highest point of the
steering wheel with your arms at a slight angle.
Adjust the head restraint so that the top edge of the head restraint is at the same
level as the upper part of your head fig. 89 - right.
Fasten the seat belt correctly page 91, “How are seat belts correctly fastened?”.
Manual driver se at adjustment page 11, “Adjusting the front seats”.
WARNING
The front seats and the head restraints must always be adjusted to match
the body size of the seat occupant as well as the seat belts must always be
s2bs.2.book Page 86 Monday, September 27, 2010 9:53 AM
Page 88 of 199

Passive Safety87
Using the system
Safety
Driving Tips
General Maintenance
Breakdown assistance
Technical Data
correctly fastened in order to provide an optimal protection for you and your
occupants.
The driver must maintain a distance of
at least 25 cm to the steering wheel
page 86, fig. 89 - left. Not maintaining this minimum distance will mean that
the airbag system will not be able to properly protect you - hazard!
When driving, hold the st eering wheel with both hands firmly on the outer
edge in the 9 o'clock and 3 o'clock po sition. Never hold the steering wheel
firmly in the 12 o'clock position or in another way (e.g. in the middle of the
steering wheel or at the inner steering wheel edge). In such cases, injuries to the
arms, the hands and the head can occur when the driver airbag is deployed.
The seat backrests must not be angled too far back when driving otherwise
this will affect proper operation of the se at belts and of the airbag system - risk
of injury!
Ensure that there are no objects in the footwell as any objects may get
behind the pedals during a driving or braking manoeuvre. You would then no
longer be able to operate the clutch, to brake or accelerate.
Correct seated position for the front passenger
The fro n t p assen ger must mai n tai n a d i stan ce of a t l ea st 25 c m from th e
dash panel so that the airbag offers him the greatest possible safety it is
deployed.For the safety of the front passenger and to reduce the risk of injury in the event of an
accident, we recommend the following setting:
Adjust the front passenger seat as far as possible to the rear.
Adjust the head restraint so that the top edge of the head restraint is at the same
level as the upper part of your head page 86, fig. 89 - right.
Fasten the seat belt correctly page 91, “How are seat belts correctly fastened?”.
In exceptional cases the front pass enger airbag can be deactivated page 101,
“Deactivating an airbag”.
Manual front passenger adjustment page 11, “Adjusting the front seats”.
WARNING
The front seats and the head restraints must always be adjusted to match
the body size of the seat occupant as well as the seat belts must always be
correctly fastened in order to provide an optimal protection for you and your
occupants.
The front passenger must maintain a distance of at least 25 cm to the dash
panel. Not maintaining this minimum distance will mean that the airbag
system will not be able to properly protect you - hazard!
Keep your feet in the footwell at all times while driving. Never place your
feet on the dash panel, out of the window or on the seats. You will be exposed
to increased risk of injury if it becomes necessary to apply the brake or in the
event of an accident. If an airbag is de ployed, you may suffer fatal injuries when
adopting an incorrect seated position!
The seat backrests must not be angled too far back when driving otherwise
this will affect proper operation of the se at belts and of the airbag system - risk
of injury!
Correct seated position for the occupants on the rear seats
Occupants on the rear seats must sit upright, keep the feet in the foot-
well and must have their se at belts correctly fastened.To reduce the risk of injury in the event of a sudden braking manoeuvre or an accident,
the occupants on the rear seats must observe the following:
Adjust the head restraints so that the top edge of the head restraints is at the same
level as the upper part of your head page 86, fig. 89 - on the right.
Fasten the seat belt correctly page 91, “How are seat belts correctly fastened?”.
If you are transporting page 103, “Transporting children safely” children in the
vehicle, please use a suitable child restraint system.
WARNING
The head restraints must always be adjusted to match the body size, in order
to offer an optimal protection for you and your occupants.
WARNING (continued)
s2bs.2.book Page 87 Monday, September 27, 2010 9:53 AM
Page 97 of 199
Airbag system
96
Apart from their normal protective function, a further task of the seat belts is to also
hold the driver and front passenger in a correct seated position in the event of a frontal
collision so as to enable the front ai rbags to offer the maximum protection.
You should therefore always fasten the seat be lts, not only because this is required by
law, but also for safety reasons and for your own protection page 89, “Why seat
belts?”.
Note
The dash panel must be replaced after the front passenger airbag has been
deployed.Function of the front airbags
Risk of injury to the head and ches t area is reduced by fully inflated
airbags.The airbag system is designed in such a way that the driver and the front passenger
airbag* are deployed in the event of a frontal collision of major severity.
In certain accident situ ations, the front, side and head airbag are deployed together.
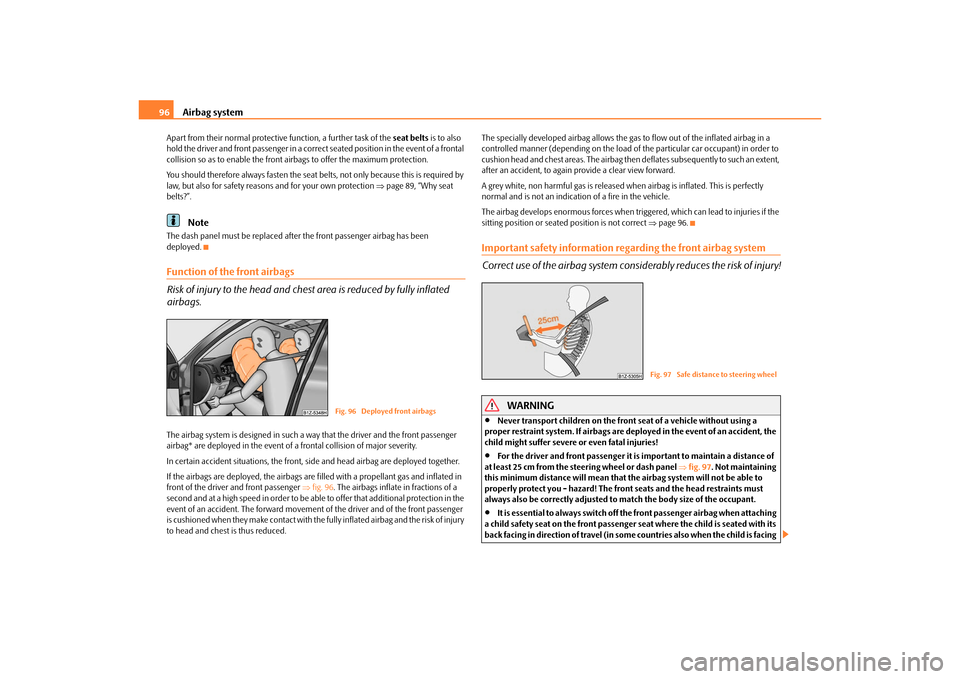
If the airbags are deployed, the airbags are filled with a propellant gas and inflated in
front of the driver and front passenger fig. 96 . The airbags inflate in fractions of a
second and at a high speed in order to be able to offer that additional protection in the
event of an accident. The forward movement of the driver and of the front passenger
is cushioned when they make contact with the fully inflated airbag and the risk of injury
to head and chest is thus reduced. The specially developed airbag allows the gas
to flow out of the inflated airbag in a
controlled manner (depending on the load of the particular car occupant) in order to
cushion head and chest areas. The airbag then deflates subsequently to such an extent,
after an accident, to again provide a clear view forward.
A grey white, non harmful gas is released when airbag is inflated. This is perfectly
normal and is not an indicati on of a fire in the vehicle.
The airbag develops enormous forces when triggered, which can lead to injuries if the
sitting position or seated position is not correct page 96.
Important safety information regarding the front airbag system
Correct use of the airbag system cons iderably reduces the risk of injury!
WARNING
Never transport children on the front seat of a vehicle without using a
proper restraint system. If airbags are de ployed in the event of an accident, the
child might suffer severe or even fatal injuries!
For the driver and front passenger it is important to maintain a distance of
at least 25 cm from the steering wheel or dash panel fig. 97 . Not maintaining
this minimum distance will mean that the airbag system will not be able to
properly protect you - hazard! The front seats and the head restraints must
always also be correctly adjusted to match the body size of the occupant.
It is essential to always switch off th e front passenger airbag when attaching
a child safety seat on the front passenger seat where the child is seated with its
back facing in direction of travel (in some countries also when the child is facing
Fig. 96 Deployed front airbags
Fig. 97 Safe distance to steering wheel
s2bs.2.book Page 96 Monday, September 27, 2010 9:53 AM
Page 152 of 199

Wheels and Tyres151
Using the system
Safety
Driving Tips
General Maintenance
Breakdown assistance
Technical Data
Wheels and TyresWheelsGeneral information
New tyres do not offer optimal grip at first and should therefore be run in for about
500 km at a moderate speed and an appropri ately cautious style of driving. You will
also profit from longer tyre life.
The tread depth of new tyres may differ because of design features and the config-
uration of the tread (depending on the type of tyre and the manufacturer).
Drive over curbs on the side of the road and other such obstacles slowly and,
where possible, at a right angle in order to avoid damage to tyres and wheel trims.
Inspect your tyres from time to time for damage (punctures, cuts, splits and
bulges). Remove foreign bodies from the tyre profile.
Damage to tyres and wheels is frequently not visible. Unusual vi brations or pulling
of the vehicle to one side coul d be a sign of tyre damage. Please reduce your speed
immediately and stop if you su spect that a wheel is damaged. Inspect the tyres for
signs of damage (bulges, splits, etc.) If no vi sible damage is present, please drive at an
appropriately slow speed and carefully to the nearest specialist garage in order to have
your vehicle inspected.
Also protect your tyres from contact with oil, grease and fuel.
Immediately replace any dust caps of the valves which have got lost.
Mark wheels before removing them so that their previous direction of running can
be maintained when mounted them again.
Always store wheels or tyres which been removed in a cool, dry and, where
possible, dark place. Tyres which are not fixed to a wheel trim should be stored upright.
Unidirectional tyres*
The direction of rotation of the tyres is mark ed by arrows on the wall of the tyre. This
indicates the direction of rotation of the tyre, and it is essential that the tyres are fitted
on to run in this direction. Only then are the tyres able to provide the optimal proper-
ties in terms of grip, low nois e, wear-and-tear and aquaplaning.
Further information concerning th e use of unidirectional tyres page 155.
WARNING
New tyres during the first 500 km do not offer optimal grip and should
therefore be run appropriately - risk of accident!
Never drive with damaged tyres - risk of accident!Note
Please observe the various differing legal requirements regarding tyres.Ty re l i feThe life of your tyres very much depends on the following points:
Tyre pressure
The working life of tyres will be shortened considerably if the tyres are insufficiently or
over-inflated and this will have an adverse effect on the handling of your vehicle.
Correctly inflated tyres are of particular importance when travelling at high speeds. It
is therefore good to check the pressure at least once a month and also before setting
off on a long trip. Please do not forget the spare wheel when checking the tyres.
The tyre inflation pressures for summer tyres are indicated on the inside of the fuel
filler flap fig. 129 . The inflation pressures for winter tyres are 20 kPa (0.2 bar) higher
than those for summer tyres page 155.
Fig. 129 An opened fuel filler flap with a
tyre size and tyre inflation pressure table
s2bs.2.book Page 151 Monday, September 27, 2010 9:53 AM
Page 153 of 199
Wheels and Tyres
152
The tyre inflation pressures for tyres of the tyre size 205/50 R17, which are intended to
be used with snow chains, is identical to the pressures for tyres of the tyre size
225/45 R17, see page 151, fig. 129 .
The tyre pressure should be at the highest pressure specified for your vehicle at all
times.
The tyre inflation pressure of the emergency spare wheel R 18 is 420 kPa (4.2 bar).
Always check the inflation pressure of tyres when cold. Do not reduce the higher pres-
sure of warm tyres. Adapt the inflation pressure of the tyres accordingly if your vehicle
is carrying a significantly higher payload.
Driving style
Fast cornering, sharp acceleration and brak ing (squealing tyres) increase wear-and-
tear on your tyres.
Balancing wheels
The wheels of a new vehicle are balanced. There are a wide range of influences when
driving which may result in an imbalance and which makes themselves felt through
vibration in the steering.
You should have the wheels rebalanced si nce any imbalance increases wear-and-tear
on the steering, the suspension and tyres. A wheel must also be rebalanced when a
new tyre is fitted and each time a tyre is repaired.
Wheel alignment errors
Incorrect wheel alignment at the front and re ar will not only increase wear-and-tear on
the tyres but will also has an adverse effect on vehicle safety. Contact your specialist
garage if you notice any unusual tyre wear.
WARNING
If the inflation pressure is too low, the tyre must perform a greater flexing
work. At higher speeds the tyre will warm up as a result of this. This can result
in tread separation and even a tyre blowout.
Immediately replace the damaged rims or tyres.
Tyres which are 6 years old or more should only be fitted in exceptional
cases and when adopting an approp riately cautious style of driving.
For the sake of the environment
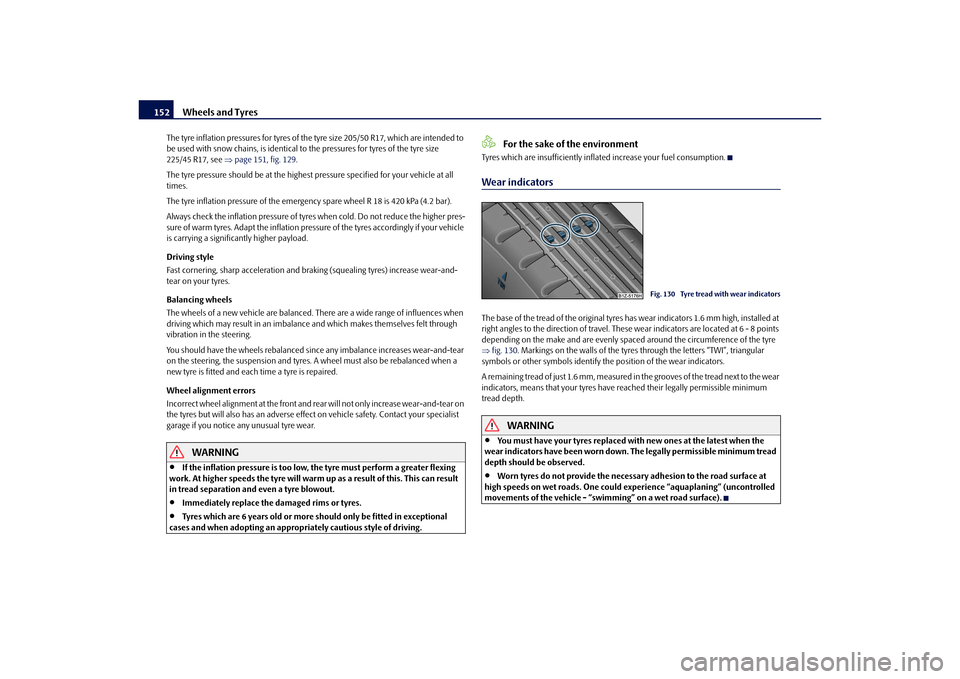
Tyres which are insufficiently inflated increase your fuel consumption.Wear indicatorsThe base of the tread of the original tyres has wear indicators 1.6 mm high, installed at
right angles to the direction of travel. These wear indicators are located at 6 - 8 points
depending on the make and are evenly spaced around the circumference of the tyre
fig. 130 . Markings on the walls of the tyres through the letters “TWI”, triangular
symbols or other symbols identify th e position of the wear indicators.
A re m a i n i n g t re a d o f j u s t 1 .6 m m , m e a s u re d i n t h e g ro o v e s o f t he tre a d n e x t t o th e w e a r
indicators, means that your tyres have reached their legally permissible minimum
tread depth.
WARNING
You must have your tyres replaced with new ones at the latest when the
wear indicators have been worn down . The legally permissible minimum tread
depth should be observed.
Worn tyres do not provide the necessary adhesion to the road surface at
high speeds on wet roads. One could experience “aquaplaning” (uncontrolled
movements of the vehicle - “swimming” on a wet road surface).
Fig. 130 Tyre tread with wear indicators
s2bs.2.book Page 152 Monday, September 27, 2010 9:53 AM
Page 154 of 199

Wheels and Tyres153
Using the system
Safety
Driving Tips
General Maintenance
Breakdown assistance
Technical Data
Changing wheels aroundIf significantly greater wear is present on the front tyres, we recommend changing the
front wheels around with the rear wheels as shown in the diagram fig. 131 . You will
then obtain approximately the same life for all the tyres.
It may be advantageous to swap the tyres ov er “crosswise” when certain types of wear
characteristic arise on the running surface of the tyres (but not in the case of unidirec-
tional tyres). The co-workers of the authorised Škoda Service Partners are extensively
familiar with the combination possibilities.
We recommend that you change the wheels around every 10 000 km in order to
achieve even wear on all wheels and to obtain optimal tyre life.New tyres and wheelsTyres and wheel rims are important design elements. One should therefore use the
tyres and wheel rims which have been releas ed for use by Škoda Auto. They are exactly
matched to the vehicle type and therefore contribute significantly to good road
holding and safe driving characteristics .
Only fit radial tyres of the same type on all 4 wheels, size (rolling circumference) and, if
possible, the same tread pattern on one axle.
The authorised Škoda Service Partners have access to the most current information
about which tyres we have rele ased for use on your vehicle.
We recommend that you have any work relati ng to tyres or wheels carried out by an
authorised Škoda Service Partner . The authorised Škoda Service Partners have all of
the necessary special tools and replacement parts available plus the required specialist knowledge and are also in a position to pr
operly dispose of the old tyres. A large
number of authorised Škoda Service Partners also have an attractive range of tyres and
wheels available.
The tyre/wheel combinations which are appr oved for your vehicle are indicated in
your vehicle documents. Approval and licensing may differ according to the legislation
prevailing in individual countries.
Proper knowledge of the tyre data makes it easier for you to select the correct type of
tyre. Tyres do, for example, have the following inscription on their walls:
195/65 R 15 91 T
What this means is:
The following speed restrictions apply to tyres.
Fig. 131 Changing wheels around
195
Tyre wi dt h i n mm
65
Height/width ratio in %
R
Code letter for the type of tyre - Radial
15
Diameter of wheel in inches
91
Load index
T
Speed symbol
Speed symbol
Permissible maximum speed
S
180 km/h
T
190 km/h
U
200 km/h
H
210 km/h
V
240 km/h
W
270 km/h
Y
300 km/h
s2bs.2.book Page 153 Monday, September 27, 2010 9:53 AM