2010 SKODA OCTAVIA TOUR open bonnet
[x] Cancel search: open bonnetPage 39 of 199
Unlocking and locking
38
opening the door in order to deactiva te the anti-theft alarm system. The alarm will be
triggered if you do not switch on the ignition within 15 seconds.
When is the alarm triggered?
The following security areas of the locked vehicle are monitored:
Bonnet,
Boot lid,
Doors,
Ignition lock,
vehicle's angle of inclinationpage 38, “Interior monitor* and Towing protection
monitoring*”,
Vehicle interior page 38, “Interior monitor* and Towing protection moni-
toring*”,
A drop in voltage of the on-board power supply.
An alarm is immediately triggered if either of the two battery terminals is disconnected
while the anti-theft alarm system is activated.
How is the alarm switched off?
You switch the alarm off if you unlock the vehi cle with the radio remote control or if you
switch the ignition on.Note
The working life of the alarm siren is 6 years. More detailed information is available
by a specialist garage.
Before leaving the vehicle, check that all the doors and windows are closed in order
to ensure that the anti-theft alarm system is fully operational.
Coding of the radio remote control and th e receiver unit precludes the use of the
radio remote control from other vehicles.
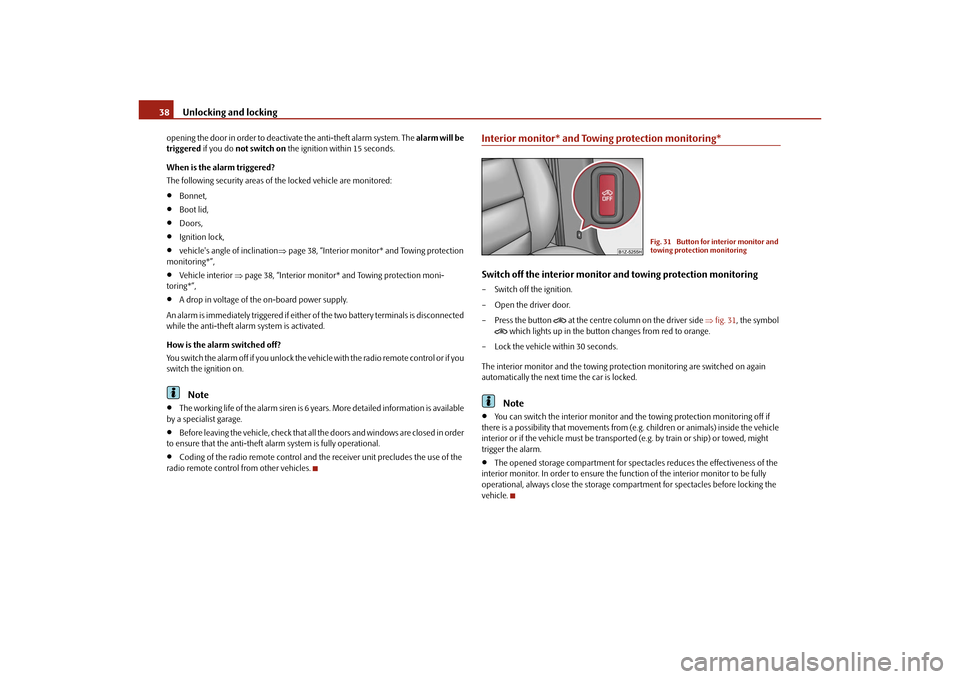
Interior monitor* and Towing protection monitoring*Switch off the interior monitor and towing protection monitoring– Switch off the ignition.
– Open the driver door.
–Press the button
at the centre column on the driver side fig. 31 , the symbol
which lights up in the button changes from red to orange.
– Lock the vehicle within 30 seconds.
The interior monitor and the towing protec tion monitoring are switched on again
automatically the next ti me the car is locked.Note
You can switch the interior monitor and th e towing protection monitoring off if
there is a possibility that movements from (e.g. children or animals) inside the vehicle
interior or if the vehicle must be transported (e.g. by train or ship) or towed, might
trigger the alarm.
The opened storage compartment for spectacles reduces the effectiveness of the
interior monitor. In order to ensure the func tion of the interior monitor to be fully
operational, always close the storage comp artment for spectacles before locking the
vehicle.
Fig. 31 Button for interior monitor and
towing protection monitoring
s2bs.2.book Page 38 Monday, September 27, 2010 9:53 AM
Page 49 of 199

Lights and Visibility
48
Automatic wipe/wash for windscreen
– Pull the lever towards the steering wheel into sprung position , the wash system
sprays immediately, the windscreen wiper starts wiping a little later. The wash
system and the windscreen wiper operate simultaneously at a speed of more than
120 km/h.
– Release the lever. The windscreen wash system stops and the wiper continues for another 3 - 4 wiper strokes (depending on the period of spraying of the wind-
screen). At a speed of more than 2 km/h , the wiper wipes once again* 5 seconds
after the last wiper stroke in order to wipe the last drops from the windscreen. This
function can be activated/deacti vated by a specialist garage.Wiping the rear window pane*– Push the lever away from the steering wheel into position - the widescreen
wiper will operate every 6 seconds.Automatic wipe/wash for the rear window pane*– Press the lever from the steering wheel forward into the sprung position , the
wash system sprays immediately, the windscreen wiper starts wiping a little later.
As long as you hold the lever in this position, the wiper operates as well as the wash
system.
– Letting go of the lever will cause the windscreen wash system to stop and the wiper to continue for another 2 - 3 wiper strokes (depending on the period of spraying of
the windscreen). The lever will stay in position after releasing it .Switching windscreen wipers off– Move the lever back into its home position .
After the windscreen wiper switches off each time or the ignition switches off for the
third time, the position of the windscreen wiper changes, this counteracts an early
fatigue of the wiper rubbers.
The windscreen wipers and the wash system only operate if the ignition is switched on
and the bonnet is closed
4). If the intermittent wipe is switched on, the intervals are also controlled depending on
speed.
The rear window will be wiped again if the
front window wipers are on when reverse
gear is selected.
The windscreen washer nozzles are heated* when the ignition is switched on.
Top up with wash liquid page 150.
Winter position
If the windscreen wipers are in rest position, they cannot be folded out from the wind-
screen. For this reason we recommend adjust ing the windscreen wipers in winter so
that they can be folded out from the windscre en easily. You can set this rest position as
follows:
Switch on the windscreen wipers.
Switch off the ignition. The windscreen wipers remain in the position in which they
were when switching off the ignition.
You can also use the service position page 49 as a winter position.
WARNING
Properly maintained windscreen wiper blades are essential for clear visi-
bility and safe driving page 49.
Do not use the windscreen washer sy stem at low temperatures, without
heating the windscreen beforehand. Otherwise the window cleaner could
freeze on the windscreen and re strict the view to the front.
The rain sensor only operates as a su pport. The driver is not released from
the responsibility to set the function of the windscreen wipers manually
depending on the visibility conditions.Caution
In frosty weather, please firs t of all check whether the windscreen wiper blades are not
frozen to the windscreen before switching them on. Switching on windscreen wipers
when the blades are frozen to the windscreen may result in damage both to the blades
and the motor of the windscreen wipers!
4)On vehicles which do not have a contact switch for the bonnet, the windshield wiper and wash
system operates also when the bonnet is opened.
A5
A6
A7
A6
A0
s2bs.2.book Page 48 Monday, September 27, 2010 9:53 AM
Page 133 of 199
Taking care of your vehicle and cleaning the vehicle
132
Do not use window leathers which you have us ed to polish the vehicle body to dry off
the windows. Residues of preservatives in the window leather can dirty the window
and reduce visibility.
Do not affix any stickers over the inside of the rear window to avoid damage to the
heating elements of the rear window heater .
We recommend using a preserva tive from Škoda genuine accessories offered by your
Škoda dealer.
Caution
Never remove snow or ice from the glass parts with warm or hot water - risk of forma-
tion of cracks in the glass!The headlight lensesPlease do not use any aggressi ve cleaning or chemical solvent products for cleaning
the front headlights - risk of damage to the plastic lenses. Please use soap and clean
warm water.
Caution
Never wipe the headlights dry and do not use any sharp objects for cleaning the plastic
lenses, this may result in damage to the protective paintwork and consequently in
formation of cracks on the headlight lenses, e.g. through effect of chemical products.Door and window sealsThe rubber seals on the doors, boot lid, bonnet and windows remain supple and last
longer if you treat them from time to time with a rubber care product (e.g. with a spray
with silicone-free oil). You also avoid premature wear of the seals and prevent leakages
in this way. It is also easier to open the doors. Rubber seals which are well cared for also
do not stick together in cold winter weather.Locking cylinderWe recommend that you use the spray from Škoda original accessories with regreasing
and anticorrosive effect for de-icing locking cylinders.
Note
When washing your vehicle, ensure that as little water as possible gets into the locking
cylinders.WheelsSteel wheels
You should also thoroughly wash the wheels and wheel trims when giving your vehicle
its regular wash. This prevents any brake dust, dirt and road salt from sticking to the
wheel hubs. You can remove stubborn brake abrasion adhering to the wheels with an
industrial cleaner. Touch up any damage to the paintwork on the wheels before rust is
able to form.
Light alloy wheels
Regular care of light alloy wh eels is necessary in order to retain their decorative
appearance over long periods. It is particul arly important to remove regularly any road
salt and brake abrasion from light alloy wheels, otherwise the light metal will suffer.
Wash thoroughly and then treat the wheels with a protective product for light alloy
wheels which does not cont ain any acidic components. We recommend to apply a
hard wax layer onto the wheel hubs every three months. You must not use any prod-
ucts which cause abrasion when treating the wheel hubs. Any damage to the paint
layer on the wheel hubs must be touched up immediately.
We recommend using a preservative from Šk oda genuine accessories offered by your
Škoda dealer.
WARNING
One should remember when cleaning th e wheels that moisture, ice and road
salt may adversely affect braking ef ficiency - risk of an accident!
Note
Severe layers of dirt on the wheels can also result in wheel imbalance. This may show
itself in the form of a wheel vibration which is transmitted to the steering wheel which,
in certain circumstances, can cause premature wear of the steering. This means it is
necessary to remove the dirt.
s2bs.2.book Page 132 Monday, September 27, 2010 9:53 AM
Page 140 of 199

Inspecting and replenishing139
Using the system
Safety
Driving Tips
General Maintenance
Breakdown assistance
Technical Data
Inspecting and replenishingEngine compartmentBonnet remote releaseBonnet remote release– Pull the unlocking lever below the dash panel on the driver's side fig. 120 .
The bonnet jumps out of its lock as a result of the spring force. A locking lever appears
at the same time in the radiator grille.Opening and closing the bonnet.Fig. 121 Radiator grille: Release lever / se curing the bonnet with the bonnet support
Opening the bonnet– Unlock the bonnet fig. 120 .
– Ensure that the arms of the windscreen wipers are correctly in place against the windscreen before opening the bonnet otherwise damage could occur to the
paintwork.
– Pulling on the release lever in direction of arrow fig. 121 will unlock the
bonnet.
– Grip with the hand under the radiator grille and lift up the bonnet.
– Take the bonnet support out of its holder and set it in the opening on the bonnet.Closing the bonnet– Lift the bonnet slightly and unhook the bonnet support. Press the bonnet support into the holder designed to hold it.
– Allow the bonnet to drop from a height of about 20 cm into the lock - bonnet do
not press down on it !
WARNING
Never open the bonnet if you see that steam or coolant is flowing out of the
engine compartment - risk of scalding! Wait long enough until the steam or
coolant has stopped escaping.
For safety reasons, the bonnet must always be properly closed when
driving. One should therefore check that the lock has in fact engaged properly
after closing the bonnet.
Stop your vehicle immediately while driving if you notice that the lock is not
properly engaged and close the bonnet properly - risk of an accident!Caution
Never open the bonnet using the locking lever - danger of causing damage.
Fig. 120 Bonnet release lever
A1
A2
s2bs.2.book Page 139 Monday, September 27, 2010 9:53 AM
Page 141 of 199

Inspecting and replenishing
140
Working in the engine compartment
Particular care is required when carrying out any work in the engine
compartment!There is a risk of injuries, scalding, acci dents and fire when working in the engine
compartment, e.g. inspecting and replenishing oil and other fluids. For this
reason, it is essential to comply with the warning instructions stated below and
with the general applicable rules of safe ty. The engine compartment of your car
is a hazardous area .
WARNING
Never open the bonnet if you see that steam or coolant is flowing out of the
engine compartment - risk of scalding! Wait long enough until the steam or
coolant has stopped escaping.
Switch off the engine and pull out the ignition key.
Apply the handbrake firmly.
Move the gear lever into the Neutral position.
Allow the engine to cool down.
Keep children clear of the engine compartment.
Never spill oil and other fluids over the hot engine. Such fluids (e.g. the anti-
freeze contained in the coolant) may ignite!
Avoid short circuits in the electrical system - particularly on the battery.
Never place your hand into the radiator fan as long as the engine is still
warm. The fan might suddenly start running!
Never open the cap of the coolant expans ion bottle as long as the engine is
still warm. The cooling system is pressurized!
Cover over the cap of the coolant expansion reservoir with a large cloth
when opening it as protection for your face, hands and arms from hot steam or
hot coolant.
Do not let objects, such as e.g. cleaning cloth or tools lie in the engine
compartment.
If you wish to work under the vehicl e, you must secure the vehicle from
rolling away and support it with suitable supporting blocks; the lifting jack* is
not sufficient for this - risk of injury!
In cases where it be necessary to carry out inspection work when the engine
is running there is an additional risk fr om rotating parts (e.g. the V-ribbed belt,
alternator, radiator fan) and from the high-voltage ignition system. Please
observe in addition the following:
Never touch the electrical cabl es of the ignition system.
Absolutely avoid any jewellery, loose it ems of clothing or long hair from
getting into the rotating parts of the engine - Hazard! Therefore remove any
jewellery beforehand, tie up your hair and wear tight fitting clothing.
Please also comply with the warnin g instructions stated below when
carrying out any essential work on the fu el system or on the electrical system:
Always separate the car battery from the electrical system.
Do not smoke.
Never carry out any work close to naked flames.
Always keep a working fire extinguisher at hand.Caution
When replenishing fluids in the engine, always ensure that the fluids are on no account
mixed up. This may result in major oper ating problems and also vehicle damage!
WARNING (continued)
s2bs.2.book Page 140 Monday, September 27, 2010 9:53 AM
Page 142 of 199

Inspecting and replenishing141
Using the system
Safety
Driving Tips
General Maintenance
Breakdown assistance
Technical Data
Overview of the engine compartment
The main inspection points.Fig. 122 1.6 ltr./75 kW petrol engine
Coolant expansion bottle . . . . . . . . . . . . . . . . . . . . . . . . . . . . . . . . . . . . . . .
Windshield washer fluid reservoir . . . . . . . . . . . . . . . . . . . . . . . . . . . . . . .
Engine oil filler opening . . . . . . . . . . . . . . . . . . . . . . . . . . . . . . . . . . . . . . . .
Engine oil dipstick . . . . . . . . . . . . . . . . . . . . . . . . . . . . . . . . . . . . . . . . . . . . . .
Brake fluid reservoir . . . . . . . . . . . . . . . . . . . . . . . . . . . . . . . . . . . . . . . . . . . .
Battery (below a cover) . . . . . . . . . . . . . . . . . . . . . . . . . . . . . . . . . . . . . . . . .Note
The location of the inspection points in th e engine compartment of petrol and diesel
engines is practically identical.
Engine oilCheck engine oil level
The dipstick indicates the le vel of oil in the engine.Checking the oil level– Ensure that the vehicle is po sitioned on a level surface.
– Switch the engine off.
– Open the bonnet in “Working in the engine compartment” on page 140.
– Wait a few minutes and pull out the oil dipstick.
– Wipe off the dipstick with a clea n cloth and insert it again fully.
– Then withdraw the dipstick again and read off the oil level.Oil level within range –You must not top up the oil.Oil level within range –You may top up the oil. It is possible that the oil level may then be within range
after doing this.Oil level within range –You must top up the oil page 142. It is sufficient, once this is done, to keep the
oil level within range .
A1
143
A2
150
A3
142
A4
141
A5
145
A6
146
Fig. 123 Dipstick
AAAB
AA
ACAB
s2bs.2.book Page 141 Monday, September 27, 2010 9:53 AM
Page 145 of 199

Inspecting and replenishing
144
– Open the bonnet page 139.
– Check the level of coolant in the coolant expansion bottle page 143, fig. 124 .
The coolant level when the engine is cold must lie between the (MIN) and
(MAX) markings. The level may also rise slightly above the (MAX) marking when
the engine is warm.
If the coolant level in the reservoir is too lo w, this is indicated by the warning light in
the instrument cluster page 25, “Coolant temperature/coolant level ”. We never-
theless recommend inspecting the coolant leve l directly at the reservoir from time to
time.
Loss of coolant
A loss of coolant is first and foremost an indication of a leak in the system. You should
not merely top up the coolant in the reservoir. It is also important to have the cooling
system inspected without delay by a specialist garage.
Losses can only occur through the pressure relief in the cap of the coolant expansion
bottle which is completely free of leaks if the coolant boils as a result of overheating
and is forced out of the cooling system.
WARNING
Read and observe the warning notes page 140, “Working in the engine
compartment” before working in the engine compartment.
Caution
One should contact a specialist garage as soon as possible if the source of overheating
itself cannot be determined and removed, since there may be grave damage to the
engine.Replenishing the coolant– Switch the engine off.
– Allow the engine to cool down.
– Place a cloth over the cap of the coolant expansion reservoir page 143, fig. 124
and unscrew the cap carefully by turning it to the left . –Top up the coolant.
– Screw the cap tight until it is heard to lock.
The coolant which you use for replenishing the system, must comply with one specific
specification
page 143. Do not use an alternative additive if the coolant additive
G13 is not available in an emergency. Just to p up the system with water and as soon as
possible arrange adjustment to correct the mixing ratio of water and coolant additive
again by a specialist garage.
Only use fresh coolant for topping up the system.
Do not fill up over the “MAX” marking! Excess coolant which is heated up is forced out
of the cooling system through the pressure relief valve in the cap of the coolant
compensation bottle.
Wait until the engine has cooled down for a system which has suffered a major loss of
coolant before pouring in coolant. This is necessary to avoid engine damage.
WARNING
The cooling system is pressurized! Do not open the cap of the coolant
expansion bottle if the engine is still hot - risk of scalding!
The coolant additive and thus all of the coolant is harmful to your health.
Avoid contact with the coolant. Coolant vapours are also harmful to the health.
It is important, therefore, to always safely store any coolant additive in its orig-
inal container out of the reach of children - risk of poisoning!
If any splashes of coolant get into yo ur eyes, rinse out your eyes immedi-
ately with clear water and contact a doctor as soon as possible.
You should also consult a doctor without delay if you have inadvertently
swallowed coolant.Caution
Do not continue your journey if for some reason it is not possible under the
conditions prevailing to top up with coolant. Switch the engine off and obtain
professional assistance from a specialist garage, otherwise it could lead to severe
engine damage.
Ab
Aa
Aa
s2bs.2.book Page 144 Monday, September 27, 2010 9:53 AM
Page 146 of 199

Inspecting and replenishing145
Using the system
Safety
Driving Tips
General Maintenance
Breakdown assistance
Technical Data
For the sake of the environment
Do not re-use coolant if it is necessary to drain the coolant in the system. It should be
collected and disposed of in compliance with environmental protection regulations.Radiator fan
The radiator fan may switch on suddenly.The radiator fan is driven by an electric motor and controlled according to the coolant
temperature.
The radiator fan may continue running for up to 10 minutes after the engine has been
switched off - even if the igni tion is also off. It may also switch on suddenly after a
certain time, if
the coolant temperature has risen beca use of an accumulation of heat or
the warm engine compartment is heated up additionally by strong sunlight.
WARNING
You must therefore be aware when workin g in the engine compartment that the
fan may switch on suddenly - risk of injury!Brake fluidInspecting the brake fluid level
The brake fluid reservoir is located on the left of the engine compartment. The brake
fluid reservoir on right-hand steering models is positioned on the other side of the
engine compartment.
– Switch the engine off.
– Open the bonnet page 139.
– Inspect the brake fluid level in the reservoir fig. 125 . The level must be between
the “MIN” and “MAX” markings.
A slight drop in the fluid level results when driving due to normal wear-and-tear and
automatic adjustment of the brak e pads, and is perfectly normal.
There may be an indication of a leak in the brake system, however, if the fluid level
drops significantly within a short time or if it drops below the “MIN” marking. If the
brake fluid level is too low, this is indicated by the warning light page 28, “Brake
system ” lighting up in the instru ment cluster. In this case stop immediately and do
not drive any further! Obtain professional assistance.
WARNING
Read and observe the warning notes page 140, “Working in the engine
compartment” before working in the engine compartment.
If the fluid level has dropped below the MIN marking, do not drive any
further - risk of accident! Obtain professional assistance.
Replacing brake fluidBrake fluid absorbs moisture. This causes the fluid to absorb moisture from the
surrounding air over a period of time. Exce ssive water in the brake fluid may be the
cause of corrosion in the brake system. The water content also lowers the boiling point
of the brake fluid.
One may only use new genuine brake fluid from Škoda Auto. The brake fluid must
comply with one of the following standards or specifications:
VW 50114
FMVSS 116 DOT4
DIN ISO 4925 CLASS 4
Fig. 125 Engine compartment: Brake
fluid reservoir
s2bs.2.book Page 145 Monday, September 27, 2010 9:53 AM