2010 SKODA OCTAVIA radio
[x] Cancel search: radioPage 46 of 275

Unlocking and locking45
Using the system
Safety
Driving Tips
General Maintenance
Breakdown assistance
Technical Data
Once you unlock the vehicle by inserting the ke
y into the driver door you then have to
insert the key into the ignition lock and switch the ignition on within 15 seconds after
opening the door in order to deactiva te the anti-theft alarm system. The alarm will be
triggered if you do not switch on the ignition within 15 seconds.
When is the alarm triggered?
The following security areas of the locked vehicle are monitored:
Bonnet,
Boot lid,
Doors,
Ignition lock,
Angle of the vehicle* page 45,
Vehicle interior* page 45,
A drop in voltage of the on-board power supply.
An alarm is immediately triggered if either of the two battery terminals is disconnected
while the anti-theft alarm system is activated.
How is the alarm switched off?
You switch the alarm off if you unlock the vehi cle with the radio remote control or if you
switch the ignition on.Note
The working life of the alarm siren is 6 years. More detailed information is available
by a specialist garage.
Before leaving the car, check that all the doors, windows and the electric
sliding/tilting roof* are properly closed in order to ensure that the anti-theft alarm
system is fully operational.
Coding of the radio remote control and th e receiver unit precludes the use of the
radio remote control from other vehicles.
Interior monitor* and Towing protection monitoring*Switch off the interior monitor and towing protection monitoring– Switch off the ignition.
– Open the driver door.
–Press the button
at the centre column on the driver side fig. 32 , the symbol
which lights up in the button changes from red to orange.
– Lock the vehicle within 30 seconds.
The interior monitor and the towing protec tion monitoring are switched on again
automatically the next ti me the car is locked.Note
You can switch the interior monitor and th e towing protection monitoring off if
there is a possibility that movements from (e.g. children or animals) inside the vehicle
interior or if the vehicle must be transported (e.g. by train or ship) or towed, might
trigger the alarm.
The opened storage compartment for spectacles reduces the effectiveness of the
interior monitor. In order to ensure the func tion of the interior monitor to be fully
operational, always close the storage comp artment for spectacles before locking the
vehicle.
Fig. 32 Button for interior monitor and
towing protection monitoring
s43s.1.book Page 45 Thursday, May 13, 2010 1:21 PM
Page 49 of 275
Unlocking and locking
48
Window convenience operationYou can open and close the electrically po wered windows as follows when unlocking
and locking the vehicle (only close the sliding/tilting roof):Opening a window– Hold the key in the locking cylinder of the driver's door in the unlock position or
press the unlock button of the radio remote control until all the windows are
opened.Closing a window– Hold the key in the locking cylinder of the dr iver's door in the lock position or press
the lock button of the radio remote control until all the windows are closed.
You can interrupt the opening or closing operation of the windows immediately by
releasing the key or the lock button.
WARNING
The system is fitted with a force limiter page 47. If there is an obstacle, the
closing process is stopped and the window goes down by several centimeters.
You should then take particular care when closing the windows! You may
otherwise suffer severe injuries as a re sult of getting an arm, for example,
jammed in the window!
Note
On vehicles fitted with an ti-theft alarm system the co nvenience window opening is
possible by means of the key in the locking cylinder only 45 seconds after deactivating
the warning system or after activating the anti-theft alarm system.Operational faultsElectrically operated power windows do not operate
If the battery of the car has been disconne cted and then reconnected, the electrically
operated power windows do not operate. The system must be activated. Proceed as
follows in order to re-establish the function:
Switch on the ignition.
Press the relevant switch top and hold it pressed as lo ng as necessary until the
window is closed.
Release the switch.
Press once again the relevant switch top and hold it pressed for approx. 3 seconds.
Operation in winter
Ice accumulating on the surface of the wi ndows during the winter may result in a
greater resistance when closing the windows and the window may stop and go down
several centimetres
It is necessary to put the force limiter out of operation in order to close the window
page 47, “Force limiter of the power windows”.
WARNING
The system is fitted with a force limiter page 47. If there is an obstacle, the
closing process is stopped and the window goes down by several centimeters.
You should then take particular care when closing the windows! You may
otherwise suffer severe injuries as a re sult of getting an arm, for example,
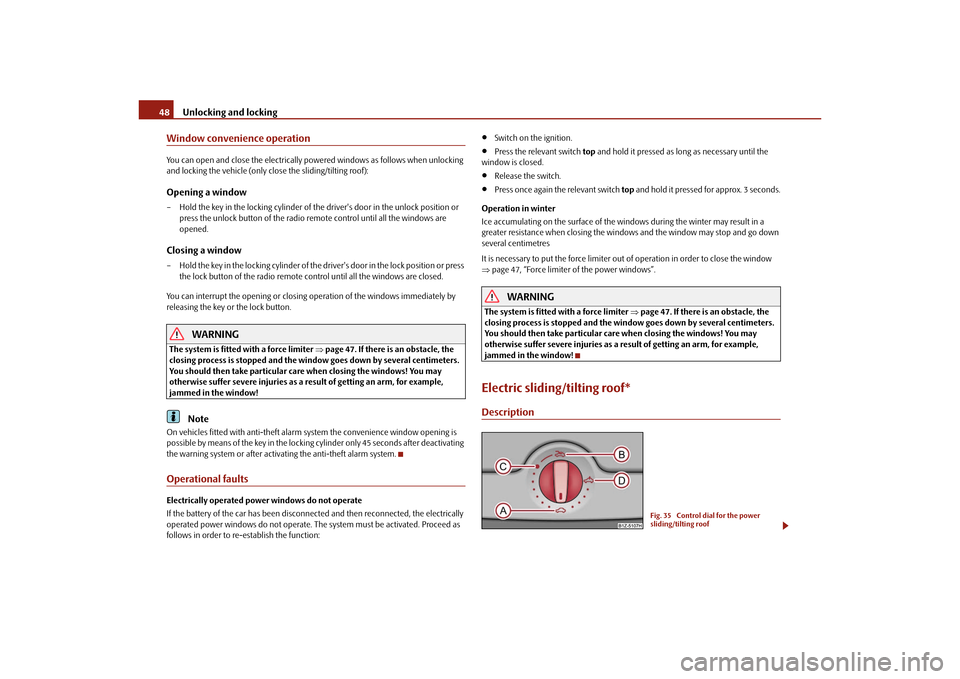
jammed in the window!Electric sliding/tilting roof*Description
Fig. 35 Control dial for the power
sliding/tilting roof
s43s.1.book Page 48 Thursday, May 13, 2010 1:21 PM
Page 55 of 275

Lights and Visibility
54
You can change the illumination period for the Coming Home Function by means
of the information display*.
Leaving Home FunctionThis function makes it possible to switch on the lights when approaching the vehicle.Switching on Leaving Home Function– The light switch is in the position automatic driving lamp control
.
– Unlock the vehicle with the radio remote control - the lights come on.
Depending on equipment fitted the function Leaving Home switches on the following
lights:
Parking lights,
Low beam,
Entry lighting in the exterior mirrors,
Licence plate light.
Leaving Home Function
The function Leaving Home is controlled with the light sensor in the mount of the inte-
rior rear mirror. If the light intensity is higher than the set value of the light sensor, the
Leaving Home Function is not switched on after unlocking the vehicle with the radio
remote control.
After unlocking the vehicle with the radio remote control, the lights come on for 10
seconds. The Leaving Home Function is also switched off after the ignition is switched
on and after locking the vehicle.
If no door is opened within 30 seconds, the lights go out and the vehicle is locked auto-
matically.Note
If the Leaving Home Function is switched on constantly, the battery will be heavily
discharged particularly in short-haul traffic.
The switching on of the described lights should only be undertaken in accordance
with the legal requirements.
You can change the illumination period for the Leaving Home Function by means
of the information display*.
Tourist light*This mode makes it possible to drive in countries with opposing traffic system, driving
on the left/right, without dazzling the oncoming vehicles. When the mode “tourist
light” is active, the side to side swivel of the headlights is deactivated.
The mode “tourist light” is activated / deactivated via the information display* in the
menu:
SETUP
Lights & Vision
Tra v e l m o d e
Off
Switched on
Fog lights*
Switching on the fog lights– First of all turn the light switch into position
or fig. 39 .
– Pull the light switch into position .
The warning light
lights up in the instrument cluste r when the fog lights are switched
on page 27.
Fig. 39 Dash panel: Light switch
A1
s43s.1.book Page 54 Thursday, May 13, 2010 1:21 PM
Page 66 of 275

Lights and Visibility65
Using the system
Safety
Driving Tips
General Maintenance
Breakdown assistance
Technical Data
Note
Automatic mirror dimming operates only properly if the sun screen* for the rear
window in the housing on the luggage compartment cover is not in use or the light
striking the interior rear-view mirr or is not affected by other objects.
Do not affix any stickers in front of the light sensor, so that you do not impair the
automatic dimming function or put it out of operation.
If you switch off the automatic dimming inte rior rear-view mirror, also the exterior
mirror dimming is switched off.
Exterior mirror
You can adjust the exterior mirrors electrically*.The exterior mirror he ater only operates when the en gine is running and up to an
outside temperature of +20 °C. Heating of the external mirror – Turn the rotary knob to position
fig. 54 .
Adjusting left and right exterior mirrors simultaneously– Turn the rotary knob to position
. The movement of the mirror surface is identical
to the movement of the rotary knob.
Adjusting the right-hand exterior mirror– Turn the rotary knob to position
. The movement of the mirror surface is identical
to the movement of the rotary knob.
Switching off operating control– Turn the rotary knob to position
.
Folding in both exterior mirrors*– Turn the rotary knob to position
.
Folding exterior mirrors* using the key with radio remote control– If all the windows are closed, press the unlock button on the radio remote
control page 43, fig. 31 for approx. 2 seconds.
Tilting surface of front pa ssenger exterior mirror*
When the rotary knob is in position
fig. 54 and the reverse gear is engaged, the
surface of the mirror tilts down slightly. This provides an aid in seeing the kerb of the
pavement when parking the car.
The mirror returns into its initial position, after the rotary knob is moved out of the
position
and put into another position or if the speed is more than 15 km/h.
Memory for exterior mirrors*
On vehicles fitted with a memory for the driver seat, the relevant setting of the exterior
mirror is also stored automatically when the se at position is stored page 68.WARNING
Convex (curved outward) or spherical (differently curved) exterior mirrors
increase the vision field. They do, however, make objects appear smaller in the
mirror. These mirrors are only of limited use, therefore, for estimating distances
to the following vehicles.
Use whenever possible the interior rear mirror, for estimating the distances
to the following vehicles.
Fig. 54 Inner part of door: Rotary knob
A3
s43s.1.book Page 65 Thursday, May 13, 2010 1:21 PM
Page 70 of 275

Seats and Stowage69
Using the system
Safety
Driving Tips
General Maintenance
Breakdown assistance
Technical Data
The seat backrests must not be angled too far back when driving otherwise
this will affect proper operation of the se at belts and of the airbag system - risk
of injury!Note
If the movement of the seat is inadverten tly interrupted during an adjustment, once
again press the switch in the appropriate di rection and continue with the adjustment
of the seat to the end.Storing settingStoring seat and exterior mirror settings for driving forward– Switch on the ignition.
– Adjust the seat page 68.
– Adjust both exterior mirrors page 65.
– Press button SET fig. 57 .
– Press one of the memory buttons with in 10 seconds after pressing the button
SET - an acknowledgement signal confirms that the seat setting is stored.Storing exterior mirror setting for reversing*– Switch on the ignition. – Turn the exterior mirror control to position
page 65.
– Engage the reverse gear.
– Move the right exterior mirror into the desired position page 65.
– Take the vehicle out of gear. The set posi tion of the exterior mirror is stored.
Memory buttons
Memory for the seat offers the possibility to store the individual driver seat and
external mirror position. An individual posi tion can be allocated to each of the three
memory buttons fig. 57 , that is three in total. Af ter pressing the corresponding
memory button , the seat and the exterior mirror are automatically moved into the
positions which have been allocated to this button page 69.
Emergency Off
You can interrupt the setting operation at any time, if you operate any button of the
driver seat.
Note
When storing settings with the memory buttons, we recommend that you begin
with the front button and assign a memory button to each additional driver.
Each new setting stored with the same button erases the previous setting.
Each time you store the seat and exterior mirror settings for driving forward you
also have to re-store the individual setting of the exterior mirror on the passenger side
for reversing.
Assigning remote control to the memory buttonsAfter storing the settings of the seat and exterior mirrors, you have 10 seconds in order
to assign the radio remote control to the appropriate memory button.
– Withdraw the ignition key.
– Press the unlock button page 43. The setting is stored with the memory button
which you have selected.
WARNING (continued)
Fig. 57 Driver seat: Memory buttons
and SET button
AA
AB
ABAB
s43s.1.book Page 69 Thursday, May 13, 2010 1:21 PM
Page 71 of 275

Seats and Stowage
70
If you wish to be able to retrieve the settings which are stored in the memory by also
using the radio remote control, you have to assign the radio remote control to a
memory button in each case.
If you wish, you can obtain an additional remote control key from an authorised Škoda
Service partner and then assign the remote control key to another memory button.
Note
If the radio remote control had previously been assigned to another memory
button, this setting is then erased by the new assignment.
If you assign the radio remote control to a memory button which has already been
assigned to a radio remote control, the ol d assignment is also replaced by a new
assignment in this case.
The assignment of the radio remote co ntrol to a memory button is retained,
however, after reassigning the seats and exterior mirrors.
Retrieving settings of the seat and mirrors
You can retrieve the stored settings either with the memory buttons or
with the remote control*.Retrieving settings with memory buttons– In order to retrieve the stored setting, you have two possibilities:
– One-touch automatic memory: briefly press the desired memory button
page 69, fig. 57 . The seat and exterior mirror are moved automatically into the
stored positions (this applies only if the ignition is switched on and the speed is less
than 5 km/h).
– Memory keying : Press and hold the desired memory button pressed long
enough until the seat and the exterior mi rror are moved into the stored positions.Retrieving settings with remote control– If the driver door is closed and the ignition is switched off, briefly press the unlock
button of the radio remote control page 43 and then open the driver door.
– The seat and exterior mirrors now move automatically into the stored positions.
Retrieving setting of exterior mirror for reversing*– Turn the rotary knob for the exterior mirror setting into the position
page 65
before engaging the reverse gear.
The mirror returns into its initial position , after the rotary knob is moved out of the
position
and put into another position or if the speed is more than 15 km/h.
Emergency Off
You can interrupt the setting operation at any time, if you operate any button of the
driver seat.
Note
If the inclination angle of the seat backrest is more than 102° in relation to the seat
cushion, the backrest remains in this position , after reaching this angle, when retrieving
the setting by briefly pressing the memory button. Once the stored angle is reached, it
is necessary to press the memory button and hold it pressed until the seat is in the
stored position.Head restraintsFig. 58 Head restraint: Adjust - left / remove - rightBest protection is achieved if the top edge of the head restraint is at the same level as
the upper part of your head.
AB
AB
s43s.1.book Page 70 Thursday, May 13, 2010 1:21 PM
Page 102 of 275

Heating and air conditioning system101
Using the system
Safety
Driving Tips
General Maintenance
Breakdown assistance
Technical Data
outside temperature above approx. +2°C,
switched on.
If the cooling system is switched on, the temperature and air humidity drops in the
vehicle. The wellbeing of the occupants of the car is enhanced as a result of this partic-
ularly at high outside temperatures and a high air humidity. The system prevents the
windows misting up during th e cold season of the year.
The heating effect is dependent upon the c oolant temperature, thus full heat output
only occurs when the engine has reached its operating temperature.
It is possible to briefly activate recirculat ed air mode in order to enhance the cooling
effect page 103.
The air inlet in front of the windscreen must be free of ice, snow or leaves in order to
ensure that the heating and cooling systems operate properly.
The AC compressor is switched off at a hi gh coolant temperature in order to provide
cooling at a high load of the engine.
After switching on the cooling Condensation from the evaporator of the air condi-
tioning may drip down and form a puddle be low the vehicle. This is quite normal and
not an indication of a leak!
Recommended setting for all periods of the year:
Set the desired temperature, we recommend 22°C.
Press the button page 102, fig. 108 .
Move the air outlet vents 3 and 4 so that the air flow is directed slightly upwards.
WARNING
For your own safety and that of other road users, ensure that all the
windows are free of ice, snow and mistin g. Please familiarize yourself about
how to correctly operate th e heating and ventilation systems, how to demist
and defrost the windows, as well as with the cooling mode.
You should not leave recirculated air mode on over a longer period of time,
as “stale” air may result in fatigue in the driver and occupants, divert your
attention and also cause the windows to mist up. The risk of having an accident
increases. Switch recirculated air mode off as soon as the windows begin
misting up.
Note
If the cooling system has not been switched on for a lengthy period, odours may
be produced at the evaporator because of deposits. Switch the cooling system on at
least once a month for approximately 5 minu tes at the highest blower stage - also
during the cold season of the year - in order to avoid such odours. Also open a window
for a short time.
We recommend that you do not smoke in the vehicle when the recirculating air
mode is operating since the smoke which is drawn at the evaporator from the interior
of the vehicle forms deposits in the evapor ator of the air conditioning system. This
produces a permanent odour when the air conditioning system is operating which can
only be eliminated through considerable effort and expense (replacement of
compressor).
The used air streams out through the air removal openings in the luggage compart-
ment.
On vehicles equipped with a factory-fitted radio* or navigation*, the information
of the Climatronic is also shown on the display. This function can be switched off, see
operating instructions of the radio* or the navigation system*.
Using the cooling economically page 100.
Operational problems page 100.
AC
AUTO
s43s.1.book Page 101 Thursday, May 13, 2010 1:21 PM
Page 112 of 275

Starting-off and Driving111
Using the system
Safety
Driving Tips
General Maintenance
Breakdown assistance
Technical Data
Releasing the handbrake– Pull the handbrake lever up slightly and at the same time press in the locking
button fig. 113 .
– Hold the button pressed and push the handbrake lever down fully .
The handbrake warning light
lights up when the handbrak e is applied, provided the
ignition is on.
A warning signal sounds and the following text appears in the display* if you have inad-
vertently driven off with the handbrake applied:
Release parking brake!
The handbrake warning is acti vated if you drive at a speed of more than 6 km/h for
more than 3 seconds.
WARNING
Please note that the handbrake must be fully released. A handbrake which
is only partially released can result in the rear brakes overheating which will
have a negative effect on the operation of the brake system - risk of accident! In
addition this can result in premature wear of the rear brake pads.
Never leave children unattended in the vehicle. The children might, for
example, release the handbrake or take the vehicle out of gear. The vehicle
might then move off - risk of accident!Caution
After the car has come to a stop, always firs t of all apply the handbrake firmly before
then additionally engaging a gear (manual gearbox) or moving the selector lever into
position P (automatic gearbox).
Rear parking aid*The parking aid provides a warning of obstacles behind the vehicle.The audible parking aid determines the di stance between the rear bumper and an
obstacle located behind the ve hicle with the aid of ultrasound sensors. The tones of
the parking aid can be adapted in th e menu of the information display* page 25.
The sensors are integrated in the rear bumper.
Range of sensors
The clearance warning begins at a distance of about 160 cm from the obstacle (area
fig. 114 ). The interval between the warning signals becomes shorter as the clear-
ance is reduced.
A continuous tone sounds from a distance of approx. 30 cm (area ) - danger area.
You should not reverse any further after this signal sounds! If the vehicle is
equipped with a factory-fitted towing device*, the border of the danger area starts -
continuous tone - 5 cm further behind th e vehicle. The vehicle can be extended
through an installed deta chable towing device.
On vehicles equipped with a factory-fitted radio* or navigation system*, the distance
to the obstruction is shown graphically in the display. On vehicles with a factory-fitted
towing device, the sensors are deactivated when towing a trailer. The driver is informed
about this by a graphic display (vehicle towing a trailer) in the radio* or the navigation*
display. The factory-fitted radio* or navigati on system* can be set so that the play func-
tion volume decreases when activating the parking aid, see Owner's Manual radio* or
navigation system*. This improves the audibility of the parking aid.
Fig. 114 Parking aid: Detection range of
rear sensors
AA
AB
s43s.1.book Page 111 Thursday, May 13, 2010 1:21 PM