2010 PORSCHE BOXSTER S Wheel
[x] Cancel search: WheelPage 235 of 294
Practical Tips, Emergency Service
233
E Maximum Load rating
The maximum load in kilograms and pounds can
be carried by the tire. If you replace tires always
use a tire that has the same maximum load rating
as the factory installed tire.
FRadial
The identification indicates if the tire has radial
structure.
G Term of tubeless or tube tire
Identification for tubeless tires.Speed code letterThe speed code letter indicates the maximum per-
missible speed for the tire.
This code letter is shown on the tire sidewall.Tip on driving
Tires with a maximum speed rating that is lower
than the specified maximum vehicle speed may be
mounted only if they bear an M+S identification on
the tire sidewall.
f
Please note that in addition to the winter tires,
all-season and all-terrain tires are also subject
to speed limits and bear this identification.
Inscription on light alloy wheelsMaintenance note
fProtect the valve inserts against soiling with
valve caps.
Use only plastic valve caps.
Soiled valve inserts can cause a gradual loss
of air.
Note on operation
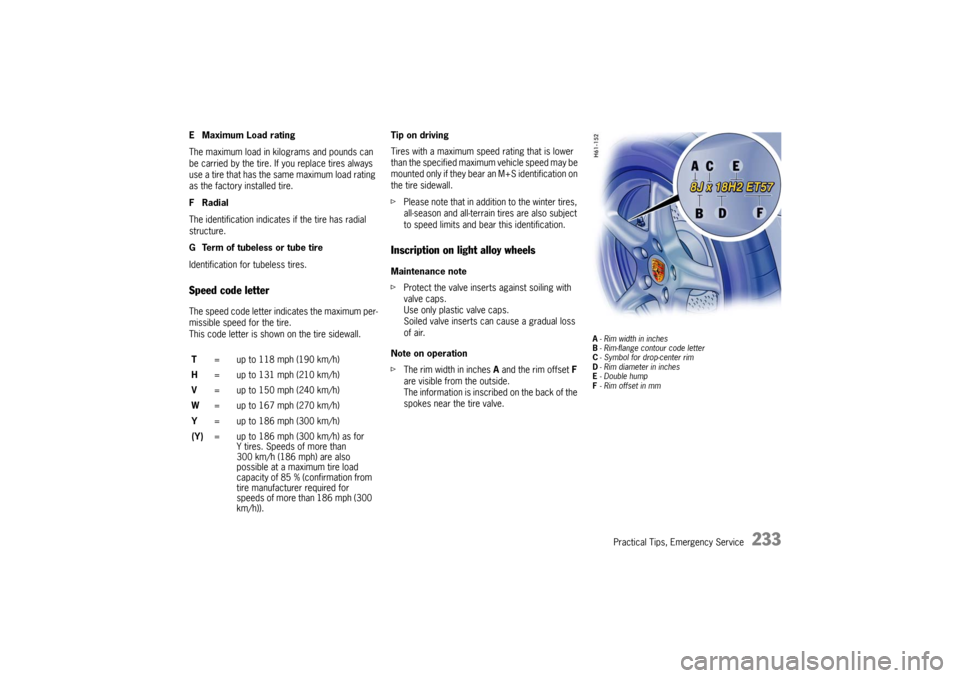
f The rim width in inches A and the rim offset F
are visible from the outside.
The information is inscri bed on the back of the
spokes near the tire valve.
A - Rim width in inches
B - Rim-flange contour code letter
C - Symbol for drop-center rim
D - Rim diameter in inches
E -Double hump
F - Rim offset in mm
T = up to 118 mph (190 km/h)
H = up to 131 mph (210 km/h)
V = up to 150 mph (240 km/h)
W = up to 167 mph (270 km/h)
Y = up to 186 mph (300 km/h)
(Y) = up to 186 mph (300 km/h) as for
Y tires. Speeds of more than
300 km/h (186 mph) are also
possible at a maximum tire load
capacity of 85 % (confirmation from
tire manufacturer required for
speeds of more than 186 mph (300
km/h)).
Page 238 of 294
236
Practical Tips, Emergency Service
Wheel Bolts
Danger!
Risk of wheel bolt breakage and wheel sepa-
ration, resulting in serious personal injury or
death.
f Follow all instructions concerning wheel bolts. f
Always clean the wheel bolts before fitting.
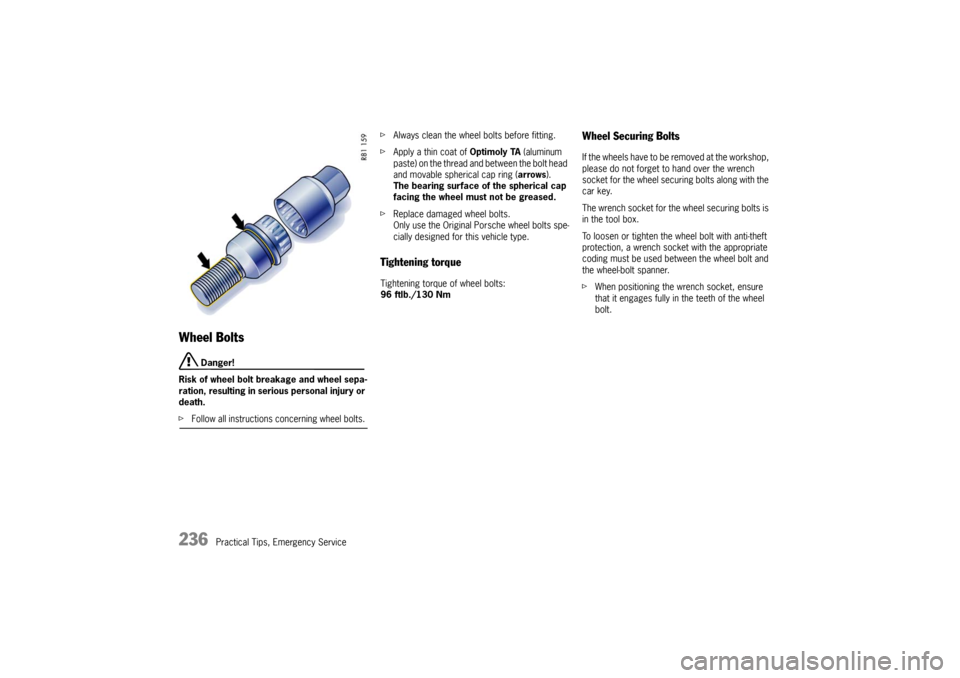
f Apply a thin coat of Optimoly TA (aluminum
paste) on the thread and between the bolt head
and movable spherical cap ring ( arrows).
The bearing surface of the spherical cap
facing the wheel must not be greased.
f Replace damaged wheel bolts.
Only use the Original Porsche wheel bolts spe-
cially designed for this vehicle type.
Tightening torque Tightening torque of wheel bolts:
96 ftlb./130 Nm
Wheel Securing Bolts If the wheels have to be removed at the workshop,
please do not forget to hand over the wrench
socket for the wheel securing bolts along with the
car key.
The wrench socket for the wheel securing bolts is
in the tool box.
To loosen or tighten the wheel bolt with anti-theft
protection, a wrench sock et with the appropriate
coding must be used be tween the wheel bolt and
the wheel-bolt spanner.
f When positioning the wr ench socket, ensure
that it engages fully in the teeth of the wheel
bolt.
Page 239 of 294

Practical Tips, Emergency Service
237
Changing a wheel
Warning!
Risk of serious personal injury or death. The
car may slip off the jack.
f Make sure that no one is in the vehicle when
jacking up and changing a wheel.
f Always place the car on stable supports if work
has to be carried out under the car.
Risk of damage to the brake discs of the
Porsche Ceramic Composite Brake (PCCB).
f Always screw in both assembly aids when changing a wheel.
Note
The tools required for changing a wheel (e.g. jack,
wheel bolt wrench, assembly aids) are not sup-
plied with the car.
Your authorized Porsche dealer will be pleased to
advise you.
1. Apply the handbrake fully and engage 1st gear or PDK selector-lever position P and remove
the ignition key.
2. Switch on the hazard warning lights if neces- sary.
3. Secure the car against rolling away, e.g. by
means of wedges under the wheels on the op-
posite side.
This is particularly important on slopes. 4. Slightly slacken the whee
l bolts of the wheel to
be changed.
5. Lift the car only at the specified jacking points.
6. Raise the car until the wheel lifts off the ground.
Please see the chapter “LIFTING THE VEHICLE
WITH A LIFTING PLATFORM OR GARAGE LIFT”
on Page 242.
7. Remove 1 or 2 wheel bolts (see respective illustration).
8. Screw in assembly aids instead of the wheel bolts.
Screw in assembly aid for
cars
without Porsche
Ceramic Composite Brake
9. Remove the remaining wheel bolts.
Note on operation
f To remove or mount the spacers:
Please see the chapter “SPACERS” on
Page 243.
Page 240 of 294

238
Practical Tips, Emergency Service
Screw in two assembly aids for
cars
with Porsche
Ceramic Composite Brake
10.Take the wheel off and put a new wheel on.
Please see the chapter “WHEEL BOLTS” on
Page 236.
11.Insert wheel bolts and tighten by hand.
12.Remove assembly aids, screw in remaining wheel bolts.
Initially tighten bolts only slightly in diagonally
opposite sequence so that the wheel
is centred.
13.Inflate the tire if necessary. Please see the chapter “TIRE PRESSURE FOR
COLD TIRES (68 °F/20 °C)” on Page 277.
14.Lower the car fully and remove the jack.
15.Tighten wheel bolts in diagonally opposite sequence.
f Immediately after changing a wheel, use
a torque wrench to check the prescribed
tightening torque (96 ftlb./130 Nm).
Note on operation for vehicles with Tire Pressure
Monitoring
f On vehicles with Tire Pressure Monitoring, the
settings on the on-board computer must be
updated after the wheel change.
f Please see the chapter “TPM TIRE PRESSURE
MONITORING” on Page 147.
Checking tire pressure with a
pressure gage1. Remove the valve stem cap from the tire.
2. Press the pressure gage onto the valve stem.
Note on operation
fDo not press too hard or force the valve stem
sideways, or air will escape.
If the sound of air escaping from the tire is
heard, reposition the pressure gage.
3. Read the tire pressure on the gage stem and compare it to the permissble tire pressure.
This information can be found on the tire pres-
sure plate or in the chapter Technical Data.
Please see the chapter “TIRE PRESSURE FOR
COLD TIRES (68 °F/20 °C)” on Page 277.
4. Remove the pressure gage.
f Please see the chapter “TPM TIRE PRESSURE
MONITORING” on Page 147.
Page 243 of 294
Practical Tips, Emergency Service
241
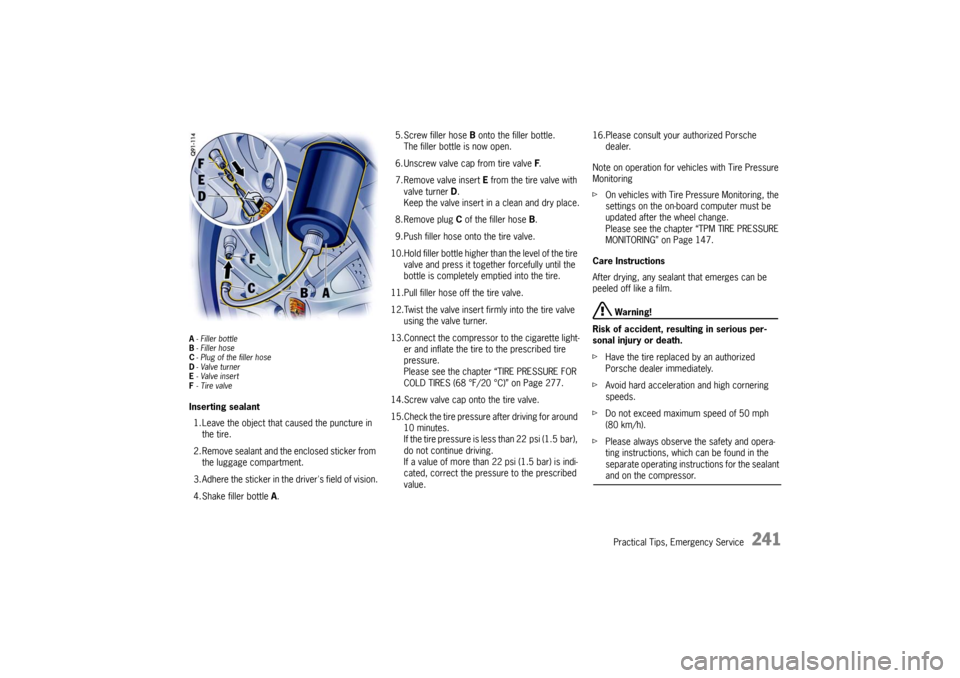
A- Filler bottle
B - Filler hose
C - Plug of the filler hose
D -Valve turner
E -Valve insert
F - Tire valveInserting sealant
1. Leave the object that caused the puncture in the tire.
2. Remove sealant and the enclosed sticker from the luggage compartment.
3. Adhere the sticker in the driver's field of vision.
4. Shake filler bottle A. 5. Screw filler hose B
onto the filler bottle.
The filler bottle is now open.
6. Unscrew valve cap from tire valve F.
7. Remove valve insert E from the tire valve with
valve turner D.
Keep the valve insert in a clean and dry place.
8. Remove plug C of the filler hose B.
9. Push filler hose onto the tire valve.
10.Hold filler bottle higher than the level of the tire valve and press it together forcefully until the
bottle is completely emptied into the tire.
11.Pull filler hose off the tire valve.
12.Twist the valve insert fi rmly into the tire valve
using the valve turner.
13.Connect the compressor to the cigarette light- er and inflate the tire to the prescribed tire
pressure.
Please see the chapter “TIRE PRESSURE FOR
COLD TIRES (68 °F/20 °C)” on Page 277.
14.Screw valve cap onto the tire valve.
15.Check the tire pressure after driving for around 10 minutes.
If the tire pressure is less than 22 psi (1.5 bar),
do not continue driving.
If a value of more than 22 psi (1.5 bar) is indi-
cated, correct the pressure to the prescribed
value. 16.Please consult your authorized Porsche
dealer.
Note on operation for vehicles with Tire Pressure
Monitoring
f On vehicles with Tire Pressure Monitoring, the
settings on the on-board computer must be
updated after the wheel change.
Please see the chapter “TPM TIRE PRESSURE
MONITORING” on Page 147.
Care Instructions
After drying, any sealan t that emerges can be
peeled off like a film.
Warning!
Risk of accident , resulting in serious per-
sonal injury or death.
f Have the tire replaced by an authorized
Porsche dealer immediately.
f Avoid hard acceleration and high cornering
speeds.
f Do not exceed maximum speed of 50 mph
(80 km/h).
f Please always observe the safety and opera-
ting instructions, which can be found in the
separate operating instructions for the sealant and on the compressor.
Page 245 of 294
Practical Tips, Emergency Service
243
SpacersfUse the spacers only together with wheels and
fastening parts approved by Porsche.
Before having spacers fitted, find out about the
current approval status.
Mounting an emergency spare wheel
If 5 mm spacers are mounted, these must not be
removed to mount an emergency spare wheel.
Fitting snow chains
The use of snow chains is not permitted when
5 mm spacers are mounted.
Caution!
Risk of damage to the wheel housings if the
5 mm spacers are not removed before fitting
snow chains.
f To permit the fitting of snow chains, have the 5 mm spacers removed on all 4 wheels.Note on operation
f
To fit/remove the spacers:
Please consult an authorized Porsche dealer.
f Please see the chapter “CHANGING A WHEEL”
on Page 237.
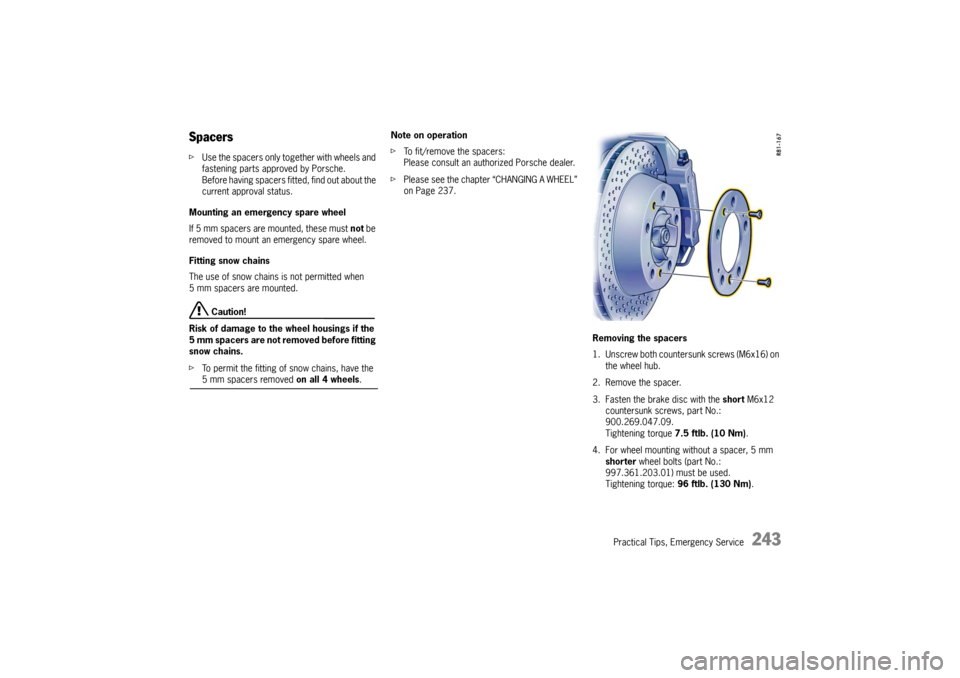
Removing the spacers
1. Unscrew both countersunk screws (M6x16) on the wheel hub.
2. Remove the spacer.
3. Fasten the brake disc with the short M6x12
countersunk screws, part No.:
900.269.047.09.
Tightening torque 7.5 ftlb. (10 Nm) .
4. For wheel mounting without a spacer, 5 mm
shorter wheel bolts (part No.:
997.361.203.01 ) must be used.
Tightening torque: 96 ftlb. (130 Nm) .
Page 246 of 294
244
Practical Tips, Emergency Service
Mounting the spacers
1. Remove wheel.
2. Unscrew both countersunk screws (M6x12) on
the break disc.
3. Fasten the spacer with the long M6x16
countersunk screws.
Tightening torque 7.5 ftlb. (10 Nm) .
4. Fit wheel. To do this use the longer wheel
bolts for fastening the wheels.
Tightening torque: 96 ftlb. (130 Nm) .
f Please see the chapter “CHANGING A WHEEL”
on Page 237.
Required scope of parts if the spacers are
removed
Short countersunk screws (M6x12)
Part No: 900.269.047.09
1 set short wheel bolts
Part No: 997.361.203.01
Short anti-theft protection
Part No: 996.361.057.01
f For information on the spacers: Please see the
chapter “SPACERS” on Page 243.
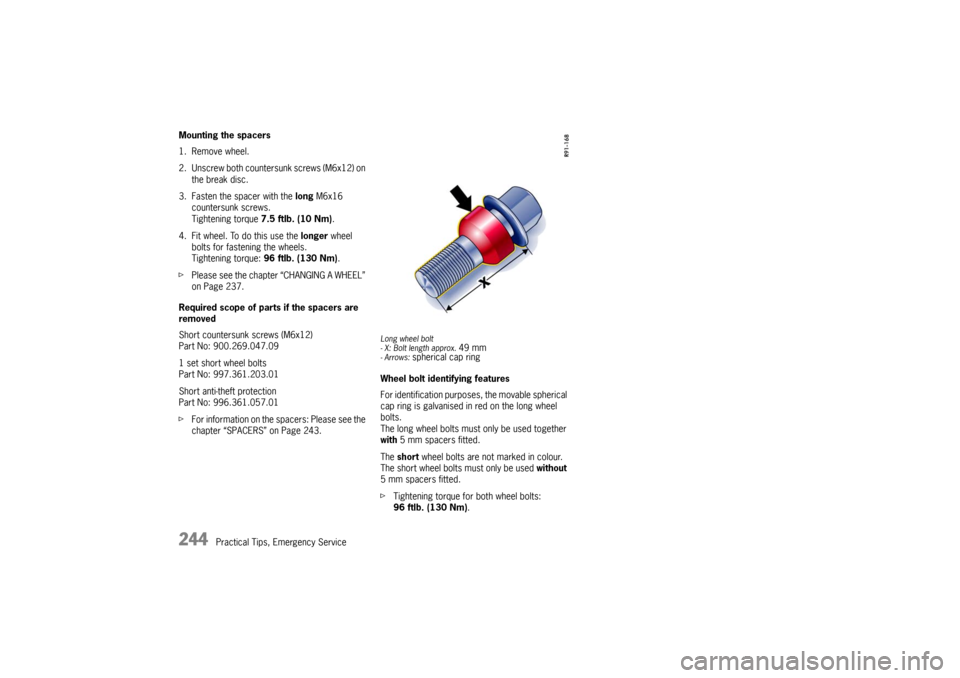
Long wheel bolt
- X: Bolt length approx.
49 mm
- Arrows:
spherical cap ring
Wheel bolt identifying features
For identification purposes, the movable spherical
cap ring is galvanised in red on the long wheel
bolts.
The long wheel bolts must only be used together
with 5 mm spacers fitted.
The short wheel bolts are not marked in colour.
The short wheel bolts must only be used without
5 mm spacers fitted.
f Tightening torque for both wheel bolts:
96 ftlb. (130 Nm) .
Page 267 of 294
Practical Tips, Emergency Service
265
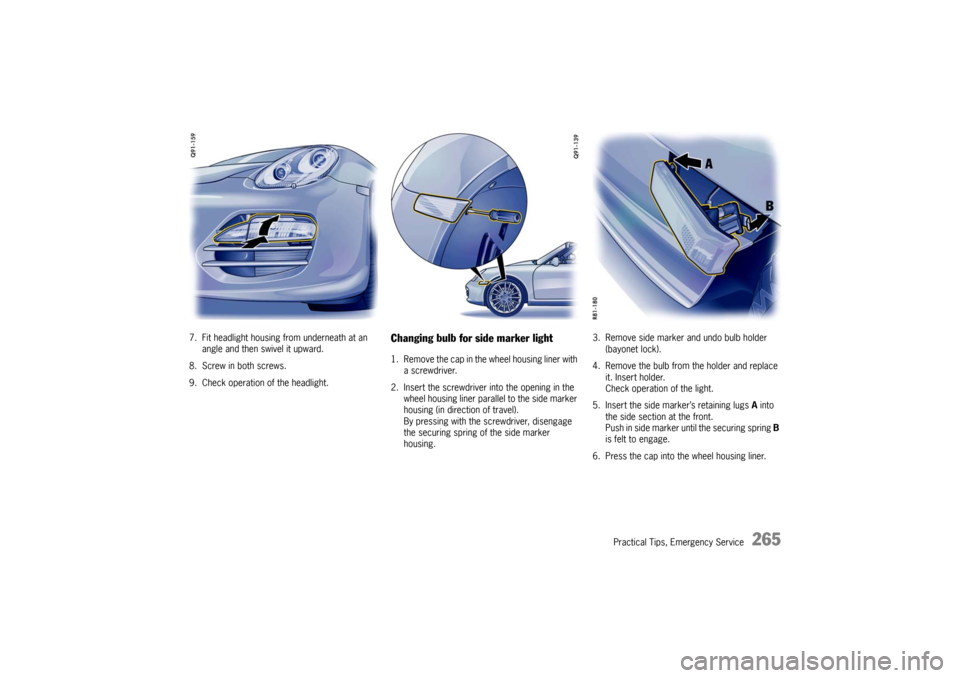
7. Fit headlight housing from underneath at an angle and then swivel it upward.
8. Screw in both screws.
9. Check operation of the headlight.
Changing bulb for side marker light1. Remove the cap in the wheel housing liner with
a screwdriver.
2. Insert the screwdriver into the opening in the wheel housing liner parallel to the side marker
housing (in direction of travel).
By pressing with the screwdriver, disengage
the securing spring of the side marker
housing. 3. Remove side marker and undo bulb holder
(bayonet lock).
4. Remove the bulb from the holder and replace it. Insert holder.
Check operation of the light.
5. Insert the side marker’s retaining lugs A into
the side section at the front.
Push in side marker until the securing spring B
is felt to engage.
6. Press the cap into the wheel housing liner.