Page 115 of 294
Automatic air conditioning system, Heated rear window/Door mirror heating
113
The heated rear window/door mirror heating is
ready for operation when the ignition is on.
Switching onfPress button.
The light-emitting diode in the button lights up.
After approx. 15 minutes, the heating switches off
automatically.
The heater can be switched back on by pressing
the button again.Switching offf Press button.
The light-emitting diode in the button goes out.
Heated Rear Window/Door
Mirror Heating
Page 116 of 294
114
Automatic air conditioning system, Heated rear window/Door mirror heating
Page 184 of 294

182
Mobile Roofs
Convertible TopBrief operating instructions can be found on the
back side of the driver’s sun visor.
fPlease see the chapter “CAR CARE INSTRUC-
TIONS” on Page 213.
Warning!
When opening or closing the convertible top,
serious personal injury may occur if a per-
son’s body parts are near or in the way of the
convertible top mechanism’s moving parts.
f Make absolutely sure that nobody can be
injured by the convertible-top mechanism or the convertible-top compartment lid.
Do not operate convertible top:
– At temperatures below 32 °F/0 °C.
– When one side of the ca r is on a curb, a hoist
or a jack.
– When items of luggage or other objects hinder the convertible top movement.
f Drive only with the convertible top fully open or
closed (end positions). f
Items of luggage or objects on the luggage
tray above the engine compartment lid must
be put in the storage box or be secured to
prevent their sliding out. These items must not
be in abrasive contact with the convertible top
or rear window. Keep s hutters of the storage
box closed while driving.
f Avoid frequent operation of the convertible top
with the engine off; the vehicle battery would
be unintentionally discharged rapidly.
f When opening or closing the convertible top,
ensure there is sufficient clearance above the
convertible top (e.g. in the garage).
f To prevent damp stains and abrasions, only
open the convertible top in a dry, clean state.
f Park your car in the shade whenever possible,
as the fabric, rubber ma terial and color can be
harmed by long exposure to sunlight.
f The convertible top may only be actuated
during driving on even surfaces.
f The convertible top must not be used with
strong counter wind (over approx. 50 mph/
80 km/h).
Conditions for operating the convertible
top – The ignition must be switched on
(engine running or off).
– Maximum speed 30 mph (50 km/h) The opening/closing process of the convertib-
le top will be interrupted if the maximum speed
is exceeded.
f Reduce speed.
Press button again.
The opening/closing process is ended.
Page 191 of 294
Mobile Roofs
189
WindstopfMake sure that all windstop parts are fastened
securely, especially when driving with the con-
vertible top open.
Note
When the convertible top is closed, it is a good
idea to remove the center section of the windstop
to permit good ventilation of the interior or for
demisting the rear window.
This is particularly the ca se in cold, wet weather.
Removing outer windstop partsfPress windstop parts to the rear and up out of
the roll-over bar and take it out.Installing outer windstop partsfFirst insert the windstop parts in the roll-over
bar from the rear, then push it up into the bar.
f Make sure that the three plastic tongues A fully
engage in the roll-over bar.
Removing central section of windstop
parts f Press release buttons B and take out the wind-
stop toward the rear. Installing center section of windstopf First insert the windstop in receiver C from the
rear, then, one after the other, press forward
until both upper mounts B engage audibly.
Page 193 of 294
Mobile Roofs
191
4. Remove the connector of the convertible top heated rear window and insert into the rear
empty socket. 5. Remove cover from front locking lever
(arrow ). 6. Press red locking button of the front locking
lever (arrow A ).
Open latch completely (arrow B).
Page 196 of 294
194
Mobile Roofs
Removing the hardtop1. Make sure that the hardtop is placed on a clean, soft surface.
2. Open doors.
3. Remove cover from the front locking lever.
4. Open front latch.
5. Open rear pivot locks (swivel inwards). Unplug plug of the hardtop heated rear win-
dow.
6. With one person on each side, grasp the hard- top.
Lift hardtop at rear and pull out of the sockets
on the windshield frame at front.
Warning!
Danger of pinching fingers or hands.
f Evenly lift the hardtop at both sides.
7. Carefully lift the hardto p up and off the vehicle
to the rear.
8. Close front hardtop latch. Fit cover on the front latch.
9. Close pivot locks on the vehicle with the plastic covers.
10.Remove the connector of the convertible top
heated rear window from the empty socket
and insert into the socket. 11.Swivel the sash guide of
the seat belt forward.
Insert the lower retaining lugs of the cover
from above and clip in the upper retaining lugs
on the bar.
Page 204 of 294

202
Maintenance, Car Care
Brake Fluid LevelfPlease see the chapter “EXERCISE EXTREME
CAUTION WHEN WORKING ON YOUR VEHICLE”
on Page 196.
f Use only new (unused) Original Porsche
brake fluid.
Warning!
Brake fluid is hazardous to your health, and
may be fatal if swallowed.
Brake fluid also attacks paintwork.
f Keep brake fluid out of children’s reach.
f Take care while topping off brake fluid not to
soil the luggage compartment or items of lug-gage.
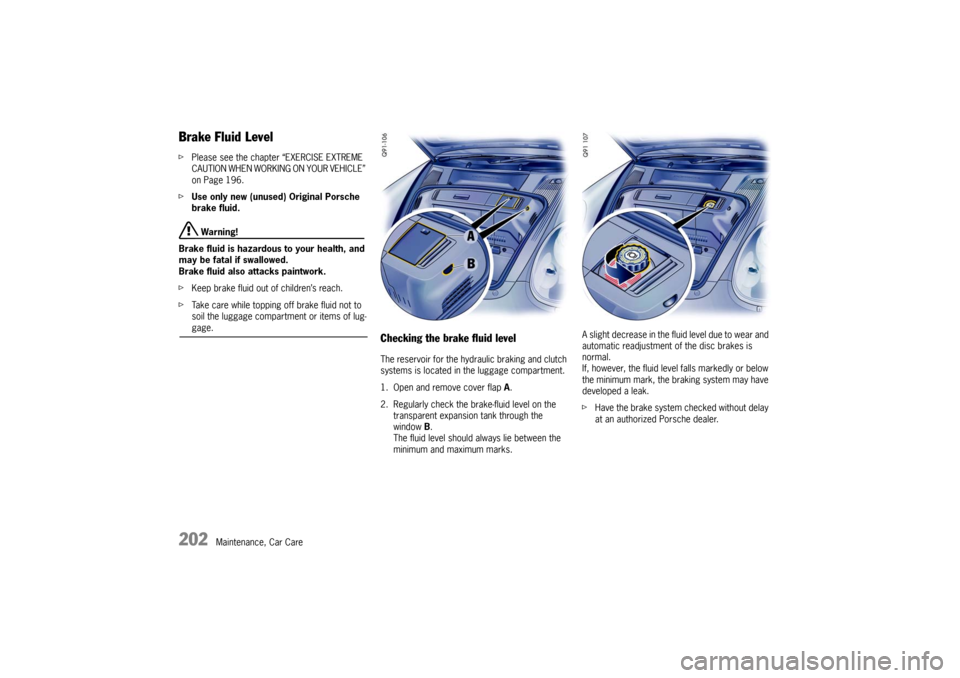
Checking the brake fluid levelThe reservoir for the hydraulic braking and clutch
systems is located in the luggage compartment.
1. Open and remove cover flap A.
2. Regularly check the brake-fluid level on the transparent expansion tank through the
window B.
The fluid level should always lie between the
minimum and maximum marks. A slight decrease in the fluid level due to wear and
automatic readjustment of
the disc brakes is
normal.
If, however, the fluid level falls markedly or below
the minimum mark, the br aking system may have
developed a leak.
f Have the brake system checked without delay
at an authorized Porsche dealer.
Page 212 of 294

210
Maintenance, Car Care
Washer FluidCapacity – Without headlight cleaning system:approximately 2.6 quarts (2.5 liters).
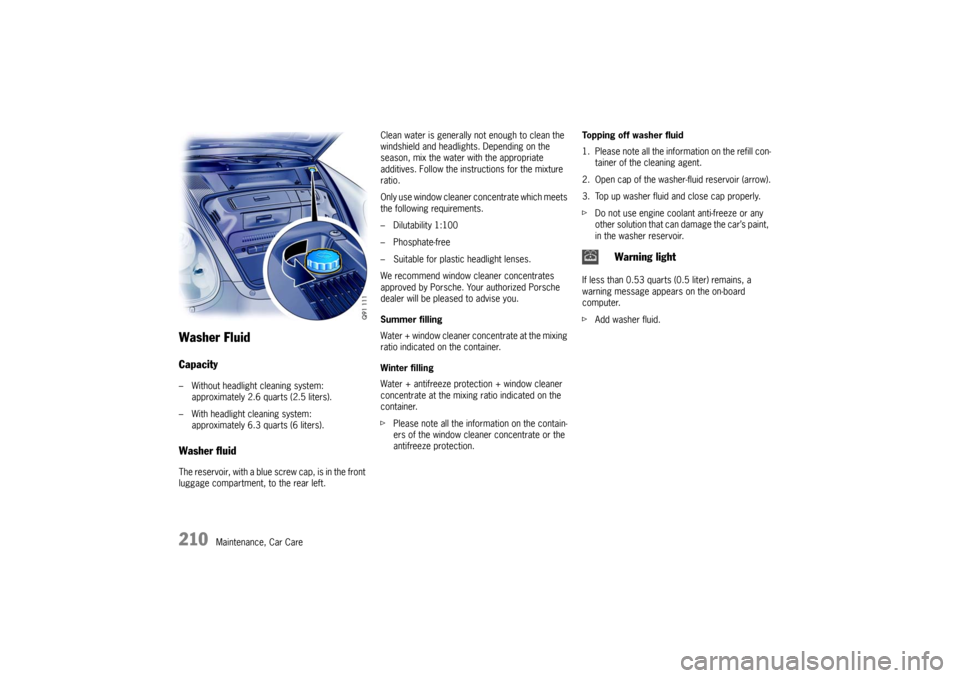
– With headlight cleaning system: approximately 6.3 quarts (6 liters). Washer fluidThe reservoir, with a blue screw cap, is in the front
luggage compartment, to the rear left. Clean water is generally
not enough to clean the
windshield and headlights. Depending on the
season, mix the water with the appropriate
additives. Follow the instructions for the mixture
ratio.
Only use window cleaner concentrate which meets
the following requirements.
– Dilutability 1:100
– Phosphate-free
– Suitable for plastic headlight lenses.
We recommend window cleaner concentrates
approved by Porsche. Your authorized Porsche
dealer will be pleased to advise you.
Summer filling
Water + window cleaner concentrate at the mixing
ratio indicated on the container.
Winter filling
Water + antifreeze protection + window cleaner
concentrate at the mixing ratio indicated on the
container.
f Please note all the info rmation on the contain-
ers of the window cleaner concentrate or the
antifreeze protection. Topping off washer fluid
1. Please note all the info
rmation on the refill con-
tainer of the cleaning agent.
2. Open cap of the washer-fluid reservoir (arrow).
3. Top up washer fluid and close cap properly.
f Do not use engine coolant anti-freeze or any
other solution that can damage the car’s paint,
in the washer reservoir.
If less than 0.53 quarts (0.5 liter) remains, a
warning message appears on the on-board
computer.
f Add washer fluid.
Warning light