Page 52 of 318

If the airbag readiness light and the
OFF light in the passenger airbag
status indicator come on together,
it may mean there is a malfunction
in the passenger sensing system.
Secure the child in the child restraint
in a rear seat position in the vehicle
and check with your dealer/retailer.
{CAUTION
If the airbag readiness light ever
comes on and stays on, it means
that something may be wrong with
the airbag system. To help avoid
injury to yourself or others, have
the vehicle serviced right away.
SeeAirbag Readiness Light on
page 4-12 for more information,
including important safety
information.
If the On Indicator is Lit for a
Child Restraint
If a child restraint has been installed
and the on indicator is lit:
1. Turn the vehicle off.
2. Remove the child restraint from the vehicle.
3. Remove any additional items from the seat such as blankets,
cushions, seat covers, seat
heaters, or seat massagers.
4. Reinstall the child restraint with the ignition key in the ACC or
LOCK position while following the
directions provided by the child
restraint manufacturer and refer
toSecuring Child Restraints
(Rear Seat Position) on
page 2-51 orSecuring Child
Restraints (Right Front Seat
Position) on page 2-53 .5. If, after reinstalling the child
restraint and restarting the
vehicle, the on indicator is still lit,
turn the vehicle off. Then slightly
recline the vehicle seatback
and adjust the seat cushion, if
adjustable, to make sure that the
vehicle seatback is not pushing
the child restraint into the seat
cushion.
6. Also make sure the child restraint is not trapped under the vehicle
head restraint. If this happens,
adjust the head restraint.
See Head Restraints on
page 2-2.
If the on indicator is still lit, secure
the child in the child restraint in
a rear seat position in the vehicle,
and check with your dealer/retailer.
2-32 Seats and Restraints
Page 68 of 318

Securing a Child Restraint
Designed for the LATCH
System
{CAUTION
If a LATCH-type child restraint is
not attached to anchors, the child
restraint will not be able to protect
the child correctly. In a crash, the
child could be seriously injured or
killed. Install a LATCH-type child
restraint properly using the
anchors, or use the vehicle’s
safety belts to secure the restraint,
following the instructions that came
with the child restraint and the
instructions in this manual.
{CAUTION
Do not attach more than one
child restraint to a single anchor.
Attaching more than one child
restraint to a single anchor could
cause the anchor or attachment to
come loose or even break during
a crash. A child or others could
be injured. To reduce the risk of
serious or fatal injuries during a
crash, attach only one child
restraint per anchor.
{CAUTION
Children can be seriously injured
or strangled if a shoulder belt is
wrapped around their neck and
the safety belt continues to
tighten. Buckle any unused safety
belts behind the child restraint so
children cannot reach them. Pull
the shoulder belt all the way out
of the retractor to set the lock, if
your vehicle has one, after the
child restraint has been installed.
Notice: Do not let the LATCH
attachments rub against the
vehicle’s safety belts. This may
damage these parts. If necessary,
move buckled safety belts to
avoid rubbing the LATCH
attachments.
2-48 Seats and Restraints
Page 72 of 318

If the child restraint does not have
the LATCH system, you will be using
the safety belt to secure the child
restraint in this position. Be sure to
follow the instructions that came
with the child restraint. Secure the
child in the child restraint when
and as the instructions say.
If more than one child restraint
needs to be installed in the
rear seat, be sure to readWhere
to Put the Restraint on page 2-43 .
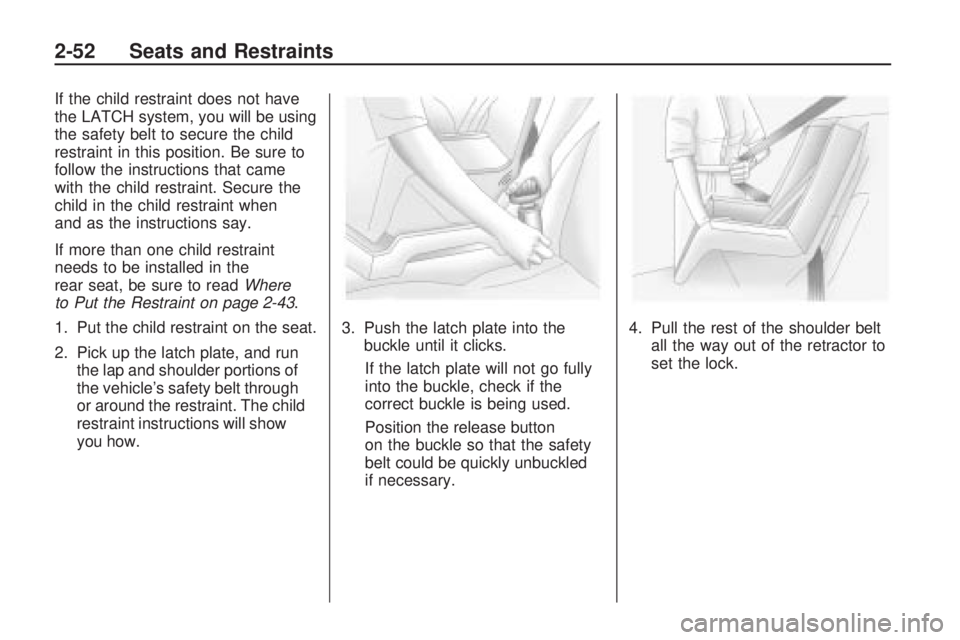
1. Put the child restraint on the seat.
2. Pick up the latch plate, and run the lap and shoulder portions of
the vehicle’s safety belt through
or around the restraint. The child
restraint instructions will show
you how. 3. Push the latch plate into the
buckle until it clicks.
If the latch plate will not go fully
into the buckle, check if the
correct buckle is being used.
Position the release button
on the buckle so that the safety
belt could be quickly unbuckled
if necessary. 4. Pull the rest of the shoulder belt
all the way out of the retractor to
set the lock.
2-52 Seats and Restraints
Page 75 of 318

You will be using the lap-shoulder
belt to secure the child restraint in
this position. Follow the instructions
that came with the child restraint.
1. Move the seat as far back asit will go before securing the
forward-facing child restraint.
When the passenger sensing
system has turned off the right
front passenger frontal and
seat-mounted side impact airbag,
the off indicator on the passenger
airbag status indicator should
light and stay lit when you start
the vehicle. See Passenger
Airbag Status Indicator on
page 4-13.
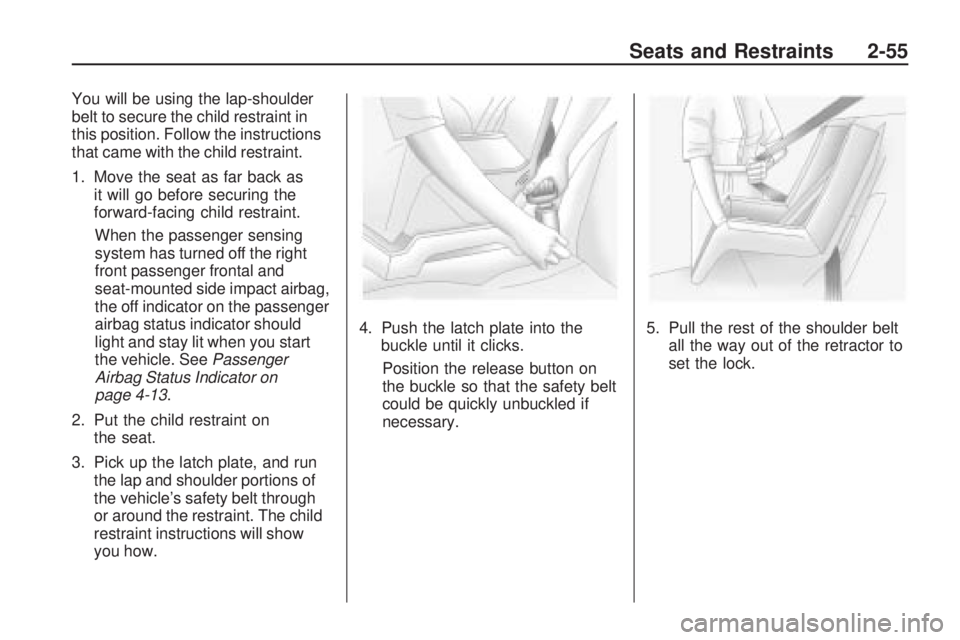
2. Put the child restraint on the seat.
3. Pick up the latch plate, and run the lap and shoulder portions of
the vehicle’s safety belt through
or around the restraint. The child
restraint instructions will show
you how. 4. Push the latch plate into the
buckle until it clicks.
Position the release button on
the buckle so that the safety belt
could be quickly unbuckled if
necessary. 5. Pull the rest of the shoulder belt
all the way out of the retractor to
set the lock.
Seats and Restraints 2-55
Page 78 of 318

Front Storage
The driver storage compartment
is located near the left side of the
steering column on the bottom of the
instrument panel. Pull up on the lever
to open the cover.
Overhead Console
If your vehicle has an overhead
console, push on the cover to open.
Center Console Storage
To access the center console
storage area, pull up on the lock
release lever to raise the upper cover
and access the tray storage. Pull up
on the lower release lever to raise
the tray and access more storage.
Additional Storage
Features
Cargo Cover
For vehicles equipped with a
cargo cover.
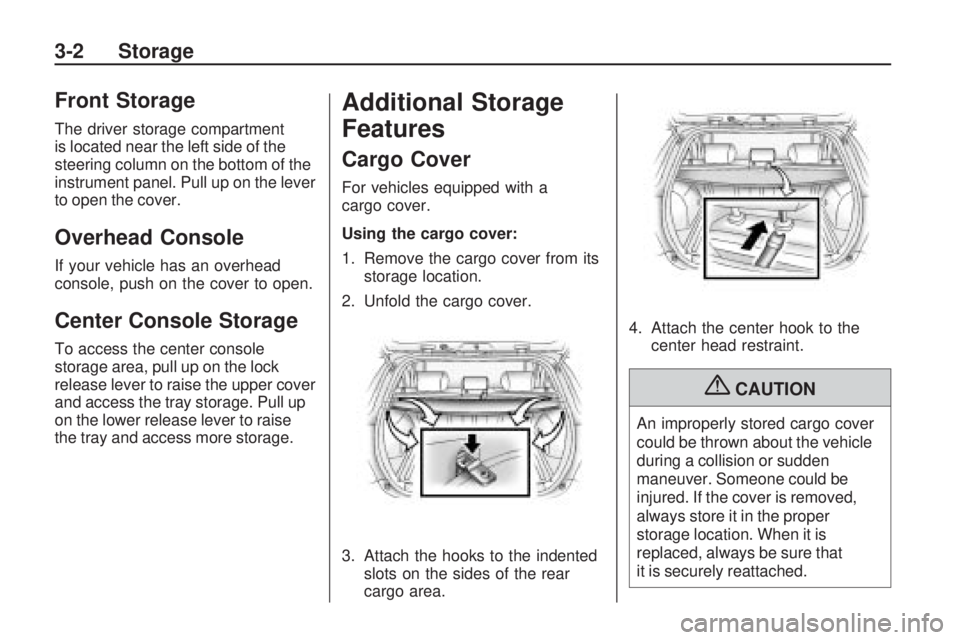
Using the cargo cover:
1. Remove the cargo cover from itsstorage location.
2. Unfold the cargo cover.
3. Attach the hooks to the indented slots on the sides of the rear
cargo area. 4. Attach the center hook to the
center head restraint.
{CAUTION
An improperly stored cargo cover
could be thrown about the vehicle
during a collision or sudden
maneuver. Someone could be
injured. If the cover is removed,
always store it in the proper
storage location. When it is
replaced, always be sure that
it is securely reattached.
3-2 Storage
Page 80 of 318

Load Rails and Hooks
There are hooks for hanging items
in the cabin, luggage compartment,
and in the cargo management
system, if the vehicle has one.
On the front passenger side, press
the hook to open and use it. There is
a weight limit of 44 lb (20 kg).
The luggage compartment hooks
should only be used to hang
items under 7 lb (3 kg).
For vehicles with a cargo
management system, open the deck
lid to hang items under 5 lb (2.3 kg).
Cargo Tie Downs
The cargo tie down straps and
hooks are intended to be used to
secure a flat tire or other items.
The tie down hooks are located in
the rear cargo area. The straps are
under the rear floor panel.
To use, hook the end of the straps
to the hooks in a criss-cross pattern.
Pull on the straps at the buckle to
tighten as needed.
Cargo Management
System
A cargo management system, for
vehicles that have it, can be used for
organizing and separating items
in the rear of the vehicle.To use:
1. Open the cover.
2. Unfold the side panels out and
lock them into place to hold up
the cover.
3. Hook the nets into the cover slots to use as dividers.
There are also hooks on the inside
cover to hold items.
Additional storage is available on
both sides of the cargo management
system. Turn the knobs to the
UNLOCK position, and remove
the deck boards to access the
storage area.
3-4 Storage
Page 83 of 318

Instruments and
Controls
Instrument Panel OverviewInstrument Panel Overview.....4-2
ControlsSteering Wheel Adjustment.....4-4
Steering Wheel Controls .........4-4
Horn ...................................
.4-5
Windshield Wiper/Washer .......4-5
Rear Window Wiper/Washer . . . .4-6
Power Outlets (Accessory Power Outlets) ....................
.4-6
Power Outlets (115 Volt Alternating Current) .............
.4-7
Cigarette Lighter ..................
.4-8
Ashtrays .............................
.4-8
Warning Lights, Gages, and
Indicators
Warning Lights, Gages, and
Indicators ..........................
.4-8
Instrument Cluster ................
.4-9
Speedometer .....................
.4-10
Odometer ..........................
.4-10
Trip Odometer ....................
.4-10
Tachometer .......................
.4-10
Fuel Gage .........................
.4-10
Engine Coolant Temperature Gage .............4-11
Safety Belt Reminders ..........4-11
Airbag Readiness Light .........4-12
Passenger Airbag Status Indicator ..........................
.4-13
Charging System Light .........4-14
Malfunction Indicator Lamp .................
.4-14
Brake System Warning Light ...............................
.4-17
Antilock Brake System (ABS) Warning Light ...........4-17
Service All-Wheel Drive Light ...............................
.4-18Speed Sensitive Power
Steering (SSPS) Warning
Light ...............................
.4-18
StabiliTrak®Indicator Light . . . .4-18
Traction Control System (TCS) Warning Light ...........4-19
Tire Pressure Light .............
.4-19
Engine Oil Pressure Light .....4-19
Low Fuel Warning Light ........4-20
Security Light .....................
.4-20
High-Beam on Light .............4-20
Fog Lamp Light ..................
.4-20
Lamps on Reminder .............4-20
Taillamp Indicator Light .........4-21
Low Washer Fluid Warning Light ...............................
.4-21
Cruise Control Light .............4-21
Door Ajar Light ...................
.4-21
Vehicle PersonalizationVehicle Personalization .........4-21
OnStar SystemOnStar®System.................
.4-23
Instruments and Controls 4-1
Page 86 of 318

Controls
Steering Wheel
Adjustment
A tilt and telescope wheel lets the
steering wheel position be adjusted.
The adjustment lever is located on
the left side of the steering column.
Pull the lever down to move the
steering wheel up or down and in
or out. Pull the lever up to lock the
steering wheel in place.
Do not adjust the tilt and telescope
lever while driving.
Steering Wheel Controls
For vehicles with audio steering
wheel controls some audio controls
can be adjusted at the steering
wheel. They include the following:
−
q+ (Volume):Press to decrease
or increase the volume.
ª«(Next/Previous): Press to
select the next or previous radio
station, CD track, or MP3 folder.
•Pressªor«to go to the next
or previous preset station.
•Press and holdªor«until a
beep is heard to go to the next
or previous radio station. Only
stations with a strong signal will
be selected.
•Pressªor«to go to the next
or previous CD track.
•Press and holdªor«until a
beep is heard to continuously go
to the next or previous track.
MODE: Press to turn the audio
system on or to select between AM,
FM, XM™ (if equipped), CD, or AUX.
Press and hold to turn the audio
system off.
4-4 Instruments and Controls