2010 PONTIAC VIBE flat tire
[x] Cancel search: flat tirePage 185 of 318

Vehicle Care
General InformationGeneral Information..............
.9-2
California Proposition 65 Warning ........................
.9-2
California Perchlorate Materials Requirements ........9-3
Accessories and Modifications ......................
.9-3
Vehicle ChecksDoing Your Own
Service Work .....................
.9-4
Hood ..................................
.9-5
Engine Compartment Overview ...........................
.9-6
Engine Oil ...........................
.9-9
Automatic Transmission Fluid ...............................
.9-12
Manual Transmission Fluid . . . .9-14
Hydraulic Clutch .................
.9-15
Engine Air Cleaner/Filter .......9-16
Cooling System ..................
.9-19
Engine Coolant ..................
.9-19Engine Overheating
.............9-23
Power Steering Fluid ............9-24
Washer Fluid .....................
.9-24
Brakes ..............................
.9-26
Brake Fluid ........................
.9-27
Battery ..............................
.9-28
All-Wheel Drive ..................
.9-29
Starter Switch Check ............9-30
Wiper Blade Replacement .....9-30
Headlamp AimingHeadlamp Aiming...............
.9-32
Bulb ReplacementBulb Replacement ..............
.9-33
Halogen Bulbs ...................
.9-33
Headlamps and Parking Lamps .............................
.9-33
Taillamps ...........................
.9-35
License Plate Lamp .............9-36
Replacement Bulbs .............
.9-37
Electrical SystemElectrical System Overload . . . .9-37
Fuses and Circuit Breakers . . .9-38
Engine Compartment Fuse Block ..............................
.9-38
Instrument Panel Fuse Block ..............................
.9-41
Wheels and TiresTires.................................
.9-43
Tire Sidewall Labeling ..........9-44
Tire Designations ................
.9-46
Tire Terminology and Definitions ........................
.9-46
Tire Pressure .....................
.9-49
Tire Pressure Monitor System ............................
.9-50
Tire Pressure Monitor Operation .........................
.9-52
Tire Inspection ...................
.9-54
Tire Rotation ......................
.9-55
When It Is Time for New Tires ...............................
.9-56
Buying New Tires ...............
.9-56
Different Size Tires and Wheels ............................
.9-58
Uniform Tire Quality Grading ...........................
.9-58
Wheel Alignment and Tire Balance ...........................
.9-60
Wheel Replacement .............9-60
Tire Chains ........................
.9-61
If a Tire Goes Flat ..............
.9-62
Tire Changing ....................
.9-63
Compact Spare Tire .............9-68
Vehicle Care 9-1
Page 229 of 318

(A) Temporary Use Only:The compact spare tire or
temporary use tire has a tread
life of approximately 3,000 miles
(5 000 km) and should not be
driven at speeds over 65 mph
(105 km/h). The compact spare
tire is for emergency use when aregular road tire has lost air and
gone flat. If your vehicle has a
compact spare tire. See
Compact
Spare Tire on page 9-68 andIf a
Tire Goes Flat on page 9-62 .
(B) Tire Ply Material
:The type
of cord and number of plies
in the sidewall and under
the tread.
(C) Tire Identi�cation Number
(TIN)
:The letters and numbers
following the DOT (Department
of Transportation) code is the
Tire Identification Number (TIN).
The TIN shows the manufacturer
and plant code, tire size, and
date the tire was manufactured.
The TIN is molded onto both
sides of the tire, although only
one side may have the date of
manufacture. (D) Maximum Cold In�ation
Load Limit
:Maximum load
that can be carried and the
maximum pressure needed
to support that load.
(E) Tire In�ation
:The
temporary use tire or compact
spare tire should be inflated
to 60 psi (420 kPa). For more
information on tire pressure and
inflation see Tire Pressure on
page 9-49.
(F) Tire Size
:A combination
of letters and numbers define a
tire’s width, height, aspect ratio,
construction type, and service
description. The letter T as the
first character in the tire size
means the tire is for temporary
use only.Compact Spare Tire Example
Vehicle Care 9-45
Page 239 of 318

Tire Rotation
Tires should be rotated every
5,000 to 8,000 miles (8 000 to
13 000 km). SeeScheduled
Maintenance on page 10-3.
The purpose of a regular tire
rotation is to achieve a uniform
wear for all tires on the vehicle.
This will ensure that the vehicle
continues to perform most like it
did when the tires were new.
Any time you notice unusual
wear, rotate the tires as soon
as possible and check wheel
alignment. Also check for
damaged tires or wheels.
See When It Is Time for New
Tires on page 9-56 andWheel
Replacement on page 9-60 for
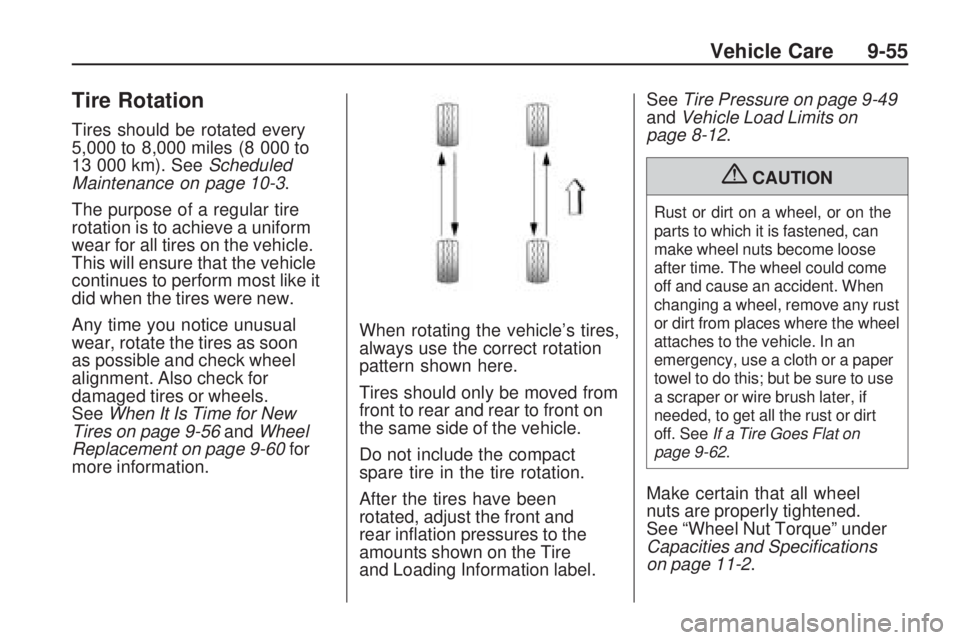
more information. When rotating the vehicle’s tires,
always use the correct rotation
pattern shown here.
Tires should only be moved from
front to rear and rear to front on
the same side of the vehicle.
Do not include the compact
spare tire in the tire rotation.
After the tires have been
rotated, adjust the front and
rear inflation pressures to the
amounts shown on the Tire
and Loading Information label.See
Tire Pressure on page 9-49
and Vehicle Load Limits on
page 8-12.
{CAUTION
Rust or dirt on a wheel, or on the
parts to which it is fastened, can
make wheel nuts become loose
after time. The wheel could come
off and cause an accident. When
changing a wheel, remove any rust
or dirt from places where the wheel
attaches to the vehicle. In an
emergency, use a cloth or a paper
towel to do this; but be sure to use
a scraper or wire brush later, if
needed, to get all the rust or dirt
off. See If a Tire Goes Flat on
page 9-62.
Make certain that all wheel
nuts are properly tightened.
See “Wheel Nut Torque” under
Capacities and Speci�cations
on page 11-2.
Vehicle Care 9-55
Page 244 of 318

Wheel Alignment and
Tire Balance
The tires and wheels on the vehicle
were aligned and balanced carefully
at the factory to give the longest tire
life and best overall performance.
Adjustments to wheel alignment and
tire balancing will not be necessary
on a regular basis. However, if there
is unusual tire wear or the vehicle
pulls to one side or the other, the
alignment should be checked. If the
vehicle vibrates when driving on a
smooth road, the tires and wheels
might need to be rebalanced.
See your dealer/retailer for proper
diagnosis.
Wheel Replacement
Replace any wheel that is bent,
cracked or badly rusted or corroded.
If wheel nuts keep coming loose, the
wheel, wheel bolts and wheel nuts
should be replaced. If the wheel
leaks air, replace it (except some
aluminum wheels, which can
sometimes be repaired). See your
dealer/retailer if any of these
conditions exist.
Your dealer/retailer will know the
kind of wheel you need.
Each new wheel should have
the same load-carrying capacity,
diameter, width, offset and be
mounted the same way as the
one it replaces.
If you need to replace any of the
wheels, wheel bolts or wheel nuts,
replace them only with new GM
original equipment parts. This way,
you will be sure to have the right
wheel, wheel bolts and wheel nuts
for the vehicle.{CAUTION
Using the wrong replacement
wheels, wheel bolts, or wheel
nuts on your vehicle can be
dangerous. It could affect the
braking and handling of your
vehicle, make your tires lose
air and make you lose control.
You could have a collision in
which you or others could be
injured. Always use the correct
wheel, wheel bolts, and wheel
nuts for replacement.
Notice: The wrong wheel can
also cause problems with bearing
life, brake cooling, speedometer
or odometer calibration, headlamp
aim, bumper height, vehicle
ground clearance, and tire or tire
chain clearance to the body and
chassis.
See If a Tire Goes Flat on page 9-62
for more information.
9-60 Vehicle Care
Page 246 of 318

If a Tire Goes Flat
It is unusual for a tire to blowout
while you are driving, especially if
you maintain your vehicle’s tires
properly. If air goes out of a tire,
it is much more likely to leak out
slowly. But if you should ever have
a blowout, here are a few tips about
what to expect and what to do:
If a front tire fails, the flat tire
creates a drag that pulls the vehicle
toward that side. Take your foot off
the accelerator pedal and grip the
steering wheel firmly. Steer to
maintain lane position, and then
gently brake to a stop well out of
the traffic lane.
A rear blowout, particularly on a
curve, acts much like a skid and
may require the same correction
you would use in a skid. In any rear
blowout remove your foot from the
accelerator pedal. Get the vehicle
under control by steering the way
you want the vehicle to go. It may bevery bumpy and noisy, but you can
still steer. Gently brake to a stop,
well off the road if possible.
{CAUTION
Lifting a vehicle and getting under
it to do maintenance or repairs is
dangerous without the appropriate
safety equipment and training. If a
jack is provided with the vehicle, it
is designed only for changing a
flat tire. If it is used for anything
else, you or others could be badly
injured or killed if the vehicle slips
off the jack. If a jack is provided
with the vehicle, only use it for
changing a flat tire.
If a tire goes flat, avoid further tire
and wheel damage by driving slowly
to a level place. Turn on the hazard
warning flashers. See Hazard
Warning Flashers on page 5-3 .
{CAUTION
Changing a tire can be dangerous.
The vehicle can slip off the jack
and roll over or fall on you or other
people. You and they could be
badly injured or even killed. Find
a level place to change your tire.
To help prevent the vehicle from
moving:
1. Set the parking brake firmly.
2. Put an automatic transmission shift lever in
P (Park), or shift a manual
transmission to 1 (First) or
R (Reverse).
3. Turn off the engine and do not restart while the vehicle
is raised.
4. Do not allow passengers to remain in the vehicle.
(Continued)
9-62 Vehicle Care
Page 247 of 318

CAUTION (Continued)
To be certain the vehicle will not
move, put blocks at the front and
rear of the tire farthest away from
the one being changed. That
would be the tire on the other
side, at the opposite end of the
vehicle.
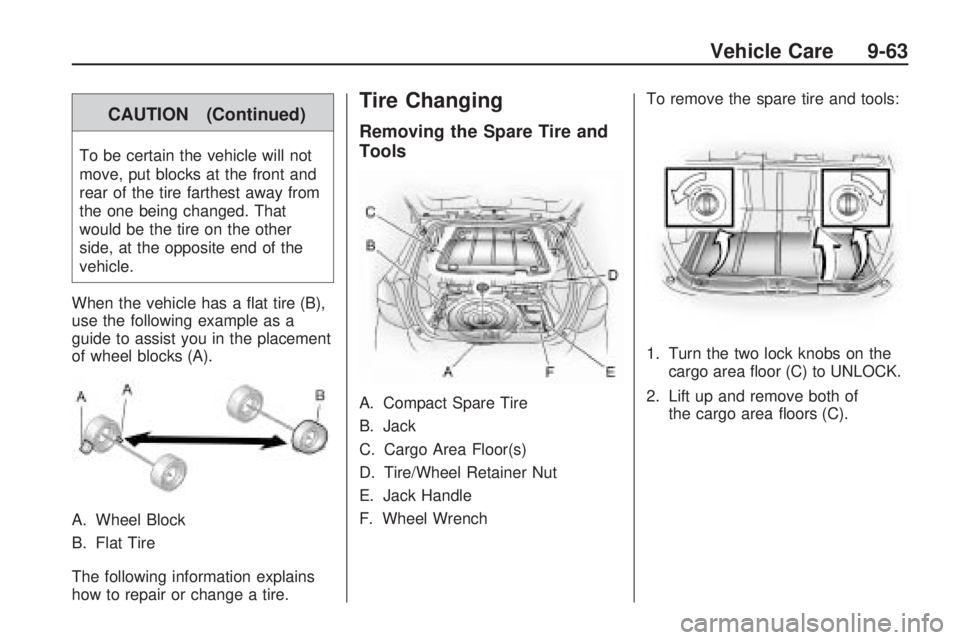
When the vehicle has a flat tire (B),
use the following example as a
guide to assist you in the placement
of wheel blocks (A).
A. Wheel Block
B. Flat Tire
The following information explains
how to repair or change a tire.
Tire Changing
Removing the Spare Tire and
Tools
A. Compact Spare Tire
B. Jack
C. Cargo Area Floor(s)
D. Tire/Wheel Retainer Nut
E. Jack Handle
F. Wheel Wrench To remove the spare tire and tools:
1. Turn the two lock knobs on the
cargo area floor (C) to UNLOCK.
2. Lift up and remove both of the cargo area floors (C).
Vehicle Care 9-63
Page 248 of 318

3. Remove the hook holdingthe jack (B) and remove
the jack (B).
4. Remove the jack handle (E) and wheel wrench (F) from
the passenger side of the
cargo area. 5. Remove the tire/wheel
retainer (D) from the compact
spare tire (A) and remove
the compact spare tire (A).
See Compact Spare Tire on
page 9-68.
6. Place the compact spare tire (A) next to the flat tire.
Removing the Flat Tire and
Installing the Spare Tire
1. Do a safety check beforeproceeding. See If a Tire Goes
Flat on page 9-62.
2. If the vehicle has steel wheels with plastic wheel nut caps,
loosen the plastic wheel nut caps.
You may need the wheel wrench
to loosen them. Do not pry off
wheel covers that have plastic
wheel nut caps.
3. Remove the wheel cover and set it off to the side.
4. Attach the jack handle to the jack and turn clockwise to raise the
lift head a little.
9-64 Vehicle Care
Page 250 of 318

8. Remove the wheel nuts and theflat tire.
9. Install the spare tire.
{CAUTION
Rust or dirt on a wheel, or on
the parts to which it is fastened,
can make wheel nuts become
loose after time. The wheel could
come off and cause an accident.
When changing a wheel, remove
any rust or dirt from places where
the wheel attaches to the vehicle.
In an emergency, use a cloth or a
paper towel to do this; but be sure
to use a scraper or wire brush
later, if needed, to get all the rust
or dirt off. See If a Tire Goes Flat
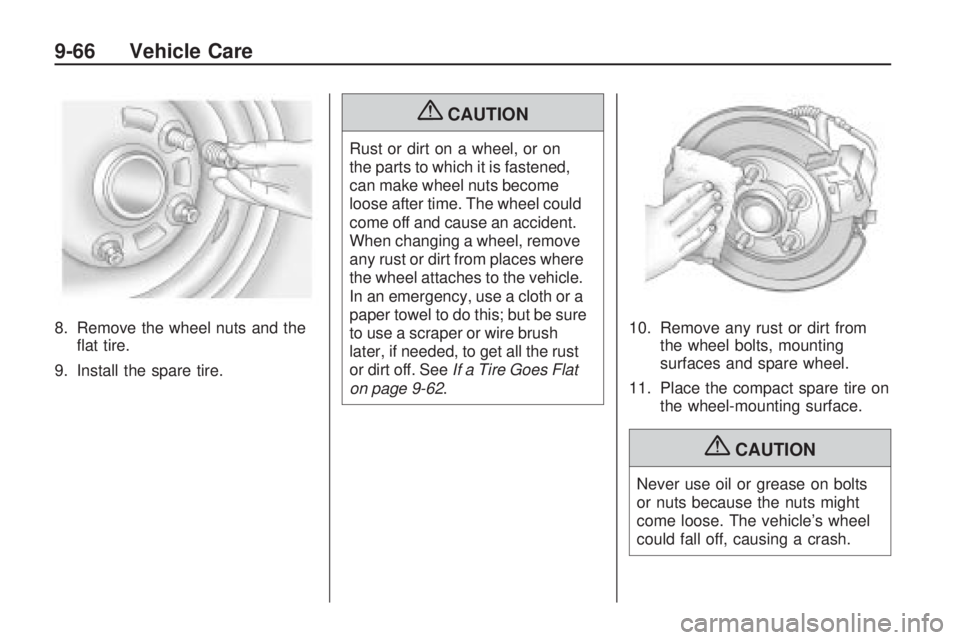
on page 9-62. 10. Remove any rust or dirt from
the wheel bolts, mounting
surfaces and spare wheel.
11. Place the compact spare tire on the wheel-mounting surface.
{CAUTION
Never use oil or grease on bolts
or nuts because the nuts might
come loose. The vehicle’s wheel
could fall off, causing a crash.
9-66 Vehicle Care