2010 PEUGEOT 308 SW BL display
[x] Cancel search: displayPage 64 of 336

!
i
62
COMFORT
Manual operation
If you wish, you can make a different
choice from that offered by the system
by changing a setting. The other func-
tions will still be controlled automati-
cally.
�)
Pressing the "AUTO"
button returns
the system to completely automatic
operation.
�)
Press this button to switch
off the air conditioning.
6. Air distribution adjustment
�)
Press one or more buttons
to direct the air fl ow
towards:
7. Air fl ow adjustment
�)
Turn this control to the left
to decrease the air fl ow or
to the right to increase the
air fl ow.
8. Air intake/Air recirculation
Switching the system off
�)
Turn the air fl ow control to the left
until all of the indicator lamps switch
off.
This action switches off the air condi-
tioning and the ventilation.
Temperature related comfort is no lon-
ger guaranteed but a slight fl ow of air,
due to the movement of the vehicle, can
still be felt.
�)
Turn the air fl ow dial to the right
or press the "AUTO"
button to
reactivate the system with the values
set before it was switched off.
�)
Press this button for
recirculation of the interior
air. The indicator lamp on
the button comes on.
5. Air conditioning On/Off
Avoid prolonged operation in inte-
rior air recirculation mode or driving
for long periods with the system off
(risk of condensation and deterio-
ration of the air quality).
- the windscreen and side windows
(demisting or defrosting),
- the windscreen, the side windows
and the vents,
- the windscreen, the side windows,
the vents and the footwells,
- the vents and the footwells,
- the vents,
- the footwells,
- the windscreen, the side windows
and the footwells.
The air fl ow indicator lamps, between
the two fans, come on progressively in
relation to the value requested.
�)
As soon as possible, press this
button again to permit the intake of
outside air and prevent the formation
of condensation. The indicator lamp
on the button switches off.
For maximum cooling or heating
of the passenger compartment, it
is possible to exceed the minimum
value 14 or the maximum value 28.
�)
Turn control 2
or 3
to the left
until "LO"
is displayed or to the
right until "HI"
is displayed.
9. Mono-zone/Dual-zone
�)
Press this button to equalise
the comfort value on the
passenger's side with that
on the driver's side (mono
zone). The indicator lamp
on the button comes on.
Air recirculation enables the passenger
compartment to be isolated from exte-
rior odours and smoke. Switching the system off could result in
discomfort (humidity, condensation).
�)
Press this button again to return
to automatic operation of the air
conditioning. The indicator lamp on
the "A/C"
button comes on.
Page 95 of 336

93
VISIBILITY
EXTERIOR LIGHTINGCONTROLS
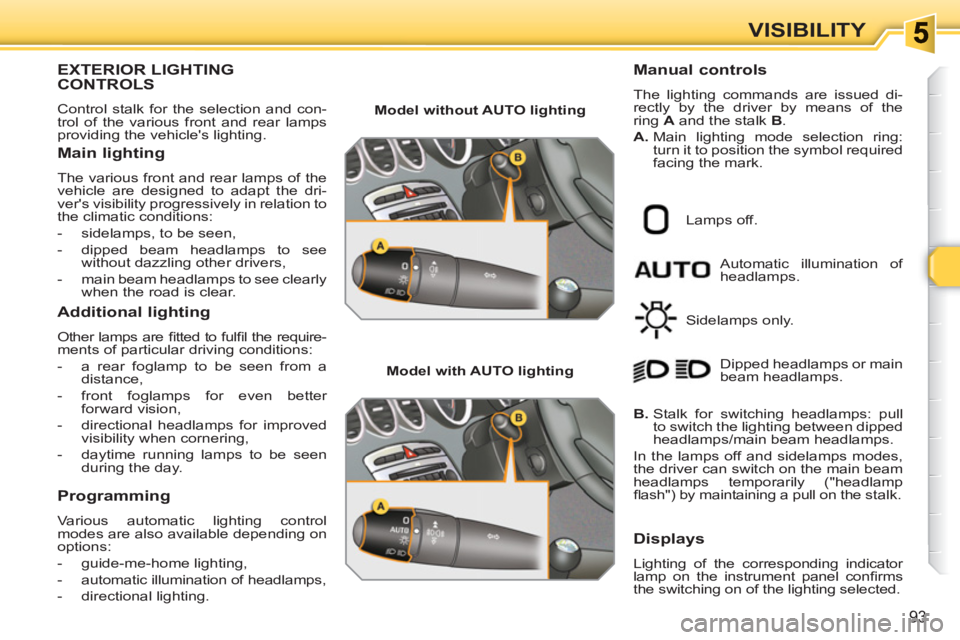
Control stalk for the selection and con-
trol of the various front and rear lamps
providing the vehicle's lighting.
Main lighting
The various front and rear lamps of the
vehicle are designed to adapt the dri-
ver's visibility progressively in relation to
the climatic conditions:
- sidelamps, to be seen,
- dipped beam headlamps to see
without dazzling other drivers,
- main beam headlamps to see clearly
when the road is clear.
Additional lighting
Other lamps are fi tted to fulfi l the require-
ments of particular driving conditions:
- a rear foglamp to be seen from a
distance,
- front foglamps for even better
forward vision,
- directional headlamps for improved
visibility when cornering,
- daytime running lamps to be seen
during the day.
Programming
Various automatic lighting control
modes are also available depending on
options:
- guide-me-home lighting,
- automatic illumination of headlamps,
- directional lighting.
Model without AUTO lighting
Model with AUTO lighting
Automatic illumination of
headlamps.
Manual controls
The lighting commands are issued di-
rectly by the driver by means of the
ring A
and the stalk B
.
A.
Main lighting mode selection ring:
turn it to position the symbol required
facing the mark.
Lamps off.
Sidelamps only.
B.
Stalk for switching headlamps: pull
to switch the lighting between dipped
headlamps/main beam headlamps.
In the lamps off and sidelamps modes,
the driver can switch on the main beam
headlamps temporarily ("headlamp
fl ash") by maintaining a pull on the stalk. Dipped headlamps or main
beam headlamps.
Displays
Lighting of the corresponding indicator
lamp on the instrument panel confi rms
the switching on of the lighting selected.
Page 98 of 336

i
!
i
96
VISIBILITY
EXTERIOR WELCOMELIGHTING
The remote switching on of the lighting
makes your approach to the vehicle ea-
sier in poor light. It is activated according
to the level of light detected by the sun-
shine sensor.
Switching on
�)
Press the open padlock on the
remote control.
The dipped beam headlamps and
the sidelamps come on; your vehicle
is also unlocked.
Programming
The lighting duration is
selected via the multifunc-
tion screen confi guration
menu.
The duration of the welcome ligh-
ting is associated with and identical
to that of the automatic guide-me-
home lighting.
In fog or snow, the sunshine sensor
may detect suffi cient light. There-
fore, the lighting will not come on
automatically.
Do not cover the sunshine sensor,
coupled with the rain sensor and
located in the centre of the wind-
screen behind the rear view mirror;
the associated functions would no
longer be controlled.
Coupling with the automatic
"Guide-me-home" lighting
Association with the automatic illumination
of headlamps provides "guide-me-home"
lighting with the following additional op-
tions:
- selection of the lighting duration to
15, 30 or 60 seconds in the vehicle
parameters on the multifunction
screen confi guration menu (except
in the case of the monochrome
screen A, for which the duration is
set: 60 seconds),
- automatic activation of "guide-me-
home" lighting when automatic
illumination of headlamps is in
operation.
Operating fault
In the event of a fault with the sun-
shine sensor, the lighting come
on, this warning lamp is displayed
on the instrument panel and/or
a message appears on the multifunction
screen, accompanied by an audible signal
Consult a PEUGEOT dealer.
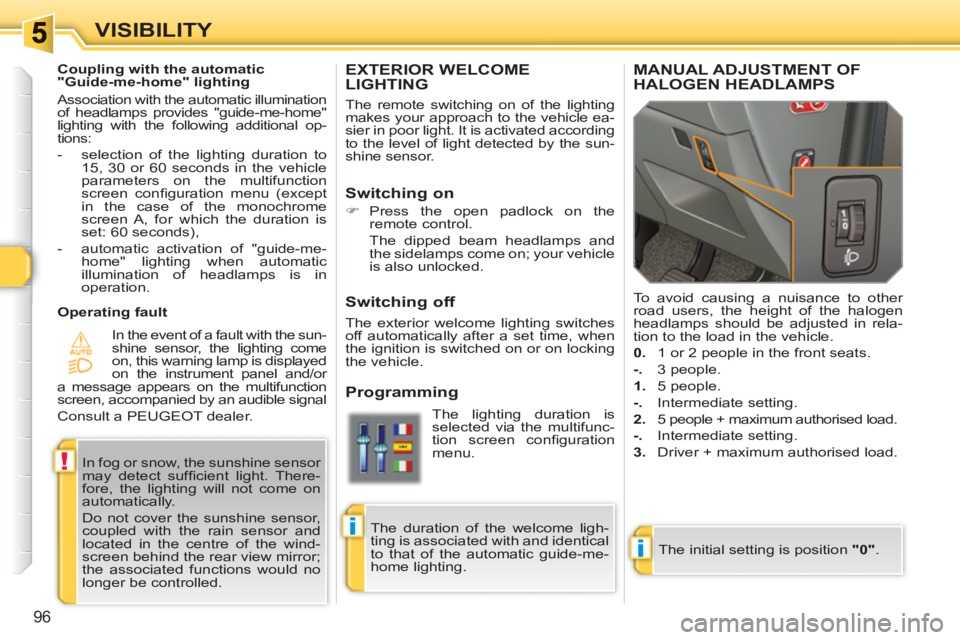
MANUAL ADJUSTMENT OFHALOGEN HEADLAMPS
The initial setting is position "0"
. To avoid causing a nuisance to other
road users, the height of the halogen
headlamps should be adjusted in rela-
tion to the load in the vehicle.
0.
1 or 2 people in the front seats.
-.
3 people.
1.
5 people.
-.
Intermediate setting.
2.
5 people + maximum authorised load.
-.
Intermediate setting.
3.
Driver + maximum authorised load.
Switching off
The exterior welcome lighting switches
off automatically after a set time, when
the ignition is switched on or on locking
the vehicle.
Page 99 of 336

!
i
97
VISIBILITY
DIRECTIONAL LIGHTING
When the dipped or main beam head-
lamps are on, this function enables the
light beams to provide improved lighting
of the side of the road when cornering.
The use of this function, from approxi-
mately 12 mph (20 km/h) and associ-
ated with the xenon headlamps only,
considerably improves the quality of
your lighting when cornering.
with directional lighting
without directional lighting
Programming
Operating fault
The function is activated or
deactivated via the multi-
function screen confi gura-
tion menu.
If a malfunction occurs, this warn-
ing lamp fl ashes on the instrument
panel, accompanied by a mes-
sage on the multifunction screen.
Consult a PEUGEOT dealer.
AUTOMATIC ADJUSTMENT OF XENON HEADLAMPS
Do not touch the xenon headlamp
bulbs. Consult a PEUGEOT dealer. In order to avoid causing a nuisance to
other road users, this system corrects
the height of the xenon headlamp beams
automatically and when stationary, in re-
lation to the load in the vehicle.
If a malfunction occurs, this
warning lamp and/or the ser-
vice warning lamp is displayed
on the instrument panel, ac-
companied by an audible signal and a
message on the multifunction screen.
The system then places your headlam-
ps in the lowest position.
When stationary or moving at very
low speed or when reverse gear is
engaged, the function is inactive.
The status of the function remains
in the memory when the ignition is
switched off.
Page 101 of 336

!
99
VISIBILITY
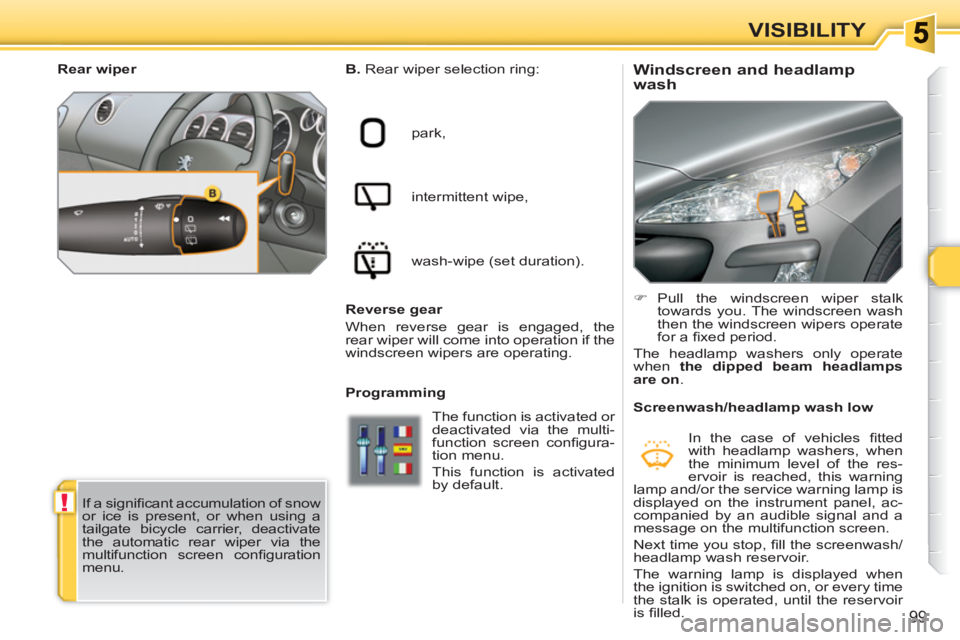
Windscreen and headlamp
wash
B.
Rear wiper selection ring:
park,
intermittent wipe,
wash-wipe (set duration).
Programming
�)
Pull the windscreen wiper stalk
towards you. The windscreen wash
then the windscreen wipers operate
for a fi xed period.
The headlamp washers only operate
when the dipped beam headlamps
are on
.
Rear wiper
If a signifi cant accumulation of snow
or ice is present, or when using a
tailgate bicycle carrier, deactivate
the automatic rear wiper via the
multifunction screen confi guration
menu.
Screenwash/headlamp wash low
In the case of vehicles fi tted
with headlamp washers, when
the minimum level of the res-
ervoir is reached, this warning
lamp and/or the service warning lamp is
displayed on the instrument panel, ac-
companied by an audible signal and a
message on the multifunction screen.
Next time you stop, fi ll the screenwash/
headlamp wash reservoir.
The warning lamp is displayed when
the ignition is switched on, or every time
the stalk is operated, until the reservoir
is fi lled.
The function is activated or
deactivated via the multi-
function screen confi gura-
tion menu.
This function is activated
by default.
Reverse gear
When reverse gear is engaged, the
rear wiper will come into operation if the
windscreen wipers are operating.
Page 107 of 336

FITTINGS
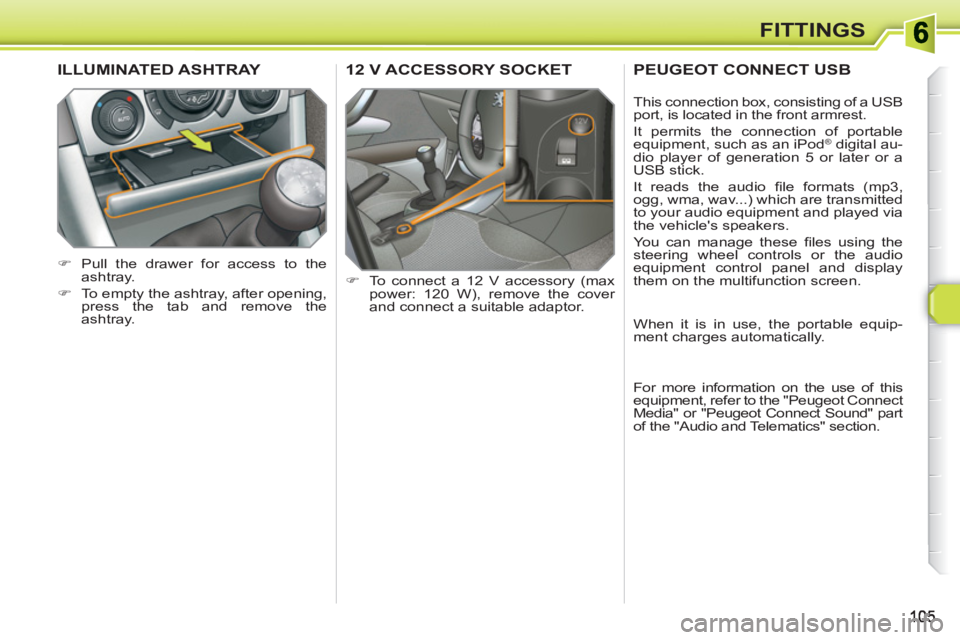
12 V ACCESSORY SOCKET
�)
To connect a 12 V accessory (max
power: 120 W), remove the cover
and connect a suitable adaptor.
ILLUMINATED ASHTRAY
�)
Pull the drawer for access to the
ashtray.
�)
To empty the ashtray, after opening,
press the tab and remove the
ashtray.
PEUGEOT CONNECT USB
This connection box, consisting of a USB
port, is located in the front armrest.
It permits the connection of portable
equipment, such as an iPod
® digital au-
dio player of generation 5 or later or a
USB stick.
It reads the audio fi le formats (mp3,
ogg, wma, wav...) which are transmitted
to your audio equipment and played via
the vehicle's speakers.
You can manage these fi les using the
steering wheel controls or the audio
equipment control panel and display
them on the multifunction screen.
When it is in use, the portable equip-
ment charges automatically.
For more information on the use of this
equipment, refer to the "Peugeot Connect
Media" or "Peugeot Connect Sound" part
of the "Audio and Telematics" section.
Page 131 of 336

!
i
i
i
129
SAFETY
TYRE UNDER-INFLATIONDETECTION
System which automatically and contin-
uously checks the pressure of the tyres
while driving. All repairs and changing of tyres on
a wheel fi tted with this system must
be carried out by a PEUGEOT
dealer.
If, when changing a tyre, you in-
stall a wheel which is not detected
by your vehicle (example: fi tting
of snow tyres), you must have the
system reinitialised by a PEUGEOT
dealer.
This system does not avoid the
need to have the tyre pressures
checked regularly (refer to the
"Identifi cation markings" section) to
ensure that the optimum dynamic
performance of the vehicle is main-
tained and prevent premature wear
of the tyres, particularly in arduous
driving conditions (heavy load, high
speed).
The tyre pressures must be checked cold, at least once a month.
Remember to check the pressure
of the spare wheel.
The tyre under-infl ation detection
system may experience temporary
interference due to electro-magnetic
emissions on a frequency close to
that used by the system.
Sensors fi tted in each valve trigger a
warning in the event of problem (speed
above 12 mph (20 km/h)).
This warning lamp is displayed on the
instrument panel and/or a message
appears on the multifunction screen,
accompanied by an audible signal,
to locate the wheel concerned.
�)
Check the tyre pressures as soon
as possible.
This check must be carried out when the
tyres are cold.
Under-infl ated tyre
The STOP
warning lamp comes
on and/or this warning lamp
is displayed on the instrument
panel, accompanied by an au-
dible signal and a message on
the multifunction screen locat-
ing the wheel concerned.
�)
Stop as soon as it is safe to do so,
avoiding any sudden movement of
the steering wheel and the brakes.
�)
Repair or change the damaged
wheel (punctured or very defl ated
tyre), and have the tyre pressure
checked as soon as possible.
Puncture
The tyre under-infl ation detection
system is an aid to driving which does
not replace the need for the driver to
be vigilant or to drive responsibly.
Sensor(s) not detected or faulty
This warning lamp is displayed
on the instrument panel and/or
a message appears on the mul-
tifunction screen, accompanied
by an audible signal, to locate the wheel
or wheels which are not detected or to
indicate a fault in the system.
Contact a PEUGEOT dealer to replace
the faulty sensor(s).
This message is also displayed
when one of the wheels is away
from the vehicle (being repaired) or
when one or more wheels without a
sensor are fi tted.
If your vehicle is equipped with a
spare wheel, this is not fi tted with
a sensor.
Page 135 of 336

133
SAFETY
Seat belt not fastened/unfastened
warning lamp
When the ignition is switched
on, this warning lamp comes
on, either on the instrument
panel or on the seat belt and
passenger's front airbag warning lamps
display, if the driver and/or the front pas-
senger has not fastened their seat belt.
From approximately 12 mph (20 km/h)
this warning lamp fl ashes for two minutes
accompanied by an audible signal of in-
creasing volume. Once these two minutes
have elapsed, this warning lamp remains
on until the driver and/or the front passen-
ger fastens their seat belt.
*
According to version and/or country.
Seat belt not fastened/unfastened
warning lamps display
1.
Front seat belts not fastened/
unfastened warning lamp.
2.
Driver's seat belt not fastened/
unfastened warning lamp.
3.
Front passenger's seat belt not
fastened/unfastened or unfastened
warning lamp * .
The corresponding warning lamp 2
or 3
comes on in red on the seat belt and
passenger's front airbag warning lamps
display if the seat belt is not fastened or
is unfastened.
Rear seat belts
The rear seats are each fi t-
ted with a three-point seat
belt with pretensioner and
for the side seats a force
limiter.
Fastening
�)
Pull the strap, then insert the tongue
in the buckle.
�)
Check that the seat belt is fastened
correctly by pulling the strap.
Unfastening
�)
Press the red button on the buckle.
�)
Guide the seat belt as it reels in.
�)
On the outer seat belts, raise the bar
to the top of the backrest to prevent
the tongue from knocking against
the side trim.