2010 NISSAN VERSA HATCHBACK oil
[x] Cancel search: oilPage 16 of 338
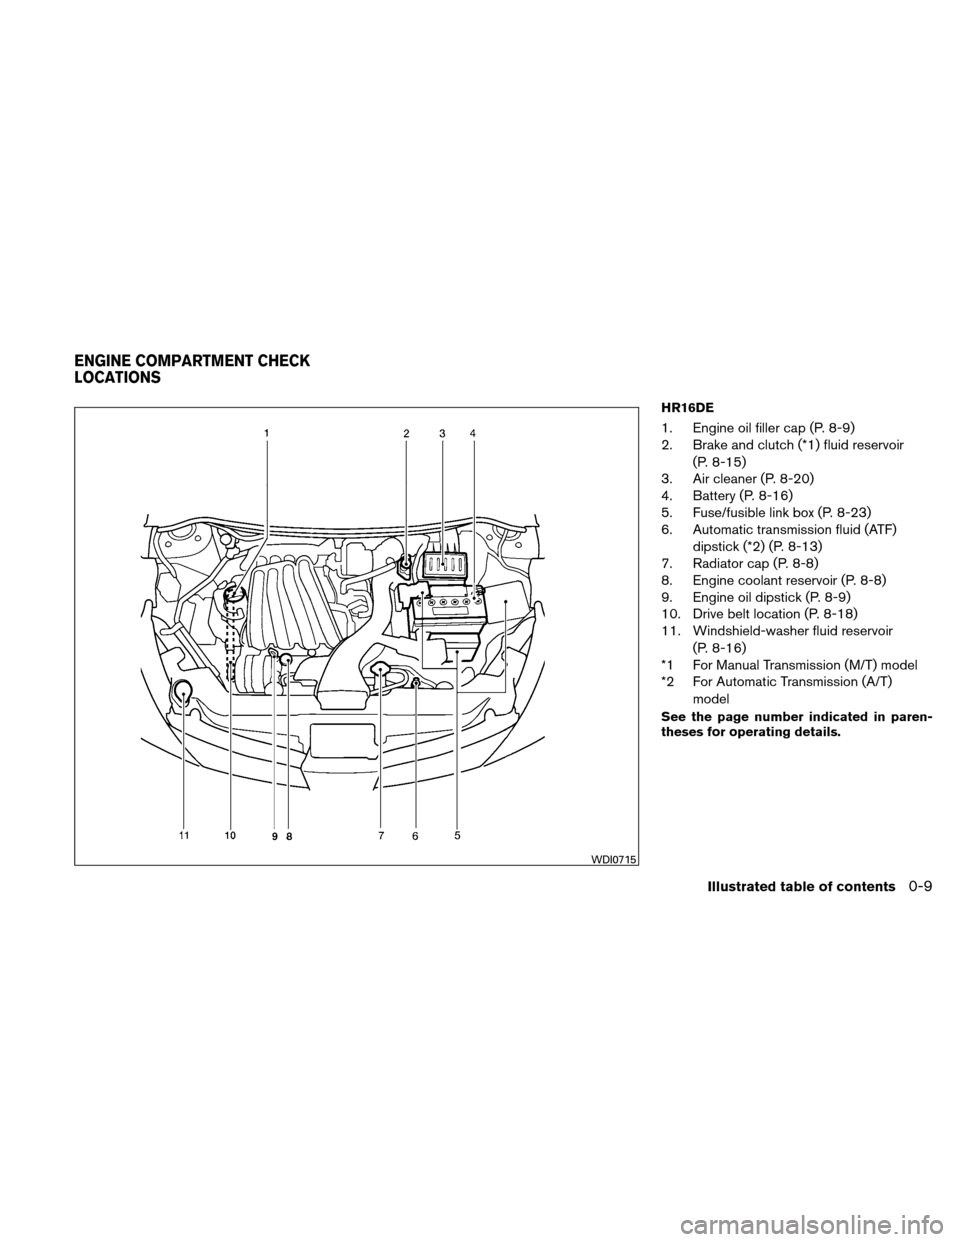
HR16DE
1. Engine oil filler cap (P. 8-9)
2. Brake and clutch (*1) fluid reservoir(P. 8-15)
3. Air cleaner (P. 8-20)
4. Battery (P. 8-16)
5. Fuse/fusible link box (P. 8-23)
6. Automatic transmission fluid (ATF)
dipstick (*2) (P. 8-13)
7. Radiator cap (P. 8-8)
8. Engine coolant reservoir (P. 8-8)
9. Engine oil dipstick (P. 8-9)
10. Drive belt location (P. 8-18)
11. Windshield-washer fluid reservoir
(P. 8-16)
*1 For Manual Transmission (M/T) model
*2 For Automatic Transmission (A/T)
model
See the page number indicated in paren-
theses for operating details.
WDI0715
ENGINE COMPARTMENT CHECK
LOCATIONS
Illustrated table of contents0-9
Page 17 of 338
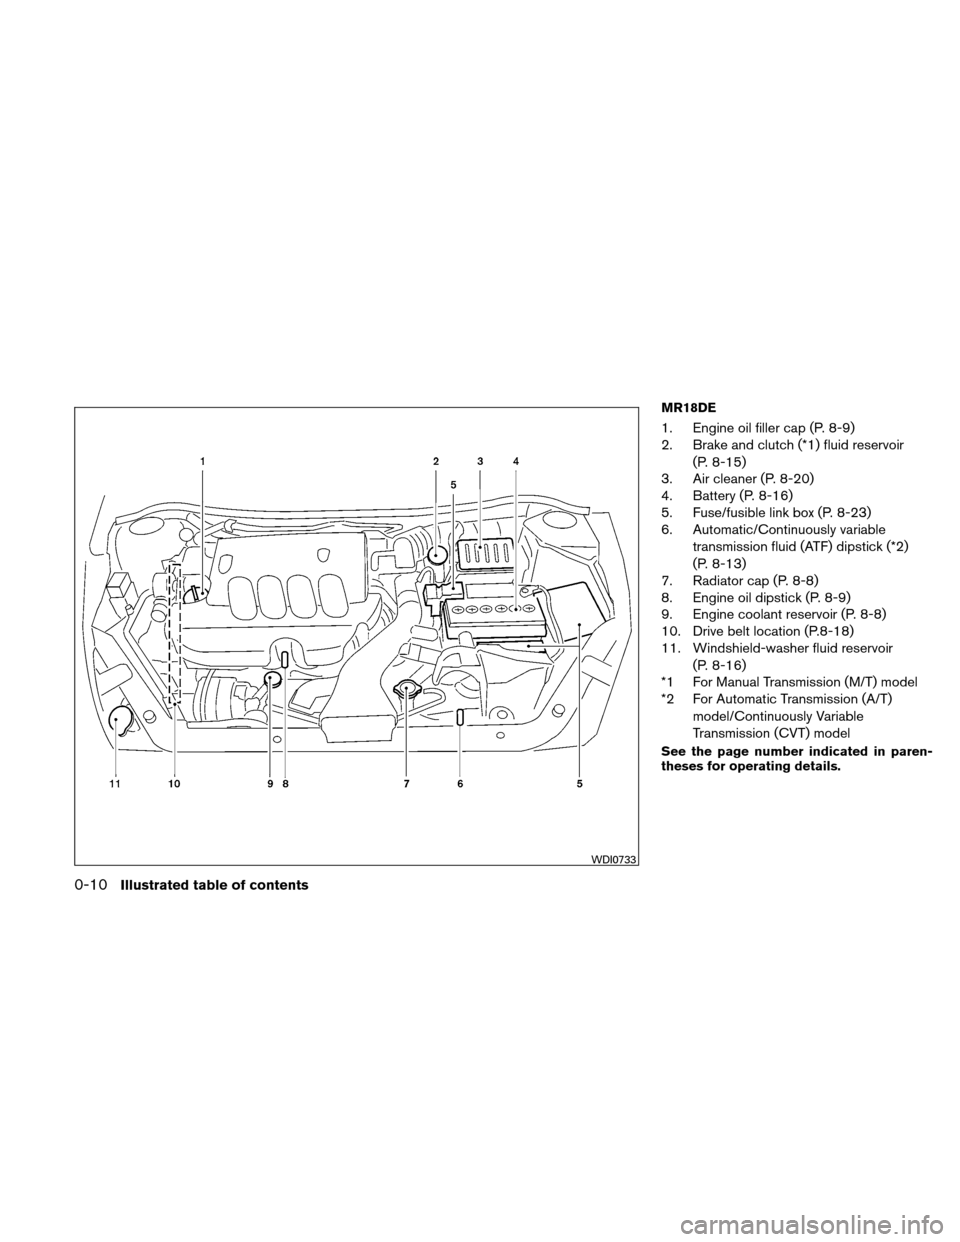
MR18DE
1. Engine oil filler cap (P. 8-9)
2. Brake and clutch (*1) fluid reservoir(P. 8-15)
3. Air cleaner (P. 8-20)
4. Battery (P. 8-16)
5. Fuse/fusible link box (P. 8-23)
6. Automatic/Continuously variable
transmission fluid (ATF) dipstick (*2)
(P. 8-13)
7. Radiator cap (P. 8-8)
8. Engine oil dipstick (P. 8-9)
9. Engine coolant reservoir (P. 8-8)
10. Drive belt location (P.8-18)
11. Windshield-washer fluid reservoir
(P. 8-16)
*1 For Manual Transmission (M/T) model
*2 For Automatic Transmission (A/T)
model/Continuously Variable
Transmission (CVT) model
See the page number indicated in paren-
theses for operating details.
WDI0733
0-10Illustrated table of contents
Page 18 of 338
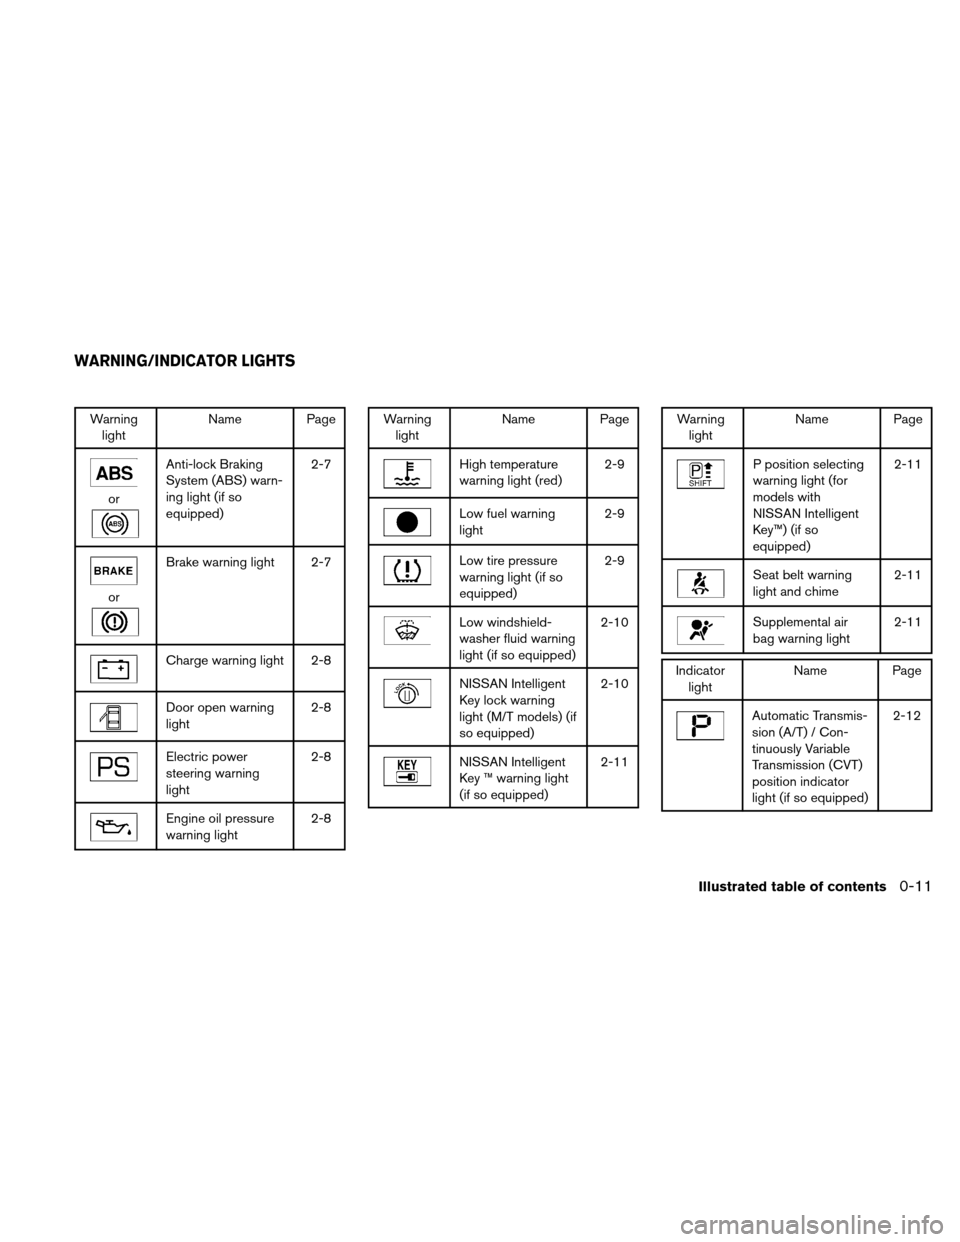
Warninglight Name Page
or
Anti-lock Braking
System (ABS) warn-
ing light (if so
equipped) 2-7
or
Brake warning light 2-7
Charge warning light 2-8
Door open warning
light
2-8
Electric power
steering warning
light2-8
Engine oil pressure
warning light
2-8
Warning
light Name Page
High temperature
warning light (red) 2-9
Low fuel warning
light2-9
Low tire pressure
warning light (if so
equipped)2-9
Low windshield-
washer fluid warning
light (if so equipped)2-10
NISSAN Intelligent
Key lock warning
light (M/T models) (if
so equipped)2-10
NISSAN Intelligent
Key ™ warning light
(if so equipped)
2-11
Warning
light Name Page
P position selecting
warning light (for
models with
NISSAN Intelligent
Key™) (if so
equipped) 2-11
Seat belt warning
light and chime
2-11
Supplemental air
bag warning light2-11
Indicator
light Name Page
Automatic Transmis-
sion (A/T) / Con-
tinuously Variable
Transmission (CVT)
position indicator
light (if so equipped) 2-12
WARNING/INDICATOR LIGHTS
Illustrated table of contents0-11
Page 83 of 338
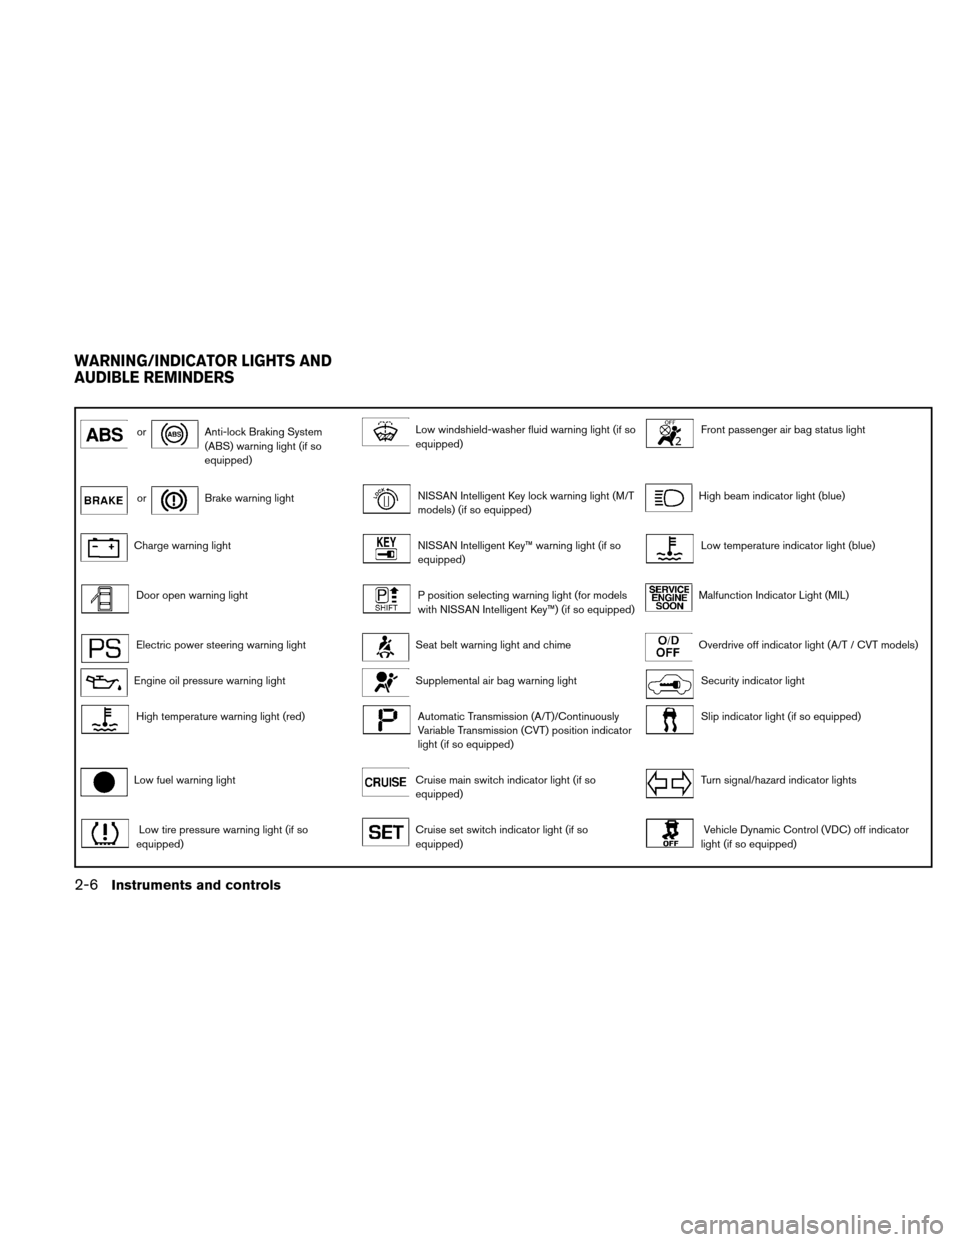
orAnti-lock Braking System
(ABS) warning light (if so
equipped)Low windshield-washer fluid warning light (if so
equipped)Front passenger air bag status light
orBrake warning lightNISSAN Intelligent Key lock warning light (M/T
models) (if so equipped)High beam indicator light (blue)
Charge warning lightNISSAN Intelligent Key™ warning light (if so
equipped)Low temperature indicator light (blue)
Door open warning lightP position selecting warning light (for models
with NISSAN Intelligent Key™) (if so equipped)Malfunction Indicator Light (MIL)
Electric power steering warning lightSeat belt warning light and chimeOverdrive off indicator light (A/T / CVT models)
Engine oil pressure warning lightSupplemental air bag warning lightSecurity indicator light
High temperature warning light (red)Automatic Transmission (A/T)/Continuously
Variable Transmission (CVT) position indicator
light (if so equipped)Slip indicator light (if so equipped)
Low fuel warning lightCruise main switch indicator light (if so
equipped)Turn signal/hazard indicator lights
Low tire pressure warning light (if so
equipped)Cruise set switch indicator light (if so
equipped)Vehicle Dynamic Control (VDC) off indicator
light (if so equipped)
WARNING/INDICATOR LIGHTS AND
AUDIBLE REMINDERS
2-6Instruments and controls
Page 85 of 338
●Pressing the brake pedal with the en-
gine stopped and/or a low brake fluid
level may increase your stopping dis-
tance and braking will require greater
pedal effort as well as pedal travel.
● If the brake fluid level is below the
MINIMUM or MIN mark on the brake
fluid reservoir, do not drive until the
brake system has been checked at a
NISSAN dealer.
Anti-lock Braking System (ABS) warning
indicator
When the parking brake is released and the
brake fluid level is sufficient, if both the brake
warning light and the Anti-lock Braking System
(ABS) waning light illuminate, it may indicate the
ABS is not functioning properly. Have the brake
system checked, and if necessary, repaired by a
NISSAN dealer promptly. Avoid high-speed driv-
ing and abrupt braking. (See “Anti-lock Braking
System (ABS) warning light” in this section.)
Charge warning light
If this light comes on while the engine is running,
it may indicate the charging system is not func-
tioning properly. Turn the engine off and check
the drive belt. If the belt is loose, broken, missing,
or if the light remains on, see a NISSAN dealer
immediately.
CAUTION
Do not continue driving if the drive belt is
loose, broken or missing.
Door open warning light
This light comes on when any of the doors are not
closed securely while the ignition switch is
placed in the ON position.
Electric power steering warning light
WARNING
● If the engine is not running or is turned
off while driving, the power assist for
the steering will not work. Steering will
be harder to operate.
● When the power steering warning light
illuminates with the engine running,
there will be no power assist for the
steering. You will still have control of
the vehicle but the steering will be
harder to operate. Have the power
steering system checked by a NISSAN
dealer. When the ignition switch is placed in the ON
position, the power steering warning light illumi-
nates. After starting the engine, the power steer-
ing warning light turns off. This indicates the
power steering system is operational.
If the power steering warning light illuminates
while the engine is running, it may indicate the
power steering system is not functioning properly
and may need servicing. Have the power steering
system checked by a NISSAN dealer.
When the power steering warning light illumi-
nates with the engine running, there will be no
power assist for the steering but you will still have
control of the vehicle. At this time, greater steer-
ing effort is required to operate the steering
wheel, especially in sharp turns and at low
speeds.
See “Power steering” in the “Starting and driving”
section.
Engine oil pressure warning
light
This light warns of low engine oil pressure. If the
light flickers or comes on during normal driving,
pull off the road in a safe area, stop the engine
immediately and call a NISSAN dealer or other
authorized repair shop.
2-8Instruments and controls
Page 86 of 338
The engine oil pressure warning light is not
designed to indicate a low oil level.Use the
dipstick to check the oil level. See “Engine oil” in
the “Maintenance and do-it-yourself” section of
this manual.
CAUTION
Running the engine with the engine oil
pressure warning light on could cause se-
rious damage to the engine almost imme-
diately. Such damage is not covered by
warranty. Turn off the engine as soon as it
is safe to do so.
High temperature warning light
(red)
When the ignition switch is placed in the ON
position, the high temperature warning light illu-
minates and then turns off. This indicates that the
high temperature sensor in the engine coolant
system is operational.
CAUTION
If the high temperature warning light illu-
minates while the engine is running, it
may indicate the engine temperature is
extremely high. Stop the vehicle safely as
soon as possible. If the vehicle is over-
heated, continuing vehicle operation may
seriously damage the engine. See “If your
vehicle overheats” in the “In case of emer-
gency” section.
Low fuel warning light
This light comes on when the fuel level in the fuel
tank is getting low. Refuel as soon as it is conve-
nient, preferably before the fuel gauge reaches E
(Empty) . There will be a small reserve of fuel
in the tank when the fuel gauge needle
reaches E (Empty) .
Low tire pressure warning light
(if so equipped)
Your vehicle is equipped with a Tire Pressure
Monitoring System (TPMS) that monitors the tire
pressure of all tires except the spare.
The low tire pressure warning light warns of low
tire pressure or indicates that the TPMS is not
functioning properly. After the ignition switch is placed in the ON
position, this light illuminates for about 1 second
and turns off.
Low tire pressure warning:
If the vehicle is being driven with low tire
pressure, the warning light will illuminate.
When the low tire pressure warning light
illuminates, you should stop and adjust the
tire pressure of all 4 tires to the recom-
mended COLD tire pressure shown on the
Tire and Loading Information label located
in the driver’s door opening. The low tire
pressure warning light does not automati-
cally turn off when the tire pressure is ad-
justed. After the tire is inflated to the rec-
ommended pressure, the vehicle must be
driven at speeds above 16 MPH (25 km/h)
to activate the TPMS and turn off the low
tire pressure warning light. Use a tire pres-
sure gauge to check the tire pressure.
For additional information, see “Tire Pressure
Monitoring System (TPMS)” in the “Starting and
driving” section and in the “In case of emergency”
section.
Instruments and controls2-9
Page 163 of 338
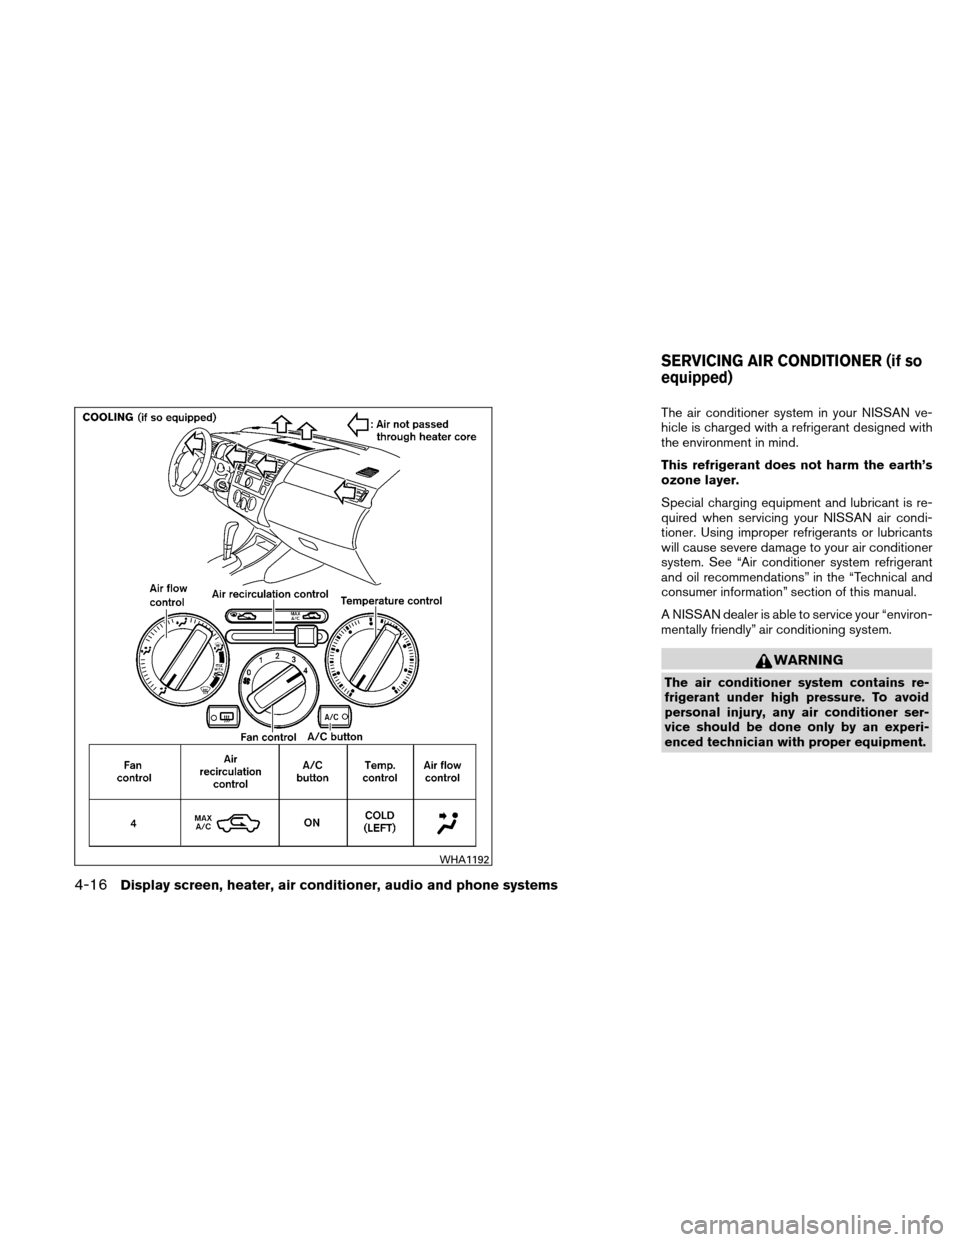
The air conditioner system in your NISSAN ve-
hicle is charged with a refrigerant designed with
the environment in mind.
This refrigerant does not harm the earth’s
ozone layer.
Special charging equipment and lubricant is re-
quired when servicing your NISSAN air condi-
tioner. Using improper refrigerants or lubricants
will cause severe damage to your air conditioner
system. See “Air conditioner system refrigerant
and oil recommendations” in the “Technical and
consumer information” section of this manual.
A NISSAN dealer is able to service your “environ-
mentally friendly” air conditioning system.
WARNING
The air conditioner system contains re-
frigerant under high pressure. To avoid
personal injury, any air conditioner ser-
vice should be done only by an experi-
enced technician with proper equipment.
WHA1192
SERVICING AIR CONDITIONER (if so
equipped)
4-16Display screen, heater, air conditioner, audio and phone systems
Page 221 of 338
●Make sure the area around the vehicle is
clear.
● Check fluid levels such as engine oil, cool-
ant, brake and clutch fluid, and windshield-
washer fluid as frequently as possible, or at
least whenever you refuel.
● Check that all windows and lights are clean.
● Visually inspect tires for their appearance
and condition. Also check tires for proper
inflation.
● Lock all doors.
● Position seat and adjust head restraints and
headrests (if so equipped) .
● Adjust inside and outside mirrors.
● Fasten seat belts and ask all passengers to
do likewise.
● Check the operation of warning lights when
the key is turned to the ON (3) position. See
“Warning/indicator lights and audible re-
minders” in the “Instruments and controls”
section of this manual. 1. Apply the parking brake.
2.
AT or CVT model:
Move the shift selector to P (Park) or N
(Neutral) . P (Park) is recommended.
The shift selector cannot be moved out
of P (Park) and into any of the other
gear positions if the ignition switch is
placed in the OFF position or if the key
is removed from the ignition switch.
The starter is designed not to operate if
the shift selector is in any of the driving
positions.
Manual transmission model:
Move the shift selector to N (Neutral) . De-
press the clutch pedal to the floor while
cranking the engine.
The starter is designed not to operate
unless the clutch pedal is fully de-
pressed.
Intelligent Key system models: Slowly
push and turn the ignition switch. When the
Intelligent Key system warning light
in
the meter illuminates in green, the ignition
switch can be turned.
The Intelligent Key must be carried
when operating the ignition switch. When the Intelligent Key system warning
light (
AT or CVT models) or the Intel-
ligent Key lock warning light (
M/T
models) in the meter blinks in red and the
inside warning buzzer emits a short beep, be
sure that the shift selector is in the P (Park)
position (AT or CVT models) and the ignition
switch is securely returned to the LOCK
position.
The Intelligent Key system warning light
(
AT or CVT models) or the Intelligent
Key lock warning light (
M/T models)
blinking in red, turns off by performing the
following operations:
● Return the ignition switch to the LOCK
position.
● Place the ignition switch in the ACC po-
sition.
When the buzzer beeps 4 times continu-
ously, check for the following:
● The ignition switch is returned to the
LOCK position.
● The mechanical key is not inserted into
the ignition switch.
BEFORE STARTING THE ENGINE STARTING THE ENGINE
5-12Starting and driving