Page 44 of 338
 SYSTEM
Your vehicle is equipped with special anchor
points that are used with LATCH (Lower Anchors
and Tethers for CHildren) system compatible
child rest")
LATCH (Lower Anchors and Tethers
for CHildren) SYSTEM
Your vehicle is equipped with special anchor
points that are used with LATCH (Lower Anchors
and Tethers for CHildren) system compatible
child restraints. This system may also be referred
to as the ISOFIX or ISOFIX compatible system.
With this system, you do not have to use a vehicle
seat belt to secure the child restraint.
LATCH lower anchor
WARNING
Failure to follow the warnings and instruc-
tions for proper use and installation of
child restraints could result in serious in-
jury or death of a child or other passen-
gers in a sudden stop or collision:
– Attach LATCH system compatible child restraints only at the locations
shown in the illustration.
– Do not secure a child restraint in the center rear seating position using
the LATCH lower anchors. The child
restraint will not be secured properly.
– Inspect the lower anchors by insert- ing your fingers into the lower anchor
area. Feel to make sure there are no
obstructions over the anchors such
as seat belt webbing or seat cushion
material. The child restraint will not
be secured properly if the lower an-
chors are obstructed.
LATCH lower anchor location
The LATCH lower anchors are located at the rear
of the seat cushion near the seatback. A label is
attached to the seatback to help you locate the
LATCH lower anchors.
LATCH system lower anchor locations
WRS0756
LATCH lower anchor location
WRS0700
Safety—Seats, seat belts and supplemental restraint system1-25
Page 45 of 338

Installing child restraint LATCH lower
anchor attachments
LATCH compatible child restraints include two
rigid or webbing-mounted attachments that can
be connected to two anchors located at certain
seating positions in your vehicle. With this sys-
tem, you do not have to use a vehicle seat belt to
secure the child restraint. Check your child re-
straint for a label stating that it is compatible with
LATCH. This information may also be in the in-
structions provided by the child restraint manu-
facturer.The child restraint top tether strap must be used
when installing the child restraint with the LATCH
lower anchor attachments or seat belts. See “Top
tether anchor” for installation instructions.
When installing a child restraint, carefully read
and follow the instructions in this manual and
those supplied with the child restraint.
Top tether anchor
WARNING
●
If the cargo cover (if so equipped) con-
tacts the top tether strap when it is
attached to the top tether anchor, re-
move the cargo cover from the vehicle
or secure it on the cargo floor below its
attachment location. If the cargo cover
is not removed, it may damage the top
tether strap during a collision. A child
could be seriously injured or killed in a
collision if the child restraint top tether
strap is damaged.
● Do not allow cargo to contact the top
tether strap when it is attached to the
top tether anchor. Properly secure the
cargo so it does not contact the top
tether strap. Cargo that is not properly
secured or cargo that contacts the top
tether strap may damage it during a
collision. A child could be seriously in-
jured or killed in a collision if the top
tether strap is damaged.
LATCH webbing-mounted attachment
LRS0661
LATCH rigid-mounted attachment
LRS0662
1-26Safety—Seats, seat belts and supplemental restraint system
Page 46 of 338
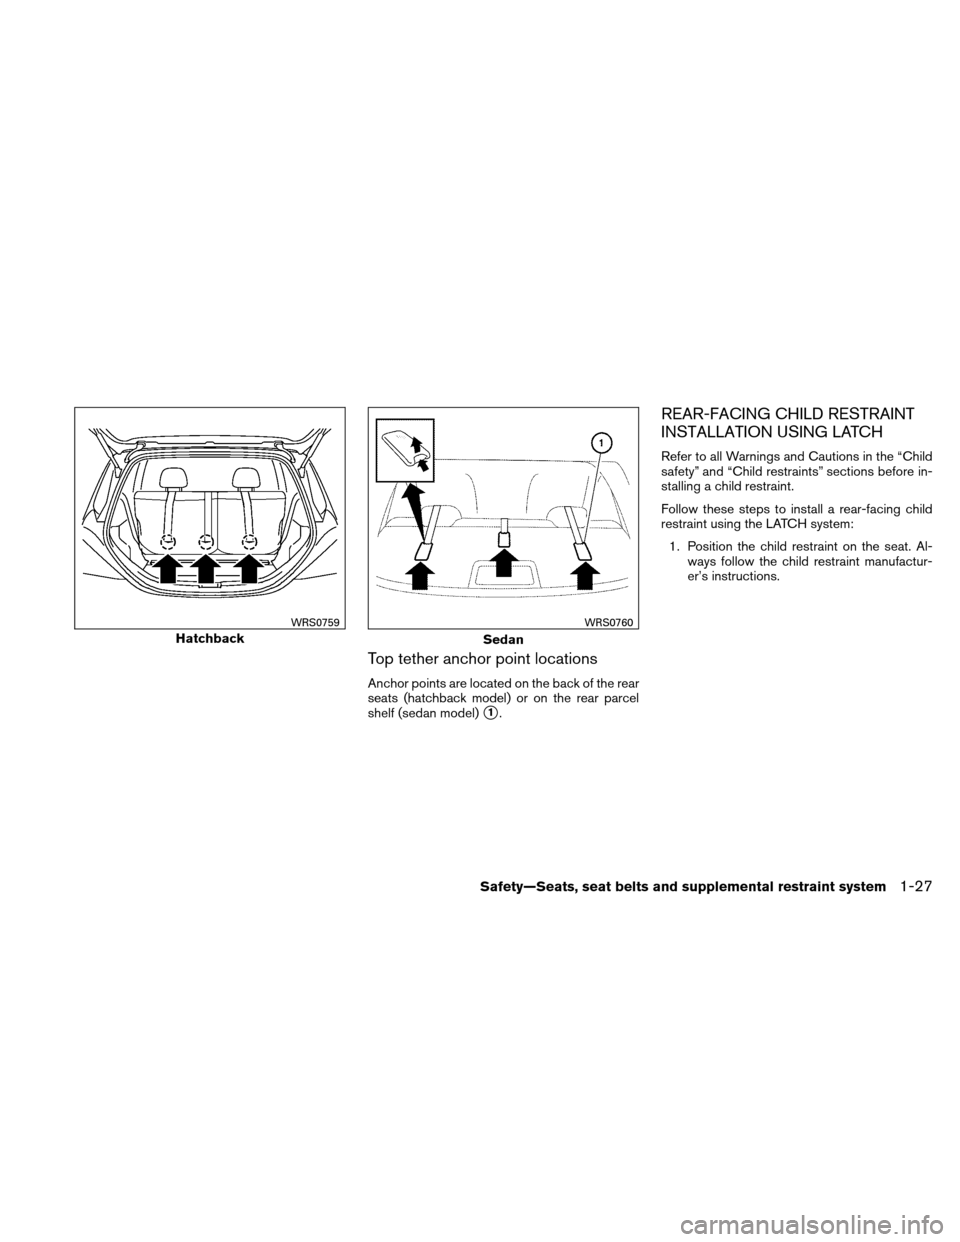
Top tether anchor point locations
Anchor points are located on the back of the rear
seats (hatchback model) or on the rear parcel
shelf (sedan model)
�1.
REAR-FACING CHILD RESTRAINT
INSTALLATION USING LATCH
Refer to all Warnings and Cautions in the “Child
safety” and “Child restraints” sections before in-
stalling a child restraint.
Follow these steps to install a rear-facing child
restraint using the LATCH system:1. Position the child restraint on the seat. Al- ways follow the child restraint manufactur-
er’s instructions.
Hatchback
WRS0759
Sedan
WRS0760
Safety—Seats, seat belts and supplemental restraint system1-27
Page 47 of 338
2. Secure the child restraint anchor attach-ments to the LATCH lower anchors. Check
to make sure the LATCH attachment is prop-
erly attached to the lower anchors. 3. For child restraints that are equipped with
webbing-mounted attachments, remove any
additional slack from the anchor attach-
ments. Press downward and rearward firmly
in the center of the child restraint with your
hand to compress the vehicle seat cushion
and seatback while tightening the webbing
of the anchor attachments.
Rear-facing web-mounted – step 2
WRS0801
Rear-facing rigid-mounted – step 2
WRS0802
Rear-facing – step 3
LRS0673
1-28Safety—Seats, seat belts and supplemental restraint system
Page 48 of 338
4. After attaching the child restraint, test it be-fore you place the child in it. Push it from side
to side while holding the child restraint near
the LATCH attachment path. The child re-
straint should not move more than 1 inch (25
mm) , from side to side. Try to tug it forward
and check to see if the LATCH attachment
holds the restraint in place. If the restraint is
not secure, tighten the LATCH attachment
as necessary, or put the restraint in another
seat and test it again. You may need to try a
different child restraint or try installing by
using the vehicle seat belt (if applicable) .
Not all child restraints fit in all types of ve-
hicles. 5. Check to make sure the child restraint is
properly secured prior to each use. If the
child restraint is loose, repeat steps 1
through 4.REAR-FACING CHILD RESTRAINT
INSTALLATION USING THE SEAT
BELTSRear-facing – step 4
LRS0674WRS0256
Safety—Seats, seat belts and supplemental restraint system1-29
Page 49 of 338
 must be
used when installing a child restraint.
Failure to use the ALR mode will result
in the child restraint not being p")
WARNING
●The three-point seat belt with Auto-
matic Locking Retractor (ALR) must be
used when installing a child restraint.
Failure to use the ALR mode will result
in the child restraint not being properly
secured. The restraint could tip over or
be loose and cause injury to a child in a
sudden stop or collision. Also, it can
change the operation of the front pas-
senger air bag. See “Front passenger
air bag and status light” later in this
section.
● When installing a child restraint system
in the rear center position, both the
center seat belt connector tongue and
buckle tongue must be secured. See
“Attaching the rear center seat belt” in
this section. Refer to all Warnings and Cautions in the “Child
safety” and “Child restraints” sections before in-
stalling a child restraint.
Follow these steps to install a rear-facing child
restraint using the vehicle seat belts in the rear
seats:
1. Child restraints for infants must be
used in the rear-facing direction and
therefore must not be used in the front
seat. Position the child restraint on the seat.
Always follow the restraint manufacturer’s
instructions. 2. Route the seat belt tongue through the child
restraint and insert it into the buckle until you
hear and feel the latch engage. Be sure to
follow the child restraint manufacturer’s in-
structions for belt routing.
Rear-facing – step 1
WRS0256
Rear-facing – step 2
WRS0761
1-30Safety—Seats, seat belts and supplemental restraint system
Page 50 of 338
3. Pull the shoulder belt until the belt is fullyextended. At this time, the seat belt retractor
is in the Automatic Locking Retractor (ALR)
mode (child restraint mode) . It reverts to the
Emergency Locking Retractor (ELR) mode
when the seat belt is fully retracted. 4. Allow the seat belt to retract. Pull up on the
shoulder belt to remove any slack in the belt. 5. Remove any additional slack from the seat
belt; press downward and rearward firmly in
the center of the child restraint to compress
the vehicle seat cushion and seatback while
pulling up on the seat belt.
Rear-facing – step 3
LRS0669
Rear-facing – step 4
LRS0670
Rear-facing – step 5
WRS0762
Safety—Seats, seat belts and supplemental restraint system1-31
Page 51 of 338

6. After attaching the child restraint, test it be-fore you place the child in it. Push it from side
to side while holding the child restraint near
the seat belt path. The child restraint should
not move more than 1 inch (25 mm) , from
side to side. Try to tug it forward and check
to see if the belt holds the restraint in place.
If the restraint is not secure, tighten the seat
belt as necessary, or put the restraint in
another seat and test it again. You may need
to try a different child restraint. Not all child
restraints fit in all types of vehicles. 7. Check to make sure that the child restraint is
properly secured prior to each use. If the
seat belt is not locked, repeat steps 1
through 6.
After the child restraint is removed and the seat
belt fully retracted, the ALR mode (child restraint
mode) is canceled.
FORWARD-FACING CHILD
RESTRAINT INSTALLATION USING
LATCH
Refer to all Warnings and Cautions in the “Child
safety” and “Child restraints” sections before in-
stalling a child restraint.
Follow these steps to install a forward-facing
child restraint using the LATCH system: 1. Position the child restraint on the seat. Al- ways follow the child restraint manufactur-
er’s instructions. 2. Secure the child restraint anchor attach-
ments to the LATCH lower anchors. Check
to make sure the LATCH attachment is prop-
erly attached to the lower anchors.
If the child restraint is equipped with a top
tether strap, route the top tether strap and
secure the tether strap to the tether anchor
point. See “Installing top tether strap” in this
section. Do not install child restraints that
require the use of a top tether strap in seat-
ing positions that do not have a top tether
anchor.
Rear-facing – step 6
WRS0763
Forward-facing web-mounted – step 2
WRS0799
1-32Safety—Seats, seat belts and supplemental restraint system


mode (child restraint mode) . It reverts to the
Emergency L")