Page 25 of 407

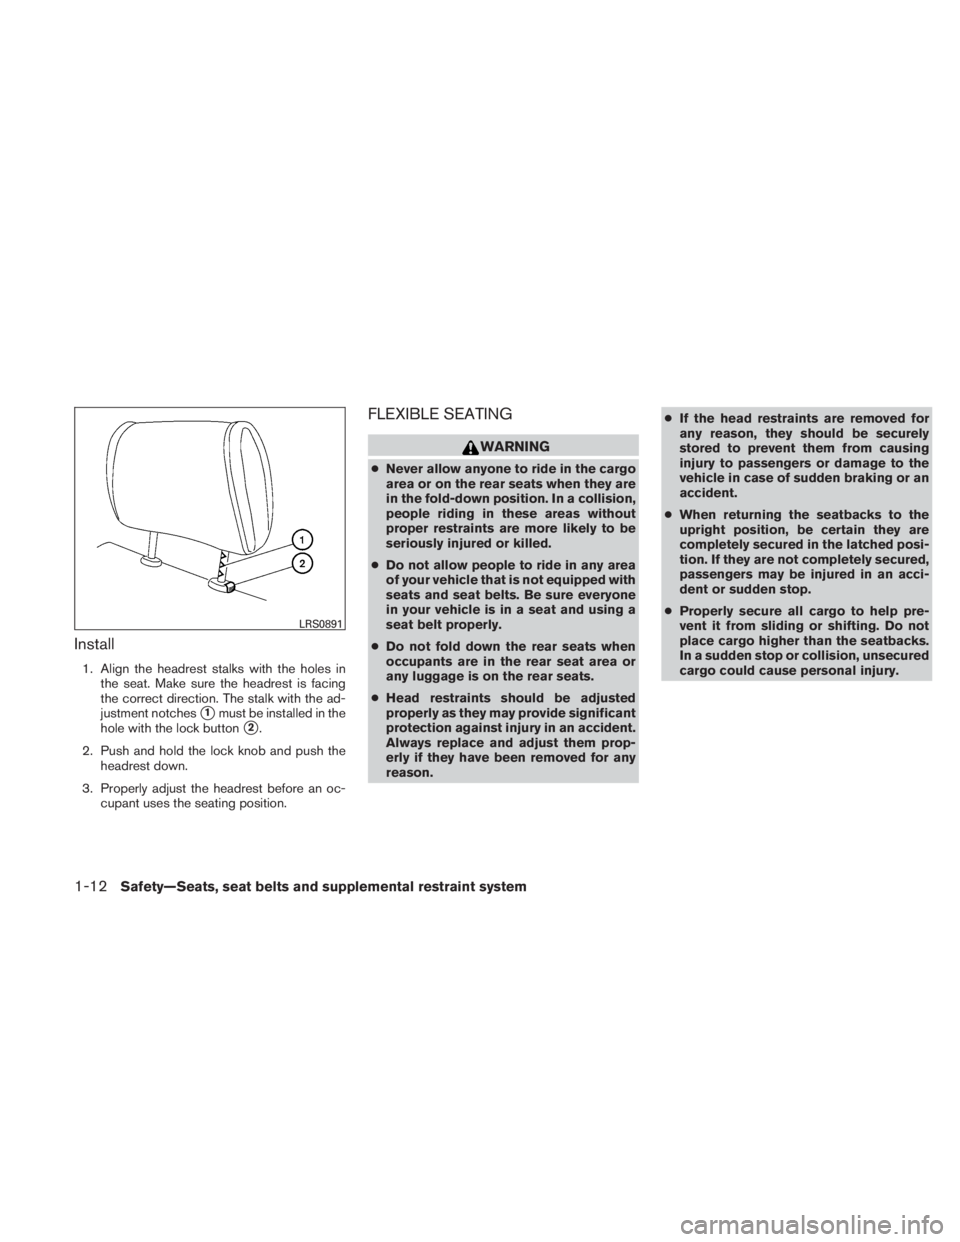
Install
1. Align the head restraint stalks with the holesin the seat. Make sure the head restraint is
facing the correct direction. The stalk with
the adjustment notches
�1must be installed
in the hole with the lock button
�2.
2. Push and hold the lock knob and push the head restraint down.
3. Properly adjust the head restraint before an occupant uses the seating position.
Front-seat Active Head Restraints
The Active Head Restraint moves forward utiliz-
ing the force that the seatback receives from the
occupant in a rear-end collision. The movement
of the head restraint helps support the occu-
pant’s head by reducing its backward movement
and helping absorb some of the forces that may
lead to whiplash-type injuries.
Active Head Restraints are effective for collisions
at low to medium speeds in which it is said that
whiplash injury occurs most.
Active Head Restraints operate only in certain
rear-end collisions. After the collision, the head
restraints return to their original position. Adjust the Active Head Restraints properly as
described in this section.
ADJUSTABLE HEADREST (if so
equipped)
Page 26 of 407
The illustration shows the seating positions
equipped with adjustable headrests. All of the
headrests are adjustable.
�Indicates the seating position is equipped with
an adjustable headrest.
+ Indicates the seating position is not equipped
with a head restraint or adjustable headrest.Components
1. Adjustable headrest
2. Adjustment notches
3. Lock knob
4. Stalks
Adjustment
Adjust the headrest so the center is level with the
center of the seat occupant’s ears.
Page 27 of 407
To raise the headrest, pull it up.To lower, push and hold the lock knob and push
the headrest down.Removal
Use the following procedure to remove the ad-
justable headrests.
1. Pull the headrest up to the highest position.
2. Push and hold the lock knob.
3. Remove the headrest from the seat.
4. Store the headrest properly so it is not loose in the vehicle.
5. Install and properly adjust the headrest be- fore an occupant uses the seating position.
Page 28 of 407
Install
1. Align the headrest stalks with the holes inthe seat. Make sure the headrest is facing
the correct direction. The stalk with the ad-
justment notches
�1must be installed in the
hole with the lock button
�2.
2. Push and hold the lock knob and push the headrest down.
3. Properly adjust the headrest before an oc- cupant uses the seating position.
FLEXIBLE SEATING
Page 52 of 407

7. Check to make sure that the child restraint isproperly secured prior to each use. If the
seat belt is not locked, repeat steps 3
through 6.
After the child restraint is removed and the seat
belt fully retracted, the ALR mode (child restraint
mode) is canceled.
FORWARD-FACING CHILD
RESTRAINT INSTALLATION USING
LATCH
Refer to all Warnings and Cautions in the “Child
Safety” and “Child Restraint” sections before in-
stalling a child restraint.
Follow these steps to install a forward-facing
child restraint in the 2nd row seats using the
LATCH system: 1. Position the child restraint on the seat. Al- ways follow the child restraint manufactur-
er’s instructions. 2. Secure the child restraint anchor attach-
ments to the LATCH lower anchors. Check
to make sure the LATCH attachment is prop-
erly attached to the lower anchors.
If the child restraint is equipped with a top
tether strap, route the top tether strap and
secure the tether strap to the tether anchor
point. See “Installing top tether strap” in this
section. Do not install child restraints that
require the use of a top tether strap in seat-
ing positions that do not have a top tether
anchor. 3. The back of the child restraint should be
secured against the vehicle seatback.
If necessary, adjust or remove the headrest
to obtain the correct child restraint fit. If the
headrest is removed, store it in a secure
place. Be sure to reinstall the headrest
when the child restraint is removed.
See “Adjustable headrest” in this section for
head restraint adjustment information.
If the seating position does not have an
adjustable headrest and it is interfering with
the proper child restraint fit, try another seat-
ing position or a different child restraint.
Page 54 of 407

Refer to all Warnings and Cautions in the “Child
Safety” and “Child Restraint” sections before in-
stalling a child restraint.
Follow these steps to install a forward-facing
child restraint using the vehicle seat belt in the
rear seats or in the front passenger seat:1. If you must install a child restraint in
the front seat, it should be placed in a
forward-facing direction only. Move
the seat to the rearmost position. Child
restraints for infants must be used in
the rear-facing direction and therefore
must not be used in the front seat. 2. Position the child restraint on the seat. Al-
ways follow the child restraint manufactur-
er’s instructions.
The back of the child restraint should be
secured against the vehicle seatback.
If necessary, adjust or remove the head re-
straint or headrest to obtain the correct child
restraint fit. If the head restraint or headrest
is removed, store it in a secure place. Be
sure to reinstall the head restraint or
headrest when the child restraint is
removed. See “Head restraints” or “Adjust-
able headrest” in this section for head re-
straint or headrest adjustment, removal and
installation information.
If the seating position does not have an
adjustable head restraint or headrest and it
is interfering with the proper child restraint
fit, try another seating position or a different
child restraint. 3. Route the seat belt tongue through the child
restraint and insert it into the buckle until you
hear and feel the latch engage. Be sure to
follow the child restraint manufacturer’s in-
structions for belt routing.
If the child restraint is equipped with a top
tether strap, route the top tether strap and
secure the tether strap to the tether anchor
point (rear seat installation only) . See “In-
stalling top tether strap” in this section. Do
not install child restraints that require the use
of a top tether strap in seating positions that
do not have a top tether anchor.
Page 60 of 407

To access the anchor points�2behind the rear
bench seat, tilt the rear seatback forward by
lifting up on the pull strap
�1behind the seat-
back.
Before se")
INSTALLING TOP TETHER STRAP
(Rear bench seat)
To access the anchor points�2behind the rear
bench seat, tilt the rear seatback forward by
lifting up on the pull strap
�1behind the seat-
back.
Before securing the child restraint with the
LATCH lower anchors (rear outboard seating po-
sitions only) or the seat belt, as applicable, follow
these steps. 1. If necessary, raise or remove the headrest to
position the top tether strap
�1over the top
of the seatback. If the headrest is removed,
store it in a secure place. Be sure to reinstall
the headrest when the child restraint is re-
moved. See “Adjustable headrest” in
this section for headrest adjustment,
removal and installation information.
2. Position the top tether strap over the top of the seatback and under the headrest.
3. Secure the tether strap to the tether anchor point on the seat directly behind the child
restraint.
4. Return the seatback to the locked position.
5. Refer back to child restraint installation steps before tightening the tether strap.
If you have any questions when installing a
top tether strap, consult your NISSAN
dealer for details.BOOSTER SEATS
Precautions on booster seats
Page 63 of 407
If the seating position does not have an
adjustable head restraint or headrest and it
is interfering with the proper booster seat fit,
try another seating position or a different
booster seat.
4. Position the lap portion of the seat belt low and snug on the child’s hips. Be sure to
follow the booster seat manufacturer’s in-
structions for adjusting the seat belt routing.
5. Pull the shoulder belt portion of the seat belt toward the retractor to take up extra slack.
Be sure the shoulder belt is positioned
across the top, middle portion of the child’s
shoulder. Be sure to follow the booster seat
manufacturer’s instructions for adjusting the
seat belt routing.
6. Follow the warnings, cautions and instruc- tions for properly fastening a seat belt
shown in “Three-point type seat belt with
retractor” earlier in this section. 7. If the booster seat is installed in the front
passenger seat, place the ignition switch in
the ON position. The front passenger air bag
status light