Page 86 of 407
Elapsed time, driving distance and average
speed information is also available for vehicles
with navigation system (if so equipped) . Refer to
“Control panel buttons” in the “Display screen,
heater, air conditioner and audio systems” sec-
tion later in this manual.
TACHOMETER
The tachometer indicates engine speed in revo-
lutions per minute (rpm) . Do not rev the engine
into the red zone
�1.
Page 136 of 407

PROGRAMMING HOMELINK�
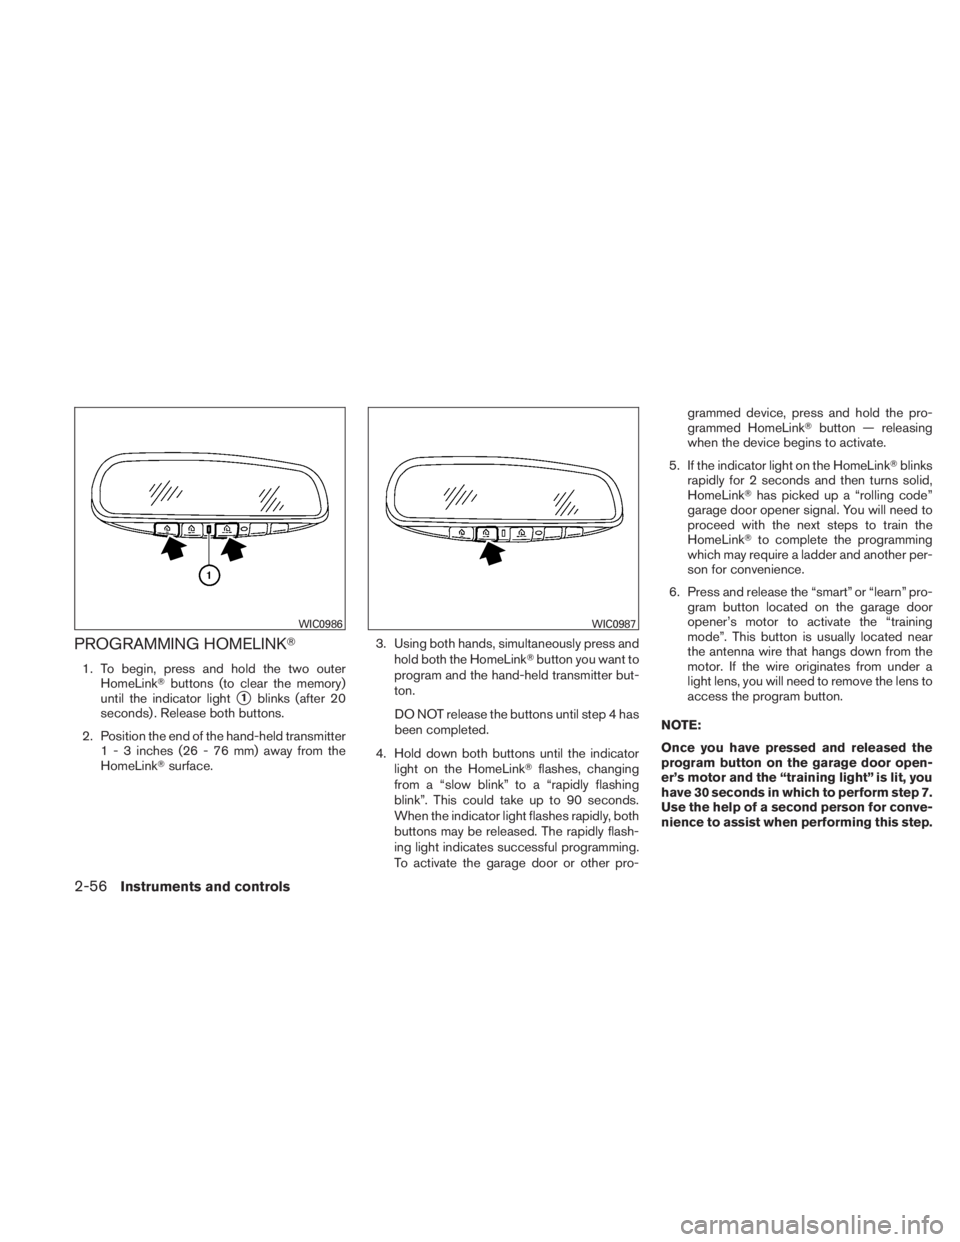
1. To begin, press and hold the two outerHomeLink� buttons (to clear the memory)
until the indicator light
�1blinks (after 20
seconds) . Release both buttons.
2. Position the end of the hand-held transmitter 1 - 3 inches (26 - 76 mm) away from the
HomeLink� surface. 3. Using both hands, simultaneously press and
hold both the HomeLink� button you want to
program and the hand-held transmitter but-
ton.
DO NOT release the buttons until step 4 has
been completed.
4. Hold down both buttons until the indicator light on the HomeLink� flashes, changing
from a “slow blink” to a “rapidly flashing
blink”. This could take up to 90 seconds.
When the indicator light flashes rapidly, both
buttons may be released. The rapidly flash-
ing light indicates successful programming.
To activate the garage door or other pro- grammed device, press and hold the pro-
grammed HomeLink�
button — releasing
when the device begins to activate.
5. If the indicator light on the HomeLink� blinks
rapidly for 2 seconds and then turns solid,
HomeLink� has picked up a “rolling code”
garage door opener signal. You will need to
proceed with the next steps to train the
HomeLink� to complete the programming
which may require a ladder and another per-
son for convenience.
6. Press and release the “smart” or “learn” pro- gram button located on the garage door
opener’s motor to activate the “training
mode”. This button is usually located near
the antenna wire that hangs down from the
motor. If the wire originates from under a
light lens, you will need to remove the lens to
access the program button.
NOTE:
Once you have pressed and released the
program button on the garage door open-
er’s motor and the “training light” is lit, you
have 30 seconds in which to perform step 7.
Use the help of a second person for conve-
nience to assist when performing this step.
Page 137 of 407

7. Within 30 seconds of pressing and releas-ing the garage door opener’s program but-
ton, quickly and firmly press and release the
HomeLink� button you’ve just programmed.
Press and release the HomeLink� button up
to 3 times to complete the training.
8. Your HomeLink� button should now be pro-
grammed. (To program the remaining
HomeLink� buttons for additional door or
gate openers, follow steps 2-4 only.)
NOTE:
Do not repeat step 1 unless you want to
“clear” all previously programmed
HomeLink� buttons.
If you have any questions or are having difficulty
programming your HomeLink� buttons, refer to
the HomeLink� web site at: www.homelink.com
or call 1-800-355-3515.
PROGRAMMING HOMELINK� FOR
CANADIAN CUSTOMERS
Prior to 1992, D.O.C. regulations required hand-
held transmitters to stop transmitting after 2 sec-
onds. To program your hand-held transmitter to
HomeLink�, continue to press and hold the
HomeLink� button (see steps2-4under “Pro-
gramming HomeLink�”) while you press and re-
press (“cycle”) your hand-held transmitters every 2 seconds until the indicator light flashes rapidly
(indicating successful programming) .
NOTE:
When programming a garage door opener,
etc., it is advised to unplug the device dur-
ing the “cycling” process to prevent pos-
sible damage to the garage door opener
components.
OPERATING THE HOMELINK�
UNIVERSAL TRANSCEIVER
The HomeLink�
Universal Transceiver (once pro-
grammed) may now be used to activate the ga-
rage door, etc. To operate, simply press the ap-
propriate programmed HomeLink� Universal
Transceiver button. The amber indicator light will
illuminate while the signal is being transmitted.
PROGRAMMING TROUBLE-
DIAGNOSIS
If the HomeLink� does not quickly learn the hand-
held transmitter information:
● replace the hand-held transmitter batteries
with new batteries.
● position the hand-held transmitter with its
battery area facing away from the
HomeLink� surface. ●
press and hold both the HomeLink� and
hand-held transmitter buttons without inter-
ruption.
● position the hand-held transmitter 1 - 3
inches (26 - 76 mm) away from the
HomeLink� surface. Hold the transmitter in
that position for up to 15 seconds. If
HomeLink� is not programmed within that
time, try holding the transmitter in another
position – keeping the indicator light in view
at all times.
If you continue to have programming difficulties,
please contact the NISSAN Consumer Affairs
Department. The phone numbers are located in
the Foreword of this manual.
CLEARING THE PROGRAMMED
INFORMATION
Individual buttons cannot be cleared. However,
to clear all programming, press and hold the two
outside buttons and release when the indicator
light begins to flash (approximately 20 seconds) .
Instruments and controls2-57
Page 138 of 407

REPROGRAMMING A SINGLE
HOMELINK�BUTTON
To reprogram a HomeLink� Universal Transceiver
button, complete the following.
1. Press and hold the desired HomeLink� but-
ton. Do not release the button until step 4
has been completed.
2. When the indicator light begins to flash slowly (after 20 seconds) , position the
hand-held transmitter1-3inches (26 - 76
mm) away from the HomeLink� surface.
3. Press and hold the hand-held transmitter button.
4. The HomeLink� indicator light will flash, first
slowly and then rapidly. When the indicator
light begins to flash rapidly, release both
buttons.
The HomeLink� Universal Transceiver button has
now been reprogrammed. The new device can
be activated by pushing the HomeLink� button
that was just programmed. This procedure will
not affect any other programmed HomeLink�
buttons.
IF YOUR VEHICLE IS STOLEN
If your vehicle is stolen, you should change the
codes of any non-rolling code device that has
been programmed into HomeLink�. Consult the
Owner’s Manual of each device or call the manu-
facturer or dealer of those devices for additional
information.
When your vehicle is recovered, you will
need to reprogram the HomeLink� Univer-
sal Transceiver with your new transmitter
information.
FCC Notice:
This device complies with FCC rules part 15
and RSS-210 of Industry Canada. Opera-
tion is subject to the following two condi-
tions:
(1) This device may not cause harmful in-
terference and (2) This device must accept
any interference that may be received, in-
cluding interference that may cause undes-
ired operation.
This transmitter has been tested and com-
plies with FCC and DOC/MDC rules.
Changes or modifications not expressly ap-
proved by the party responsible for compli-
ance could void the user’s authority to op-
erate the equipment. DOC: ISTC 1763K1313
FCC I.D. CV2V67690
2-58Instruments and controls
Page 166 of 407
4 Display screen, heater, air conditioner,
audio and phone systems
Control panel buttons (if so equipped)...............4-2
How to use the joystick and ENTER button ........4-3
How to use the BACK button . ...................4-3
Setting up the start-up screen ...................4-3
How to use the TRIP button .....................4-4
How to use the SETTING button .................4-7
Page 174 of 407
Display settings
Select the “Display” key and press the ENTER
button. The DISPLAY SETTINGS screen will ap-
pear.Brightness/contrast:
Select the “Brightness/Contrast” key to adjust
the brightness and contrast of the map back-
ground. Use the joystick to adjust the brightness
to darker or brighter and the contrast to lower or
higher.
The new settings are automatically saved when
you exit the setting screen by pressing the BACK
button or any other mode button.Display off:
Select the “Display Off” key. The indicator of the
“Display Off” turns amber and the message
above will be displayed briefly. When the audio,
HVAC (Heater and air conditioner) , or any mode
button on the control panel is operated, the dis-
play turns on for that operation. If one of the
control panel buttons is pressed, the display will
not automatically turn off until that operation is
finished. Otherwise, the screen turns off auto-
matically after 5 seconds.
Page 180 of 407

WARNING
●The air conditioner cooling function op-
erates only when the engine is running.
● Do not leave children or adults who
would normally require the assistance
of others alone in your vehicle. Pets
should also not be left alone. They
could accidentally injure themselves or
others through inadvertent operation of
the vehicle. Also, on hot, sunny days,
temperatures in a closed vehicle could
quickly become high enough to cause
severe or possibly fatal injuries to
people or animals.
● Do not use the recirculation mode for
long periods as it may cause the interior
air to become stale and the windows to
fog up.
1. Fan speed control dial
2. Front window defroster button
3. Rear window defroster button
4. Air recirculation button
5. Temperature control dial
6. Max A/C button
7. Air flow control buttons
8. Air conditioner ON/OFF buttonCONTROLS
Fan control dial
The fan control dial turns the fan on and off, and
controls fan speed.
Air flow control buttons
The air flow control buttons allow you to select
the air flow outlets.
MAX A/C — Air flows from center and side
vents with maximum cooling
(air conditioning) .
Page 194 of 407
1. Driver temperature control dial
2. A/C ON/OFF button
3. Front window defroster button
4. Fan speed control dial
5. System OFF button
6. Rear window defroster button
7. Air recirculation button
8. Passenger temperature control dial
9. DUAL button
10. Air flow control buttons
11. AUTO button