Page 3574 of 3745

SE-8
< SERVICE INFORMATION >
SQUEAK AND RATTLE TROUBLE DIAGNOSES
Most of these incidents can be repaired by adjusting, securing or insulating the item(s) or component(s) caus-
ing the noise.
SUNROOF/HEADLINING
Noises in the sunroof/headlining area c an often be traced to one of the following:
1. Sunroof lid, rail, linkage or seals making a rattle or light knocking noise
2. Sun visor shaft shaking in the holder
3. Front or rear windshield touching headliner and squeaking
Again, pressing on the components to stop the noise while duplicating the conditions can isolate most of these
incidents. Repairs usually consist of insulating with felt cloth tape.
OVERHEAD CONSOLE (FRONT AND REAR)
Overhead console noises are often caused by the c onsole panel clips not being engaged correctly. Most of
these incidents are repaired by pushing up on the c onsole at the clip locations until the clips engage.
In addition look for:
1. Loose harness or harness connectors.
2. Front console map/reading lamp lense loose.
3. Loose screws at console attachment points.
SEATS
When isolating seat noise it's important to note the pos ition the seat is in and the load placed on the seat when
the noise is present. These conditions should be duplicated when verifying and isolating the cause of the
noise.
Cause of seat noise include:
1. Headrest rods and holder
2. A squeak between the seat pad cushion and frame
3. The rear seatback lock and bracket
These noises can be isolated by moving or pressing on the suspected components while duplicating the con-
ditions under which the noise occurs. Most of thes e incidents can be repaired by repositioning the component
or applying urethane tape to the contact area.
UNDERHOOD
Some interior noise may be caused by components under the hood or on the engine wall. The noise is then
transmitted into the passenger compartment.
Causes of transmitted underhood noise include:
1. Any component mounted to the engine wall
2. Components that pass through the engine wall
3. Engine wall mounts and connectors
4. Loose radiator mounting pins
5. Hood bumpers out of adjustment
6. Hood striker out of adjustment
These noises can be difficult to isolate since they cannot be reached from the interior of the vehicle. The best
method is to secure, move or insulate one component at a time and test drive the \
vehicle. Also, engine RPM
or load can be changed to isolate the noise. Repairs can usually be made by moving, adjusting, securing, or
insulating the component causing the noise.
Revision: January 20102010 Versa
Page 3577 of 3745
FRONT SEATSE-11
< SERVICE INFORMATION >
C
DE
F
G H
J
K L
M A
B
SE
N
O P
FRONT SEAT
Driver SeatINFOID:0000000005396868
1. Headrest 2. Headrest holder (locked)3. Headrest holder (free)
4. Seat assembly 5. Seat belt buckle6. Rear leg cover
7. Push nut 8. Seat cushion inner finisher9. Snap pin
10. Reclining lever 11. Lever cover12. Lifter lever (if equipped)
13. Seat cushion finisher B 14. Reclining device control wire 15. Seat cushion lower finisher
16. Seat cushion outer finisher 17. Seat cushion pad18. Seat cushion trim
AWJIA0475ZZ
Revision: January 20102010 Versa
Page 3579 of 3745

FRONT SEATSE-13
< SERVICE INFORMATION >
C
DE
F
G H
J
K L
M A
B
SE
N
O P
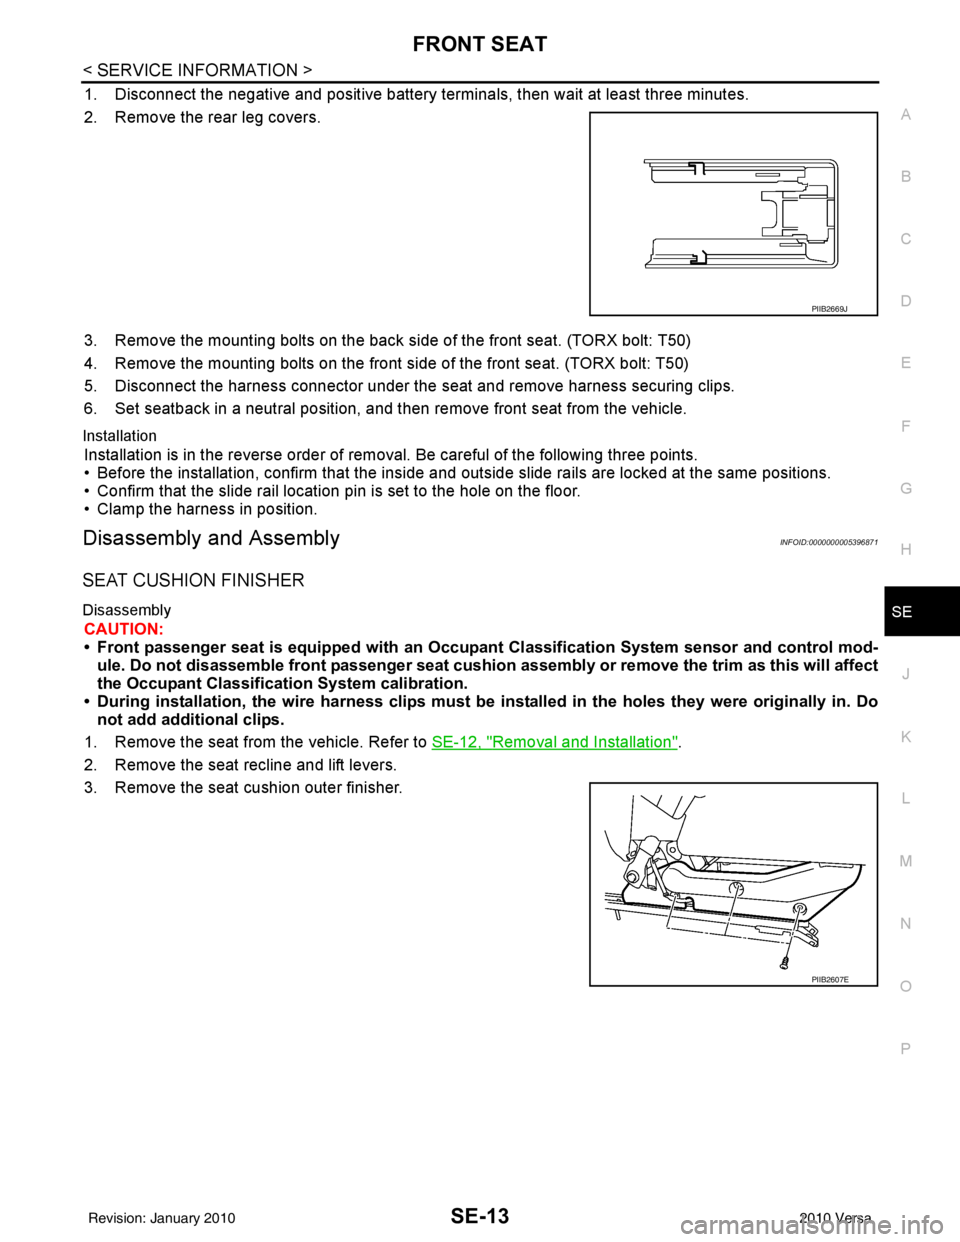
1. Disconnect the negative and positive battery term inals, then wait at least three minutes.
2. Remove the rear leg covers.
3. Remove the mounting bolts on the back si de of the front seat. (TORX bolt: T50)
4. Remove the mounting bolts on the front side of the front seat. (TORX bolt: T50)
5. Disconnect the harness connector under the seat and remove harness securing clips.
6. Set seatback in a neutral position, and t hen remove front seat from the vehicle.
Installation
Installation is in the reverse order of removal. Be careful of the following three points.
• Before the installation, confirm that the inside and outside slide rails are locked at the same positions.
• Confirm that the slide rail location pin is set to the hole on the floor.
• Clamp the harness in position.
Disassembly and AssemblyINFOID:0000000005396871
SEAT CUSHION FINISHER
Disassembly
CAUTION:
• Front passenger seat is equipped with an Occupant Classification System sensor and control mod-
ule. Do not disassemble front passenger seat cushion assembly or remove the trim as this will affect
the Occupant Classificatio n System calibration.
• During installation, the wire harn ess clips must be installed in the holes they were originally in. Do
not add additional clips.
1. Remove the seat from the vehicle. Refer to SE-12, "
Removal and Installation".
2. Remove the seat recline and lift levers.
3. Remove the seat cushion outer finisher.
PIIB2669J
PIIB2607E
Revision: January 20102010 Versa
Page 3581 of 3745
REAR SEATSE-15
< SERVICE INFORMATION >
C
DE
F
G H
J
K L
M A
B
SE
N
O P
REAR SEAT
Component Parts DrawingINFOID:0000000005396872
60:40 SPLIT FOLD DOWN SEAT - HATCHBACK
WIIA1231E
1. Seat cushion trim 2. Seat cushion pad3. Seatback side
4. Armrest 5. Rear seat bushing6. Armrest hinge cover
Revision: January 20102010 Versa
Page 3583 of 3745
REAR SEATSE-17
< SERVICE INFORMATION >
C
DE
F
G H
J
K L
M A
B
SE
N
O P
4. Remove the seatback mounting bolts from the left rear seat back brackets.
CAUTION:
Tighten seatback mounting bolts in the order as shown.
5. Remove the seatback from the vehicle.
6. Remove the kicking plate rear inner. Refer to EI-40, "
Removal and Installation" .
7. Remove the bolt under the seatback side.
8. Pull seatback side up, and then remove seatback side.
9. Remove the bolts, and then remove rear seatback center bracket.
10. Remove the bolt, and then remove rear seatback side bracket from the vehicle.
11. Remove the rear seatback finisher. Refer to EI-54, "
Removal and Installation" .
12. Remove the bolts, and then remove the rear seat striker.
Installation
Installation is in the reverse order of removal. Be careful of the following point.
WIIA1288E
PIIB2482J
PIIB2483J
PIIB2484J
Revision: January 20102010 Versa
Page 3585 of 3745
REAR SEATSE-19
< SERVICE INFORMATION >
C
DE
F
G H
J
K L
M A
B
SE
N
O P
Assembly of Armrest
Assembly is in the reverse order of disassembly.
Disassembly of Seatback Trim and Pad
1. Remove the headrest.
2. Remove the retainer under the back of seatback.
3. Remove the clips, and then remove the striker cover.
4. Remove the headrest holder.
5. To remove armrest, refer to "Disassembly of Armrest " .
6. Remove the seatback trim.
7. Remove the bolts, and then remove the rear seat lock assembly.
8. Remove the seatback pad from the seatback frame.
9. Remove the seatback center bracket
bolt and then remove the seatback frame.
PIIB2486J
PIIB2485J
PIIB4084J
PIIB2487J
Revision: January 20102010 Versa
Page 3587 of 3745
REAR SEATSE-21
< SERVICE INFORMATION >
C
DE
F
G H
J
K L
M A
B
SE
N
O P
Component Parts DrawingINFOID:0000000005396875
60:40 SPLIT FOLD DOWN SEAT - SEDAN
WBIA0849E
1. Seat cushion trim 2. Seat cushion pad3. Seatback side
4. Armrest 5. Rear seat bushing6. Armrest hinge cover
7. Headrest 8. Headrest holder (free)9. Headrest holder (locked)
10. Striker cover 11. Seatback trim12. Seatback pad
Revision: January 20102010 Versa
Page 3589 of 3745

REAR SEATSE-23
< SERVICE INFORMATION >
C
DE
F
G H
J
K L
M A
B
SE
N
O P
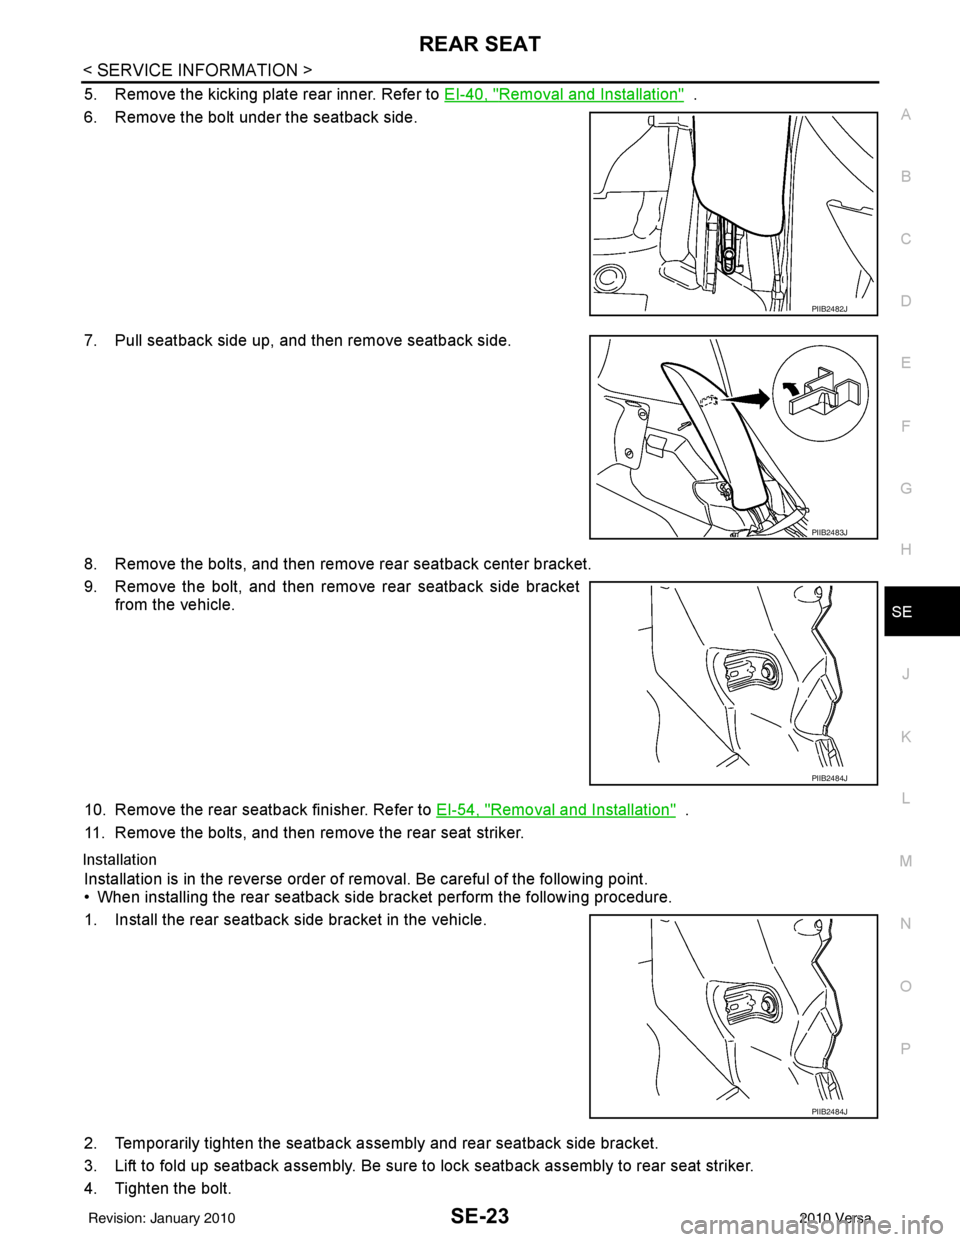
5. Remove the kicking plate rear inner. Refer to EI-40, "Removal and Installation" .
6. Remove the bolt under the seatback side.
7. Pull seatback side up, and then remove seatback side.
8. Remove the bolts, and then remove rear seatback center bracket.
9. Remove the bolt, and then remove rear seatback side bracket from the vehicle.
10. Remove the rear seatback finisher. Refer to EI-54, "
Removal and Installation" .
11. Remove the bolts, and then remove the rear seat striker.
Installation
Installation is in the reverse order of removal. Be careful of the following point.
• When installing the rear seatback side bracket perform the following procedure.
1. Install the rear seatback side bracket in the vehicle.
2. Temporarily tighten the seatback asse mbly and rear seatback side bracket.
3. Lift to fold up seatback assembly. Be sure to lock seatback assembly to rear seat striker.
4. Tighten the bolt.
PIIB2482J
PIIB2483J
PIIB2484J
PIIB2484J
Revision: January 20102010 Versa