2010 NISSAN QASHQAI check oil
[x] Cancel search: check oilPage 231 of 297

Downloaded from www.Manualslib.com manuals search engine 8Maintenance and do-it-yourself
Maintenance and do-it-yourself
Maintenance requirements ....................................... 8-2
Scheduled maintenance...................................... 8-2
General maintenance .......................................... 8-2
Where to go for service ...................................... 8-2
General maintenance ............................................... 8-2 Explanation of general maintenance items ........... 8-2
Maintenance precautions ......................................... 8-4
Engine compartment ................................................ 8-5
Engine cooling system ............................................. 8-6 Checking engine coolant level............................. 8-6
Changing engine coolant .................................... 8-6
Engine oil................................................................. 8-8 Checking engine oil level .................................... 8-8
Changing engine oil ............................................ 8-9
Changing engine oil filter .................................... 8-11
Protect the environment ...................................... 8-13
Fuel filter (Diesel engine models) ............................. 8-13 Draining water .................................................... 8-13
Bleeding the fuel system ..................................... 8-14
Automatic transmission fluid (ATF) ........................... 8-14
Continuously variable transmission (CVT) fluid ......... 8-14
Brakes ..................................................................... 8-15 Checking brake pedal......................................... 8-15
Checking handbrake........................................... 8-15
Brake and clutch fluid .............................................. 8-15
Window washer fluid/headlight cleaner fluid
(where fitted) ........................................................... 8-16
Battery..................................................................... 8-17 Vehicle battery .................................................... 8-17
Jump-starting ...................................................... 8-19 Integrated keyfob/Intelligent Key battery
replacement........................................................ 8-19
Drive belts ............................................................... 8-21
Spark plugs (Petrol engine models).......................... 8-21
Air cleaner filter........................................................ 8-21 Viscous paper type ............................................. 8-22
Dry paper type (where fitted) .............................. 8-22
Wiper blades ........................................................... 8-22 Cleaning ............................................................. 8-22
Front window wiper replacement ........................ 8-22
Back door window wiper replacement ................ 8-23
Windscreen washer nozzle ................................. 8-23
Fuses ...................................................................... 8-23 Passenger compartment ..................................... 8-23
Engine compartment ........................................... 8-24
Lights ...................................................................... 8-25 Headlights .......................................................... 8-25
Exterior lights ...................................................... 8-27
Interior lights....................................................... 8-27
Light locations .................................................... 8-27
Wheels and tyres ..................................................... 8-31 Tyre inflation pressure......................................... 8-31
Types of tyres ..................................................... 8-31
Snow chains....................................................... 8-32
Tyre rotation ....................................................... 8-32
Tyre wear and damage ....................................... 8-33
Tyre age ............................................................. 8-33
Changing tyres and wheels ................................. 8-33
Four-wheel drive (4WD) models ......................... 8-33
Wheel balance.................................................... 8-33
Page 234 of 297
Downloaded from www.Manualslib.com manuals search engine Lights*:
Clean the headlights on a regular basis. Make sure
that the headlights, stop lights, tail lights, turn signal
lights, and other lights are all operating properly and
installed securely. Also check headlight aim.
Tyres*:
Check the pressure with a gauge periodically when
at a service station (including the spare) and adjust
to the specified pressure if necessary. Check care-
fully for damage, cuts or excessive wear.
Tyre rotation*:
Tyres should be rotated every 10,000 km (6,000
miles) for Two-Wheel Drive (2WD) models and
5,000 km (3,000 miles) for Four-Wheel Drive (4WD)
models. However, the timing for tyre rotation may
vary according to your driving habits and road sur-
face conditions.
Wheel alignment and balance:
If the vehicle pull to either side while driving on a
straight and level road, or if you detect uneven or
abnormal tyre wear, there may be a need for wheel
alignment. If the steering wheel or seat vibrates at
normal highway speeds, wheel balancing may be
needed.
Wheel nuts:
When checking the tyres, make sure no wheel nuts
are missing, and check for any loose wheel nuts.
Tighten if necessary.Windscreen:
Clean the windscreen on a regular basis. Check the
windscreen at least every six months for cracks or
other damage. Have a damaged windscreen re-
paired by a qualified repair facility.
Wiper blades*:
Check for cracks or wear if they do not wipe prop-
erly.
Under the bonnet and vehicle
The maintenance items listed here should be
checked periodically, e.g. each time you check the
engine oil or refuel.
Battery*:
Check if the green indicator on the top of the main-
tenance free battery is visible. If it is not visible,
replace the battery as soon as possible.
Vehicles operated in high temperatures or under
severe conditions, check the fluid level frequently.
Brake and clutch fluid level*:
Make sure that the brake and clutch fluid level is
between the MAX and MIN lines on the reservoir.
Engine coolant level*:
Check the coolant level when the engine is cold.
Engine drive belts*:
Make sure that the drive belts are not frayed, worn,
cracked or oily.Engine oil level*:
Check the level after parking the vehicle on a level
surface and turning off the engine.
Fluid leaks:
Check under the vehicle for fuel, oil, water or other
fluid leaks after the vehicle has been parked for a
while. Water dripping from the air conditioner after
use is normal. If you should notice any leaks or if
petrol fumes are evident, check for the cause and
have it corrected immediately.
Window washer fluid*:
Check that there is adequate fluid in the tank.
Inside the vehicle
The maintenance items listed here should be
checked on a regular basis, such as when perform-
ing periodic maintenance, cleaning the vehicle, etc.
Accelerator pedal:
Check the pedal for smooth operation and make
sure that the pedal does not catch or require uneven
effort. Keep the floor mats away from the pedal.
Brake pedal*:
Check the pedal for smooth operation. If the brake
pedal suddenly goes down further than normal, the
pedal feels spongy or the vehicle seems to take
longer to stop, contact a NISSAN dealer or qualified
workshop immediately. Keep the floor mat away
from the pedal.
Maintenance and do-it-yourself8-3
Page 239 of 297
Downloaded from www.Manualslib.com manuals search engine CHECKING ENGINE OIL LEVEL
CAUTION
The oil level should be checked regularly. Oper-
ating with an insufficient amount of oil can dam-
age the engine, and such damage is not covered
by warranty.
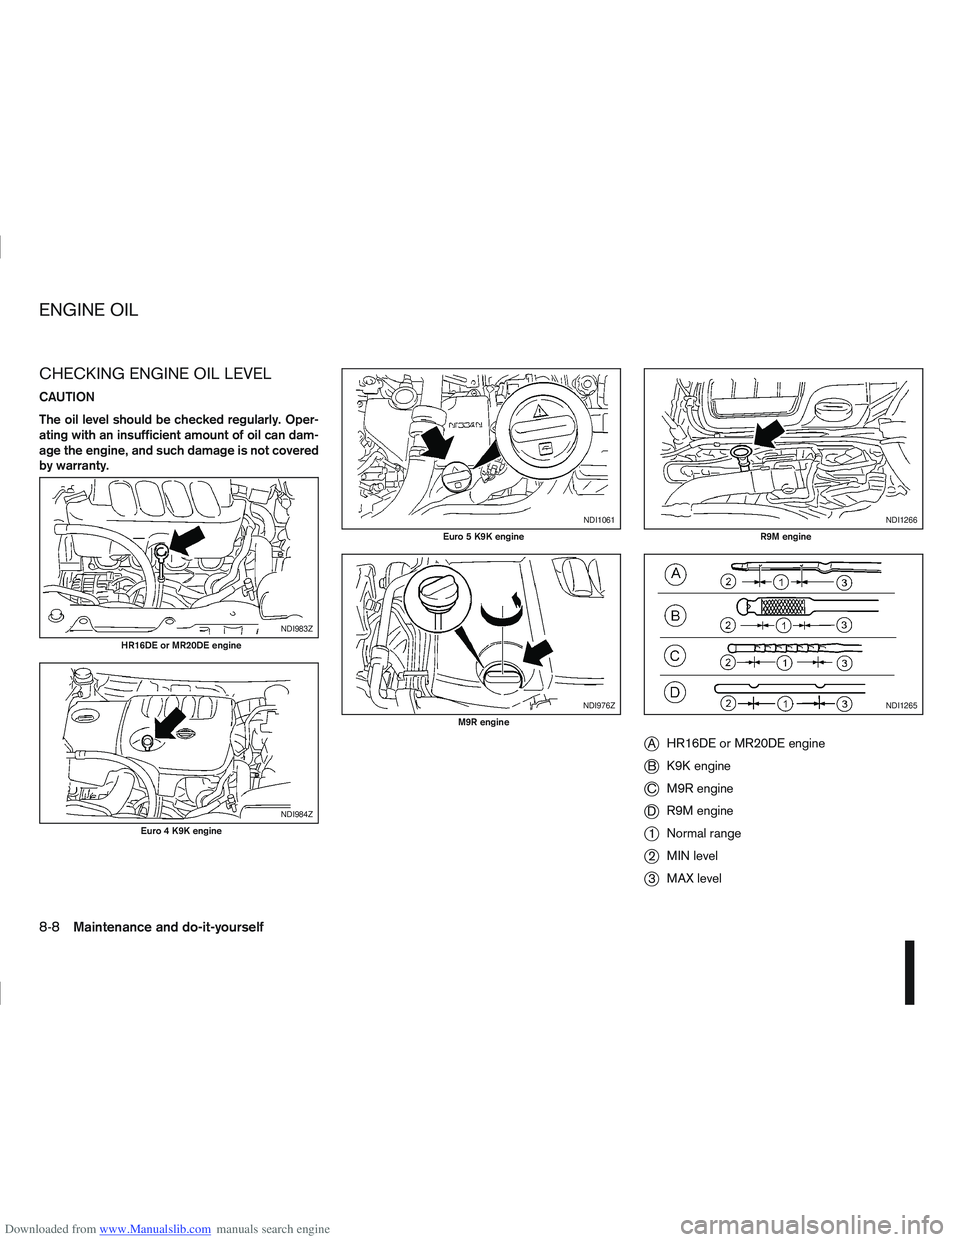
jAHR16DE or MR20DE engine
jB K9K engine
jC M9R engine
jDR9M engine
j1Normal range
j2MIN level
j3MAX level
NDI983Z
HR16DE or MR20DE engine
NDI984Z
Euro 4 K9K engine
NDI1061
Euro 5 K9K engine
NDI976Z
M9R engine
NDI1266
R9M engine
NDI1265
ENGINE OIL
8-8Maintenance and do-it-yourself
Page 240 of 297
Downloaded from www.Manualslib.com manuals search engine 1. Park the vehicle on a level surface and apply thehandbrake.
2. Start the engine. If the engine is cold, start and let the engine idle until it reaches the operational
temperature.
3. Turn the engine off.
4. Wait at least 10 minutes for the engine oil to drain back into the oil pan.
5. Open the bonnet. For details, see “Bonnet release” in the “3. Pre-driving checks and
adjustments” section.
6. Remove the dipstick and wipe it clean. Models with M9R engine: the engine oil dipstick
is attached to the engine oil filler cap. Remove
the engine oil filler cap and wipe the dipstick
clean.
7. Reinsert it all the way. Models with M9R engine: install the engine oil
filler cap.
8. Remove the dipstick again and check the oil level. It should be in the normal range
j1.
9. If the oil level is below MIN
j2 , remove the en-
gine oil filler cap and pour the recommended oil
through the opening. Do not overfill
j3.
10. Recheck the oil level with the dipstick.
11. Install the engine oil filler cap securely.
12. Close the bonnet. It is normal to add some engine oil between oil
maintenance intervals depending on the severity
of operating conditions or depending on the prop-
erty of the engine oil used. More engine oil is
consumed by frequent acceleration/deceleration
especially when the engine rpm is high. Con-
sumption is likely to be higher when the engine
is new. If the rate of oil consumption, after hav-
ing driven for 5,000 km (3,000 miles), is more
than 0.5 litre per 1,000 km (621 miles), consult a
NISSAN dealer or qualified workshop.
CHANGING ENGINE OIL
WARNING
NISSAN recommends contacting a NISSAN
dealer or qualified workshop for engine oil
servicing.
NISSAN GREEN PROGRAM
Used oil must not be poured into the ground,
canals, rivers, etc. It should be disposed of at
a rubbish tip having proper facilities. Check
your local regulations.
Be careful not to burn yourself, as the engine
oil is hot.
Prolonged and repeated contact with used
engine oil may cause skin cancer.
Avoid direct skin contact with used oil. If skin
contact is made, wash thoroughly with soap
or hand cleaner and plenty of water as soon
as possible.
Store used engine oil in marked containers
out of the reach of children.
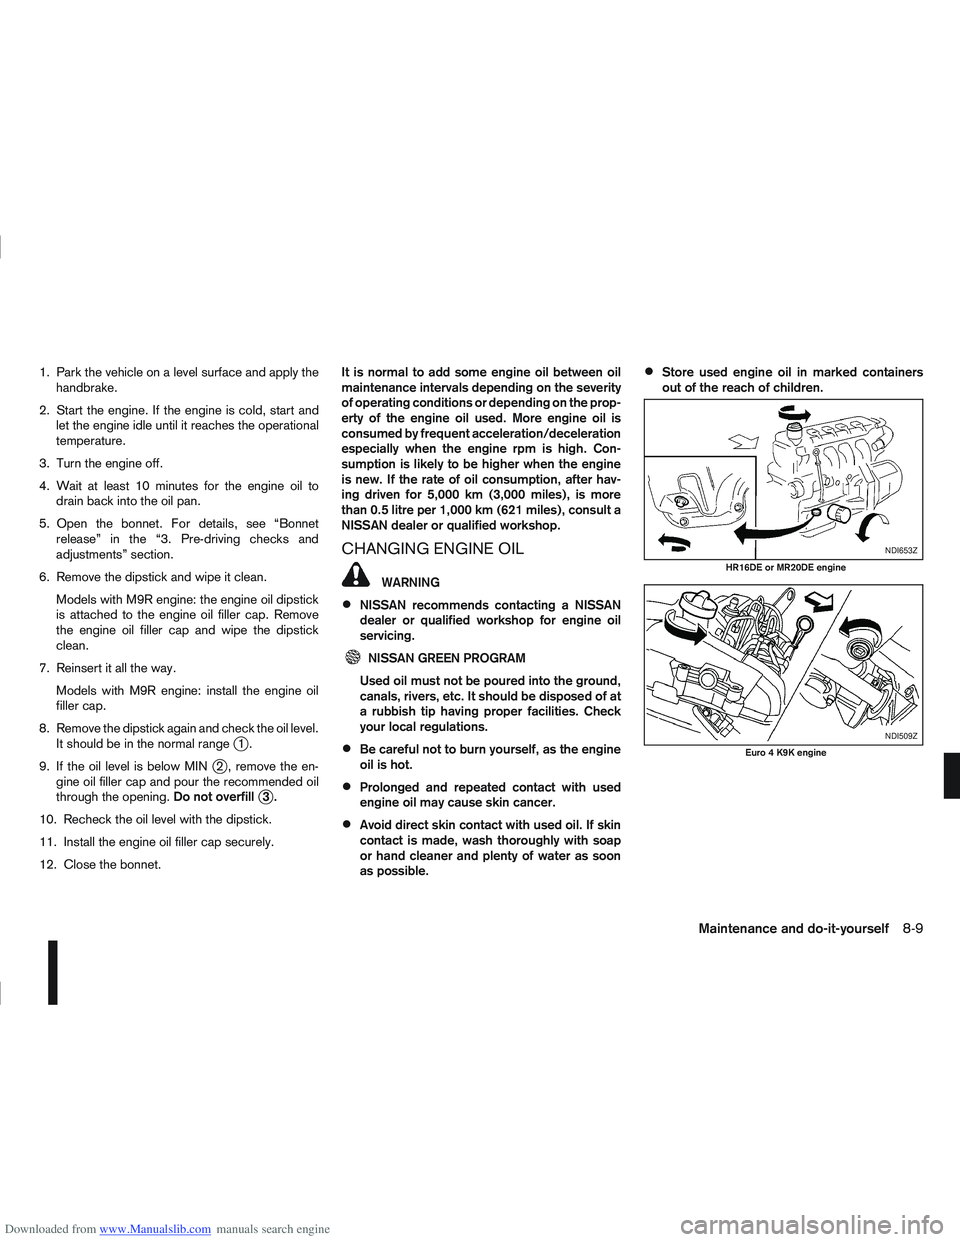
NDI653Z
HR16DE or MR20DE engine
NDI509Z
Euro 4 K9K engine
Maintenance and do-it-yourself8-9
Page 241 of 297

Downloaded from www.Manualslib.com manuals search engine 1. Park the vehicle on a level surface and apply thehandbrake.
2. Start the engine. If the engine is cold, start and let the engine idle until the engine temperature
reaches the operational temperature.
3. Turn the engine off and wait at least 10 minutes to let the engine oil drain back into the oil pan. 4. Open the bonnet. For details, see “Bonnet
release” in the “3. Pre-driving checks and
adjustments” section.
5. Remove the engine oil filler cap.
6. Raise and support the vehicle using a suitable floor jack and safety jack stands.
Place the safety jack stands under the vehicle
jack-up points.
For details, see “Flat tyre” in the “6. In case of
emergency” section.
7. Remove the engine compartment under cover.
8. Place a large drain pan under the drain plug.
9. Remove the drain plug with a wrench and com- pletely drain the oil.
If the engine oil filter needs to be changed, re-
move and replace it at this time. See “Changing
engine oil filter” later in this section.
10. Clean and re-install the drain plug along with a new washer. Securely tighten the drain plug
with a wrench. Do not use excessive force. Drain plug tightening torques:
HR16DE, MR20DE engine:
34.3 (3.5 kg-m, 25 ft-lb)
K9K engine:
20 (2.1 kg-m, 15 ft-lb)
M9R engine:
44 (4.5 kg-m, 32 ft-lb)
R9M engine:
50 (5.1 kg-m, 36.9 ft-lb)
11. Refill the engine with recommended engine oil and quantity.
See “Capacities and recommended
fuel/lubricants” in the “9. Technical information”
section.
12. Check the oil level with the dipstick. For details, see “Checking engine oil level” earlier in this
section. If necessary, add engine oil.
13. Install the engine oil filler cap securely.
14. Start the engine.
15. Check for any leakage around the drain plug. Correct as required.
16. Turn the engine off and wait several minutes.
17. Check the oil level again with the dipstick. If necessary, add engine oil.
18. Install the engine compartment under cover.
19. Lower the vehicle carefully to the ground.
20. Close the bonnet.
NDI1064
Euro 5 K9K engine
NDI978Z
M9R or R9M engine
8-10Maintenance and do-it-yourself
Page 242 of 297
Downloaded from www.Manualslib.com manuals search engine CHANGING ENGINE OIL FILTER
WARNING
NISSAN recommends contacting a NISSAN
dealer or qualified workshop for engine oil fil-
ter servicing.
NISSAN GREEN PROGRAM
A used oil filter should be disposed of at a
rubbish tip having proper facilities.
HR16DE, MR20DE or K9K engine
Removal:
1. Drain the engine oil. For details, see “Changing engine oil” earlier in this section.
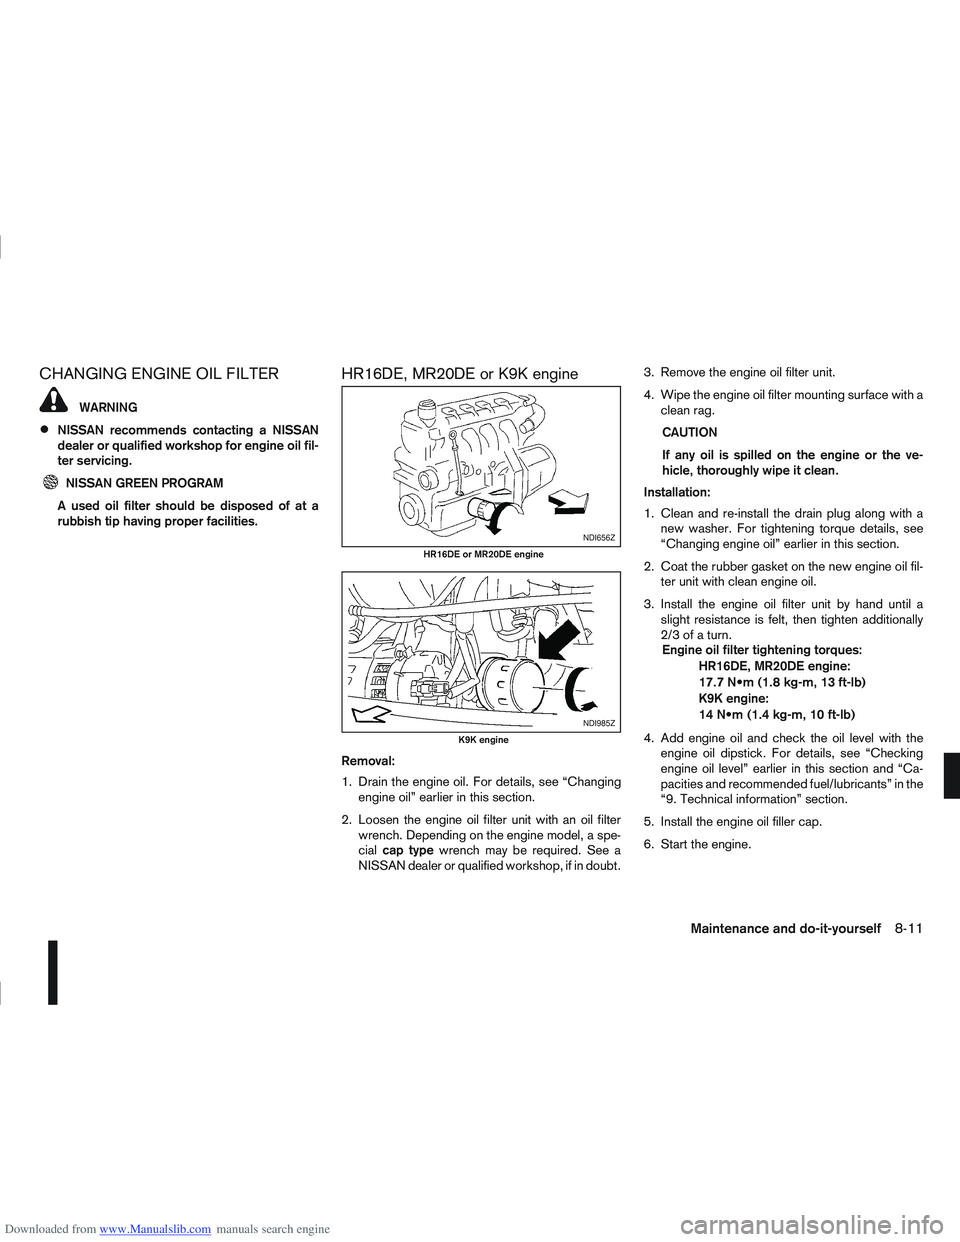
2. Loosen the engine oil filter unit with an oil filter wrench. Depending on the engine model, a spe-
cial cap type wrench may be required. See a
NISSAN dealer or qualified workshop, if in doubt. 3. Remove the engine oil filter unit.
4. Wipe the engine oil filter mounting surface with a
clean rag.
CAUTION
If any oil is spilled on the engine or the ve-
hicle, thoroughly wipe it clean.
Installation:
1. Clean and re-install the drain plug along with a new washer. For tightening torque details, see
“Changing engine oil” earlier in this section.
2. Coat the rubber gasket on the new engine oil fil- ter unit with clean engine oil.
3. Install the engine oil filter unit by hand until a slight resistance is felt, then tighten additionally
2/3ofaturn.Engine oil filter tightening torques:
HR16DE, MR20DE engine:
17.7 (1.8 kg-m, 13 ft-lb)
K9K engine:
14 (1.4 kg-m, 10 ft-lb)
4. Add engine oil and check the oil level with the engine oil dipstick. For details, see “Checking
engine oil level” earlier in this section and “Ca-
pacities and recommended fuel/lubricants” in the
“9. Technical information” section.
5. Install the engine oil filler cap.
6. Start the engine.
NDI656Z
HR16DE or MR20DE engine
NDI985Z
K9K engine
Maintenance and do-it-yourself8-11
Page 243 of 297

Downloaded from www.Manualslib.com manuals search engine 7. After the engine has been warmed up, make surethere are no leaks around the engine oil filter unit
and the drain plug. Correct as required.
8. Turn the engine off and wait several minutes. Check the oil level and add engine oil, if neces-
sary.
9. Install the engine compartment under cover.
10. Lower the vehicle carefully to the ground.
11. Close the bonnet.M9R or R9M engine
Removal:
1. Drain the engine oil. For details, see “Changing engine oil” earlier in this section.
2. Loosen the engine oil filter cover with a wrench.
3. Remove the engine oil filter cover then the oil fil- ter element.
4. Remove the rubber O-ring from the filter cover. 5. Wipe the oil filter cover entirely with a clean rag.
Installation:
1. Clean and re-install the drain plug along with a
new washer. For tightening torque details, see
“Changing engine oil” earlier in this section.
2. Install the rubber O-ring, in its housing, on the outside of the engine oil filter cover.
3. Insert the new oil filter element into the engine oil filter cover.
4. Coat the rubber O-ring with clean engine oil.
5. Install the engine oil filter cover until a slight re- sistance is felt, then tighten additionally 2/3 of a
turn.Tightening torque:
25 (2.6 kg-m, 18 ft-lb)
6. Add engine oil and check the oil level with the engine oil dipstick. For details, see “Checking
engine oil level” earlier in this section and “Ca-
pacities and recommended fuel/lubricants” in the
“9. Technical information” section.
7. Install the engine oil filler cap.
8. Start the engine.
9. After the engine has been warmed up, make sure there are no leaks around the engine oil filter
cover and the drain plug. Correct as required.
10. Turn the engine off and wait several minutes. Check the oil level and add engine oil, if neces-
sary.
11. Install the engine compartment undercover.
NDI981Z
M9R
NDI1267
R9M
8-12Maintenance and do-it-yourself
Page 257 of 297
Downloaded from www.Manualslib.com manuals search engine Only hold the xenon headlight bulb by the
base.
The bulb is manufactured from high-quality
quartz and is under high pressure.
Damage, soiling, and fingerprints should be
avoided and, if necessary, removed with alco-
hol before installing the bulb.
When the headlights are switched on, the
bulbs produce a certain amount of UV radia-
tion. In order to avoid any impairment of health
(burning and conjunctivitis), the bulb should
only be used in closed headlights with appro-
priate UV–absorbing front glass.
Due to the risk of burning, the bulb should be
left to cool down for 3 minutes after switching
off before touching.
Due to the use of mercury and various salts,
the bulb should be treated as special waste
when discarded.
The bulb may only be operated with a suitable
ballast which produces very high voltages
when switched on and during operation.
Contact with bulb and wires should therefore
be avoided and a safe distance of at least 30
mm should be maintained.
Replacing the halogen headlight bulb
CAUTION
High pressure halogen gas is sealed inside
the halogen bulb. The bulb may break if the
glass envelope is scratched or the bulb is
dropped.
When handling the bulb, DO NOT TOUCH THE
GLASS ENVELOPE.
Use the same number type and wattage as
originally installed.
Aiming is usually not necessary after replac-
ing the bulb. When aiming adjustment is nec-
essary, contact a NISSAN dealer or qualified
workshop.
Do not leave the bulb out of the headlight
reflector for a long period of time as dust,
moisture or smoke may enter the headlight
body and affect the performance of the head-
light.
The headlight is a semi-sealed beam type which
uses a replaceable headlight (halogen) bulb. A bulb
can be replaced from inside the engine compart-
ment without removing the headlight assembly.
Contact a NISSAN dealer or qualified workshop, if
you need assistance for bulb replacement.
1. Open the bonnet. For details, see “Bonnet release” in the “3. Pre-driving checks and
adjustments” section.
2. Disconnect the negative (—) battery cable. 3. When the broken bulb is located in the headlight
assembly under the air duct, carefully remove the
clips and rotate the air duct
jc clockwise a 1/4
of a turn.
4. Remove the cap (
jAorjB ) of the headlight as-
sembly.
5. Turn the connector 1/4 of a turn in the anti clock- wise direction and remove the headlight bulb.
6. Install the new bulb in the reverse order of re- moval and make sure that the cap is securely
sealed with the headlight body.
7. Where removed (step 3.), re-install the air duct
jc and clips in the order of removal.
8. Reconnect the negative (—) battery cable and close the bonnet.
NOTE
Fog may temporarily form inside the lens of the
exterior lights in the rain or in a car wash. The fog
is caused by a temperature difference between
the inside and the outside of the lens. This is not
a malfunction. If large droplets can be seen, then
contact a NISSAN dealer or qualified workshop.
8-26Maintenance and do-it-yourself