2010 NISSAN PATHFINDER key battery
[x] Cancel search: key batteryPage 317 of 463
5 Starting and driving
Precautions when starting and driving................5-2
Exhaust gas (carbon monoxide)..................5-2
Three-way catalyst..............................5-2
Tire Pressure Monitoring System (TPMS)..........5-3
On-pavement and off-road driving
precautions....................................5-5
Avoiding collision and rollover....................5-6
Off-road recovery...............................5-6
Rapid air pressure loss..........................5-6
Drinking alcohol/drugs and driving................5-7
Driving safety precautions.......................5-7
Ignition switch.....................................5-9
NISSAN Intelligent Key™ (if so equipped)........5-10
Ignition switch positions........................5-10
Automatic transmission.........................5-11
Key positions.................................5-12
Nissan vehicle immobilizer system...............5-12
Before starting the engine.........................5-13
Starting the engine...............................5-13
Driving the vehicle................................5-14
Automatic transmission.........................5-14
Parking brake....................................5-19Cruise control....................................5-20
Precautions on cruise control...................5-20
Cruise control operations.......................5-20
Break-in schedule................................5-21
Increasing fuel economy...........................5-22
Using four wheel drive (4WD).............5-22
Parking/parking on hills............................5-32
Power steering...................................5-33
Brake system....................................5-33
Brake precautions.............................5-33
Anti-lock Braking System (ABS).................5-34
Active brake limited slip (ABLS) system.............5-35
Vehicle Dynamic Control (VDC) system.............5-36
Cold weather driving..............................5-37
Freeing a frozen door lock......................5-37
Anti-freeze....................................5-37
Battery.......................................5-37
Draining of coolant water.......................5-37
Tire equipment................................5-37
Special winter equipment.......................5-38
Driving on snow or ice.........................5-38
Engine block heater (if so equipped).............5-38
Page 326 of 463

NISSAN INTELLIGENT KEY™ (if so
equipped)
The ignition lock is designed so that the ignition
switch cannot be turned to LOCK until the shift
selector is moved to the P (Park) position.
When turning the ignition switch, make sure the
shift selector is in the P (Park) position.
If the shift selector is not returned to the P (Park)
position, the ignition switch cannot be moved
toward LOCK.When the ignition switch cannot be turned to-
ward the LOCK position when the Intelligent Key
is in range, proceed as follows:
1. Move the shift selector into the P (Park)
position.
2. Turn the ignition switch slightly in the ON
direction.
3. Turn the switch toward the LOCK position.
The shift selector can be moved from the P
(Park) position if the ignition switch is in
the ON position and the foot brake pedal is
depressed.
There is an OFF position in between LOCK and
ACC, although it does not show on the ignition
switch. When the ignition switch is OFF, the
steering wheel is not locked (for models with a
steering wheel lock mechanism) .
In order for the steering wheel to be locked, it
must be turned about 1/6 of a turn counterclock-
wise from the straight up position.
To lock the steering wheel, turn the ignition
switch to the LOCK position. To unlock the
steering wheel, push the ignition switch in
and turn it gently while rotating the steer-
ing wheel slightly right and left.If the battery of the vehicle equipped with
the Intelligent Key system is discharged,
the ignition switch cannot be turned from
the LOCK position, even using the me-
chanical key.
IGNITION SWITCH POSITIONS
Push in the ignition switch to thesBposition
when you turn it.
LOCK (Normal parking position)
sA:
The ignition switch can only be locked in the
LOCK position.
The ignition switch will be unlocked when it is
pushed in, and turned to the ACC position
sC
while carrying the Intelligent Key.
ACC (Accessories)
sC:
This position activates electrical accessories
such as the radio, when the engine is not running.
ON (Normal operating position)
sD:
This position turns on the ignition system and the
electrical accessories.
START
sE:
This position starts the engine. As soon as the
engine has started, release the ignition switch
immediately. It will automatically return to the ON
position.
LSD0171
5-10Starting and driving
Page 327 of 463

The ignition switch cannot be turned back to the
LOCK position unless the shift selector is in the P
(Park) position. (It can be turned only to the
sB
position.)
CAUTION
Do not leave the vehicle with the ignition
switch in ACC or ON positions when the
engine is not running for an extended pe-
riod. This can discharge the battery.
AUTOMATIC TRANSMISSION
The ignition lock is designed so the ignition
switch cannot be placed in the LOCK position
and the key cannot be removed until the shift
selector is moved to the P (Park) position.
When removing the key from the ignition switch,
make sure the shift selector is in the P (Park)
position.
If the shift selector is not returned to P (Park)
position, the ignition switch cannot be placed in
the LOCK position.To remove the key from the ignition switch:
1. Shift the shift selector to the P (Park) posi-
tion with the ignition switch in the ON posi-
tion.
2. Place the ignition switch in the LOCK posi-
tion.
3. Remove the key from the ignition switch.
If the shift selector is shifted to the P (Park)
position after the ignition switch is placed in the
OFF position or when the ignition switch cannot
be placed in the LOCK position, proceed as
follows to remove the key.
1. Move the shift selector into the P (Park)
position.
2. Place the ignition switch slightly toward the
ON position.
3. Place the ignition switch in the LOCK posi-
tion.
4. Remove the key.
The shift selector is designed so it cannot moved
out of P (Park) and into any of the other gear
positions if the ignition switch is placed in the
OFF position or if the key is removed from the
switch.
WSD0041
Starting and driving5-11
Page 353 of 463

cDo not modify the vehicle’s suspension.
If suspension parts such as shock ab-
sorbers, struts, springs, stabilizer bars,
bushings and wheels are not NISSAN
approved for your vehicle or are ex-
tremely deteriorated the Vehicle Dy-
namic Control system may not operate
properly. This could adversely affect ve-
hicle handling performance, and the
VDC OFF indicator light may come on.
cWhen driving on extremely inclined sur-
faces such as higher banked corners,
the Vehicle Dynamic Control system
may not operate properly and the VDC
OFF indicator light may come on. Do
not drive on these types of roads.
cWhen driving on an unstable surface
such as a turntable, ferry, elevator or
ramp, the Vehicle Dynamic Control off
indicator light may illuminate. This is
not a malfunction. Restart the engine
after driving onto a stable surface.
cIf wheels or tires other than the recom-
mended ones are used, the Vehicle Dy-
namic Control system may not operate
properly and the Vehicle Dynamic Con-
trol off indicator light may come on.
cThe Vehicle Dynamic Control system is
not a substitute for winter tires or tire
chains on a snow covered road.FREEING A FROZEN DOOR LOCK
To prevent a door lock from freezing, apply de-
icer through the key hole. If the lock becomes
frozen, heat the key before inserting it into the key
hole or use the remote keyless entry keyfob (if so
equipped) .
ANTI-FREEZE
In the winter when it is anticipated that the tem-
perature will drop below 32°F (0°C) , check the
anti-freeze to assure proper winter protection.
For details, see “Engine cooling system” in the
“Maintenance and do-it-yourself” section of this
manual.
BATTERY
If the battery is not fully charged during extremely
cold weather conditions, the battery fluid may
freeze and damage the battery. To maintain maxi-
mum efficiency, the battery should be checked
regularly. For details, see “Battery” in the “Main-
tenance and do-it-yourself” section of this
manual.
DRAINING OF COOLANT WATER
If the vehicle is to be left outside without anti-
freeze, drain the cooling system, including the
engine block. Refill before operating the vehicle.
For details, see “Changing engine coolant” in the
“Maintenance and do-it-yourself” section of this
manual.
TIRE EQUIPMENT
1. SUMMER tires have a tread designed to
provide superior performance on dry pave-
ment. However, the performance of these
tires will be substantially reduced in snowy
and icy conditions. If you operate your ve-
hicle on snowy or icy roads, NISSAN recom-
mends the use of MUD & SNOW or ALL
SEASON TIRES on all four wheels. Please
consult a NISSAN dealer for the tire type,
size, speed rating and availability informa-
tion.
2. For additional traction on icy roads, studded
tires may be used. However, some U.S.
states and Canadian provinces prohibit their
use. Check local, state and provincial laws
before installing studded tires.
Skid and traction capabilities of studded
snow tires on wet or dry surfaces may be
poorer than that of non-studded snow tires.
COLD WEATHER DRIVING
Starting and driving5-37
Page 365 of 463

WARNING
Always follow the instructions below.
Failure to do so could result in damage to
the charging system and cause personal
injury.
1. If the booster battery is in another vehicle,
position the two vehicles to bring their bat-
teries near each other.
Do not allow the two vehicles to touch.
2. Apply the parking brake. Move the shift se-
lector to N (Neutral) (manual transmission)
or to P (Park) (automatic transmission) .
Switch off all unnecessary electrical sys-tems (lights, heater, air conditioner, etc.) .
3. Remove vent caps on the battery (if so
equipped) . Cover the battery with an old
cloth to reduce explosion hazard.
4. Connect jumper cables in the sequence il-
lustrated (
sA,sB,sC,sD).
CAUTION
cAlways connect positive (1) to positive
(1) and negative (2) to body ground (for
example, strut mounting bolt, engine
lift bracket, etc.) — not to the battery.cMake sure the jumper cables do not
touch moving parts in the engine com-
partment and that the cable clamps do
not contact any other metal.
5. Start the engine of the booster vehicle and
let it run for a few minutes.
6. Keep the engine speed of the booster ve-
hicle at about 2,000 rpm, and start the en-
gine of the vehicle being jump started.
CAUTION
Do not keep the starter motor engaged for
more than 10 seconds. If the engine does
not start right away, turn the key off and
wait 3 to 4 seconds before trying again.
7. After starting the engine, carefully discon-
nect the negative cable and then the positive
cable.
8. Replace the vent caps (if so equipped) . Be
sure to dispose of the cloth used to cover
the vent holes as it may be contaminated
with corrosive acid.
WCE0054
In case of emergency6-9
Page 377 of 463

8 Maintenance and do-it-yourself
Maintenance requirements..........................8-2
General maintenance..............................8-2
Explanation of general maintenance items.........8-2
Maintenance precautions...........................8-5
Engine compartment check locations................8-6
Engine cooling system.............................8-8
Checking engine coolant level...................8-8
Changing engine coolant........................8-9
Engine oil.........................................8-9
Checking engine oil level........................8-9
Changing engine oil...........................8-11
Changing engine oil filter.......................8-12
5-speed automatic transmission fluid...............8-13
Power steering fluid...............................8-13
Brake fluid.......................................8-14
Brake fluid....................................8-14
Window washer fluid.............................8-15
Window washer fluid reservoir..................8-15
Battery..........................................8-15
Jump starting.................................8-17
Variable voltage control system.....................8-17
Drive belt........................................8-18
Spark plugs......................................8-19Replacing spark plugs.........................8-19
Air cleaner.......................................8-19
In-cabin microfilter.............................8-20
Windshield wiper blades..........................8-21
Cleaning.....................................8-21
Replacing....................................8-22
Brakes..........................................8-24
Fuses...........................................8-25
Engine compartment...........................8-25
Passenger compartment.......................8-26
Battery replacement..............................8-27
Keyfob (if so equipped)........................8-28
NISSAN Intelligent Key™ (if so equipped)........8-29
Lights...........................................8-30
Headlights....................................8-30
Exterior and interior lights.......................8-32
Wheels and tires.................................8-35
Tire pressure..................................8-35
Tire labeling...................................8-39
Types of tires..................................8-41
Tire chains....................................8-42
Changing wheels and tires.....................8-42
Page 404 of 463

KEYFOB (if so equipped)
Replace the battery in the keyfob as follows:
s1Open the lid using a coinsA.
s2Remove the batterysB.
s3Install a new batterysCwith the “+” facing
down.
cHold the battery by the edges. Holding the
battery across the contact points will seri-
ously deplete the storage capacity.cDo not touch the internal circuit and electric
terminals as it could cause a malfunction.
cWhen changing the battery, do not let dust
or oil get on the keyfob.
cThere is danger of explosion if a lithium bat-
tery is incorrectly replaced. Replace only
with the same or equivalent type.
Recommended battery: CR2025 or equivalent.
s4Close the lid securely.
5. Press the
button, then thebutton two or three times to check the key-
fob operation.
If the battery is removed for any reason
other than replacement, perform step 5.
cAn improperly disposed battery can
hurt the environment. Always confirm
local regulations for battery disposal.
cThe keyfob is water-resistant; how-
ever, if it does get wet, immediately
wipe completely dry.
cThe operational range of the keyfob
extends to approximately 33 ft (10 m)
from the vehicle. This range may vary
with conditions.
LDI0484
8-28Maintenance and do-it-yourself
Page 405 of 463
FCC Notice:
Changes or modifications not expressly ap-
proved by the party responsible for compli-
ance could void the user’s authority to op-
erate the equipment.
This device complies with Part 15 of the
FCC Rules and RSS-210 of Industry
Canada.
Operation is subject to the following two
conditions: (1) This device may not cause
harmful interference, and (2) this device
must accept any interference received, in-
cluding interference that may cause undes-
ired operation of the device.NISSAN INTELLIGENT KEY™ (if so
equipped)
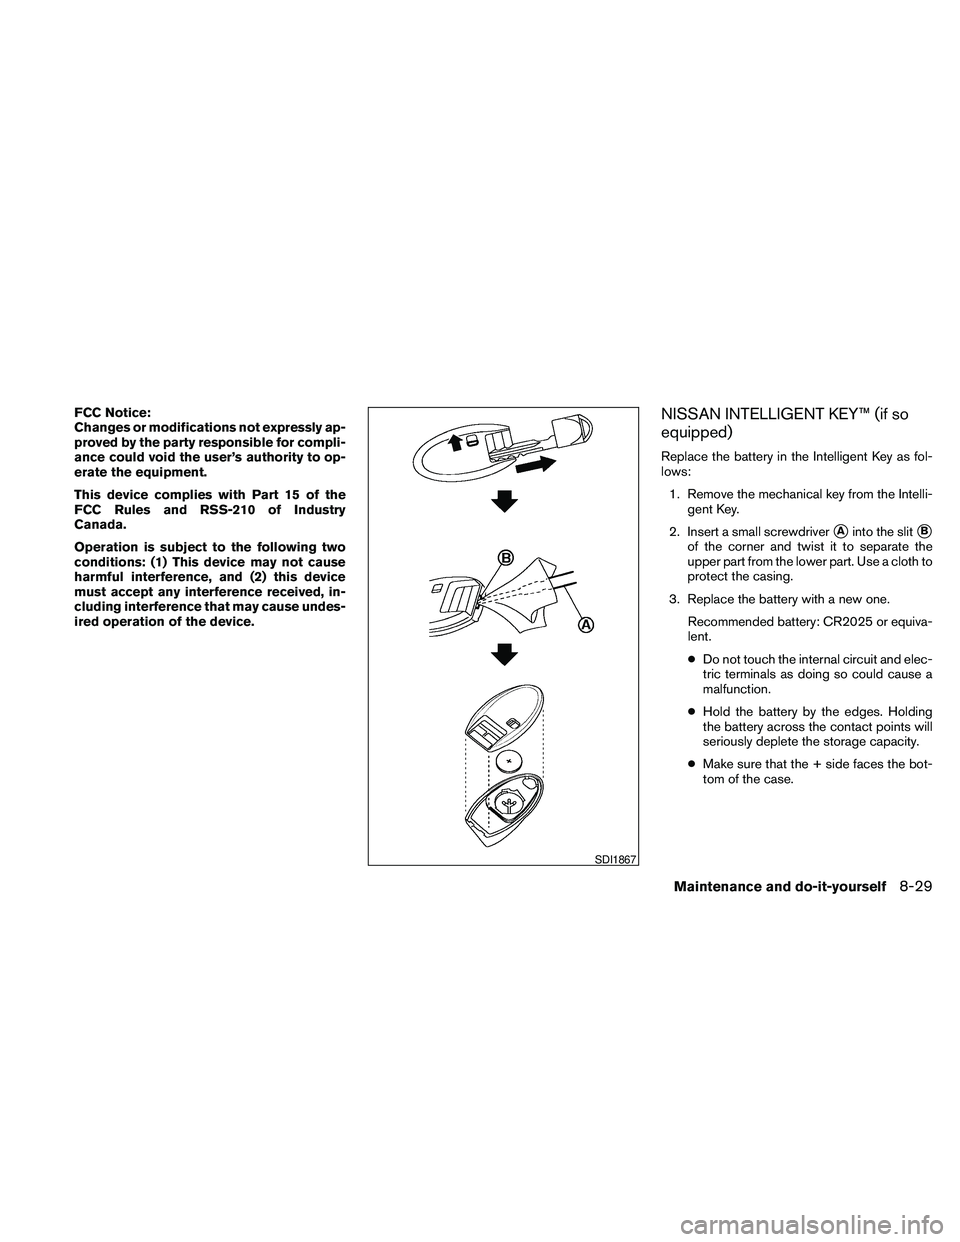
Replace the battery in the Intelligent Key as fol-
lows:
1. Remove the mechanical key from the Intelli-
gent Key.
2. Insert a small screwdriver
sAinto the slitsB
of the corner and twist it to separate the
upper part from the lower part. Use a cloth to
protect the casing.
3. Replace the battery with a new one.
Recommended battery: CR2025 or equiva-
lent.
cDo not touch the internal circuit and elec-
tric terminals as doing so could cause a
malfunction.
cHold the battery by the edges. Holding
the battery across the contact points will
seriously deplete the storage capacity.
cMake sure that the + side faces the bot-
tom of the case.
SDI1867
Maintenance and do-it-yourself8-29