2010 NISSAN NOTE battery
[x] Cancel search: batteryPage 133 of 235
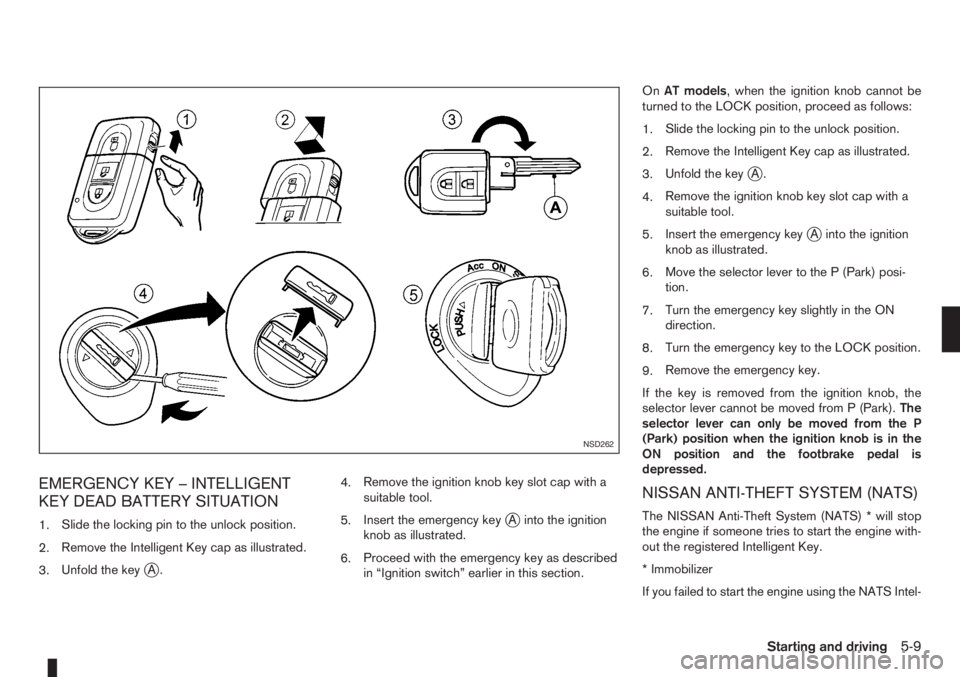
EMERGENCY KEY – INTELLIGENT
KEY DEAD BATTERY SITUATION
1.Slide the locking pin to the unlock position.
2.Remove the Intelligent Key cap as illustrated.
3.Unfold the key
jA.4.Remove the ignition knob key slot cap with a
suitable tool.
5.Insert the emergency key
jA into the ignition
knob as illustrated.
6.Proceed with the emergency key as described
in “Ignition switch” earlier in this section.OnAT models, when the ignition knob cannot be
turned to the LOCK position, proceed as follows:
1.Slide the locking pin to the unlock position.
2.Remove the Intelligent Key cap as illustrated.
3.Unfold the key
jA.
4.Remove the ignition knob key slot cap with a
suitable tool.
5.Insert the emergency key
jA into the ignition
knob as illustrated.
6.Move the selector lever to the P (Park) posi-
tion.
7.Turn the emergency key slightly in the ON
direction.
8.Turn the emergency key to the LOCK position.
9.Remove the emergency key.
If the key is removed from the ignition knob, the
selector lever cannot be moved from P (Park).The
selector lever can only be moved from the P
(Park) position when the ignition knob is in the
ON position and the footbrake pedal is
depressed.
NISSAN ANTI-THEFT SYSTEM (NATS)
The NISSAN Anti-Theft System (NATS) * will stop
the engine if someone tries to start the engine with-
out the registered Intelligent Key.
* Immobilizer
If you failed to start the engine using the NATS Intel-
NSD262
Starting and driving5-9
Page 135 of 235
c. Start the engine with your foot off the ac-
celerator pedal. Release the ignition
switch when the engine starts.
If the engine starts, but fails to run, repeat
the procedure from step a.
CAUTION
•Do not operate the starter for more than 15
seconds at a time. If the engine does not start,
turn the ignition switch to the “OFF” position
and wait 10 seconds (Petrol engine models)
or 20 seconds (Diesel engine models) before
cranking again, otherwise the starter could be
damaged.
•If it becomes necessary to start the engine
with a booster battery and jumper leads, the
instructions and cautions contained in the
“Jump-starting” in the “6. In case of
emergency” section should be carefully fol-
lowed.
7.Warm-up
Allow the engine to idle for at least 30 seconds
after starting. Drive at moderate speed for a short
distance first, especially in cold weather.
WARNING
Do not leave the vehicle unattended while the
engine is warming up.
DRIVING WITH MANUAL
TRANSMISSION
CAUTION
•Do not rest your foot on the clutch pedal while
driving. This may cause clutch damage.
•Stop your vehicle completely before shifting
into the R (Reverse) position.
•When you are shifting from one gear to an-
other, be certain to depress the clutch pedal
all the way to the floor to avoid clashing or
chipping the gears.
•Avoid abrupt starts and acceleration for your
safety.
•When quick acceleration is required for some
reason, shift to a lower gear and accelerate
until the vehicle reaches the maximum speed
in each gear. Do not exceed the speed limit of
any gear. Pay special attention when acceler-
ating or when shifting into a lower gear on
slippery surfaces. Sudden acceleration or
down shifting could cause the wheels to skid
and result in loss of control.
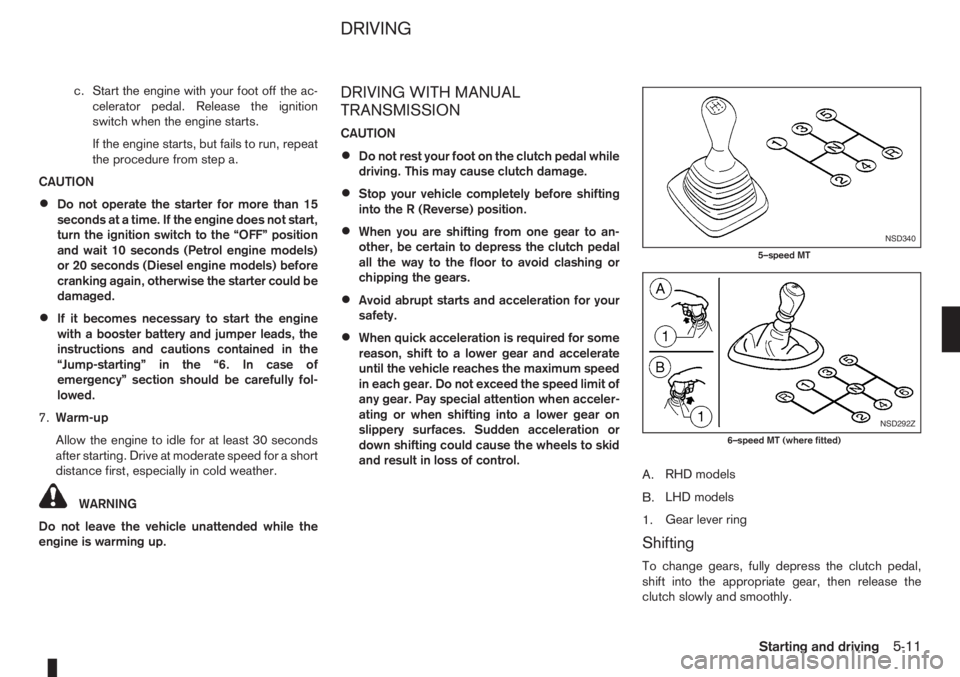
A.RHD models
B.LHD models
1.Gear lever ring
Shifting
To change gears, fully depress the clutch pedal,
shift into the appropriate gear, then release the
clutch slowly and smoothly.
NSD340
5–speed MT
NSD292Z
6–speed MT (where fitted)
DRIVING
Starting and driving5-11
Page 138 of 235
Accelerator downshift – In the D (Drive)
position
For rapid passing or driving uphill, fully depress the
accelerator pedal to the floor. This shifts the trans-
mission down into a lower gear, depending on the
vehicle speed.
A.RHD models
B.LHD models
Overdrive switch
ON: For normal driving, push the overdrive
switchto“ON
” with the selector lever in
the D (Drive) position. The transmission is
shifted up into OVERDRIVE as the vehicle
speed increases.
The overdrive will not engage until the engine
has warmed up.
OFF: For driving up and down long slopes where
engine braking is necessary, push the over-
drive switch “OFF
”. The overdrive off in-dicator light
in the instrument panel
illuminates.
When cruising at low speeds or climbing a
gentle slope, you may feel an uncomfortable
shift shock as the transmission shifts in and
out of the overdrive position repeatedly. In
this case, push the overdrive switch to turn
the Overdrive “OFF”.
When driving conditions change, push the overdrive
switch to turn the overdrive “ON”. The overdrive off
indicator light
in the instrument panel will turn
off.
Remember not to drive at high speeds for extended
periods of time with the overdrive “OFF”. This re-
duces fuel economy.
A.RHD models
B.LHD models
Shift lock release
If the battery is discharged, the selector lever can-
not be moved from the P (Park) position even with
the brake pedal depressed and the ignition switch in
the ON position.
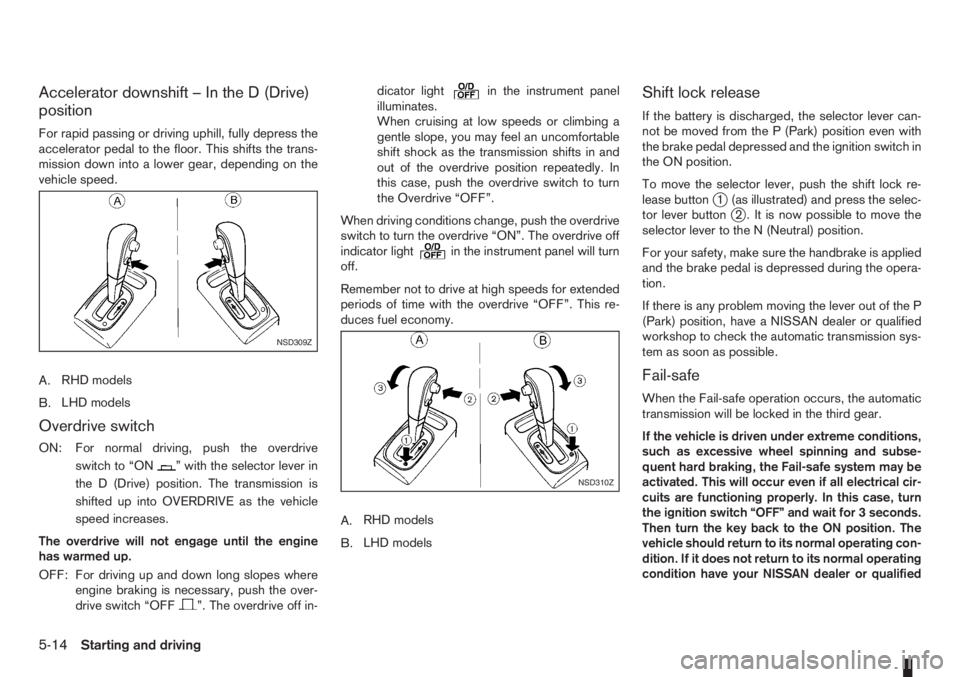
To move the selector lever, push the shift lock re-
lease button
j1 (as illustrated) and press the selec-
tor lever buttonj2 . It is now possible to move the
selector lever to the N (Neutral) position.
For your safety, make sure the handbrake is applied
and the brake pedal is depressed during the opera-
tion.
If there is any problem moving the lever out of the P
(Park) position, have a NISSAN dealer or qualified
workshop to check the automatic transmission sys-
tem as soon as possible.
Fail-safe
When the Fail-safe operation occurs, the automatic
transmission will be locked in the third gear.
If the vehicle is driven under extreme conditions,
such as excessive wheel spinning and subse-
quent hard braking, the Fail-safe system may be
activated. This will occur even if all electrical cir-
cuits are functioning properly. In this case, turn
the ignition switch “OFF” and wait for 3 seconds.
Then turn the key back to the ON position. The
vehicle should return to its normal operating con-
dition. If it does not return to its normal operating
condition have your NISSAN dealer or qualified
NSD309Z
NSD310Z
5-14Starting and driving
Page 151 of 235
WARNING
•If the Electrically Power Assisted Steering
warning light (EPAS) illuminates while driv-
ing, the power assist for steering will be dis-
abled. Greater steering efforts are required to
operate the steering wheel, especially in
sharp turns and at low speed. Stop the ve-
hicle as soon as safely possible and contact a
NISSAN dealer or qualified workshop for fur-
ther assistance.
•In certain circumstances, factors external to
the EPAS system may contribute to the illumi-
nation of the warning light. If the warning light
illuminates, stop the vehicle as soon as safely
possible if driving. Turn the ignition switch to
the “OFF” position and wait for approximately
20 seconds, then turn the ignition switch to
the ON position again. If the light remains illu-
minated, we recommend you to contact a
NISSAN dealer or qualified workshop. See
“Warning/indicator lights and audible
reminders” in the “2. Instruments and
controls” section for further details regarding
the EPAS warning light.
The EPAS (Electrically Power Assisted Steering)
system is designed to assist steering.
The steering may appear to feel slightly stiff follow-
ing parking manoeuvres including a great deal of
steering. This is not a malfunction; it is caused by a
control system designed to prevent the motor fromoverheating. No servicing is required. The EPAS
system will return to normal operation the next time
the vehicle is driven.
Similarly, the EPAS system may not provide full as-
sistance during periods of reduced battery voltage
but will recover once normal battery voltage is re-
stored.
If the EPAS warning light comes on while the engine
is running, it may indicate that the EPAS system is
not working properly. As result greater steering ef-
forts are required to steer the steering wheel, espe-
cially in sharp turns and at low speeds. Have the
system checked by a NISSAN dealer or qualified
workshop as soon as possible.
NOTE
Incorrectly inflated tyres can lead to poor steer-
ing ability and make the driver suspect a steering
problem: keep the vehicle’s tyres inflated to the
correct pressure at all times.
CAUTION
Any malfunction or accident that could have dam-
aged the steering components (including actual
or attempted theft damage) should be reported
to a NISSAN dealer or qualified workshop.The brake system has two separate hydraulic cir-
cuits. If one circuit malfunctions, you will still have
braking ability with two wheels.
BRAKE PRECAUTIONS
Vacuum assisted brake
The brake booster aids braking by using engine
vacuum. If the engine stops or the drive belt is bro-
ken, you can stop the vehicle by depressing the
brake pedal. However, greater foot pressure on the
brake pedal will be required to stop the vehicle and
the stopping distance will be longer.
Wet brakes
When the vehicle is washed or driven through wa-
ter, the brakes may get wet. As a result, your brak-
ing distance will be longer and the vehicle may pull
to one side during braking.
To dry brakes, drive the vehicle at a safe speed
while lightly pressing the brake pedal to heat up the
brakes. Do this until the brakes return to normal.
Avoid driving the vehicle at high speeds until the
brakes function correctly.
Using the brakes
Avoid resting your foot on the brake pedal while
driving. This will overheat the brakes, wear out the
brake linings and pads faster and reduce fuel
economy performance.
To help reduce brake wear and to prevent the brakes
from overheating, reduce speed and downshift to a
lower gear before going down a slope or long down-
POWER STEERING SYSTEM BRAKE SYSTEM
Starting and driving5-27
Page 155 of 235
NOTE
The ESP system cannot be switched off when
the ESP system is operating and the “SLIP” indi-
cator light (
) is blinking.
Push the ESP OFF switch again, or restart the en-
gine, to turn the system ON. See “Electronic Stabil-
ity Programme (ESP) system (where fitted)” earlier
in this section for operational details.
WARNING
•Whatever the conditions, drive with caution.
Accelerate and decelerate with great care. If
accelerating or decelerating too fast, the drive
wheels will lose even more traction.
•Allow more stopping distance in cold weather
driving. Braking should be started sooner than
on dry surfaces.
•Keep at a greater distance from the vehicle in
front of you on slippery roads.
•Wet ice (0°C, 32°F and freezing rain), very cold
snow and ice can be slick and very difficult to
drive on. The vehicle will have a lot less trac-
tion or grip under these conditions. Try to
avoid driving on wet ice until the road is salted
or sanded.
•Watch for slippery spots (black ice). These
may appear on an otherwise clear road in
shaded areas. If a patch of ice is seen ahead,
brake before driving on it. Try not to brake
while actually on the ice and avoid any sud-
den steering manoeuvres.
•Snow can trap dangerous exhaust gas under
your vehicle. Keep snow clear of the exhaust
pipe and from around your vehicle.
BATTERY
If the battery is not fully charged during extremely
cold weather conditions, the battery fluid may freeze
and damage the battery. To maintain maximum effi-ciency, the battery should be checked regularly. For
details, see “Battery” in the “8. Maintenance and
do-it-yourself” section.
ENGINE COOLANT
If the vehicle is to be left outside without anti-freeze,
drain the cooling system. Refill before operating the
vehicle. For details, see “Engine cooling system” in
the “8. Maintenance and do-it-yourself” section.
TYRE EQUIPMENT
1) The SUMMER tyres are of a tread design to pro-
vide superior performance on dry surfaces. How-
ever, the performance of these tyres will be sub-
stantially reduced in snowy and icy conditions. If
you operate your vehicle on snowy or icy roads,
NISSAN recommends the use of MUD & SNOW
or ALL SEASON tyres on all four wheels. Please
consult a NISSAN dealer or qualified workshop
for tyre type, size, speed rating and availability
information.
2) For additional traction on icy roads, studded
tyres may be used. However, some countries,
provinces and states prohibit their use. Check
applicable laws before installing studded tyres.
CAUTION
Skid and traction capabilities of studded snow
tyres on wet or dry surfaces may be poorer
than that of non-studded snow tyres.
3) Snow chains may be used, if desired. But the
use of snow chains may be prohibited in some
areas. Therefore, check the local laws before
COLD WEATHER DRIVING
Starting and driving5-31
Page 165 of 235
After repairing tyre
See a NISSAN dealer or qualified workshop for tyre
repair/replacement as soon as possible.
WARNING
•Incorrect jump-starting can lead to a battery
explosion. The battery explosion may result in
severe injury or death. It may also result in
damage to the vehicle. Be sure to follow the
instructions in this section.
•Explosive hydrogen gas is always present in
the vicinity of the battery. Keep all sparks and
flames away from the battery.
•Always wear suitable eye protection glasses
and remove rings, bracelets, and any other
jewelry whenever working on or near a bat-
tery.
NCE177
JUMP-STARTING
In case of emergency6-9
Page 166 of 235
•Never lean over the battery while jump-start-
ing.
•Never allow battery fluid to come into contact
with eyes, skin, clothes or the vehicle’s
painted surfaces. Battery fluid is a corrosive
sulphuric acid which can cause severe burns.
If the fluid comes into contact with anything,
immediately flush the contacted area with
plenty of water.
•Keep the battery out of the reach of children.
•The booster battery must be rated at 12 volts.
Use of an incorrectly rated battery will dam-
age your vehicle.
•Never attempt to jump-start a frozen battery.
It could explode and cause serious injury.
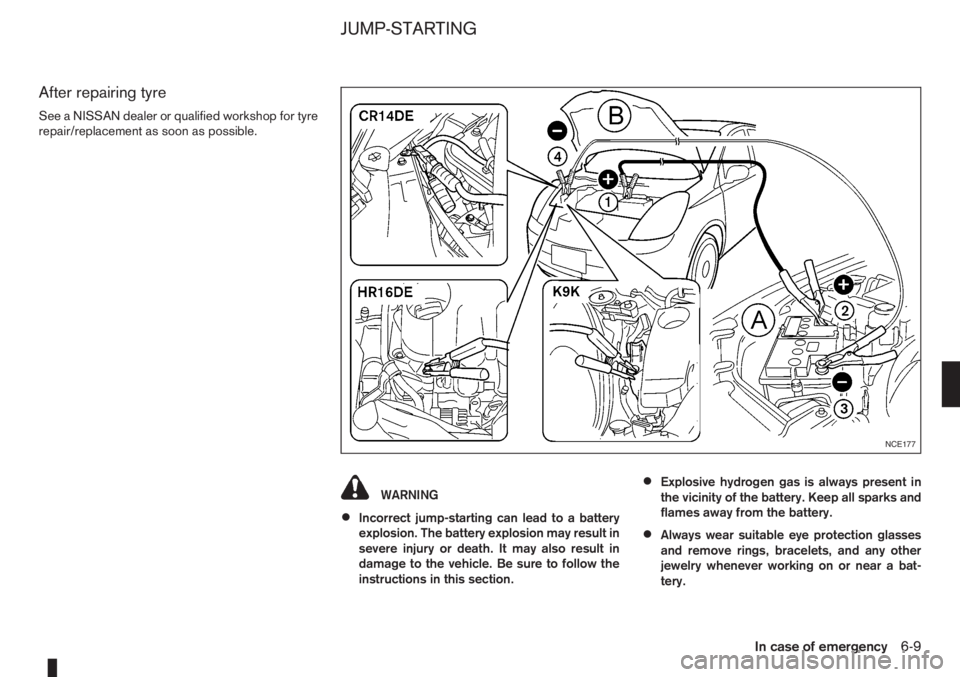
1. Prepare vehicle
jA with the booster battery for
the vehiclejB being jump-started.
CAUTION
Do not allow the two vehicles to touch.
2. Apply the handbrake.
3. Shift the gear lever (MT models) into the N (Neu-
tral) position [AT models, move the selector lever
to the P (Park) position].
4. Switch off all unnecessary electrical systems
(headlights, hazard lights etc,).
5. Ensure that the ignition switch of the vehicle be-
ing jump-started is in the LOCK position.6. Open the bonnet. For details, see “Bonnet
release” in the “3. Pre-driving checks and
adjustments” section.
7. Remove the vent caps (where fitted) on the bat-
tery and cover the battery with an old cloth.
8. Connect the jump leads in the sequence (
j1→j2→j3→j4 ) as illustrated.
CAUTION
•Always connect positivej+ to positivej+
and negativej- to body ground (for ex-
ample, engine lift bracket, etc.) – not to
the battery’s negative
j-.
•An incorrect connection could damage the
charging system.
•Be sure that the jumper cables do not
touch moving parts in the engine compart-
ment.
•Be careful not to allow contact between
the positive jump lead connector and the
vehicle or the negative lead during con-
nection and disconnection.
9. Start the engine of the other vehicle
jA and let it
run for a few minutes. Keep the engine speed at
about 2,000 rpm.
10. Start the engine of your vehicle
jB in the nor-
mal way.
CAUTION
Do not keep the starter motor engaged formore than 10 seconds. If the engine does not
start immediately, turn the ignition switch to
“OFF” and wait 10 seconds before trying
again.
11. After starting the engine of your vehicle, care-
fully disconnect the negative lead and then the
positive lead (
j4→j3→j2→j1).
12. Remove and dispose of the cloth that was used
to cover the vent holes as it may be contami-
nated with corrosive acid.
13. Install the vent caps (where fitted).
14. Close the bonnet.
6-10In case of emergency
Page 176 of 235

8Maintenance and do-it-yourselfMaintenance and do-it-yourself
Maintenance requirements ....................................... 8-2
Scheduled maintenance...................................... 8-2
General maintenance .......................................... 8-2
Where to go for service ...................................... 8-2
General maintenance ............................................... 8-2
Explanation of general maintenance items ........... 8-2
Maintenance precautions ......................................... 8-4
Engine compartment ................................................ 8-5
Engine cooling system ............................................. 8-6
Checking engine coolant level............................. 8-6
Changing engine coolant .................................... 8-6
Engine oil................................................................. 8-8
Checking engine oil level .................................... 8-9
Changing engine oil ............................................ 8-9
Changing engine oil filter .................................... 8-11
Protect the environment ...................................... 8-12
Fuel filter (Diesel engine models) ............................. 8-12
Bleeding the fuel system ..................................... 8-12
Automatic transmission fluid (ATF) ........................... 8-13
Brakes ..................................................................... 8-13
Checking brake pedal......................................... 8-13
Checking handbrake........................................... 8-13
Brake and clutch fluid .............................................. 8-13
Window washer fluid/headlight cleaner fluid
(where fitted) ........................................................... 8-14
Battery..................................................................... 8-15
Vehicle battery .................................................... 8-15
Reinitialisation procedure after battery
reconnection....................................................... 8-16
Jump-starting ...................................................... 8-16Integrated Keyfob/Intelligent Key battery
replacement........................................................ 8-17
Drive belts ............................................................... 8-18
Spark plugs (Petrol engine models).......................... 8-18
Air cleaner filter........................................................ 8-19
Viscous paper type ............................................. 8-19
Dry paper type (where fitted) .............................. 8-19
Wiper blades ........................................................... 8-19
Cleaning ............................................................. 8-19
Front window wiper replacement ........................ 8-20
Back door window wiper replacement ................ 8-20
Windscreen washer nozzle ................................. 8-20
Fuses ...................................................................... 8-21
Passenger compartment ..................................... 8-21
Engine compartment ........................................... 8-22
Lights ...................................................................... 8-23
Headlights .......................................................... 8-23
Exterior lights ...................................................... 8-24
Interior lights....................................................... 8-24
Light locations .................................................... 8-25
Wheels and tyres ..................................................... 8-29
Tyre inflation pressure......................................... 8-29
Types of tyres ..................................................... 8-29
Snow chains....................................................... 8-30
Tyre rotation ....................................................... 8-30
Tyre wear and damage ....................................... 8-30
Tyre age ............................................................. 8-31
Changing tyres and wheels ................................. 8-31
Wheel balance.................................................... 8-31
Spare tyre .......................................................... 8-31