2010 NISSAN NOTE key battery
[x] Cancel search: key batteryPage 77 of 235

VEHICLE DEAD BATTERY –
LEFT-HAND SIDE DOOR HANDLE
The left-hand side door can be locked or unlocked
with the door key/emergency key when the vehi-
cle’s battery is dead.
To lock the door with the key/emergency
key
1. If necessary, carefully remove the protection capjA (where fitted) on the left-hand side door
handle by inserting the key/emergency key in the
cap’s base slot and pry it off.
2. To lock the door
j1 , insert the key/emergency
key in the left-hand side door handle key cylinder
and turn it towards the front of the vehicle
jF.
To unlock the door
j2 , turn the key/emergency
key towards the rear of the vehicle.
The left-hand side door handle can only be locked
from the outside by using the key/emergency key
when the door is closed.See “Ignition knob (where fitted)” in the “5. Starting
and driving” section for access to the Intelligent sys-
tem emergency key.
CAUTION
The alarm system will be triggered when the door
is opened using the key/emergency key (NISSAN
alarm equipped models). To stop the alarm, turn
the ignition key/emergency key to the ON posi-
tion.
Initialising the system after vehicle
battery loading or replacement
After recharging or replacing the battery, you should
release (initialise) the system by:
•Inserting the key/emergency key into the ignition
switch and then turning it to the ON position.
•Unlocking the vehicle using the integrated key-
fob.
LOCKING WITH POWER DOOR
LOCK SWITCH
CAUTION
When locking the door with the power door lock
switch, be sure not to leave the key inside the
vehicle.
Central door lock equipped models
Operating the power door lock switch located on
the centre console will lockj1 or unlockj2 all
doors when the driver’s door is closed (the indica-
tor light
j3 comes on when all doors are locked).
However, a chime will sound and the doors will not
lock if the power door lock switch is pressed when
a passenger door is open, even if the driver’s door
is closed.
NOTE
•It is also possible to open the driver’s door,
move the power door lock switch to the lock
j1 position and close the door to lock all doors
unless the key is in the ignition or the Intelli-
gent Key (where fitted) is left inside the ve-
hicle.
•If the integrated Intelligent Keyfob lock button
(where fitted) is pressed inside the vehicle, all
doors lock, the power door lock indicator light
j3 comes on and the power door unlock side
of the switchj2 cannot be activated (central
door lock equipped models and Super Lock
equipped models). To unlock, press the inte-
grated Intelligent Keyfob unlock button. How-
ever, note that if the door is manually opened
from inside after having pressed the Keyfob
NPA927Z
NPA868Z
Centre console
Pre-driving checks and adjustments3-7
Page 116 of 235
![NISSAN NOTE 2010 Owners Manual [Pair Device]:
1. Press the<SETUP>button. Select the [Blue-
tooth] key using the<TUNE/MENU>dial. Then
press the<ENTER>button.
You can register up to 5 different Bluetooth mo-
bile phones. However, you NISSAN NOTE 2010 Owners Manual [Pair Device]:
1. Press the<SETUP>button. Select the [Blue-
tooth] key using the<TUNE/MENU>dial. Then
press the<ENTER>button.
You can register up to 5 different Bluetooth mo-
bile phones. However, you](/manual-img/5/56794/w960_56794-115.png)
[Pair Device]:
1. Press the
tooth] key using the
press the
You can register up to 5 different Bluetooth mo-
bile phones. However, you can only use one de-
vice at a time. If you have 5 different Bluetooth
registered devices, a new device can only re-
place one of the 5 existing paired devices. Use
[Delete Device] key to delete one of the existing
paired devices. For details, see “[Delete Device]”
later in this section.
2. Select the [Pair Device] key.
The pairing procedure depends on the
connected device:
•Mobile phone:
The message [Ready to Pair Pin:1234] will
be displayed.
•Audio device without PIN code:
The Bluetooth connection will be automati-
cally connected without any further input.
•Audio device with PIN code:
A new screen will appear. Assign the 4 digit
PIN code by turning the
to each code and press the
to confirm. Then select [Validate] and press
made.
The 4–digit PIN code is provided with the
audio device, see the owner’s manual of the
audio device.
3. On Bluetooth® audio/mobile phone devices.
1) Switch on the Bluetooth® connection, if not
already switched on.
2) Switch on the search mode for Bluetooth®
devices. If the search mode finds a device it
will be shown on the device display.
3) When a device is found use the
to select [My Car].
4) Enter the number code shown on the relevant
device with the device’s own keypad, and
press the confirmation key on the device it-
self. Refer to the relevant Bluetooth® device
owner’s manual for further details.
When successfully paired a notification message
will be displayed, then the audio system displaywill return to the current audio source display.
During connection the following status icons will
be displayed (top left of the display): Signal
strength (), Battery status* () and Blue-
tooth “ON” ().
*: If the low battery message comes on, the
Bluetooth® device must be recharged soon.
The pairing procedure and operation may vary ac-
cording to device type and compatibility. See the
Bluetooth® owner’s manual for further details.
NOTE
•For device details, see your audio/mobile
phone Owner’s Manual.
•For assistance with the Bluetooth® audio/
mobile phone integration, please visit your lo-
cal NISSAN dealer.
[Select Device]:
The paired device list shows which Bluetooth® au-
dio or mobile phone devices have been paired or
registered with the Bluetooth® audio system. If the
list contains devices then select the appropriate de-
vice to connect to the Bluetooth® audio system.
The following symbols (where fitted) indicate the
capability of the registered device:
•: Mobile phone integration
•: Audio streaming (A2DP- Advanced Audio
Distribution Profile)
NAA1202
4-32Heater and air conditioner, and audio system
Page 125 of 235

5Starting and drivingStarting and driving
Running-in schedule ................................................ 5-2
Before starting the engine ........................................ 5-2
Precautions when starting and driving ...................... 5-3
Exhaust gas (Carbon Monoxide) ......................... 5-3
Three-way catalyst (Petrol engine models)................ 5-4
To help prevent damage ..................................... 5-4
Turbocharger system (Diesel engine models) ........... 5-4
Diesel particulate filter (where fitted) ........................ 5-5
Care when driving ................................................... 5-5
Engine cold start period ...................................... 5-5
Loading luggage ................................................. 5-5
Driving on wet roads ........................................... 5-5
Driving under winter conditions ........................... 5-5
Ignition switch.......................................................... 5-6
Manual transmission ........................................... 5-6
Automatic transmission ....................................... 5-6
Steering lock ...................................................... 5-7
Key positions ...................................................... 5-7
NISSAN Anti-Theft System (NATS)..................... 5-7
Ignition knob (where fitted)....................................... 5-7
Manual transmission ........................................... 5-8
Automatic transmission ....................................... 5-8
Steering lock ...................................................... 5-8
Ignition knob position .......................................... 5-8
Emergency key – Intelligent Key dead battery
situation .............................................................. 5-9
NISSAN Anti-Theft System (NATS)..................... 5-9
Starting the engine................................................... 5-10
Driving ..................................................................... 5-11
Driving with manual transmission......................... 5-11Driving with automatic transmission..................... 5-12
Speed limiter ........................................................... 5-15
Speed limiter operations ..................................... 5-16
Cruise control system .............................................. 5-18
Precautions on cruise control system .................. 5-19
Cruise control system operations ........................ 5-19
Ultrasonic Parking Sensor (where fitted) .................. 5-22
Parking .................................................................... 5-22
Trailer towing ........................................................... 5-24
Operating precautions ........................................ 5-24
Tyre pressure ..................................................... 5-25
Safety chains ...................................................... 5-25
Trailer brakes...................................................... 5-25
Trailer detection (where fitted) ............................ 5-25
Installation of coupling device ............................. 5-25
Vehicle security........................................................ 5-26
Power steering system............................................. 5-27
Brake system ........................................................... 5-27
Brake precautions .............................................. 5-27
Anti-lock Braking System (ABS).......................... 5-28
Electronic Stability Programme (ESP) system
(where fitted) ........................................................... 5-29
Electronic Stability Programme (ESP) OFF
switch................................................................. 5-30
Cold weather driving................................................ 5-31
Battery ............................................................... 5-31
Engine coolant .................................................... 5-31
Tyre equipment ................................................... 5-31
Special winter equipment.................................... 5-32
Corrosion protection ........................................... 5-32
Page 133 of 235

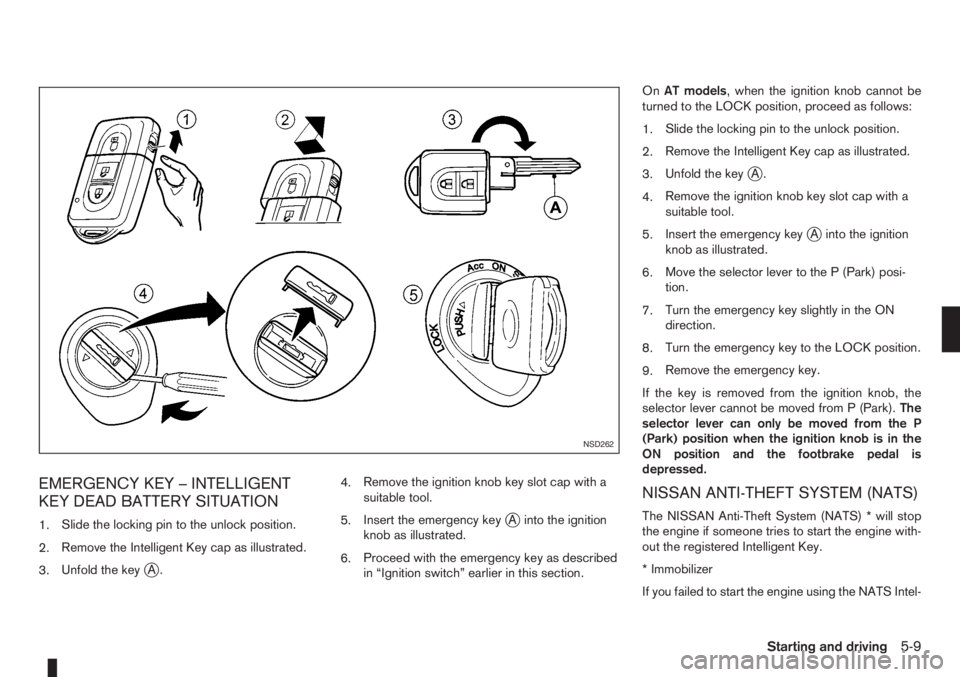
EMERGENCY KEY – INTELLIGENT
KEY DEAD BATTERY SITUATION
1.Slide the locking pin to the unlock position.
2.Remove the Intelligent Key cap as illustrated.
3.Unfold the key
jA.4.Remove the ignition knob key slot cap with a
suitable tool.
5.Insert the emergency key
jA into the ignition
knob as illustrated.
6.Proceed with the emergency key as described
in “Ignition switch” earlier in this section.OnAT models, when the ignition knob cannot be
turned to the LOCK position, proceed as follows:
1.Slide the locking pin to the unlock position.
2.Remove the Intelligent Key cap as illustrated.
3.Unfold the key
jA.
4.Remove the ignition knob key slot cap with a
suitable tool.
5.Insert the emergency key
jA into the ignition
knob as illustrated.
6.Move the selector lever to the P (Park) posi-
tion.
7.Turn the emergency key slightly in the ON
direction.
8.Turn the emergency key to the LOCK position.
9.Remove the emergency key.
If the key is removed from the ignition knob, the
selector lever cannot be moved from P (Park).The
selector lever can only be moved from the P
(Park) position when the ignition knob is in the
ON position and the footbrake pedal is
depressed.
NISSAN ANTI-THEFT SYSTEM (NATS)
The NISSAN Anti-Theft System (NATS) * will stop
the engine if someone tries to start the engine with-
out the registered Intelligent Key.
* Immobilizer
If you failed to start the engine using the NATS Intel-
NSD262
Starting and driving5-9
Page 138 of 235

Accelerator downshift – In the D (Drive)
position
For rapid passing or driving uphill, fully depress the
accelerator pedal to the floor. This shifts the trans-
mission down into a lower gear, depending on the
vehicle speed.
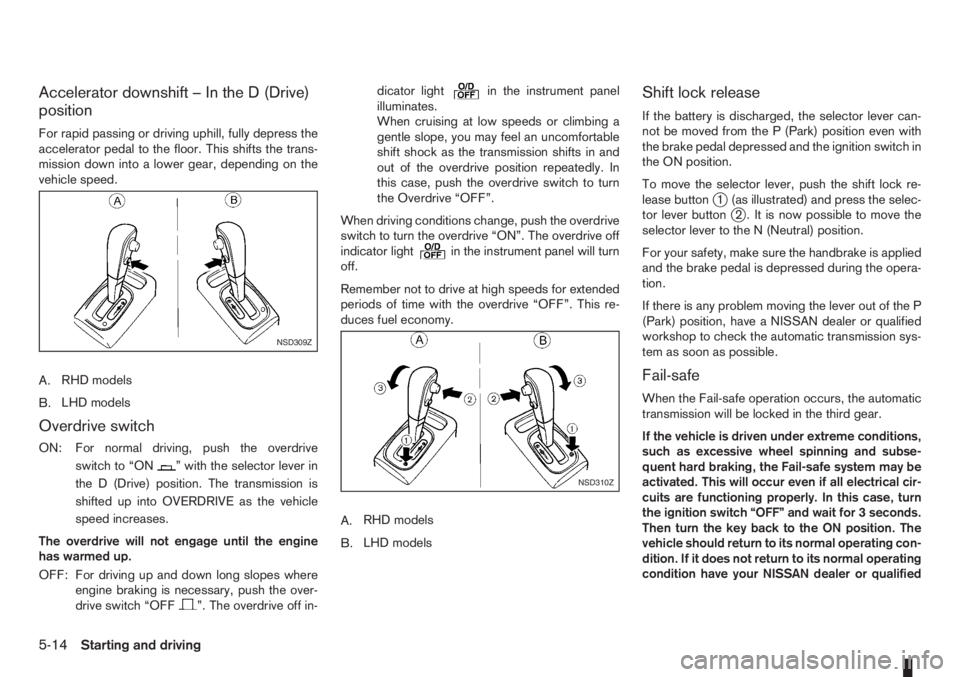
A.RHD models
B.LHD models
Overdrive switch
ON: For normal driving, push the overdrive
switchto“ON
” with the selector lever in
the D (Drive) position. The transmission is
shifted up into OVERDRIVE as the vehicle
speed increases.
The overdrive will not engage until the engine
has warmed up.
OFF: For driving up and down long slopes where
engine braking is necessary, push the over-
drive switch “OFF
”. The overdrive off in-dicator light
in the instrument panel
illuminates.
When cruising at low speeds or climbing a
gentle slope, you may feel an uncomfortable
shift shock as the transmission shifts in and
out of the overdrive position repeatedly. In
this case, push the overdrive switch to turn
the Overdrive “OFF”.
When driving conditions change, push the overdrive
switch to turn the overdrive “ON”. The overdrive off
indicator light
in the instrument panel will turn
off.
Remember not to drive at high speeds for extended
periods of time with the overdrive “OFF”. This re-
duces fuel economy.
A.RHD models
B.LHD models
Shift lock release
If the battery is discharged, the selector lever can-
not be moved from the P (Park) position even with
the brake pedal depressed and the ignition switch in
the ON position.
To move the selector lever, push the shift lock re-
lease button
j1 (as illustrated) and press the selec-
tor lever buttonj2 . It is now possible to move the
selector lever to the N (Neutral) position.
For your safety, make sure the handbrake is applied
and the brake pedal is depressed during the opera-
tion.
If there is any problem moving the lever out of the P
(Park) position, have a NISSAN dealer or qualified
workshop to check the automatic transmission sys-
tem as soon as possible.
Fail-safe
When the Fail-safe operation occurs, the automatic
transmission will be locked in the third gear.
If the vehicle is driven under extreme conditions,
such as excessive wheel spinning and subse-
quent hard braking, the Fail-safe system may be
activated. This will occur even if all electrical cir-
cuits are functioning properly. In this case, turn
the ignition switch “OFF” and wait for 3 seconds.
Then turn the key back to the ON position. The
vehicle should return to its normal operating con-
dition. If it does not return to its normal operating
condition have your NISSAN dealer or qualified
NSD309Z
NSD310Z
5-14Starting and driving
Page 176 of 235

8Maintenance and do-it-yourselfMaintenance and do-it-yourself
Maintenance requirements ....................................... 8-2
Scheduled maintenance...................................... 8-2
General maintenance .......................................... 8-2
Where to go for service ...................................... 8-2
General maintenance ............................................... 8-2
Explanation of general maintenance items ........... 8-2
Maintenance precautions ......................................... 8-4
Engine compartment ................................................ 8-5
Engine cooling system ............................................. 8-6
Checking engine coolant level............................. 8-6
Changing engine coolant .................................... 8-6
Engine oil................................................................. 8-8
Checking engine oil level .................................... 8-9
Changing engine oil ............................................ 8-9
Changing engine oil filter .................................... 8-11
Protect the environment ...................................... 8-12
Fuel filter (Diesel engine models) ............................. 8-12
Bleeding the fuel system ..................................... 8-12
Automatic transmission fluid (ATF) ........................... 8-13
Brakes ..................................................................... 8-13
Checking brake pedal......................................... 8-13
Checking handbrake........................................... 8-13
Brake and clutch fluid .............................................. 8-13
Window washer fluid/headlight cleaner fluid
(where fitted) ........................................................... 8-14
Battery..................................................................... 8-15
Vehicle battery .................................................... 8-15
Reinitialisation procedure after battery
reconnection....................................................... 8-16
Jump-starting ...................................................... 8-16Integrated Keyfob/Intelligent Key battery
replacement........................................................ 8-17
Drive belts ............................................................... 8-18
Spark plugs (Petrol engine models).......................... 8-18
Air cleaner filter........................................................ 8-19
Viscous paper type ............................................. 8-19
Dry paper type (where fitted) .............................. 8-19
Wiper blades ........................................................... 8-19
Cleaning ............................................................. 8-19
Front window wiper replacement ........................ 8-20
Back door window wiper replacement ................ 8-20
Windscreen washer nozzle ................................. 8-20
Fuses ...................................................................... 8-21
Passenger compartment ..................................... 8-21
Engine compartment ........................................... 8-22
Lights ...................................................................... 8-23
Headlights .......................................................... 8-23
Exterior lights ...................................................... 8-24
Interior lights....................................................... 8-24
Light locations .................................................... 8-25
Wheels and tyres ..................................................... 8-29
Tyre inflation pressure......................................... 8-29
Types of tyres ..................................................... 8-29
Snow chains....................................................... 8-30
Tyre rotation ....................................................... 8-30
Tyre wear and damage ....................................... 8-30
Tyre age ............................................................. 8-31
Changing tyres and wheels ................................. 8-31
Wheel balance.................................................... 8-31
Spare tyre .......................................................... 8-31
Page 193 of 235

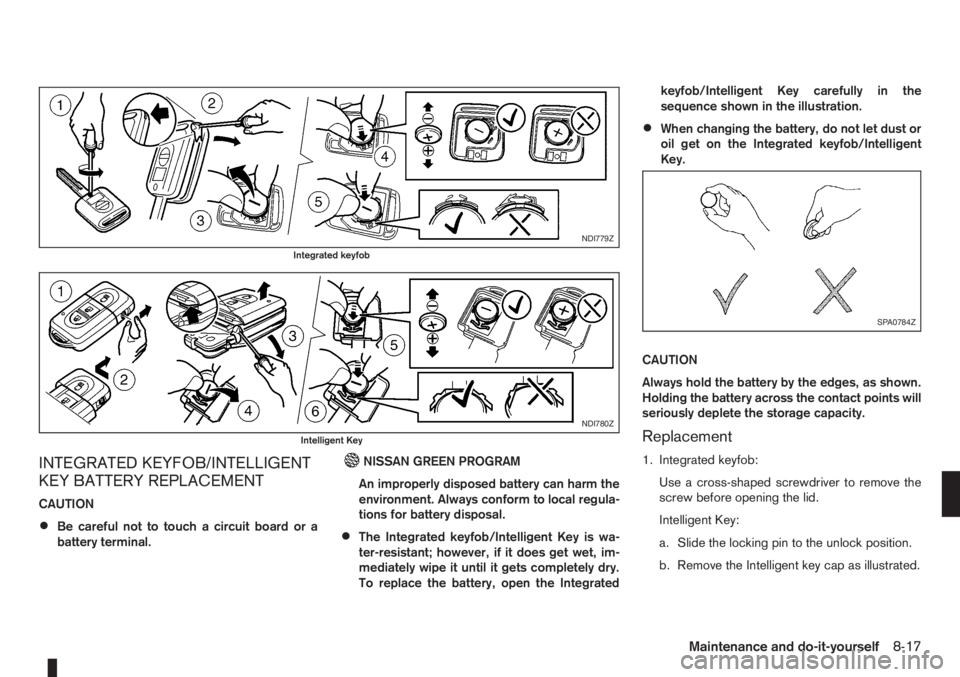
INTEGRATED KEYFOB/INTELLIGENT
KEY BATTERY REPLACEMENT
CAUTION
•Be careful not to touch a circuit board or a
battery terminal.
NISSAN GREEN PROGRAM
An improperly disposed battery can harm the
environment. Always conform to local regula-
tions for battery disposal.
•The Integrated keyfob/Intelligent Key is wa-
ter-resistant; however, if it does get wet, im-
mediately wipe it until it gets completely dry.
To replace the battery, open the Integratedkeyfob/Intelligent Key carefully in the
sequence shown in the illustration.
•When changing the battery, do not let dust or
oil get on the Integrated keyfob/Intelligent
Key.
CAUTION
Always hold the battery by the edges, as shown.
Holding the battery across the contact points will
seriously deplete the storage capacity.
Replacement
1. Integrated keyfob:
Use a cross-shaped screwdriver to remove the
screw before opening the lid.
Intelligent Key:
a. Slide the locking pin to the unlock position.
b. Remove the Intelligent key cap as illustrated.
NDI779Z
Integrated keyfob
NDI780Z
Intelligent Key
SPA0784Z
Maintenance and do-it-yourself8-17
Page 194 of 235

2. Insert a flat blade screwdriver or a suitable tool
into the slit of the corner and twist it to open the
lid.
3. Replace the battery with a new one.
For models equipped with Integrated keyfob, use
the following battery type:
CR2016
For models equipped with Intelligent Key, use
the following battery type:
CR2032
•Do not touch the internal circuit and electric ter-
minals as doing so could cause a malfunction.
•Make sure that the + side faces the bottom of the
case, as illustrated.
4. Install the lid in the reverse order of removal.
5. Operate the buttons to check its operation.
Contact a NISSAN dealer or qualified workshop
if you need assistance for battery replacement.
WARNING
Be sure the ignition switch is in the “OFF” or
LOCK position. Otherwise the cooling fan or the
engine may start to operate suddenly.
1. Visually inspect each belt for signs of unusual
wear, cuts, fraying or looseness. If the belt is in
poor condition or loose, have it replaced or ad-
justed by a NISSAN dealer or qualified work-
shop.
2. Have the belts checked regularly for condition
and tension in accordance with the maintenance
schedule as shown in the separately provided
Warranty Information and Maintenance booklet.WARNING
Be sure the engine and ignition switch are off
and that the handbrake is engaged securely.
CAUTION
•Be sure to use the correct socket to remove
the spark plugs. An incorrect socket can
cause damage to the spark plugs.
•Always replace spark plugs with recom-
mended or equivalent ones.
Replace spark plugs according to the maintenance
schedule. For details, see the separately provided
Warranty Information & Maintenance Booklet.
If replacement is required, see a NISSAN dealer or
qualified workshop for servicing.
DRIVE BELTS SPARK PLUGS (Petrol engine
models)
8-18Maintenance and do-it-yourself