2010 NISSAN NOTE fog light
[x] Cancel search: fog lightPage 92 of 235

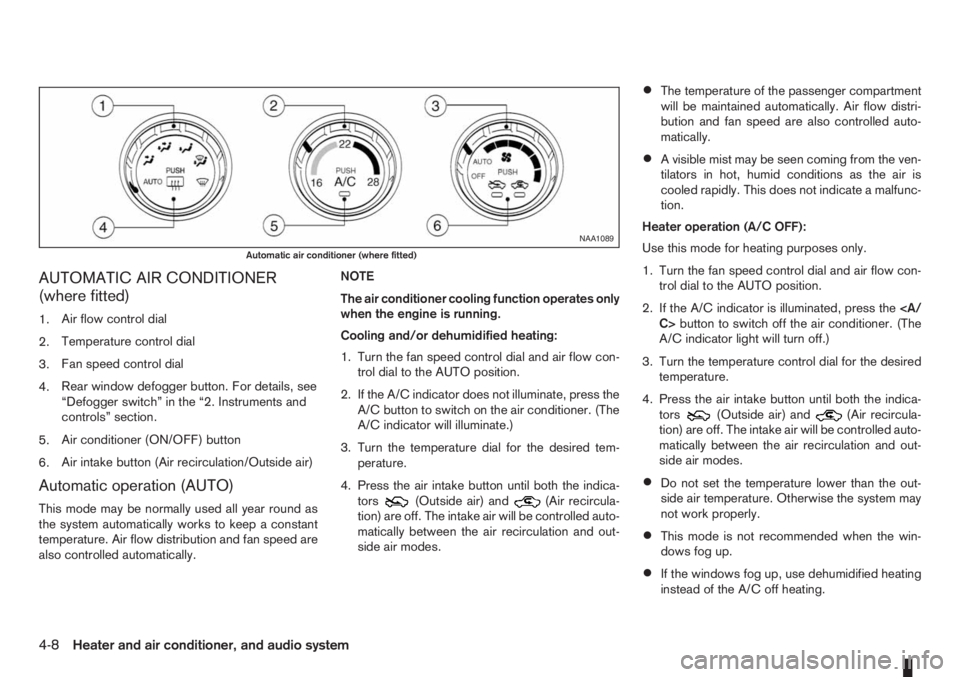
AUTOMATIC AIR CONDITIONER
(where fitted)
1.Air flow control dial
2.Temperature control dial
3.Fan speed control dial
4.Rear window defogger button. For details, see
“Defogger switch” in the “2. Instruments and
controls” section.
5.Air conditioner (ON/OFF) button
6.Air intake button (Air recirculation/Outside air)
Automatic operation (AUTO)
This mode may be normally used all year round as
the system automatically works to keep a constant
temperature. Air flow distribution and fan speed are
also controlled automatically.NOTE
The air conditioner cooling function operates only
when the engine is running.
Cooling and/or dehumidified heating:
1. Turn the fan speed control dial and air flow con-
trol dial to the AUTO position.
2. If the A/C indicator does not illuminate, press the
A/C button to switch on the air conditioner. (The
A/C indicator will illuminate.)
3. Turn the temperature dial for the desired tem-
perature.
4. Press the air intake button until both the indica-
tors(Outside air) and(Air recircula-
tion) are off. The intake air will be controlled auto-
matically between the air recirculation and out-
side air modes.
•The temperature of the passenger compartment
will be maintained automatically. Air flow distri-
bution and fan speed are also controlled auto-
matically.
•A visible mist may be seen coming from the ven-
tilators in hot, humid conditions as the air is
cooled rapidly. This does not indicate a malfunc-
tion.
Heater operation (A/C OFF):
Use this mode for heating purposes only.
1. Turn the fan speed control dial and air flow con-
trol dial to the AUTO position.
2. If the A/C indicator is illuminated, press the
C>button to switch off the air conditioner. (The
A/C indicator light will turn off.)
3. Turn the temperature control dial for the desired
temperature.
4. Press the air intake button until both the indica-
tors
(Outside air) and(Air recircula-
tion) are off. The intake air will be controlled auto-
matically between the air recirculation and out-
side air modes.
•Do not set the temperature lower than the out-
side air temperature. Otherwise the system may
not work properly.
•This mode is not recommended when the win-
dows fog up.
•If the windows fog up, use dehumidified heating
instead of the A/C off heating.
NAA1089
Automatic air conditioner (where fitted)
4-8Heater and air conditioner, and audio system
Page 93 of 235

Dehumidified defrosting or defogging:
1. Turn the air flow control dial to the
position.
2. Turn the fan speed control dial to the desired
position.
3. Turn the temperature control dial for the desired
temperature.
•To quickly remove ice from the outside of the
windscreen, turn the fan speed control dial to
the maximum position.
•As soon as possible after the windscreen has
been cleared of ice, turn the fan speed control
dial to the AUTO position for the automatic mode.
•When the air flow control dial is turned to theorposition, the outside air mode and
the air conditioner will automatically switch on
(except when the fan speed control dial is in the
OFF position) when the outside temperatures is
above −5°C (23°F) to defog the windscreen.
Outside air is drawn into the passenger com-
partment to improve the defogging performance.
Manual operation
Fan speed controlm:
Turn the fan speed control dial:
– to the OFF position to switch off the heater and
air conditioner system.
– to the AUTO position for automatic control of the
fan speed.
– to adjust the fan speed.Temperature control:
Turn temperature dial to set the desired air tempera-
ture.
Air flow control:
Turn the air flow control dial to one of following air
mode.
m
Air flows from centre and side vents.
m
Air flows from centre, side vents and
floor outlets.
mAir flows mainly from floor outlets.
m
Air flows from the defogger outlets and
floor outlets.
mAir flows mainly from defogger outlets.
Air recirculation
m:
Press the air intake button until the air recirculation
indicator light (
) comes on. When selected,
interior air will be recirculated inside the vehicle and
the air conditioner will switch on.
Use this mode to recirculate interior air inside the
passenger compartment in situations such as: driv-
ing on a dust raised road, avoiding traffic fumes or
having maximum cooling from the air conditioner.Outside air circulation
m:
Press the air intake button until outside air indicator
light (
) comes on. When selected, outside air
will be drawn into the vehicle.
Use this mode to draw outside air into the passen-
ger compartment for normal heating, ventilation or
air conditioner operation.
Operating tips
•In order to improve the heater operation, clear
the snow and ice from the wiper blade and air
inlet in front of the windscreen.
•When the engine coolant temperature and out-
side air temperature are low, the air flow from
the floor outlets may not operate for a maximum
of approximately 150 seconds. However, this is
not a malfunction. After the coolant temperature
has warmed up, the air flow from the floor outlets
will operate normally.
•After parking in the sun, drive for two or three
minutes with the windows open to vent hot air
from the passenger compartment. Then, close
the windows. This will allow the acceleration of
the air conditioner’s cooling operation.
•Keep the windows closed while the air condi-
tioner is operating.
•The air conditioning system should be operated
for approximately 10 minutes at least once a
month. This helps prevent damage to the system
due to lack of lubrication.
Heater and air conditioner, and audio system4-9
Page 94 of 235

•If the coolant temperature warning light comes
on, turn the air conditioner off. For additional
information, see “Engine overheat” in the “6. In
case of emergency” section.
•If the engine coolant reaches an extremely high
temperature, the air conditioning system will au-
tomatically turn off. This may happen for example
if the engine runs at idle speed for a long time on
a hot day.
The sensor
j1 on the fascia helps the system to
maintain a constant temperature inside the cabin.
Do not put anything on or around this sensor.
Air conditioner filter
The air conditioning system is equipped with a filter
which collects dirt, pollen, dust, etc. To make sure
air conditioner heats, defogs, and ventilates effi-
ciently, replace the filter regularly. To replace the fil-
ter, contact a NISSAN dealer or qualified workshop.
The filter should be replaced if the air flow isextremely reduced or when the windows get fog
up easily during air conditioning system opera-
tion.
Servicing air conditioner
The air conditioning system in your NISSAN vehicle
is charged with an environmentally friendly refriger-
ant.
NISSAN GREEN PROGRAM
This refrigerant will not harm the earth’s ozone
layer.
Special charging equipment and lubricant are re-
quired when servicing your vehicle’s air conditioner.
Using improper refrigerants or lubricants will cause
severe damage to the air conditioning system. See
“Air conditioning system refrigerant and lubricant
recommendations (where fitted)” in the “9. Techni-
cal information” section of this manual.
A NISSAN dealer or qualified workshop will be able
to service the environmentally “friendly” air condi-
tioning system.The audio system operates when the ignition switch
is in the Acc or ON position. If you want to listen to
the radio or CD while the engine is not running, turn
the ignition switch to the Acc position.Do not use
for an extended period of time with the engine
stopped.
AUDIO OPERATION PRECAUTIONS
WARNING
Do not adjust the audio system while driving so
that full attention may be given to vehicle opera-
tion.
Radio
•Radio reception is affected by station signal
strength, distance from radio transmitter, build-
ings, bridges, mountains and other external influ-
ences. Intermittent changes in reception quality
are normally caused by these external influences.
•Using a mobile phone in or near the vehicle may
influence radio reception quality.
•Use the antenna for the best reception.
Compact Disc (CD) player
•During cold weather or rainy days, the player
may malfunction due to the humidity. If this oc-
curs, remove the CD and dehumidify or ventilate
the player completely.
•The player may skip while driving on rough roads.
NAA901Z
AUDIO SYSTEM
4-10Heater and air conditioner, and audio system
Page 180 of 235

Handbrake*:
Confirm that your vehicle is held securely on a fairly
steep hill with only the handbrake applied.
Seats:
Check seat position controls such as seat adjust-
ers, seatback recliner, etc. to ensure they operate
smoothly and all latches lock securely in every posi-
tion. Check that the head restraints move up and
down smoothly and the locks hold securely in all
latched positions.
Seat belts:
Check that all parts of the seat belt system (e.g.
buckles, anchors, adjusters and retractors) operate
properly and smoothly, and are installed securely.
Check the belt webbing for cuts, fraying, wear or
damage. See “Seat belt maintenance” in the
“1. Safety — seats, seat belts and supplemental
restraint system” section for further details.
Steering wheel:
Check for any change in the steering conditions,
such as excessive free play, hard steering or strange
noises.
Warning lights and audible reminders:
Make sure that all warning/indicator lights and au-
dible reminders are operating properly.
Windscreen defogger:
Check that the air comes out of the defogger outlets
properly when operating the heater or air condi-
tioner.Windscreen wiper and washer*:
Check that the wipers and washer operate properly
and that the wipers do not streak.When performing any inspection or maintenance
work on your vehicle, always take care to prevent
serious accidental injury to yourself or damage to
the vehicle. The following are general precautions
which should be closely observed.
•Park the vehicle on a level surface, apply the
handbrake securely and block the wheels to
prevent the vehicle from moving. For a manual
transmission models, move the gear lever to
N (Neutral) position. [For automatic transmis-
sion models, move the selector lever to P
(Park) position.]
•Do not work under the engine bonnet while
the engine is hot. Turn off the engine and wait
until it cools down.
•Be sure to turn the ignition switch to the “OFF”
or LOCK position.
When the ignition switch is in the ON or Acc
position, the cooling fan may start to operate
suddenly even when the engine is not run-
ning. To avoid injury, always disconnect the
negative battery cable before working near
the engine.
•If you must work with the engine running,
keep your hands, clothing, hair and tools away
from moving fans, belts and any other moving
parts.
•It is advisable to remove ties and any jewel-
lery, such as rings, watches, etc. before work-
ing on your vehicle.
MAINTENANCE PRECAUTIONS
8-4Maintenance and do-it-yourself
Page 200 of 235

3. Disconnect the electrical connector from the rear
end of the headlight bulb.
4. Remove the cap.
5. Push and turn the retaining spring to loosen it.
6. Remove the headlight bulb. Do not shake or ro-
tate the bulb during the removal.
7. Install the new bulb in the reverse order of re-
moval and make sure that the cap is securely
sealed with the headlight body.
8. Reconnect the negative (—) battery cable and
close the bonnet.
Contact a NISSAN dealer or qualified workshop, if
you need assistance for bulb replacement.
NOTE
Fog may temporarily form inside the lens of the
exterior lights in the rain or in a car wash. The fog
is caused by a temperature difference between
the inside and the outside of the lens. This is not
a malfunction. If large droplets can be seen, then
contact a NISSAN dealer or qualified workshop.EXTERIOR LIGHTS
Item Wattage (W)
Headlight (type H4) 55/60
Front turn signal light 21
Front side light 5
Front fog light (H11 type, where fitted)
*155
Side turn signal light 5
Rear combination light
Turn signal 16
Stop/Tail 21/5
Reverse 16
High-mounted stop light *1 18
Number plate light 5
Rear fog light 21
*1: If replacement is required, contact a NISSAN dealer
or qualified workshop.
INTERIOR LIGHTS
Item Wattage (W)
Room light/Map light (where fitted) 5
Luggage compartment light 10
NDI726
Light locations
8-24Maintenance and do-it-yourself
Page 201 of 235

LIGHT LOCATIONS
1.Headlight
2.Room light and Map light (where fitted)
3.Room and Map lights (where fitted)
4.Side turn signal light
5.Front side light
6.Front fog light (where fitted)
7.Front turn signal light
8.High mounted stop light
9.Rear combination light
10.Luggage compartment light
11.Rear fog light
12.Number plate light
REMOVE
INSTALL
Replacing procedures
All other lights are either type A, B, C or D. When
replacing a bulb, first remove the lens and/or cover.
NDI707
NDI729
Front turn signal light
Maintenance and do-it-yourself8-25
Page 204 of 235

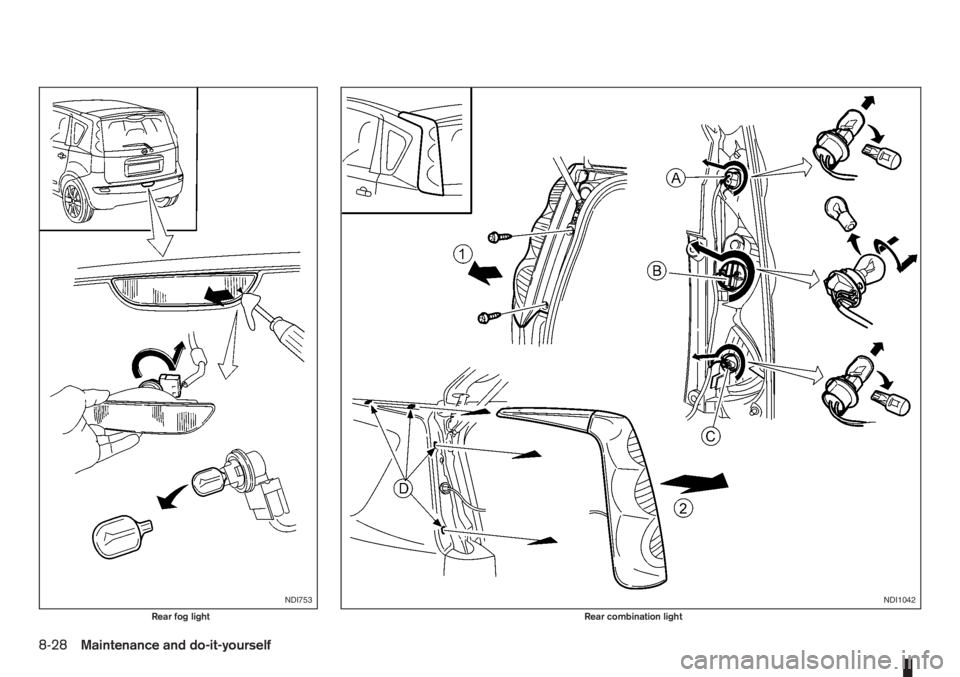
NDI753
Rear fog light
NDI1042
Rear combination light
8-28Maintenance and do-it-yourself
Page 223 of 235

E
Electronic Stability Programme (ESP) system ...................... 5-29
– ESP OFF switch ........................................................... 5-30
Engine
– Before starting the engine ................................................ 5-2
– Changing engine coolant ................................................. 8-6
– Changing engine oil ......................................................... 8-9
– Changing engine oil filter ............................................... 8-11
– Checking engine coolant level ......................................... 8-6
– Checking engine oil level ................................................. 8-9
– Data ................................................................................ 9-5
– Engine cold start period ................................................... 5-5
– Engine compartment ................................................ 0-9, 8-5
– Engine coolant ............................................................... 5-31
– Engine cooling system ..................................................... 8-6
– Engine oil ........................................................................ 8-8
– Engine overheat ............................................................. 6-11
– Engine serial number ....................................................... 9-7
– Fuel filter (Diesel engine models) ................................... 8-12
– Starting the engine ........................................................ 5-10
Exhaust gas (Carbon Monoxide) ............................................ 5-3
Exterior lights ...................................................................... 8-24
F
Filter
– Air cleaner filter ............................................................. 8-19
– Air conditioner filter ......................................................... 4-7
– Fuel filter (Diesel engine models) ................................... 8-12
Floor mats ............................................................................. 7-4
Fluid
– Automatic transmission fluid (ATF) ................................. 8-13
– Brake and clutch fluid .................................................... 8-13
– Window washer/headlight cleaner fluid .......................... 8-14Fog light
– Front fog light ................................................................ 2-17
– Rear fog light ................................................................. 2-18
Front passenger air bag indicator light ................................. 1-14
Fuel
– Bleeding the fuel system ................................................ 8-12
– Capacities and recommended fuel/lubricants ................... 9-2
– Fuel filler lid ................................................................... 3-11
– Fuel filter (Diesel engine models) ................................... 8-12
– Fuel gauge ...................................................................... 2-2
– Fuel recommendation ...................................................... 9-4
Fuel filler lid ......................................................................... 3-11
– Cap ............................................................................... 3-11
– Opener lever ................................................................. 3-11
Fuses .................................................................................. 8-21
– Engine compartment ...................................................... 8-22
– Passenger compartment ................................................ 8-21
H
Handbrake lever .................................................................. 3-11
Hazard warning flasher switch ............................................. 2-19
Head restraint ....................................................................... 1-4
– Active head restraints ...................................................... 1-5
Headlight
– Headlight aiming control switch ..................................... 2-18
– Headlight and turn signal switch .................................... 2-16
– Headlight cleaner .......................................................... 2-14
– Headlight switch ............................................................ 2-16
– Headlights (bulb replacement) ....................................... 8-23
– Replacement (bulb) ....................................................... 8-23
– Turn signal switch .......................................................... 2-17
Heated seats ....................................................................... 2-19
Heater and air conditioner/ventilation ..................................... 4-2
Horn ................................................................................... 2-19
Index10-3