2010 NISSAN MURANO maintenance
[x] Cancel search: maintenancePage 303 of 425

Black plate (299,1)
Model "Z51-D" EDITED: 2009/ 8/ 3
belted or radial) , and tread pattern
on all four wheels. Install tire chains
on the front wheels when driving on
slippery roads and drive carefully.
. Be sure to check the brakes imme-
diately after driving in mud or water.
See “BRAKE SYSTEM” later in this
section for wet brakes.
. Avoid parking your vehicle on steep
hills. If you get out of the vehicle
and it rolls forward, backward or
sideways, you could be injured.
. Whenever you drive off-road
through sand, mud or water as deep
as the wheel hub, more frequent
maintenance may be required. See
the maintenance information in the
“NISSAN Service and Maintenance
Guide”.
. Spinning the front wheels on slip-
pery surfaces may cause the AWD
warning light to flash and the AWD
system to automatically switch from
the AWD mode to the 2WD mode.
This could reduce traction. Be espe-
cially careful when towing a trailer.
(AWD models)
WARNING
Do not operate the push-button ignition
switch while driving the vehicle except
in an emergency. (The engine will stop
when the ignition switch is pushed 3
consecutive times or the ignition switch
is pushed and held for more than 2
seconds.) If the engine stops while the
vehicle is being driven, this could lead
to a crash and serious injury.INTELLIGENT KEY SYSTEMThe Intelligent Key system can operate the
ignition switch without taking the Intelligent
Key out from your pocket or purse. The
operating environment and/or conditions may
affect the Intelligent Key system operation.
CAUTION
.Be sure to carry the Intelligent Key
with you when operating the vehi-
cle.
. Never leave the Intelligent Key in-
side the vehicle when you leave the
vehicle.
SSD0436
Operating rangeThe Intelligent Key functions can only be used
for starting the engine when the Intelligent Key is
within the specified operating range
*1.
When the Intelligent Key battery is almost
discharged or strong radio waves are present
near the operating location, the Intelligent Key
system’s operating range becomes narrower
and may not function properly.
If the Intelligent Key is within the operating
range, it is possible for anyone, even someone
who does not carry the Intelligent Key, to turn
the ignition switch to start the engine.
PUSH-BUTTON IGNITION SWITCH
Starting and driving
5-9
Page 306 of 425

Black plate (302,1)
Model "Z51-D" EDITED: 2009/ 8/ 3
INTELLIGENT KEY BATTERY DIS-
CHARGEIf the battery of the Intelligent Key is almost
discharged, the guide light
*B
of the key port
*A
blinks and the indicator appears on the dot
matrix liquid crystal display. (See “DOT MATRIX
LIQUID CRYSTAL DISPLAY” in the “2. Instru-
ments and controls” section.)
In this case, inserting the Intelligent Key into the
port*A
allows you to start the engine. Make
sure that the key ring side faces backward as
illustrated. Insert the Intelligent Key in the port
until it is latched and secured.
To remove the Intelligent Key from the port, push
the ignition switch to the OFF position and pull
the Intelligent Key out of the port.
NOTE:
The key port does not charge the key
battery. If you see the low battery indicator
in the dot matrix liquid crystal display,
replace the battery as soon as possible.
(See “BATTERY REPLACEMENT” in the “8.
Maintenance and do-it-yourself” section.)
CAUTION
. Never place anything except the
Intelligent Key in the key port. Doing
so may cause damage to the equip- ment.
. Make sure the Intelligent Key is in
the correct direction when inserting
it to the key port. The engine may
not start if it is in the incorrect
direction.
. Remove the Intelligent Key from the
key port after the ignition switch is
pushed to the OFF position. .
Make sure the area around the vehicle is
clear.
. Check fluid levels such as engine oil, cool-
ant, brake fluid and window washer fluid as
frequently as possible, or at least whenever
you refuel.
. Check that all windows and lights are clean.
. Visually inspect tires for their appearance
and condition. Also check tires for proper
inflation.
. Lock all doors.
. Position seats and adjust head restraints/
headrests.
. Adjust inside and outside mirrors.
. Fasten seat belts and ask all passengers to
do likewise.
. Check the operation of warning lights when
the ignition switch is pushed to the ON
position. (See “WARNING/INDICATOR
LIGHTS AND AUDIBLE REMINDERS” in
the “2. Instruments and controls” section.)
BEFORE STARTING THE ENGINE
5-12
Starting and driving
Page 320 of 425

Black plate (316,1)
Model "Z51-D" EDITED: 2009/ 8/ 3
ANTI-LOCK BRAKING SYSTEM (ABS)
WARNING
.The Anti-lock Braking System (ABS)
is a sophisticated device, but it
cannot prevent accidents resulting
from careless or dangerous driving
techniques. It can help maintain
vehicle control during braking on
slippery surfaces. Remember that
stopping distances on slippery sur-
faces will be longer than on normal
surfaces even with ABS. Stopping
distances may also be longer on
rough, gravel or snow covered
roads, or if you are using tire chains.
Alwaysmaintainasafedistance
from the vehicle in front of you.
Ultimately, the driver is responsible
for safety.
. Tire type and condition may also
affect braking effectiveness.
— When replacing tires, install the
specified size of tires on all four
wheels.
— When installing a spare tire, make sure that it is the proper
size and type as specified on the Tire and Loading Information
label. See “TIRE AND LOADING
INFORMATION LABEL” in the “9.
Technical and consumer infor-
mation” section of this manual.
— For detailed information, see “WHEELS AND TIRES” in the
“8. Maintenance and do-it-your-
self” section of this manual.
The Anti-lock Braking System (ABS) controls
the brakes so the wheels do not lock during hard
braking or when braking on slippery surfaces.
The system detects the rotation speed at each
wheel and varies the brake fluid pressure to
prevent each wheel from locking and sliding. By
preventing each wheel from locking, the system
helps the driver maintain steering control and
helps to minimize swerving and spinning on
slippery surfaces.
Using the systemDepress the brake pedal and hold it down.
Depress the brake pedal with firm steady
pressure, but do not pump the brakes. The
ABS will operate to prevent the wheels from
locking up. Steer the vehicle to avoid obstacles.
WARNING
Do not pump the brake pedal. Doing so
may result in increased stopping dis-
tances.Self-test featureThe ABS includes electronic sensors, electric
pumps, hydraulic solenoids and a computer. The
computer has a built-in diagnostic feature that
tests the system each time you start the engine
and move the vehicle at a low speed in forward
or reverse. When the self-test occurs, you may
hear a “clunk” noise and/or feel a pulsation in the
brake pedal. This is normal and does not
indicate a malfunction. If the computer senses
a malfunction, it switches the ABS off and
illuminates the ABS warning light on the
instrument panel. The brake system then oper-
ates normally, but without anti-lock assistance.
If the ABS warning light illuminates during the
self-test or while driving, have the vehicle
checked by a NISSAN dealer.Normal operationThe ABS operates at speeds above 3 to 6 MPH
(5 to 10 km/h) . The speed varies according to
road conditions.
When the ABS senses that one or more wheels
are close to locking up, the actuator rapidly
5-26
Starting and driving
Page 323 of 425

Black plate (319,1)
Model "Z51-D" EDITED: 2009/ 8/ 3
cially careful when driving and cor-
nering on slippery surfaces. Always
drive carefully.
FREEING A FROZEN DOOR LOCKTo prevent a door lock from freezing, apply
deicer through the key hole. If the lock becomes
frozen, heat the key before inserting it into the
key hole or use the remote keyless entry keyfob.ANTI-FREEZEIn the winter when it is anticipated that the
outside temperature will drop below 328F(0 8C) ,
check the anti-freeze to assure proper winter
protection. For additional information, see “EN-
GINE COOLING SYSTEM” in the “8. Main-
tenance and do-it-yourself” section.BATTERYIf the battery is not fully charged during
extremely cold weather conditions, the battery
fluid may freeze and damage the battery. To
maintain maximum efficiency, the battery should
be checked regularly. For additional information,
see “BATTERY” in the “8. Maintenance and do-
it-yourself” section.DRAINING OF COOLANT WATERIf the vehicle is to be left outside without anti-
freeze, drain the cooling system, including the
engine block. Refill before operating the vehicle.
For details, see “ENGINE COOLING SYSTEM”
in the “8. Maintenance and do-it-yourself”
section.
TIRE EQUIPMENTSUMMER tires have a tread designed to provide
superior performance on dry pavement. How-
ever, the performance of these tires will be
substantially reduced in snowy and icy condi-
tions. If you operate your vehicle on snowy or icy
roads, NISSAN recommends the use of MUD &
SNOW or ALL SEASON tires on all four wheels.
Consult a NISSAN dealer for the tire type, size,
speed rating and availability information.
For additional traction on icy roads, studded
tires may be used. However, some U.S. states
and Canadian provinces prohibit their use.
Check local, state and provincial laws before
installing studded tires.
Skid and traction capabilities of studded
snow tires, on wet or dry surfaces, may be
poorer than that of non-studded snow
tires.
Tire chains may be used. For details, see “TIRE
CHAINS” in the “8. Maintenance and do-it-
yourself” section of this manual.All-Wheel Drive (AWD) modelIf you install snow tires, they must also be the
same size, brand, construction and tread pattern
on all four wheels.
COLD WEATHER DRIVING
Starting and driving
5-29
Page 333 of 425

Black plate (329,1)
Model "Z51-D" EDITED: 2009/ 8/ 3
SCE0751
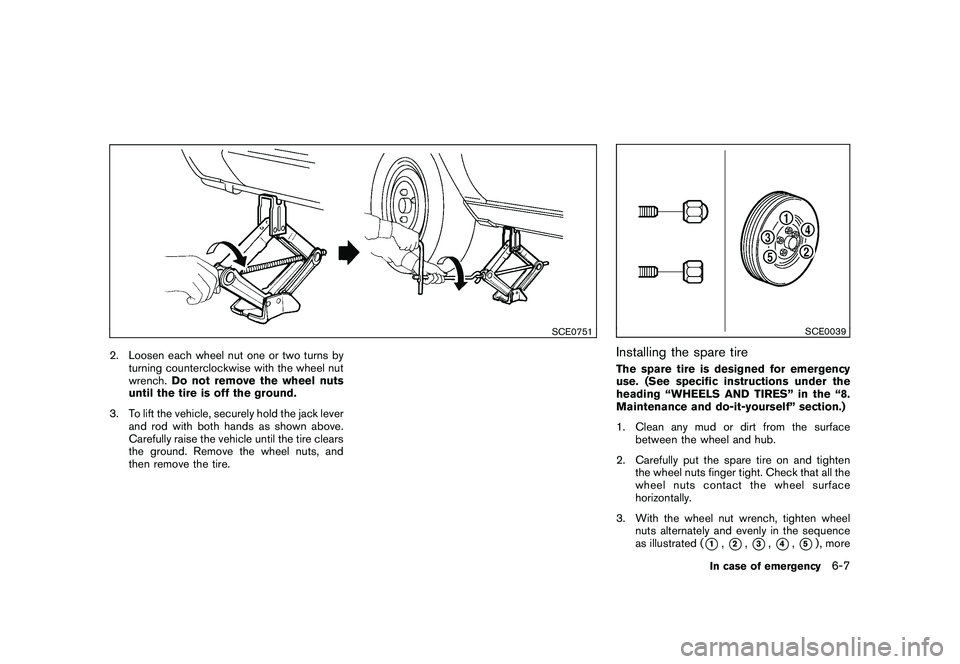
2. Loosen each wheel nut one or two turns byturning counterclockwise with the wheel nut
wrench. Do not remove the wheel nuts
until the tire is off the ground.
3. To lift the vehicle, securely hold the jack lever and rod with both hands as shown above.
Carefully raise the vehicle until the tire clears
the ground. Remove the wheel nuts, and
then remove the tire.
SCE0039
Installing the spare tireThe spare tire is designed for emergency
use. (See specific instructions under the
heading “WHEELS AND TIRES” in the “8.
Maintenance and do-it-yourself” section.)
1. Clean any mud or dirt from the surfacebetween the wheel and hub.
2. Carefully put the spare tire on and tighten the wheel nuts finger tight. Check that all the
wheel nuts contact the wheel surface
horizontally.
3. With the wheel nut wrench, tighten wheel nuts alternately and evenly in the sequence
as illustrated (
*1,*2,*3,*4,*5) , more
In case of emergency
6-7
Page 334 of 425

Black plate (330,1)
Model "Z51-D" EDITED: 2009/ 8/ 3
than 2 times, until they are tight.
4. Lower the vehicle slowly until the tire touches the ground. Then, with the wheel
nut wrench, tighten the wheel nuts securely
in the sequence as illustrated. Lower the
vehicle completely.
WARNING
.Incorrect wheel nuts or improperly
tightened wheel nuts can cause the
wheel to become loose or come off.
This could cause an accident.
. Do not use oil or grease on the
wheel studs or nuts. This could
cause the nuts to become loose.
. Retighten the wheel nuts when the
vehicle has been driven for 600
miles (1,000 km) (also in cases of a
flat tire, etc.) .
. As soon as possible, tighten the
wheel nuts to the specified torque
with a torque wrench.
Wheel nut tightening torque: 80 ft-lb (108 N·m)
The wheel nuts must be kept tightened
to specification at all times. It is
recommended that wheel nuts be tigh- tened to specifications at each lubrica-
tion interval.
.
Adjust tire pressure to the COLD
pressure.
COLD pressure:
After the vehicle has been parked for
three hours or more or driven less than
1 mile (1.6 km) .
COLD tire pressures are shown on the
Tire and Loading Information label
affixed to the driver side center pillar.
Stowing the damaged tire and the tools1. Securely store the damaged tire, jack and tools in the storage area.
2. Replace the cargo box.
3. Close the cargo floor board.
4. Close the lift gate.
WARNING
. Always make sure that the spare tire
and jacking equipment are properly
secured after use. Such items can
become dangerous projectiles in an
accident or sudden stop.
. The T-type spare tire and small size spare tire are designed for emer-
gency use. See specific instructions
under the heading “WHEELS AND
TIRES” in the “8. Maintenance and
do-it-yourself” section.
6-8
In case of emergency
Page 349 of 425

Black plate (25,1)
8 Maintenance and do-it-yourself
Model "Z51-D" EDITED: 2009/ 8/ 3
Maintenance requirement..................................... 8-2
Scheduled maintenance ................................... 8-2
General maintenance ...................................... 8-2
Where to go for service ................................... 8-2
General maintenance .......................................... 8-2
Explanation of maintenance items ....................... 8-2
Maintenance precautions ..................................... 8-5
Engine compartment check locations ...................... 8-6
VQ35DE engine ............................................ 8-6
Engine cooling system ......................................... 8-7
Checking engine coolant level ........................... 8-7
Changing engine coolant ................................. 8-8
Engine oil ......................................................... 8-8
Checking engine oil level ................................. 8-8
Changing engine oil and filter ............................ 8-8
Continuously Variable Transmission (CVT) fluid ........ 8-11
Power steering fluid .......................................... 8-11
Brake fluid ...................................................... 8-12
Window washer fluid ........................................ 8-12
Battery .......................................................... 8-13
Jump starting .............................................. 8-14
Variable voltage control system (if so equipped) ...... 8-15
Drive belt ....................................................... 8-15 Spark plugs
.................................................... 8-16
Replacing spark plugs ................................... 8-16
Air cleaner ...................................................... 8-16
Windshield wiper blades .................................... 8-17
Cleaning .................................................... 8-17
Replacing ................................................... 8-18
Rear window wiper blade ................................... 8-19
Brakes ........................................................... 8-19
Self-adjusting brakes .................................... 8-19
Brake pad wear warning ................................ 8-19
Fuses ............................................................ 8-20
Engine compartment ..................................... 8-20
Passenger compartment ................................ 8-21
Battery replacement .......................................... 8-21
Lights ............................................................ 8-24
Headlights .................................................. 8-25
Exterior and interior lights ............................... 8-27
Wheels and tires .............................................. 8-30
Tire pressure ............................................... 8-30
Tire labeling ................................................ 8-33
Types of tires .............................................. 8-35
Tire chains .................................................. 8-36
Changing wheels and tires ............................. 8-36
Page 350 of 425

Black plate (350,1)
Model "Z51-D" EDITED: 2009/ 8/ 3
Your new NISSAN has been designed to have
minimum maintenance requirements with long
service intervals to save you both time and
money. However, some day-to-day and regular
maintenance is essential to maintain your
NISSAN’s fine mechanical condition, as well
as its emission and engine performance.
It is the owner’s responsibility to make sure that
the scheduled maintenance, as well as general
maintenance, is performed.
As the vehicle owner, you are the only one who
can ensure that your vehicle receives the proper
maintenance. You are a vital link in the main-
tenance chain.SCHEDULED MAINTENANCEFor your convenience, both required and op-
tional scheduled maintenance items are de-
scribed and listed in your “NISSAN Service and
Maintenance Guide”. You must refer to that
guide to ensure that necessary maintenance is
performed on your NISSAN at regular intervals.GENERAL MAINTENANCEGeneral maintenance includes those items
which should be checked during normal day-
to-day operation. They are essential for proper
vehicle operation. It is your responsibility to
perform these procedures regularly as pre-
scribed.Performing general maintenance checks re-
quires minimal mechanical skill and only a few
general automotive tools.
These checks or inspections can be done by
yourself, a qualified technician or, if you prefer, a
NISSAN dealer.
WHERE TO GO FOR SERVICEIf maintenance service is required or your vehicle
appears to malfunction, have the systems
checked and serviced by a NISSAN dealer.
NISSAN technicians are well-trained specialists
and are kept up-to-date with the latest service
information through technical bulletins, service
tips, and in-dealership information systems.
They are completely qualified to work on
NISSAN vehicles
beforework begins.
You can be confident that a NISSAN dealer’s
service department performs the best job to
meet the maintenance requirements on your
vehicle — in a reliable and economical way. During the normal day-to-day operation of the
vehicle, general maintenance should be per-
formed regularly as prescribed in this section. If
you detect any unusual sounds, vibrations or
smell, be sure to check for the cause or have a
NISSAN dealer do it promptly. In addition, you
should notify a NISSAN dealer if you think that
repairs are required.
When performing any checks or maintenance
work, see “MAINTENANCE PRECAUTIONS”
later in this section.
EXPLANATION OF MAINTENANCE
ITEMSAdditional information on the following
items with “*” is found later in this section.Outside the vehicleThe maintenance items listed here should be
performed from time to time, unless otherwise
specified.
Doors and engine hood:
Check that all doors
and the engine hood operate properly. Also
ensure that all latches lock securely. Lubricate
hinges, latches, latch pins, rollers and links if
necessary. Make sure that the secondary latch
keeps the hood from opening when the primary
latch is released.
When driving in areas using road salt or other
corrosive materials, check lubrication frequently.
MAINTENANCE REQUIREMENT GENERAL MAINTENANCE8-2
Maintenance and do-it-yourself