2010 NISSAN MURANO ECU
[x] Cancel search: ECUPage 55 of 425

Black plate (51,1)
Model "Z51-D" EDITED: 2009/ 8/ 3
SSS0651
Front-facing — step 4
4. Pull the shoulder belt until the belt is fullyextended. At this time, the seat belt retractor
is in the Automatic Locking Retractor (ALR)
mode (child restraint mode) . It reverts to
Emergency Locking Retractor (ELR) mode
when the seat belt is fully retracted.
SSS0652
Front-facing — step 5
5. Allow the seat belt to retract. Pull up on theshoulder belt to remove any slack in the belt.
SSS0653
Front-facing — step 6
6. Remove any additional slack from the seatbelt; press downward and rearward firmly in
the center of the child restraint with your
knee to compress the vehicle seat cushion
and seatback while pulling up on the seat
belt.
7. If the child restraint is equipped with a top tether strap, route the top tether strap and
secure the tether strap to the tether anchor
point (rear seat installation only) . (See “TOP
TETHER STRAP CHILD RESTRAINT” ear-
lier in this section.) Do not install child
restraints that require the use of a top tether
strap to seating positions that do not have a
top tether anchor.
Safety — Seats, seat belts and supplemental restraint system
1-37
Page 56 of 425

Black plate (52,1)
Model "Z51-D" EDITED: 2009/ 8/ 3
SSS0641
Front-facing — step 8
8. After attaching the child restraint, test itbefore you place the child in it. Push it from
side to side while holding the seat near the
seat belt path. The child restraint should not
move more than 1 inch (25 mm) from side to
side. Try to tug it forward and check to see if
the belt holds the restraint in place. If the
restraint is not secure, tighten the belt as
necessary, or put the restraint in another
seat and test it again. You may need to try a
different child restraint. Not all child re-
straints fit in all types of vehicles. 9. Check that the retractor is in the ALR mode
by trying to pull more seat belt out of the
retractor. If you cannot pull any more belt
webbing out of the retractor, the retractor is
in the ALR mode.
10. Check to make sure the child restraint is properly secured prior to each use. If the
seat belt is not locked, repeat steps 3
through 9.
SSS0823
Front-facing — step 11
11. If the child restraint is installed in the frontpassenger seat, turn the ignition switch to
the ON position. The front passenger air bag
status light
should illuminate. If this
light is not illuminated, see “Front passenger
air bag and status light” later in this section.
Move the child restraint to another
seating position . Have the system
checked by a NISSAN dealer.
After the child restraint is removed and the seat
belt is fully retracted, the ALR mode (child
restraint mode) is canceled.
1-38
Safety — Seats, seat belts and supplemental restraint system
Page 58 of 425

Black plate (54,1)
Model "Z51-D" EDITED: 2009/ 8/ 3
SSS0656
Rear-facing — step 4
4. Allow the seat belt to retract. Pull up on theshoulder belt to remove any slack in the belt.
SSS0657
Rear-facing — step 5
5. Remove any additional slack from the childrestraint; press downward and rearward
firmly in the center of the child restraint with
your hand to compress the vehicle seat
cushion and seatback while pulling up on
the seat belt.
SSS0658
Rear-facing — step 6
6. After attaching the child restraint, test itbefore you place the child in it. Push it from
side to side while holding the seat near the
seat belt path. The child restraint should not
move more than 1 inch (25 mm) from side to
side. Try to tug it forward and check to see if
the belt holds the restraint in place. If the
restraint is not secure, tighten the belt as
necessary, or put the restraint in another
seat and test it again. You may need to try a
different child restraint. Not all child re-
straints fit in all types of vehicles.
1-40
Safety — Seats, seat belts and supplemental restraint system
Page 59 of 425

Black plate (55,1)
Model "Z51-D" EDITED: 2009/ 8/ 3
7. Check that the retractor is in the ALR modeby trying to pull more seat belt out of the
retractor. If you cannot pull any more seat
belt webbing out of the retractor, the
retractor is in the ALR mode.
8. Check to make sure that the child restraint is properly secured prior to each use. If the
seat belt is not locked, repeat steps 3
through 7.
After the child restraint is removed and the seat
belt fully retracted, the ALR mode (child restraint
mode) is canceled.
SSS0099
PRECAUTIONS ON BOOSTER SEATS
WARNING
. Infants and small children should
always be placed in an appropriate
child restraint while riding in the
vehicle. Failure to use a child re-
straint or booster seat can result in
serious injury or death.
. Infants and small children should
never be carried on your lap. It is not
possible for even the strongest
adult to resist the forces of a severe
accident. The child could be crushed between the adult and parts of the
vehicle. Also, do not put the same
seat belt around both your child and
yourself.
. NISSAN recommends that the boos-
ter seat be installed in the rear seat.
According to accident statistics,
children are safer when properly
restrained in the rear seat than in
the front seat. If you must install a
booster seat in the front seat, see
“BOOSTER SEAT INSTALLATION”
later in this section.
. A booster seat must only be in-
stalled in a seating position that has
a lap/shoulder belt. Failure to use a
three-point type seat belt with a
booster seat can result in a serious
injury in sudden stop or collision.
. Improper use or improper installa-
tion of a booster seat can increase
the risk or severity of injury for both
the child and other occupants of the
vehicle and can lead to serious
injury or death in an accident.
. Do not use towels, books, pillows or
other items in place of a booster
seat. Items such as these may moveBOOSTER SEATS
Safety — Seats, seat belts and supplemental restraint system
1-41
Page 60 of 425
Black plate (56,1)
Model "Z51-D" EDITED: 2009/ 8/ 3
during normal driving or a collision
and result in serious injury or death.
Booster seats are designed to be
used with a lap/shoulder belt. Boos-
ter seats are designed to properly
route the lap and shoulder portions
of the seat belt over the strongest
portions of a child’s body to provide
the maximum protection during a
collision.
. Follow all of the booster seat man-
ufacturer’s instructions for installa-
tion and use. When purchasing a
booster seat, be sure to select one
which will fit your child and vehicle.
It may not be possible to properly
install some types of booster seats
in your vehicle.
. If the booster seat and seat belt is
not used properly, the risk of a child
being injured in a collision or a
sudden stop greatly increases.
. Adjustable seatbacks should be
positioned to fit the booster seat,
but as upright as possible.
. After placing the child in the booster
seat and fastening the seat belt,
make sure the shoulder portion of the belt is away from the child’s face
and neck and the lap portion of the
belt does not cross the abdomen.
. Do not put the shoulder belt behind
the child or under the child’s arm. If
you must install a booster seat in
the front seat, see “BOOSTER SEAT
INSTALLATION” later in this section.
. When your booster seat is not in
use, keep it secured with a seat belt
to prevent it from being thrown
around in case of a sudden stop or
accident.
CAUTION
Remember that a booster seat left in a
closed vehicle can become very hot.
Check the seating surface and buckles
before placing your child in the booster
seat.
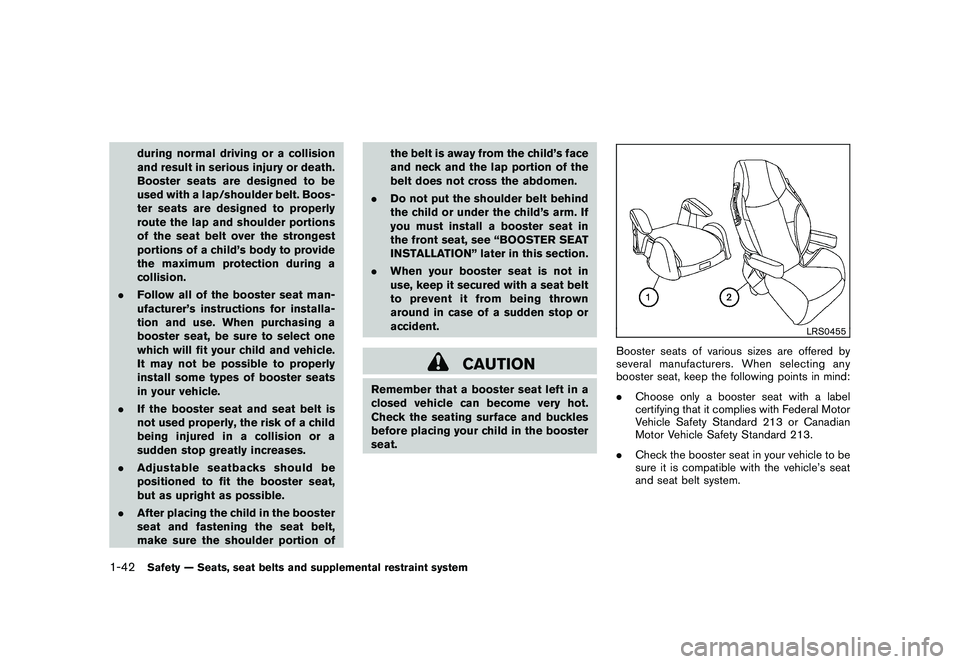
LRS0455
Booster seats of various sizes are offered by
several manufacturers. When selecting any
booster seat, keep the following points in mind:
.Choose only a booster seat with a label
certifying that it complies with Federal Motor
Vehicle Safety Standard 213 or Canadian
Motor Vehicle Safety Standard 213.
. Check the booster seat in your vehicle to be
sure it is compatible with the vehicle’s seat
and seat belt system.
1-42
Safety — Seats, seat belts and supplemental restraint system
Page 62 of 425

Black plate (58,1)
Model "Z51-D" EDITED: 2009/ 8/ 3
SSS0640
Front passenger seat
1. Adjust the rear seatback to the uprightposition.
If you must install a booster seat in the
front seat, move the seat to the rear-
most position.
2. Position the booster seat on the seat. Only place it in a front-facing direction. Always
follow the booster seat manufacturer’s
instructions.
LRS0451
Rear center position
3. The booster seat should be positioned onthe vehicle seat so that it is stable. If
necessary, adjust or remove the head
restraint/headrest to obtain the correct
booster seat fit. (See “HEAD RESTRAINTS”
earlier in this section.)
If the head restraint/headrest is removed,
store it in a secure place. Be sure to reinstall
the head restraint/headrest when the boos-
ter seat is removed.
If the seating position does not have an
adjustable head restraint/headrest and it is
interfering with the proper booster seat fit,
try another seating position or a different
booster seat.
LRS0452
Rear outboard position
4. Position the lap portion of the seat belt lowand snug on the child’s hips. Be sure to
follow the booster seat manufacturer’s
instructions for adjusting the seat belt
routing.
5. Pull the shoulder belt portion of the seat belt toward the retractor to take up extra slack.
Be sure the shoulder belt is positioned
across the top, middle portion of the child’s
shoulder. Be sure to follow the booster seat
manufacturer’s instructions for adjusting the
seat belt routing.
1-44
Safety — Seats, seat belts and supplemental restraint system
Page 71 of 425

Black plate (67,1)
Model "Z51-D" EDITED: 2009/ 8/ 3
Status light:
The front passenger air bag status lightis located on the instrument panel below the air
conditioner controls. The light operates as
follows:
.Unoccupied passenger seat: The
light is OFF and the front passenger air bag
is OFF and will not inflate in a crash.
. Passenger’s seat occupied by a small adult,
child or child restraint as outlined in this
section: The
light illuminates to
indicate that the front passenger air bag is
OFF and will not inflate in a crash.
. Occupied passenger seat and the passen-
ger meets the conditions outlined in this
section: The
light is OFF to indicate
that the front passenger air bag is opera-
tional.
Front passenger air bag:
The front passenger air bag is designed to
automatically turn OFF when the vehicle is
operated under some conditions as described
below as permitted by U.S. regulations. If the
front passenger air bag is OFF, it will not inflate
in a crash. The driver air bag and other air bags
in your vehicle are not part of this system.
The purpose of the regulation is to help reduce
the risk of injury or death from an inflating air bag to certain front passenger seat occupants, such
as children, by requiring the air bag to be
automatically turned OFF.
The occupant classification sensor (pattern
sensor) is in the front passenger seat cushion
and is designed to detect an occupant and
objects on the seat. For example, if a child is in
the front passenger seat, the Advanced Air Bag
System is designed to turn the passenger air
bag OFF in accordance with the regulations.
Also, if a child restraint of the type specified in
the regulations is on the seat, the occupant
classification sensor can detect it and cause the
air bag to turn OFF.
Front passenger seat adult occupants who are
properly seated and using the seat belt as
outlined in this manual should not cause the
passenger air bag to be automatically turned
OFF. For small adults it may be turned OFF,
however, if the occupant does not sit in the seat
properly (for example, by not sitting upright, by
sitting on an edge of the seat, or by otherwise
being out of position) , this could cause the
sensor to turn the air bag OFF. Always be sure
to be seated and wearing the seat belt properly
for the most effective protection by the seat belt
and supplemental air bag.
NISSAN recommends that pre-teens and chil-
dren be properly restrained in a rear seat.
NISSAN also recommends that appropriate
child restraints and booster seats be properlyinstalled in a rear seat. If this is not possible, the
occupant classification sensor is designed to
operate as described above to turn the front
passenger air bag OFF for specified child
restraints. Failing to properly secure child
restrains and to use the Automatic Locking
Retractor (ALR) mode (child restraint mode)
may allow the restraint to tip or move in an
accident or sudden stop. This can also result in
the passenger air bag inflating in a crash instead
of being OFF. (See “CHILD RESTRAINTS”
earlierinthissectionforproperuseand
installation.)
If the front passenger seat is not occupied, the
passenger air bag is designed not to inflate in a
crash. However, heavy objects placed on the
seat could result in air bag inflation, because of
the object being detected by the occupant
classification sensor. Other conditions could
also result in air bag inflation, such as if a child is
standing on the seat, or if two children are on the
seat, contrary to the instructions in this manual.
Always be sure that you and all vehicle
occupants are seated and restrained properly.
Using the passenger air bag status light, you can
monitor when the front passenger air bag is
automatically turned OFF with the seat occu-
pied. The light will not illuminate when the front
passenger seat is unoccupied.
If an adult occupant is in the seat but the
passenger air bag status light is illuminated
Safety — Seats, seat belts and supplemental restraint system
1-53
Page 78 of 425

Black plate (7,1)
2 Instruments and controls
Model "Z51-D" EDITED: 2009/ 8/ 3
Instrument panel................................................ 2-2
Meters and gauges ............................................. 2-4
Speedometer and odometer ............................. 2-5
Tachometer ................................................... 2-6
Engine coolant temperature gauge ..................... 2-6
Fuel gauge ................................................... 2-7
Compass (if so equipped) .................................... 2-7
Zone variation change procedure ....................... 2-9
Warning/indicator lights and audible reminders ....... 2-10
Checking bulbs ........................................... 2-10
Warning lights ............................................. 2-10
Indicator lights ............................................. 2-14
Audible reminders ........................................ 2-16
Dot matrix liquid crystal display ............................ 2-17
Indicators for operation .................................. 2-18
Indicators for maintenance .............................. 2-20
Trip computer .............................................. 2-21
Security systems .............................................. 2-25
Vehicle security system (if so equipped) ............ 2-25
NISSAN Vehicle Immobilizer System ................. 2-27
Windshield wiper and washer switch .................... 2-28
Rain-sensing auto wiper system
(if so equipped) ........................................... 2-29
Rear window wiper and washer switch .................. 2-30
Rear window and outside mirror defroster switch ..... 2-31Headlight and turn signal switch
.......................... 2-32
Xenon headlights (if so equipped) .................... 2-32
Headlight switch .......................................... 2-32
Turn signal switch ........................................ 2-35
Fog light switch (if so equipped) ...................... 2-35
Hazard warning flasher switch ............................. 2-36
Horn ............................................................. 2-36
Heated seats (if so equipped) ............................. 2-37
Clock ............................................................ 2-38
Models without color display ........................... 2-38
Models with color display ............................... 2-38
Vehicle Dynamic Control (VDC) OFF switch ........... 2-39
Power outlet ................................................... 2-39
Cigarette lighter and ashtray (if so equipped) .......... 2-40
Storage ......................................................... 2-41
Cup holders ................................................ 2-41
Sunglasses holder ........................................ 2-42
Glove box .................................................. 2-43
Console box ............................................... 2-43
Storage box (if so equipped) .......................... 2-44
Cargo floor box ........................................... 2-45
Luggage side box ......................................... 2-45
Cargo cover (if so equipped) .......................... 2-45
Luggage hooks ............................................ 2-46
Roof rack (if so equipped) .............................. 2-47
Coat hooks ................................................. 2-48