2010 NISSAN MURANO mirror
[x] Cancel search: mirrorPage 191 of 425
Black plate (187,1)
Model "Z51-D" EDITED: 2009/ 8/ 3
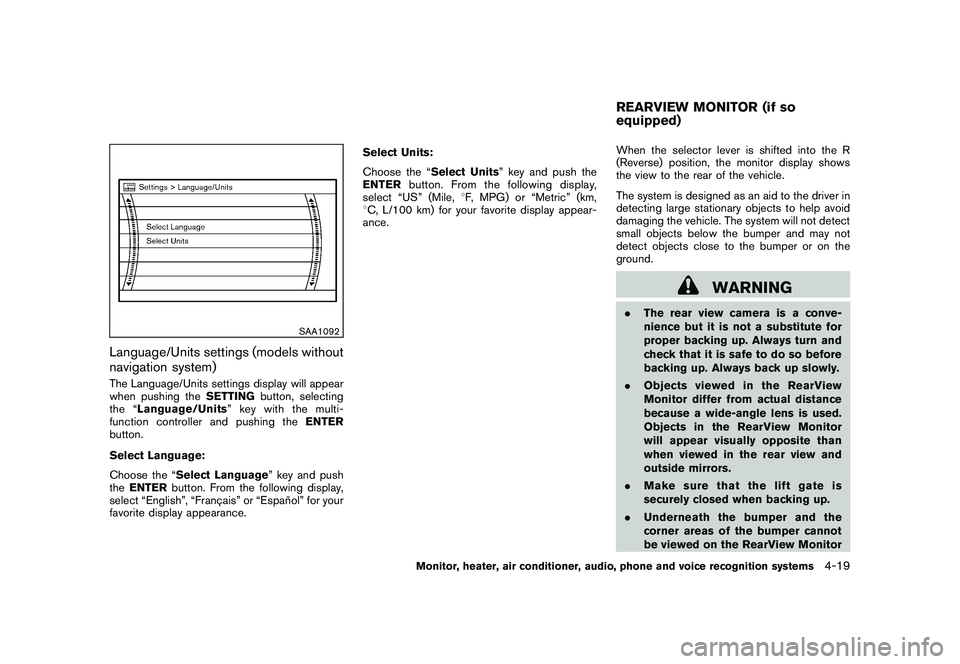
SAA1092
Language/Units settings (models without
navigation system)The Language/Units settings display will appear
when pushing theSETTINGbutton, selecting
the “ Language/Units ”keywiththemulti-
function controller and pushing the ENTER
button.
Select Language:
Choose the “Select Language” key and push
the ENTER button. From the following display,
select “English”, “Franc¸ ais” or “Espan ˜
ol” for your
favorite display appearance. Select Units:
Choose the “Select Units” key and push the
ENTER
button. From the following display,
select “US” (Mile, 8F, MPG) or “Metric” (km,
8 C, L/100 km) for your favorite display appear-
ance. When the selector lever is shifted into the R
(Reverse) position, the monitor display shows
the view to the rear of the vehicle.
The system is designed as an aid to the driver in
detecting large stationary objects to help avoid
damaging the vehicle. The system will not detect
small objects below the bumper and may not
detect objects close to the bumper or on the
ground.
WARNING
.
The rear view camera is a conve-
nience but it is not a substitute for
proper backing up. Always turn and
check that it is safe to do so before
backing up. Always back up slowly.
. Objects viewed in the RearView
Monitor differ from actual distance
because a wide-angle lens is used.
Objects in the RearView Monitor
will appear visually opposite than
when viewed in the rear view and
outside mirrors.
. Make sure that the lift gate is
securely closed when backing up.
. Underneath the bumper and the
corner areas of the bumper cannot
be viewed on the RearView MonitorREARVIEW MONITOR (if so
equipped)
Monitor, heater, air conditioner, audio, phone and voice recognition systems
4-19
Page 193 of 425

Black plate (189,1)
Model "Z51-D" EDITED: 2009/ 8/ 3
.On a snow-covered or slippery road,
there may be a difference between
the predicted course line and the
actual course line.
. If the battery is disconnected or
becomes discharged, the predicted
course lines may be displayed in-
correctly. If this occurs, please per-
form the following procedures:
— Turn the steering wheel from
lock to lock while the engine is
running.
— Drive the vehicle on a straight road for more than 5 minutes.
. When the steering wheel is turned
with the ignition switch in the ACC
position, the predicted course lines
may be displayed incorrectly.
. The displayed lines will appear
slightly off to the right because the
rear view camera is not installed in
the rear center of the vehicle.
. The distance guide line and the
vehicle width line should be used
as a reference only when the vehicle
is on a level paved surface. The
distance viewed on the monitor is
for reference only and may be different than the actual distance
between the vehicle and displayed
objects.
. When backing-up the vehicle up a
hill objects viewed in the monitor
are further than they appear. When
backing-up the vehicle down a hill,
objects viewed in the monitor are
closer than they appear. Use the
inside mirror or glance over your
shoulder to properly judge dis-
tances to other objects.
The vehicle width and predicted course
lines are wider than the actual width and
course.
SAA1897
1. Visually check that the parking space is safe before parking your vehicle.
2. The rear view of the vehicle is displayed on the screen
*A
when the selector lever is
moved to the R (Reverse) position.
Monitor, heater, air conditioner, audio, phone and voice recognition systems
4-21
Page 199 of 425
Black plate (195,1)
Model "Z51-D" EDITED: 2009/ 8/ 3
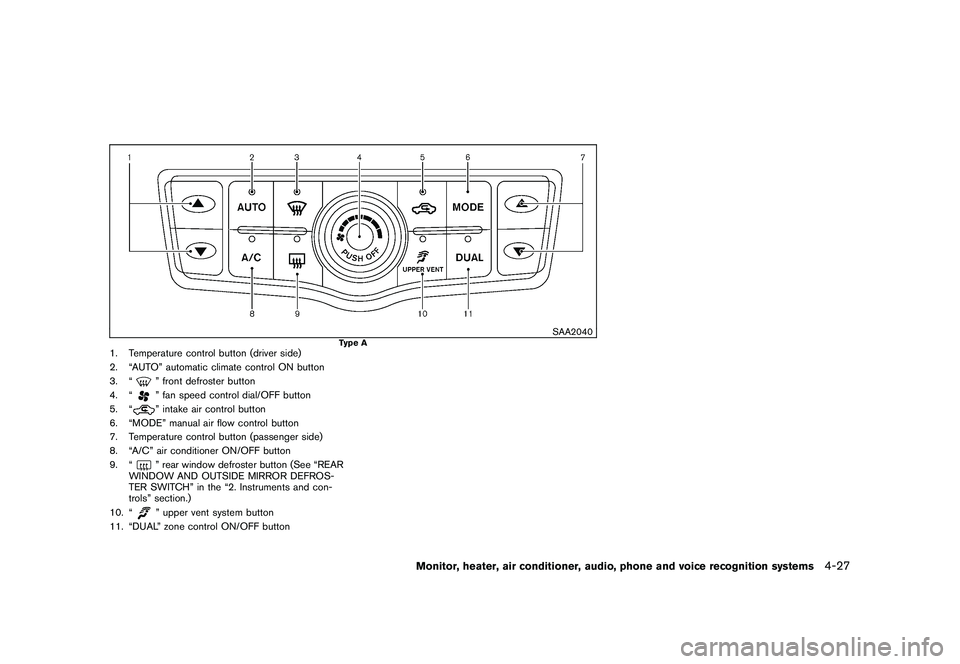
SAA2040
Type A
1. Temperature control button (driver side)
2. “AUTO” automatic climate control ON button
3. “
” front defroster button
4. “” fan speed control dial/OFF button
5. “” intake air control button
6. “MODE” manual air flow control button
7. Temperature control button (passenger side)
8. “A/C” air conditioner ON/OFF button
9. “” rear window defroster button (See “REAR
WINDOW AND OUTSIDE MIRROR DEFROS-
TER SWITCH” in the “2. Instruments and con-
trols” section.)
10. “” upper vent system button
11. “DUAL” zone control ON/OFF button
Monitor, heater, air conditioner, audio, phone and voice recognition systems
4-27
Page 200 of 425
Black plate (196,1)
Model "Z51-D" EDITED: 2009/ 8/ 3
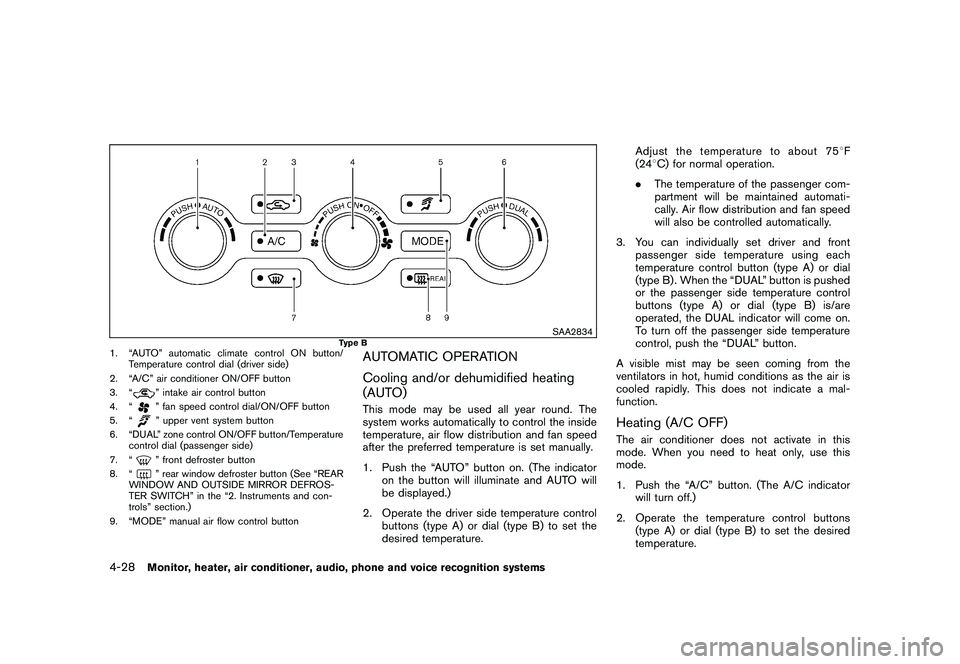
SAA2834
Type B
1. “AUTO” automatic climate control ON button/Temperature control dial (driver side)
2. “A/C” air conditioner ON/OFF button
3. “
” intake air control button
4. “” fan speed control dial/ON/OFF button
5. “” upper vent system button
6. “DUAL” zone control ON/OFF button/Temperature control dial (passenger side)
7. “” front defroster button
8. “” rear window defroster button (See “REAR
WINDOW AND OUTSIDE MIRROR DEFROS-
TER SWITCH” in the “2. Instruments and con-
trols” section.)
9. “MODE” manual air flow control button
AUTOMATIC OPERATION
Cooling and/or dehumidified heating
(AUTO)This mode may be used all year round. The
system works automatically to control the inside
temperature, air flow distribution and fan speed
after the preferred temperature is set manually.
1. Push the “AUTO” button on. (The indicator on the button will illuminate and AUTO will
be displayed.)
2. Operate the driver side temperature control buttons (type A) or dial (type B) to set the
desired temperature. Adjust the temperature to about 75
8F
(24 8C) for normal operation.
. The temperature of the passenger com-
partment will be maintained automati-
cally. Air flow distribution and fan speed
will also be controlled automatically.
3. You can individually set driver and front passenger side temperature using each
temperature control button (type A) or dial
(type B) . When the “DUAL” button is pushed
or the passenger side temperature control
buttons (type A) or dial (type B) is/are
operated, the DUAL indicator will come on.
To turn off the passenger side temperature
control, push the “DUAL” button.
A visible mist may be seen coming from the
ventilators in hot, humid conditions as the air is
cooled rapidly. This does not indicate a mal-
function.
Heating (A/C OFF)The air conditioner does not activate in this
mode. When you need to heat only, use this
mode.
1. Push the “A/C” button. (The A/C indicator will turn off.)
2. Operate the temperature control buttons (type A) or dial (type B) to set the desired
temperature.
4-28
Monitor, heater, air conditioner, audio, phone and voice recognition systems
Page 306 of 425
Black plate (302,1)
Model "Z51-D" EDITED: 2009/ 8/ 3
INTELLIGENT KEY BATTERY DIS-
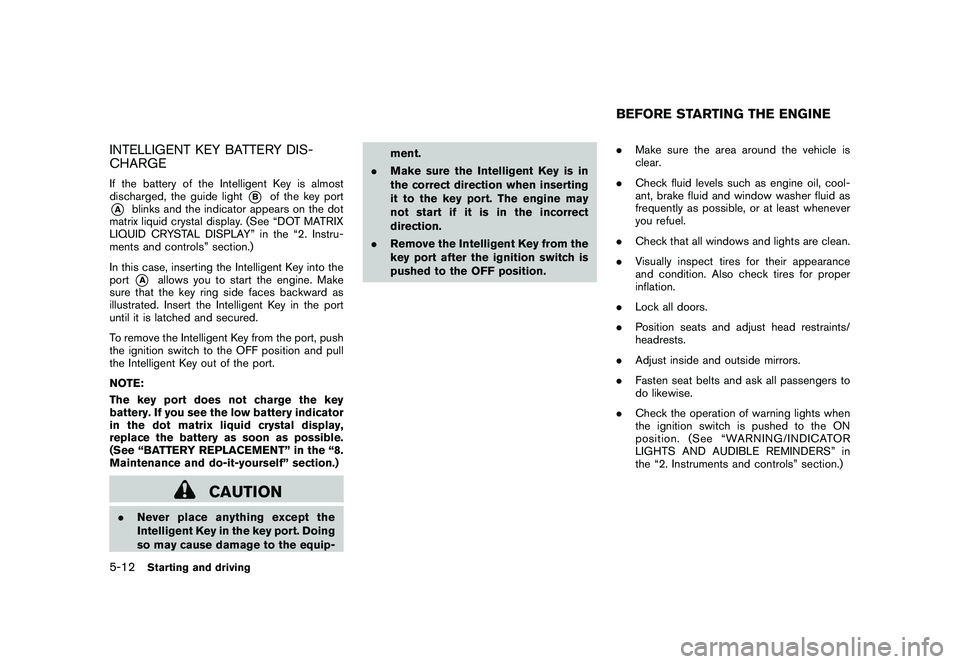
CHARGEIf the battery of the Intelligent Key is almost
discharged, the guide light
*B
of the key port
*A
blinks and the indicator appears on the dot
matrix liquid crystal display. (See “DOT MATRIX
LIQUID CRYSTAL DISPLAY” in the “2. Instru-
ments and controls” section.)
In this case, inserting the Intelligent Key into the
port*A
allows you to start the engine. Make
sure that the key ring side faces backward as
illustrated. Insert the Intelligent Key in the port
until it is latched and secured.
To remove the Intelligent Key from the port, push
the ignition switch to the OFF position and pull
the Intelligent Key out of the port.
NOTE:
The key port does not charge the key
battery. If you see the low battery indicator
in the dot matrix liquid crystal display,
replace the battery as soon as possible.
(See “BATTERY REPLACEMENT” in the “8.
Maintenance and do-it-yourself” section.)
CAUTION
. Never place anything except the
Intelligent Key in the key port. Doing
so may cause damage to the equip- ment.
. Make sure the Intelligent Key is in
the correct direction when inserting
it to the key port. The engine may
not start if it is in the incorrect
direction.
. Remove the Intelligent Key from the
key port after the ignition switch is
pushed to the OFF position. .
Make sure the area around the vehicle is
clear.
. Check fluid levels such as engine oil, cool-
ant, brake fluid and window washer fluid as
frequently as possible, or at least whenever
you refuel.
. Check that all windows and lights are clean.
. Visually inspect tires for their appearance
and condition. Also check tires for proper
inflation.
. Lock all doors.
. Position seats and adjust head restraints/
headrests.
. Adjust inside and outside mirrors.
. Fasten seat belts and ask all passengers to
do likewise.
. Check the operation of warning lights when
the ignition switch is pushed to the ON
position. (See “WARNING/INDICATOR
LIGHTS AND AUDIBLE REMINDERS” in
the “2. Instruments and controls” section.)
BEFORE STARTING THE ENGINE
5-12
Starting and driving
Page 375 of 425
Black plate (375,1)
Model "Z51-D" EDITED: 2009/ 8/ 3
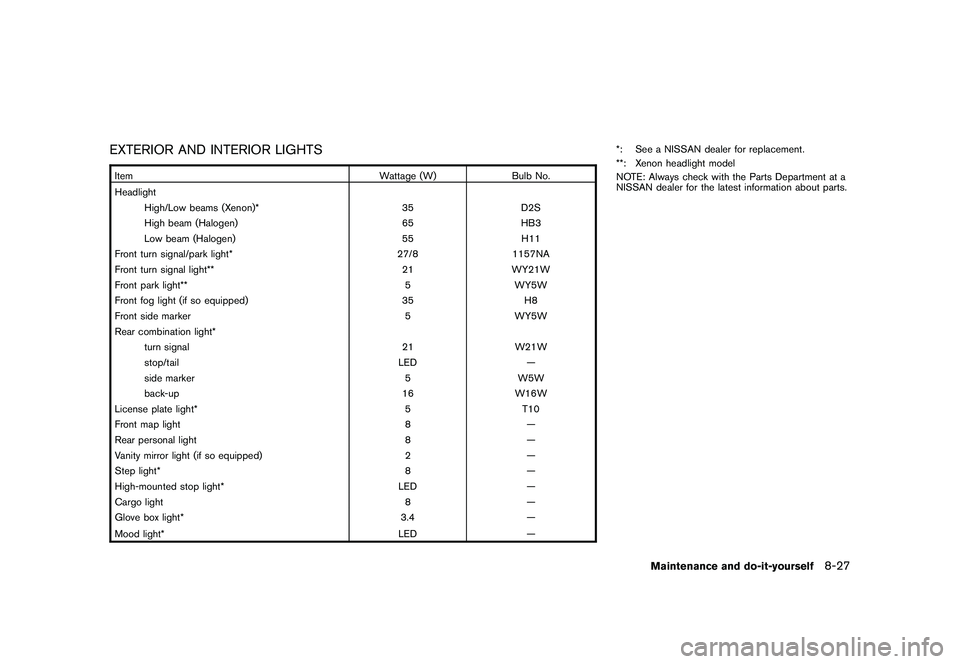
EXTERIOR AND INTERIOR LIGHTSItemWattage (W)Bulb No.
Headlight High/Low beams (Xenon)* 35D2S
High beam (Halogen) 65HB3
Low beam (Halogen) 55H11
Front turn signal/park light* 27/81157NA
Front turn signal light** 21WY21W
Front park light** 5WY5W
Front fog light (if so equipped) 35H8
Front side marker 5WY5W
Rear combination light* turn signal 21W21W
stop/tail LED—
side marker 5W5W
back-up 16W16W
License plate light* 5T10
Front map light 8—
Rear personal light 8—
Vanity mirror light (if so equipped) 2—
Step light* 8—
High-mounted stop light* LED—
Cargo light 8—
Glove box light* 3.4—
Mood light* LED
—*: See a NISSAN dealer for replacement.
**: Xenon headlight model
NOTE: Always check with the Parts Department at a
NISSAN dealer for the latest information about parts.
Maintenance and do-it-yourself
8-27
Page 377 of 425
Black plate (377,1)
Model "Z51-D" EDITED: 2009/ 8/ 3
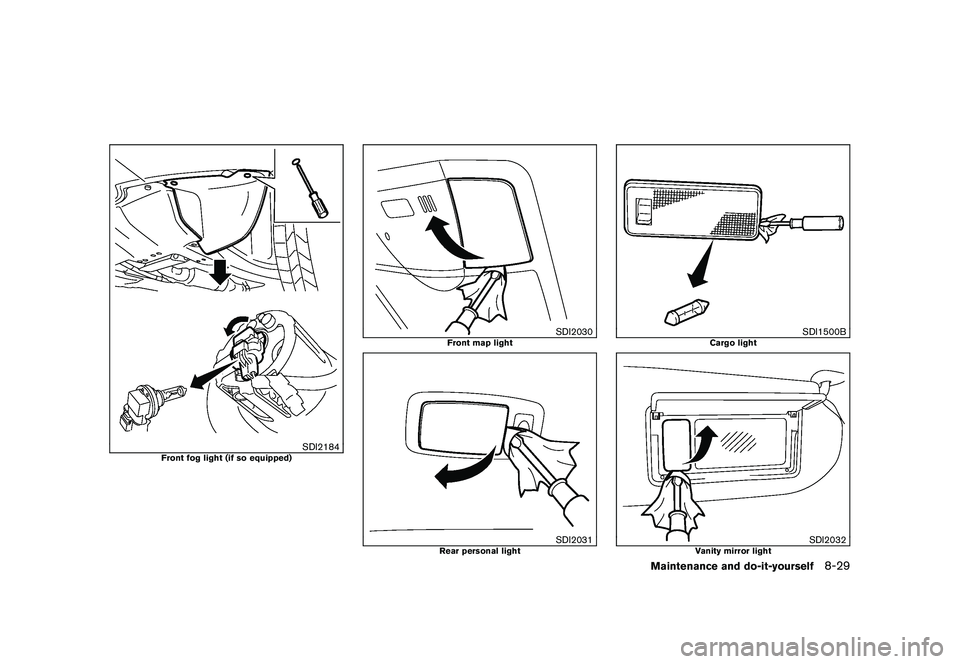
SDI2184
Front fog light (if so equipped)
SDI2030
Front map light
SDI2031
Rear personal light
SDI1500B
Cargo light
SDI2032
Vanity mirror light
Maintenance and do-it-yourself
8-29
Page 409 of 425

Black plate (409,1)
Model "Z51-D" EDITED: 2009/ 8/ 3
Tire pressures.
When towing a trailer, inflate the vehicle
tires to the recommended cold tire
pressure indicated on the Tire and
Loading Information label.
.
Trailer tire condition, size, load rating
and proper inflation pressure should be
in accordance with the trailer and tire
manufacturers’ specifications.
Safety chainsAlways use a suitable chain between your
vehicle and the trailer. The safety chains should
be crossed and should be attached to the hitch,
not to the vehicle bumper or axle. The safety
chains can be attached to the bumper if the
hitch ball is mounted to the bumper. Be sure to
leave enough slack in the chains to permit
turning corners.Trailer lights
CAUTION
When splicing into the vehicle electrical
system, a commercially available
power-type module/converter must be
used to provide power for all trailer
lighting. This unit uses the vehicle
battery as a direct power source for alltrailer lights while using the vehicle tail
light, stoplight and turn signal circuits
as a signal source. The module/con-
verter must draw no more than 15
milliamps from the stop and tail lamp
circuits. Using a module/converter that
exceeds these power requirements may
damage the vehicle’s electrical system.
See a reputable trailer dealer to obtain
the proper equipment and to have it
installed.
Trailer lights should comply with federal and/or
local regulations. For assistance in hooking up
trailer lights, contact a NISSAN dealer or
reputable trailer dealer.
Trailer brakesIf your trailer is equipped with a braking system,
make sure it conforms to federal and/or local
regulations and that it is properly installed.
WARNING
Never connect a trailer brake system
directly to the vehicle brake system.Pre-towing tips. Be certain your vehicle maintains a level
position when a loaded or unloaded trailer is
hitched. Do not drive the vehicle if it has an abnormal nose-up or nose-down condition;
check for improper tongue load, overload,
worn suspension or other possible causes
of either condition.
. Always secure items in the trailer to prevent
load shift while driving.
. Keep the cargo load as low as possible in
the trailer to keep the trailer center of gravity
low.
. Load the trailer so approximately 60% of the
trailer load is in the front half and 40% is in
the back half. Also make sure the load is
balanced side to side.
. Check your hitch, trailer tire pressure,
vehicle tire pressure, trailer light operation,
and trailer wheel lug nuts every time you
attach a trailer to the vehicle.
. Be certain your rearview mirrors conform to
all federal, state or local regulations. If not,
install any mirrors required for towing before
driving the vehicle.
. Determine the overall height of the vehicle
and trailer so the required clearance is
known.
Trailer towing tipsIn order to gain skill and an understanding of the
vehicle’s behavior, you should practice turning,
stopping and backing up in an area which is freeTechnical and consumer information
9-21