2010 NISSAN MURANO buttons
[x] Cancel search: buttonsPage 151 of 425

Black plate (147,1)
Model "Z51-D" EDITED: 2009/ 8/ 3
Switching procedure:
Push the LOCK
*1
and UNLOCK
*2
buttons simultaneously for more than 2 seconds
to switch the mode from one to the other.
When pushing the buttons to set the hazard
indicator mode, the hazard indicator flashes 3
times.
When pushing the buttons to set the hazard
indicator and horn mode, the hazard indicator
flashes once and the horn chirps once.
BATTERY SAVER SYSTEMWhen all the following conditions are met for 60
minutes, the battery saver system will cut off the
power supply to prevent battery discharge.
.The ignition switch is in the ACC position,
and
. All doors are closed, and
. The selector lever is in the P (Park) position.WARNING SIGNALSTo help prevent the vehicle from moving
unexpectedly by erroneous operation of the
Intelligent Key listed on the following chart or
to help prevent the vehicle from being stolen,
chime or beep sounds inside and outside the
vehicle and a warning displays in the dot matrix
liquid crystal display.
When a chime or beep sounds or the warning
displays, be sure to check the vehicle and
Intelligent Key.
See “TROUBLESHOOTING GUIDE” later in
this section and “DOT MATRIX LIQUID CRYS-
TAL DISPLAY” in the “2. Instruments and
controls” section.
Pre-driving checks and adjustments
3-13
Page 153 of 425

Black plate (149,1)
Model "Z51-D" EDITED: 2009/ 8/ 3
WARNING
The Intelligent Key transmits radio
waves when the buttons are pushed.
The FAA advises that radio waves may
affect aircraft navigation and commu-
nication systems. Do not operate the
Intelligent Key while on an airplane.
Make sure the buttons are not operated
unintentionally when the unit is stored
for a flight.
It is possible to lock/unlock all doors, activate
the panic alarm and open the windows and lift
gate (if so equipped) by pushing the buttons on
the Intelligent Key from outside the vehicle.
Before locking the doors, make sure the
Intelligent Key is not left in the vehicle.
The LOCK/UNLOCK button on the Intelligent
Key can operate at a distance of approximately
33 ft (10 m) from the vehicle. (The effective
distance depends upon the conditions around
the vehicle.)
The lock and unlock buttons will not operate
when:
. the distance between the Intelligent Key and
the vehicle is over 33 ft (10 m) .
. the Intelligent Key battery is completely discharged.
After locking with the remote keyless entry
function, pull the door handle to make sure the
doors are securely locked.
The LOCK/UNLOCK operating range varies
depending on the environment. To securely
operate the lock and unlock buttons, approach
the vehicle to about 3 ft (1 m) from the door.
SPA2252A
Type A
SPA2436
Type B
REMOTE KEYLESS ENTRY SYSTEM
Pre-driving checks and adjustments
3-15
Page 155 of 425

Black plate (151,1)
Model "Z51-D" EDITED: 2009/ 8/ 3
2. The theft warning alarm will sound and theheadlights will flash for 25 seconds.
3. The panic alarm stops under either of the following conditions.
.It has run for 25 seconds, or
. Any of the buttons is pushed. (Note: the
panic button should be pushed for more
than 1 second.)Setting hazard indicator and horn modeThis vehicle is set in hazard indicator and horn
mode when you first receive the vehicle.
In hazard indicator and horn mode, when the
LOCK
button
*1
is pushed, the hazard
indicator flashes twice and the horn chirps once.
When the UNLOCKbutton
*2
is pushed,
the hazard indicator flashes once.
If horns are not necessary, the system can be
switched to the hazard indicator mode.
In hazard indicator mode, when the LOCK
button is pushed, the hazard indicator flashes
twice. When the UNLOCK
button is
pushed, neither the hazard indicator nor the
horn operates. Hazard indicator and horn mode:
DOOR LOCK
DOOR UNLOCK
Intelligent Key system
(Using door handle or lift gate request switch) HAZARD -
twice
OUTSIDE CHIME - twice HAZARD -
once
OUTSIDE CHIME - once
Remote keyless entry system
(Using
or
button) HAZARD -
twice
HORN - once HAZARD -
once
HORN - none
Hazard indicator mode:
DOOR LOCK DOOR UNLOCK
Intelligent Key system
(Using door handle or lift gate request switch) HAZARD -
twice HAZARD - none
Remote keyless entry system (Using
or
button) HAZARD -
twice
HAZARD - none
Pre-driving checks and adjustments
3-17
Page 156 of 425
Black plate (152,1)
Model "Z51-D" EDITED: 2009/ 8/ 3
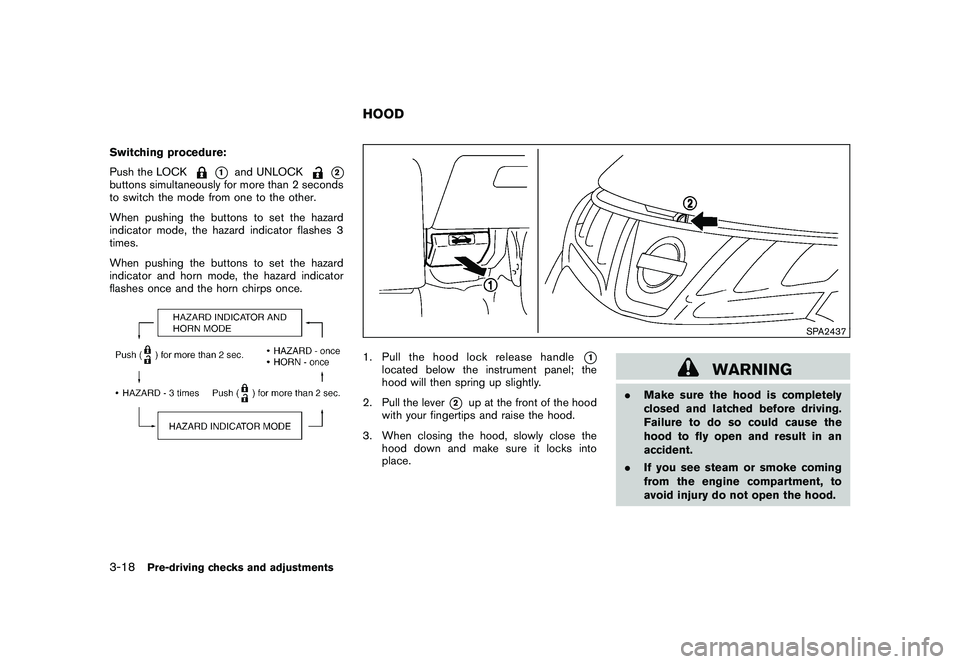
Switching procedure:
Push the LOCK
*1
and UNLOCK
*2
buttons simultaneously for more than 2 seconds
to switch the mode from one to the other.
When pushing the buttons to set the hazard
indicator mode, the hazard indicator flashes 3
times.
When pushing the buttons to set the hazard
indicator and horn mode, the hazard indicator
flashes once and the horn chirps once.
SPA2437
1. Pull the hood lock release handle
*1
located below the instrument panel; the
hood will then spring up slightly.
2. Pull the lever
*2
up at the front of the hood
with your fingertips and raise the hood.
3. When closing the hood, slowly close the hood down and make sure it locks into
place.
WARNING
.Make sure the hood is completely
closed and latched before driving.
Failure to do so could cause the
hood to fly open and result in an
accident.
. If you see steam or smoke coming
from the engine compartment, to
avoid injury do not open the hood.
HOOD
3-18
Pre-driving checks and adjustments
Page 173 of 425
Black plate (14,1)
Model "Z51-D" EDITED: 2009/ 8/ 3
Care and maintenance.................................. 4-73
Car phone or CB radio ...................................... 4-74
Bluetooth
®Hands-Free Phone System with
navigation system ............................................. 4-75
Regulatory information ................................... 4-76
Voice commands. ......................................... 4-76
Control buttons ........................................... 4-77
Pairing procedure ......................................... 4-77
Phonebook registration .................................. 4-78
Making a call ............................................... 4-80
Receiving a call ........................................... 4-81
During a call ............................................... 4-81
Phone setting .............................................. 4-82
Troubleshooting guide ................................... 4-84
Bluetooth®Hands-Free Phone System without
navigation system (if so equipped) ....................... 4-85
Regulatory information ................................... 4-86
Initialization ................................................. 4-86
Operating tips ............................................. 4-86
Giving voice commands ................................. 4-86
Control buttons ........................................... 4-88 Getting started
............................................ 4-88
Choosing a language .................................... 4-88
Pairing procedure ......................................... 4-88
Making a call by entering a phone number ......... 4-89
Receiving a call ........................................... 4-89
List of voice commands ................................. 4-90
Call ........................................................... 4-90
Phone book ................................................ 4-92
Memo pad .................................................. 4-94
Setup ........................................................ 4-94
Speaker Adaptation (SA) mode ....................... 4-96
Troubleshooting guide ................................... 4-98
NISSAN Voice Recognition System
(models with navigation system) .......................... 4-99
NISSAN voice recognition standard mode .......... 4-99
Using the system ....................................... 4-102
NISSAN voice recognition alternate command
mode ...................................................... 4-109
Using the system ....................................... 4-115
Troubleshooting guide ................................. 4-121
Page 174 of 425
Black plate (170,1)
Model "Z51-D" EDITED: 2009/ 8/ 3
WARNING
.Do not disassemble or modify this
system. If you do, it may result in
accidents, fire, or electric shock.
. Do not use this system if you notice
any abnormality, such as a frozen
screen or lack of sound. Continued
use of the system may result in
accident, fire or electric shock.
. In case you notice any foreign
object in the system hardware, spill
liquid on it, or notice smoke or smell
coming from it, stop using the
system immediately and contact
your nearest NISSAN dealer. Ignor-
ing such conditions may lead to
accidents, fire, or electric shock.
. Park the vehicle in a safe location
and apply the parking brake to view
the images on the front center dis-
play screen using devices connected
to the auxiliary input jacks.
Do not attempt to operate the system in
extreme temperature conditions [below
� 48F( �208 C) and above 158 8F(70 8C)].
Operating this system under these condi-
tions may result in system malfunctions.
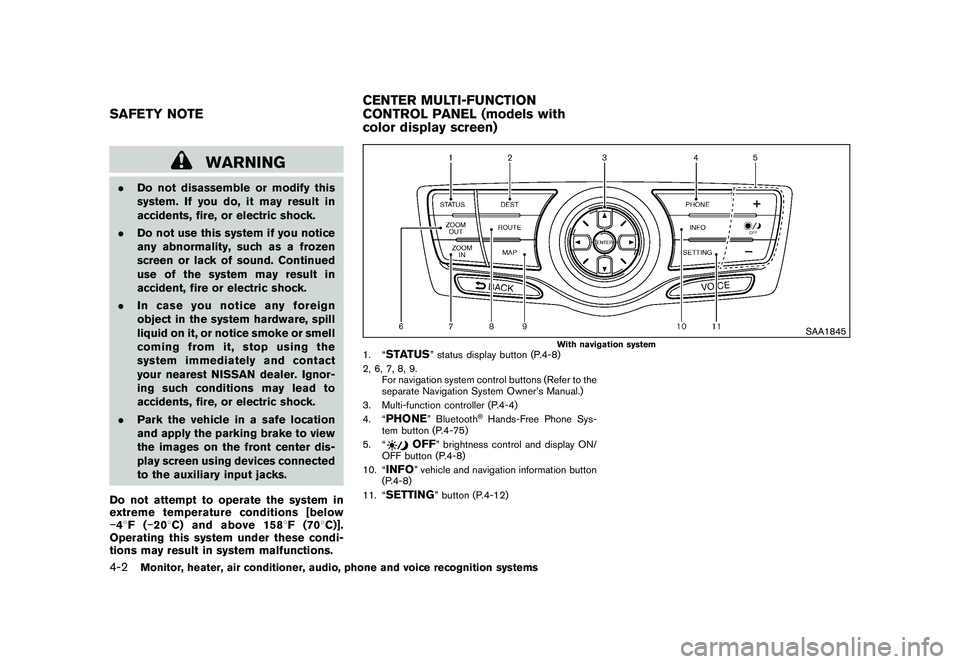
SAA1845
With navigation system
1. “
STATUS
” status display button (P.4-8)
2, 6, 7, 8, 9. For navigation system control buttons (Refer to the
separate Navigation System Owner’s Manual.)
3. Multi-function controller (P.4-4)
4. “
PHONE
” Bluetooth
®Hands-Free Phone Sys-
tem button (P.4-75)
5. “
OFF
” brightness control and display ON/
OFF button (P.4-8)
10. “
INFO
” vehicle and navigation information button
(P.4-8)
11. “
SETTING
” button (P.4-12)
SAFETY NOTE CENTER MULTI-FUNCTION
CONTROL PANEL (models with
color display screen)4-2
Monitor, heater, air conditioner, audio, phone and voice recognition systems
Page 176 of 425
Black plate (172,1)
Model "Z51-D" EDITED: 2009/ 8/ 3
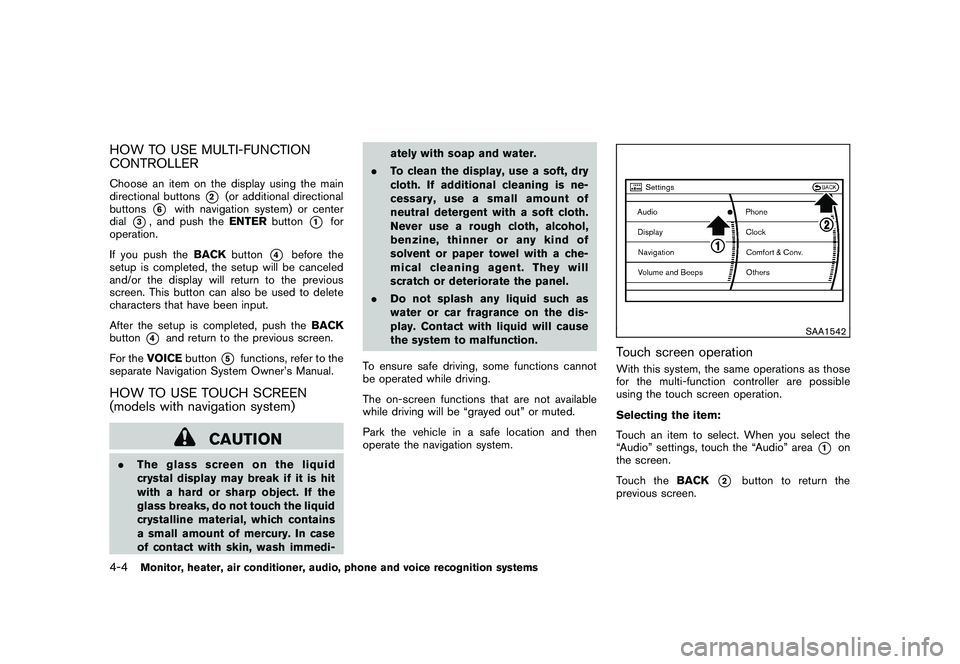
HOW TO USE MULTI-FUNCTION
CONTROLLERChoose an item on the display using the main
directional buttons
*2
(or additional directional
buttons
*6
with navigation system) or center
dial
*3, and push the ENTERbutton
*1
for
operation.
If you push the BACKbutton
*4
before the
setup is completed, the setup will be canceled
and/or the display will return to the previous
screen. This button can also be used to delete
characters that have been input.
After the setup is completed, push the BACK
button
*4
and return to the previous screen.
For the VOICE button
*5
functions, refer to the
separate Navigation System Owner’s Manual.
HOW TO USE TOUCH SCREEN
(models with navigation system)
CAUTION
. The glass screen on the liquid
crystal display may break if it is hit
with a hard or sharp object. If the
glass breaks, do not touch the liquid
crystalline material, which contains
a small amount of mercury. In case
of contact with skin, wash immedi- ately with soap and water.
. To clean the display, use a soft, dry
cloth. If additional cleaning is ne-
cessary, use a small amount of
neutral detergent with a soft cloth.
Never use a rough cloth, alcohol,
benzine, thinner or any kind of
solvent or paper towel with a che-
mical cleaning agent. They will
scratch or deteriorate the panel.
. Do not splash any liquid such as
water or car fragrance on the dis-
play. Contact with liquid will cause
the system to malfunction.
To ensure safe driving, some functions cannot
be operated while driving.
The on-screen functions that are not available
while driving will be “grayed out” or muted.
Park the vehicle in a safe location and then
operate the navigation system.
SAA1542
Touch screen operationWith this system, the same operations as those
for the multi-function controller are possible
using the touch screen operation.
Selecting the item:
Touch an item to select. When you select the
“Audio” settings, touch the “Audio” area
*1
on
the screen.
Touch the BACK
*2
button to return the
previous screen.
4-4
Monitor, heater, air conditioner, audio, phone and voice recognition systems
Page 200 of 425
Black plate (196,1)
Model "Z51-D" EDITED: 2009/ 8/ 3
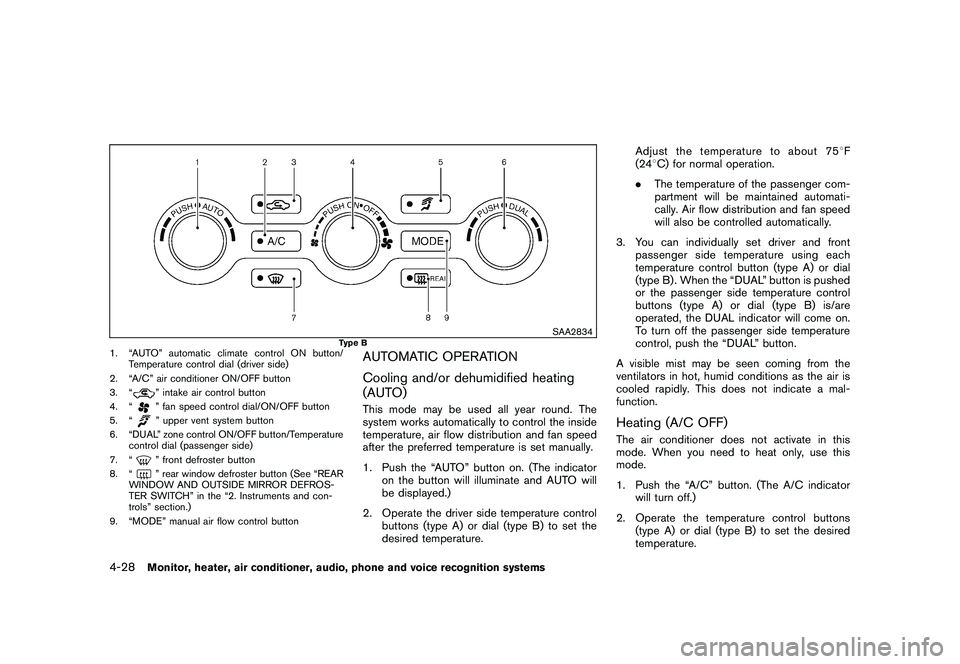
SAA2834
Type B
1. “AUTO” automatic climate control ON button/Temperature control dial (driver side)
2. “A/C” air conditioner ON/OFF button
3. “
” intake air control button
4. “” fan speed control dial/ON/OFF button
5. “” upper vent system button
6. “DUAL” zone control ON/OFF button/Temperature control dial (passenger side)
7. “” front defroster button
8. “” rear window defroster button (See “REAR
WINDOW AND OUTSIDE MIRROR DEFROS-
TER SWITCH” in the “2. Instruments and con-
trols” section.)
9. “MODE” manual air flow control button
AUTOMATIC OPERATION
Cooling and/or dehumidified heating
(AUTO)This mode may be used all year round. The
system works automatically to control the inside
temperature, air flow distribution and fan speed
after the preferred temperature is set manually.
1. Push the “AUTO” button on. (The indicator on the button will illuminate and AUTO will
be displayed.)
2. Operate the driver side temperature control buttons (type A) or dial (type B) to set the
desired temperature. Adjust the temperature to about 75
8F
(24 8C) for normal operation.
. The temperature of the passenger com-
partment will be maintained automati-
cally. Air flow distribution and fan speed
will also be controlled automatically.
3. You can individually set driver and front passenger side temperature using each
temperature control button (type A) or dial
(type B) . When the “DUAL” button is pushed
or the passenger side temperature control
buttons (type A) or dial (type B) is/are
operated, the DUAL indicator will come on.
To turn off the passenger side temperature
control, push the “DUAL” button.
A visible mist may be seen coming from the
ventilators in hot, humid conditions as the air is
cooled rapidly. This does not indicate a mal-
function.
Heating (A/C OFF)The air conditioner does not activate in this
mode. When you need to heat only, use this
mode.
1. Push the “A/C” button. (The A/C indicator will turn off.)
2. Operate the temperature control buttons (type A) or dial (type B) to set the desired
temperature.
4-28
Monitor, heater, air conditioner, audio, phone and voice recognition systems