Page 31 of 293

�3Position the lap belt portionlow and snug
on the hips as shown.
�4Pull the shoulder belt portion toward the
retractor to take up extra slack. Be sure the
shoulder belt is routed over your shoulder
and across your chest.
The front passenger seat and the rear seating
positions three-point seat belts have two modes
of operation:
● Emergency Locking Retractor (ELR)
● Automatic Locking Retractor (ALR)
The ELR mode allows the seat belt to extend and
retract to allow the driver and passengers some freedom of movement in the seat. The ELR locks
the seat belt when the vehicle slows down rapidly
or during certain impacts.
The ALR mode (child restraint mode) locks the
seat belt for child restraint installation.
When the ALR mode is activated, the seat belt
cannot be extended again until the seat belt
tongue is detached from the buckle and fully
retracted. The seat belt returns to the ELR mode
after the seat belt fully retracts. For additional
information, refer to “Child restraints” in this sec-
tion.
The ALR mode should be used only for
child restraint installation. During normal
seat belt use by an occupant, the ALR mode
should not be activated. If it is activated, it
may cause uncomfortable seat belt ten-
sion. It can also change the operation of
the front passenger air bag. For additional
information, refer to “Supplemental air bag
warning light” in this section.
Page 88 of 293
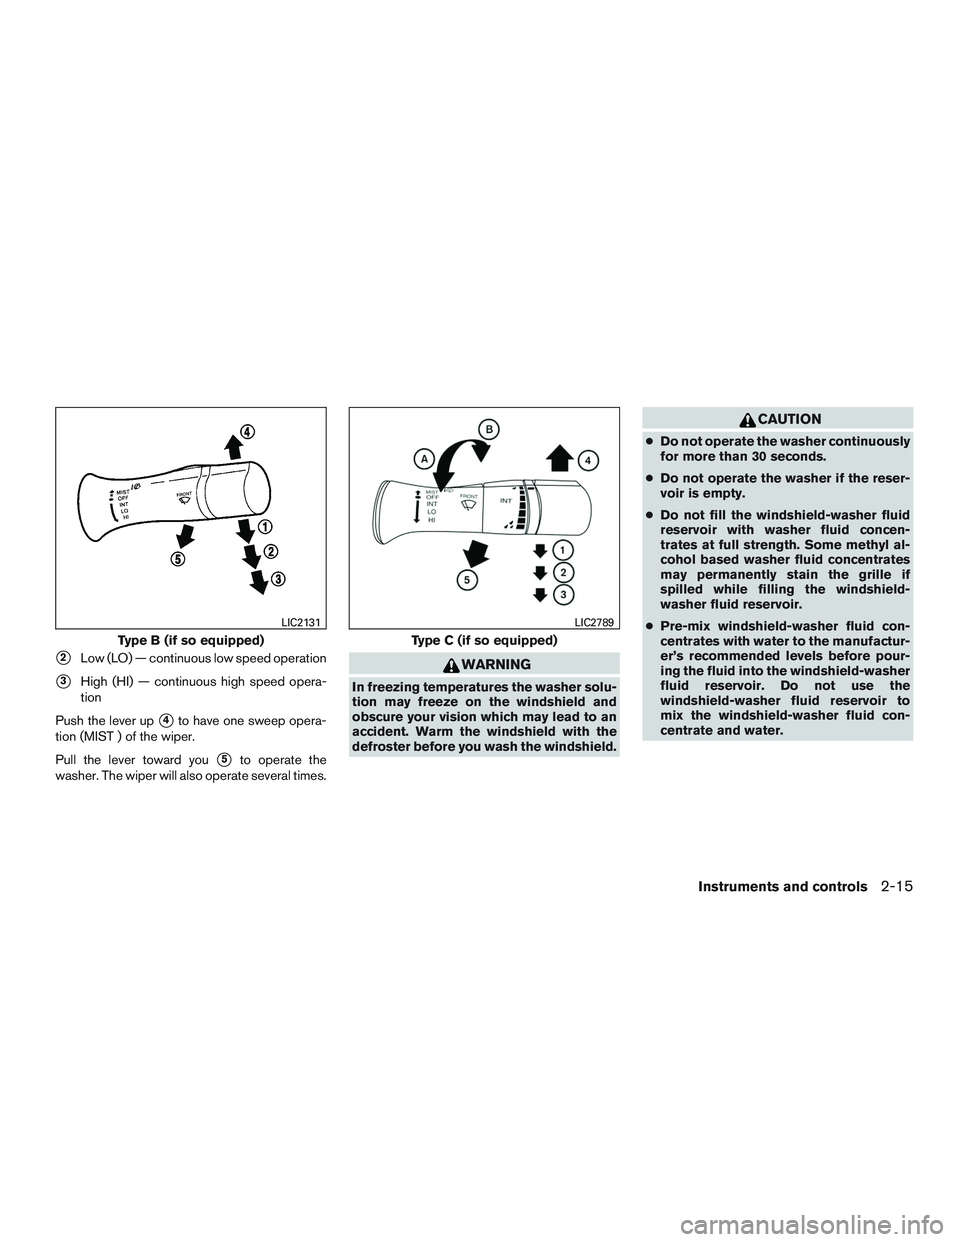
�2Low (LO) — continuous low speed operation
�3High (HI) — continuous high speed opera-
tion
Push the lever up
�4to have one sweep opera-
tion (MIST ) of the wiper.
Pull the lever toward you
�5to operate the
washer. The wiper will also operate several times.
Page 117 of 293
WARNING
●Objects viewed in the outside mirror on
the passenger side are closer than they
appear. Be careful when moving to the
right. Using only this mirror could cause
an accident. Use the inside mirror or
glance over your shoulder to properly
judge distances to other objects.
● Do not adjust the mirrors while driving.
You could lose control of your vehicle
and cause an accident.
Manual folding outside mirrors
Pull the outside mirror toward the door to fold it.
Heated mirrors (if so equipped)
The outside mirrors can be heated to defrost,
defog, or de-ice for improved visibility. For addi-
tional information, refer to “Rear window de-
froster switch” in the “Instruments and controls”
section of this manual.
Page 162 of 293
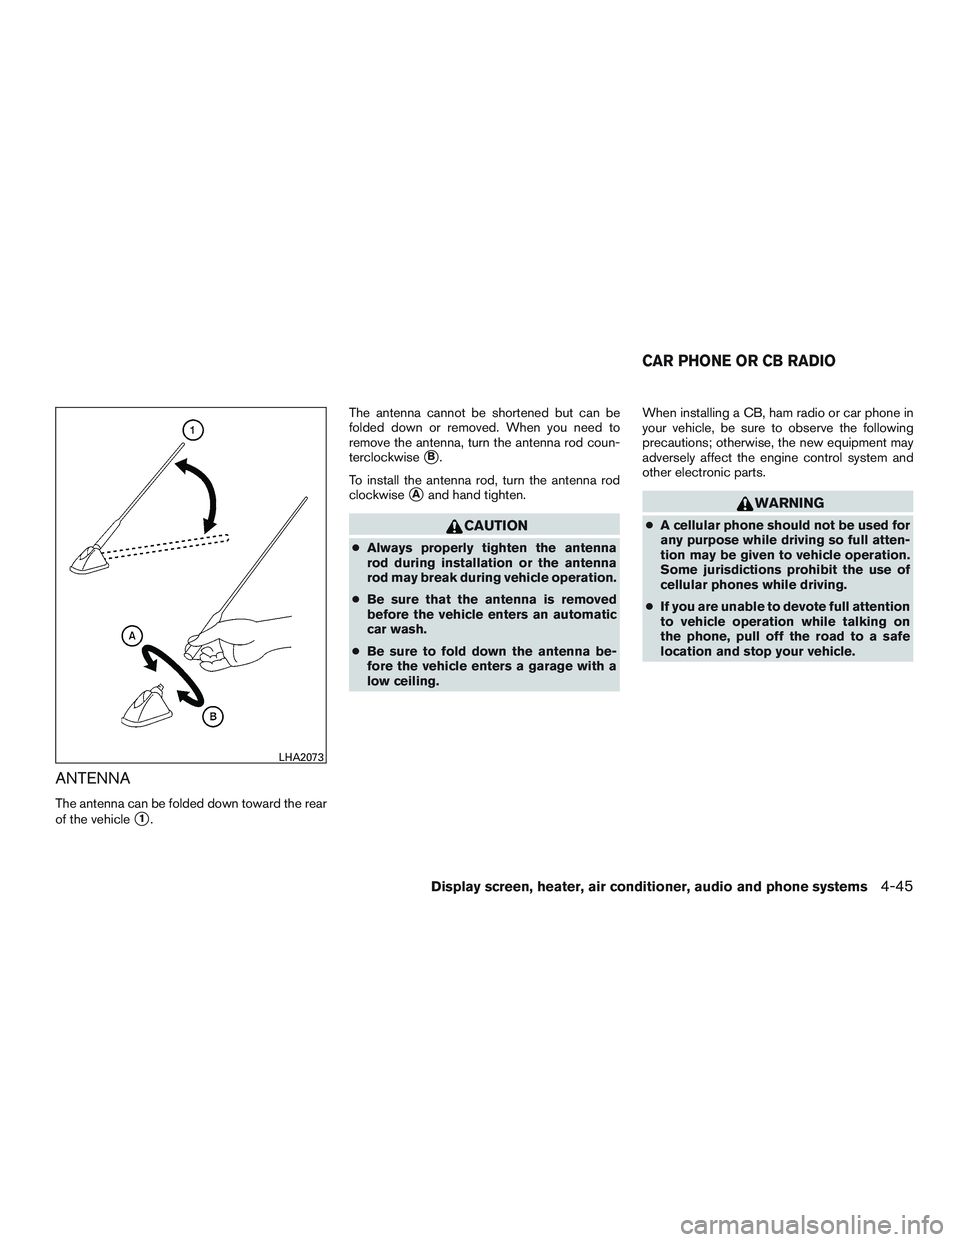
ANTENNA
The antenna can be folded down toward the rear
of the vehicle
�1.The antenna cannot be shortened but can be
folded down or removed. When you need to
remove the antenna, turn the antenna rod coun-
terclockwise
�B.
To install the antenna rod, turn the antenna rod
clockwise
�Aand hand tighten.
Page 176 of 293
CAUTION
●Do not use leaded gasoline. Deposits
from leaded gasoline will seriously re-
duce the three-way catalyst’s ability to
help reduce exhaust pollutants.
● Keep your engine tuned up. Malfunc-
tions in the ignition, fuel injection, or
electrical systems can cause overrich
fuel flow into the three-way catalyst,
causing it to overheat. Do not keep driv-
ing if the engine misfires, or if notice-
able loss of performance or other un-
usual operating conditions are
detected. Have the vehicle inspected
promptly by a NISSAN dealer.
● Avoid driving with an extremely low fuel
level. Running out of fuel could cause
the engine to misfire, damaging the
three-way catalyst.
● Do not race the engine while warming it
up.
● Do not push or tow your vehicle to start
the engine.
AVOIDING COLLISION AND
ROLLOVER
Page 178 of 293

WARNING
●Never remove the ignition key or place
the ignition switch in the LOCK position
while driving. The steering wheel will
lock. This may cause the driver to lose
control of the vehicle and could result in
serious vehicle damage or personal
injury.
AUTOMATIC TRANSMISSION (if so
equipped)
The ignition lock is designed so the key cannot be
turned to the LOCK position and removed until
the shift lever is placed in the P (Park) position.
When removing the key from the ignition switch,
make sure the shift lever is in the P (Park) posi-
tion.
If the shift lever is not returned to the P (Park)
position, the ignition switch cannot be moved to
the LOCK position. To remove the key from the ignition switch:
1. Shift the shift lever to the P (Park) position with the ignition switch in the ON position.
2. Place the ignition switch in the LOCK posi- tion.
3. Remove the key from the ignition switch.
If the shift lever is shifted to the P (Park) position
after the ignition switch is turned to the OFF
position or when the ignition switch cannot be
turned to the LOCK position, proceed as follows
to remove the key. 1. Move the shift lever into the P (Park) posi- tion.
2. Turn the ignition switch slightly toward the ON position.
3. Turn the ignition switch to the LOCK posi- tion.
4. Remove the key.
The shift lever is designed so it cannot be moved
out of P (Park) and into any of the other gear
positions if the ignition switch is turned to OFF
position
�1or if the key is removed from the
switch.
Page 191 of 293

WARNING
●Do not stop or park the vehicle over
flammable materials such as dry grass,
waste paper or rags. They may ignite
and cause a fire.
● Safe parking procedures require that
both the parking brake be set and the
transmission placed into P (Park) for
automatic transmission models or in an
appropriate gear for manual transmis-
sion models. Failure to do so could
cause the vehicle to move unexpectedly
or roll away and result in an accident. Make sure the shift lever has been
pushed as far forward as it can go and
cannot be moved without depressing
the foot brake pedal.
● Never leave the engine running while
the vehicle is unattended.
● Do not leave children unattended inside
the vehicle. They could unknowingly ac-
tivate switches or controls. Unattended
children could become involved in seri-
ous accidents. 1. Firmly apply the parking brake.
2.
Manual transmission models:
Place the shift lever in the R (Reverse) posi-
tion. When parking on an uphill grade, place
the shift lever in 1st gear.
Automatic transmission models:
Move the shift lever to the P (Park) position.
3. To help prevent the vehicle from rolling into traffic when parked on an incline, it is a good
practice to turn the wheels as illustrated.
● HEADED DOWNHILL WITH CURB:
�A
Turn the wheels into the curb and move the
vehicle forward until the curb side wheel
gently touches the curb.
● HEADED UPHILL WITH CURB:
�B
Turn the wheels away from the curb and
move the vehicle back until the curb side
wheel gently touches the curb.
● HEADED UPHILL OR DOWNHILL, NO
CURB:
�C
Turn the wheels toward the side of the road
so the vehicle will move away from the cen-
ter of the road if it moves.
4. Turn the ignition switch to the LOCK position and remove the key.
Page 209 of 293
Stowing the damaged tire
Securely store the damaged tire in the cargo area
as illustrated.
Securely store the jack and tools in the storage
area.
Return the spare tire basket back to its original
position in the reverse order of removal. For ad-
ditional information, refer to “Getting the spare
tire and tools” in this section.NOTE:
The spare tire basket cannot be used to
store the conventional tire.