Page 156 of 373

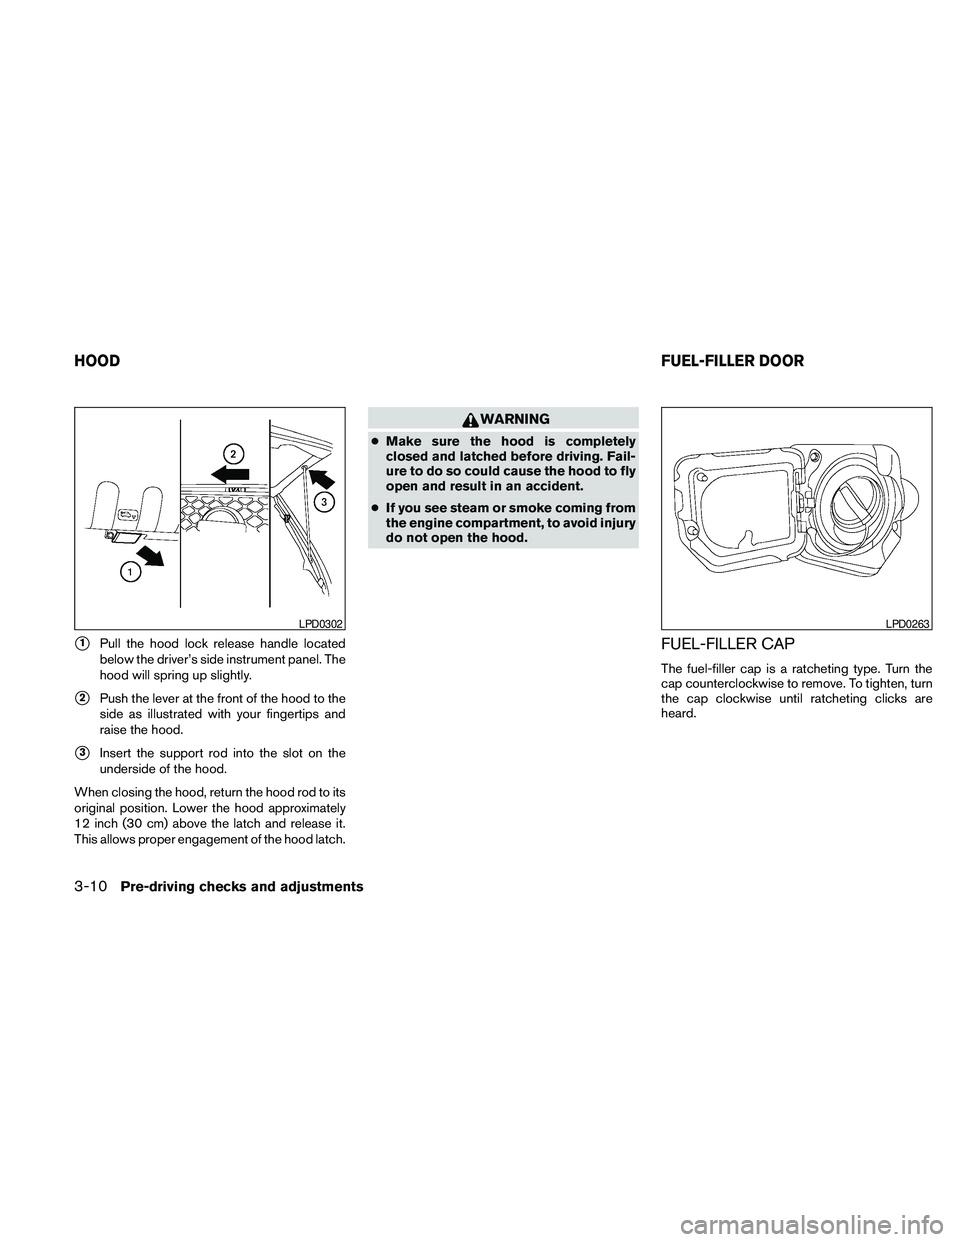
s1Pull the hood lock release handle located
below the driver’s side instrument panel. The
hood will spring up slightly.
s2Push the lever at the front of the hood to the
side as illustrated with your fingertips and
raise the hood.
s3Insert the support rod into the slot on the
underside of the hood.
When closing the hood, return the hood rod to its
original position. Lower the hood approximately
12 inch (30 cm) above the latch and release it.
This allows proper engagement of the hood latch.
WARNING
cMake sure the hood is completely
closed and latched before driving. Fail-
ure to do so could cause the hood to fly
open and result in an accident.
cIf you see steam or smoke coming from
the engine compartment, to avoid injury
do not open the hood.
FUEL-FILLER CAP
The fuel-filler cap is a ratcheting type. Turn the
cap counterclockwise to remove. To tighten, turn
the cap clockwise until ratcheting clicks are
heard.
LPD0302LPD0263
HOODFUEL-FILLER DOOR
3-10Pre-driving checks and adjustments
Page 158 of 373

CAUTION
cIf fuel is spilled on the vehicle body,
flush it away with water to avoid paint
damage.
cInsert cap straight into the fuel-filler
tube, then tighten until the fuel-filler
cap clicks. Failure to tighten the fuel-
filler cap properly may cause
the
Malfunction Indicator Light
(MIL) to illuminate. If the
light
illuminates because the fuel-filler cap
is loose or missing, tighten or install the
cap and continue to drive the vehicle.
The
light should turn off after a
few driving trips. If the
light
does not turn off after a few driving
trips, have the vehicle inspected by a
NISSAN dealer.
cFor additional information, see the
“Malfunction Indicator Light (MIL)” in
the “Instruments and Controls” section
in this manual.
TILT OPERATION (if so equipped)
Pull the lock lever forward and hold it to adjust the
steering wheel up or down to the desired posi-
tion.
Release the lock lever to lock the steering wheel
in place.
WARNING
Do not adjust the steering wheel while
driving. You could lose control of your
vehicle and cause an accident.s1To block glare from the front, swing down the
main sun visor.
s2To block glare from the side, remove the
main sun visor from the center mount and
swing the visor to the side.
LPD0304
WPD0315
STEERING WHEEL SUN VISORS
3-12Pre-driving checks and adjustments
Page 367 of 373

G
Garage door opener, HomeLinkTUniversal
Transceiver....................2-51
Gascap..................3-10, 3-10
Gauge
Engine coolant temperature gauge.....2-6
Engine oil pressure gauge..........2-8
Fuel gauge...................2-7
Odometer...................2-4
Speedometer.................2-4
Tachometer..................2-6
Trip computer.................2-5
Trip odometer.................2-4
Voltmeter....................2-8
General maintenance...............8-2
Glove box.....................2-40
H
Hands-free phone system, BluetoothT.....4-37
Hazard warning flasher switch.........2-30
Headlight and turn signal switch........2-26
Headlight control switch............2-26
Headlights....................8-28
Heated seats...................2-32
Heater
Heater and air conditioner controls . .4-2, 4-10
Heater operation............4-4, 4-11
Hill descent control switch...........2-33
Hill descent control system...........5-36
Hill start assist system..............5-37
HomeLinkTUniversal Transceiver........2-51
Hood release...................3-10Horn.......................2-31
I
Ignition switch...................5-9
Immobilizer system.........2-24, 3-2, 5-11
Important vehicle information label.......9-11
In-cabin microfilter................8-20
Increasing fuel economy.............5-22
Indicator lights and audible reminders
(See warning/indicator lights and audible
reminders)....................2-13
Inside automatic anti-glare mirror........3-14
Inside mirror...................3-13
Instrument brightness control..........2-29
Instrument panel...............0-6, 2-2
Instrument panel dimmer switch........2-29
Interior light....................2-50
ISOFIX child restraints.............1-28
J
Jump seat.....................1-5
Jump starting...................6-9
K
Key.........................3-2
Keyfob battery replacement...........8-26
Keyless entry system (See remote keyless entry
system).......................3-6L
Labels
Air conditioner specification label.....9-12
C.M.V.S.S. certification label........9-11
Emission control information label.....9-12
Engine serial number............9-11
F.M.V.S.S. certification label.........9-11
Tire and Loading Information label.....9-12
Vehicle identification number (VIN) plate . .9-10
Warning labels (for SRS)..........1-71
LATCH (Lower Anchors and Tethers for CHildren)
System......................1-28
License plate
Installing the license plate..........9-13
Light
Air bag warning light.........1-72, 2-18
Brake light (See stop light).........8-30
Bulb check/instrument panel........2-14
Bulb replacement..............8-30
Charge warning light............2-15
Fog light switch...............2-30
Headlight and turn signal switch......2-26
Headlight control switch..........2-26
Headlights..................8-28
Interior light..................2-50
Light bulbs..................8-28
Low tire pressure warning light.......2-16
Low washer fluid warning light.......2-18
Passenger air bag and status light.....1-66
Security indicator light............2-20
Warning/indicator lights and audible
reminders...................2-13
Lights
Map lights..................2-51
10-3