2010 NISSAN FRONTIER ECU
[x] Cancel search: ECUPage 299 of 373

REPLACING SPARK PLUGS
Platinum-tipped spark plugs (if so
equipped)
It is not necessary to replace platinum-tippedsA
spark plugs as frequently as conventional type
spark plugs because they last much longer. Fol-
low the maintenance log shown in the “NISSAN
Service and Maintenance Guide”. Do not service
platinum-tipped spark plugs by cleaning or re-
gapping.
cAlways replace spark plugs with rec-
ommended or equivalent ones.
WARNING
Be sure the engine and ignition switch are
off and that the parking brake is engaged
securely.
CAUTION
Be sure to use the correct socket to re-
move the spark plugs. An incorrect socket
can damage the spark plugs.
If replacement is required, see your NISSAN
dealer for assistance.
Iridium-tipped spark plugs (if so
equipped)
It is not necessary to replace iridium-tippedsA
spark plugs as frequently as conventional type
spark plugs because they last much longer. Fol-
low the maintenance log shown in the “NISSAN
Service and Maintenance Guide”. Do not service
iridium-tipped spark plugs by cleaning or regap-
ping.
cAlways replace spark plugs with rec-
ommended or equivalent ones.
WARNING
Be sure the engine and ignition switch are
off and that the parking brake is engaged
securely.
CAUTION
Be sure to use the correct socket to re-
move the spark plugs. An incorrect socket
can damage the spark plugs.
If replacement is required, see your NISSAN
dealer for assistance.
SDI1895
SPARK PLUGS
Maintenance and do-it-yourself8-19
Page 304 of 373

Two types of fuses are used. TypesAis used in
the fuse boxes in the engine compartment. Type
sBis used in the passenger compartment fuse
box.
Type A fuses are provided as spare fuses. They
are stored in the passenger compartment fuse
box.
Type A fuses can be installed in the engine com-
partment and passenger compartment fuse
boxes.If a type A fuse is used to replace a type B fuse,
the type A fuse will not be level with the fuse
pocket as shown in the illustration. This will not
affect the performance of the fuse. Make sure the
fuse is installed in the fuse box securely.
Type B fuses cannot be installed in the under-
hood fuse boxes. Only use type A fuses in the
underhood fuse boxes.
ENGINE COMPARTMENT
CAUTION
Never use a fuse of a higher or lower
amperage rating than specified on the
fuse box cover. This could damage the
electrical system or cause a fire.
If any electrical equipment does not come on,
check for an open fuse.
1. Be sure the ignition switch and the headlight
switch are OFF.
2. Open the engine hood.
LDI0455LDI0457LDI0444
FUSES
8-24Maintenance and do-it-yourself
Page 307 of 373

KEYFOB (if so equipped)
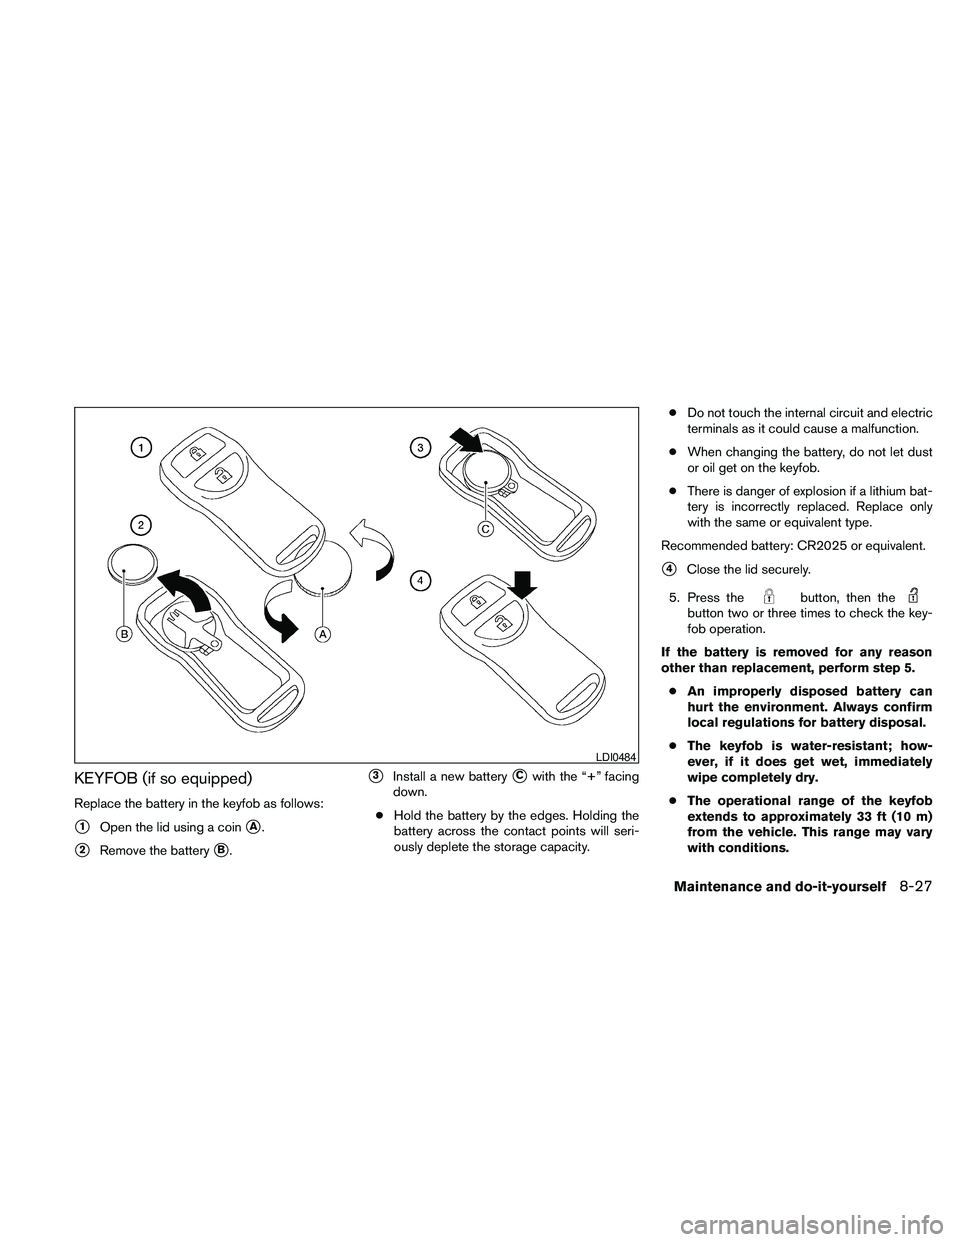
Replace the battery in the keyfob as follows:
s1Open the lid using a coinsA.
s2Remove the batterysB.
s3Install a new batterysCwith the “+” facing
down.
cHold the battery by the edges. Holding the
battery across the contact points will seri-
ously deplete the storage capacity.cDo not touch the internal circuit and electric
terminals as it could cause a malfunction.
cWhen changing the battery, do not let dust
or oil get on the keyfob.
cThere is danger of explosion if a lithium bat-
tery is incorrectly replaced. Replace only
with the same or equivalent type.
Recommended battery: CR2025 or equivalent.
s4Close the lid securely.
5. Press the
button, then thebutton two or three times to check the key-
fob operation.
If the battery is removed for any reason
other than replacement, perform step 5.
cAn improperly disposed battery can
hurt the environment. Always confirm
local regulations for battery disposal.
cThe keyfob is water-resistant; how-
ever, if it does get wet, immediately
wipe completely dry.
cThe operational range of the keyfob
extends to approximately 33 ft (10 m)
from the vehicle. This range may vary
with conditions.
LDI0484
Maintenance and do-it-yourself8-27
Page 319 of 373

studded tires. Skid and traction capabilities of
studded snow tires on wet or dry surfaces may be
poorer than that of non-studded snow tires.
TIRE CHAINS
Use of tire chains may be prohibited according to
location. Check the local laws before installing
tire chains. When installing tire chains, make sure
they are the proper size for the tires on your
vehicle and are installed according to the chain
manufacturer’s suggestions.Use only SAE
class “S” chains.Class “S” chains are used on
vehicles with restricted tire to vehicle clearance.
Vehicles that can use Class “S” chains are de-
signed to meet the minimum clearances between
the tire and the closest vehicle suspension or
body component required to accommodate the
use of a winter traction device (tire chains or
cables) . The minimum clearances are determined
using the factory equipped tire size. Other types
may damage your vehicle. Use chain tensioners
when recommended by the tire chain manufac-
turer to ensure a tight fit. Loose end links of the
tire chain must be secured or removed to prevent
the possibility of whipping action damage to the
fenders or underbody. If possible, avoid fully load-
ing your vehicle when using tire chains. In addi-
tion, drive at a reduced speed. Otherwise, your
vehicle may be damaged and/or vehicle handling
and performance may be adversely affected.Tire chains must be installed only on the
rear wheels and not on the front wheels.
Do not use tire chains on dry roads. Driving with
chains in such conditions can cause damage to
the various mechanisms of the vehicle due to
some overstress.
Use only the 2WD range when driving on clear
paved roads.
CHANGING WHEELS AND TIRES
Tire rotation
NISSAN recommends rotating the tires
every 7,500 miles (12,000 km) .
See “Flat tire” in the “In case of emer-
gency” section in this manual for tire re-
placing procedures.
As soon as possible, tighten the
wheel nuts to the specified torque
with a torque wrench.
WDI0258
Maintenance and do-it-yourself8-39
Page 325 of 373

9 Technical and consumer information
Capacities and recommended fuel/lubricants.........9-2
Fuel recommendation...........................9-4
Engine oil and oil filter recommendations..........9-6
Air conditioner system refrigerant and oil
recommendations..............................9-7
Specifications.....................................9-8
Engine........................................9-8
Wheels and tires...............................9-9
Dimensions and weights........................9-9
When traveling or registering your vehicle in
another country..................................9-10
Vehicle identification..............................9-10
Vehicle identification number (VIN) plate.........9-10
Vehicle identification number
(chassis number)..............................9-10
Engine serial number...........................9-11
F.M.V.S.S./C.M.V.S.S. certification label..........9-11
Emission control information label...............9-12
Tire and loading information label................9-12
Air conditioner specification label................9-12
Installing front license plate........................9-13
Installing front license plate with grommets.......9-13
Installing front license plate without
grommets....................................9-13
Vehicle loading information........................9-13Terms........................................9-13
Vehicle load capacity..........................9-14
Securing the load..............................9-16
Utili-track™ channel system (if so equipped)......9-17
Loading tips..................................9-22
Truck-camper loading information..................9-23
Crew Cab Models.............................9-23
King Cab models..............................9-23
Special Body vehicles..........................9-23
Location for center of gravity....................9-23
Vehicle load weight capacity....................9-24
Measurement of weights.......................9-24
Towing a trailer...................................9-24
Maximum load limits...........................9-25
Towing load/specification.......................9-28
Towing safety.................................9-29
Flat towing....................................9-35
Uniform tire quality grading........................9-36
Emission control system warranty..................9-37
Reporting safety defects (US only).................9-37
Readiness for inspection/maintenance (I/M) test.....9-37
Event Data Recorders (EDR).......................9-38
Owner’s Manual/Service Manual order information . . . 9-39
In the event of a collision.......................9-39
Page 340 of 373

5. Determine the combined weight of
luggage and cargo being loaded on
the vehicle. That weight may not
safely exceed the available cargo and
luggage load capacity calculated in
Step 4.
6. If your vehicle will be towing a trailer,
load from your trailer will be trans-
ferred to your vehicle. Consult this
manual to determine how this re-
duces the available cargo and lug-
gage load capacity of your vehicle.
Before driving a loaded vehicle, confirm
that you do not exceed the Gross Vehicle
Weight Rating (GVWR) or the Gross Axle
Weight Rating (GAWR) for your vehicle.
See “Measurement of Weights” later in
this section.
Also check tires for proper inflation pres-
sures. See the Tire and Loading Informa-
tion label.
SECURING THE LOAD
For your convenience, tie down hooks (if so
equipped) are placed at each corner of the truck
box. These may be used to help secure cargo
loaded into the truck box.
WARNING
cProperly secure all cargo with ropes or
straps to help prevent it from sliding or
shifting. Do not place cargo higher than
the seatbacks. In a sudden stop or col-
lision, unsecured cargo could cause
personal injury.cDo not load your vehicle any heavier
than the GVWR or the maximum front
and rear GAWRs. If you do, parts of your
vehicle can break, tire damage could
occur, or it can change the way your
vehicle handles. This could result in
loss of control and cause personal
injury.
LTI0102
9-16Technical and consumer information
Page 341 of 373

1. Side channels
2. Header channel
3. Channel sections
4. Floor channels
UTILI-TRACK™ CHANNEL SYSTEM
(if so equipped)
WARNING
cProperly install and tighten the tie-
down cleats into the Utili-track™ chan-
nel system. Also, do not attach any rope
or straps directly to the channel. Failure
to properly install the tie-down cleats or
attaching ropes or straps directly to the
channel can cause the cargo to become
unsecured. In a sudden stop or colli-
sion, unsecured cargo could cause per-
sonal injury.
cProperly secure all cargo with ropes or
straps to help prevent it from sliding or
shifting. In a sudden stop or collision,
unsecured cargo could cause personal
injury.
The Utili-track™ channel system allows you to
move tie-down clamps in the bed to the best
location to secure a load.
The tie-down cleats must be installed so the
clamp is properly seated in the notches in the rail.
If the tie-down cleat is not seated in the notches,
it will not be flush with the rail and cannot be
properly tightened. The bolt in the center of the
cleat must be tightened hand tight (20 – 40 inch
pounds)Check the tightness of the tie-down cleat peri-
odically during a trip to make sure the center bolt
has not become loose.
Install the tie-down cleat as follows:
1. Remove the channel protectors by sliding
them out the back of the truck bed. Properly
store the channel protectors.
2. Loosen the center bolt completely.
LTI0107
Technical and consumer information9-17
Page 345 of 373

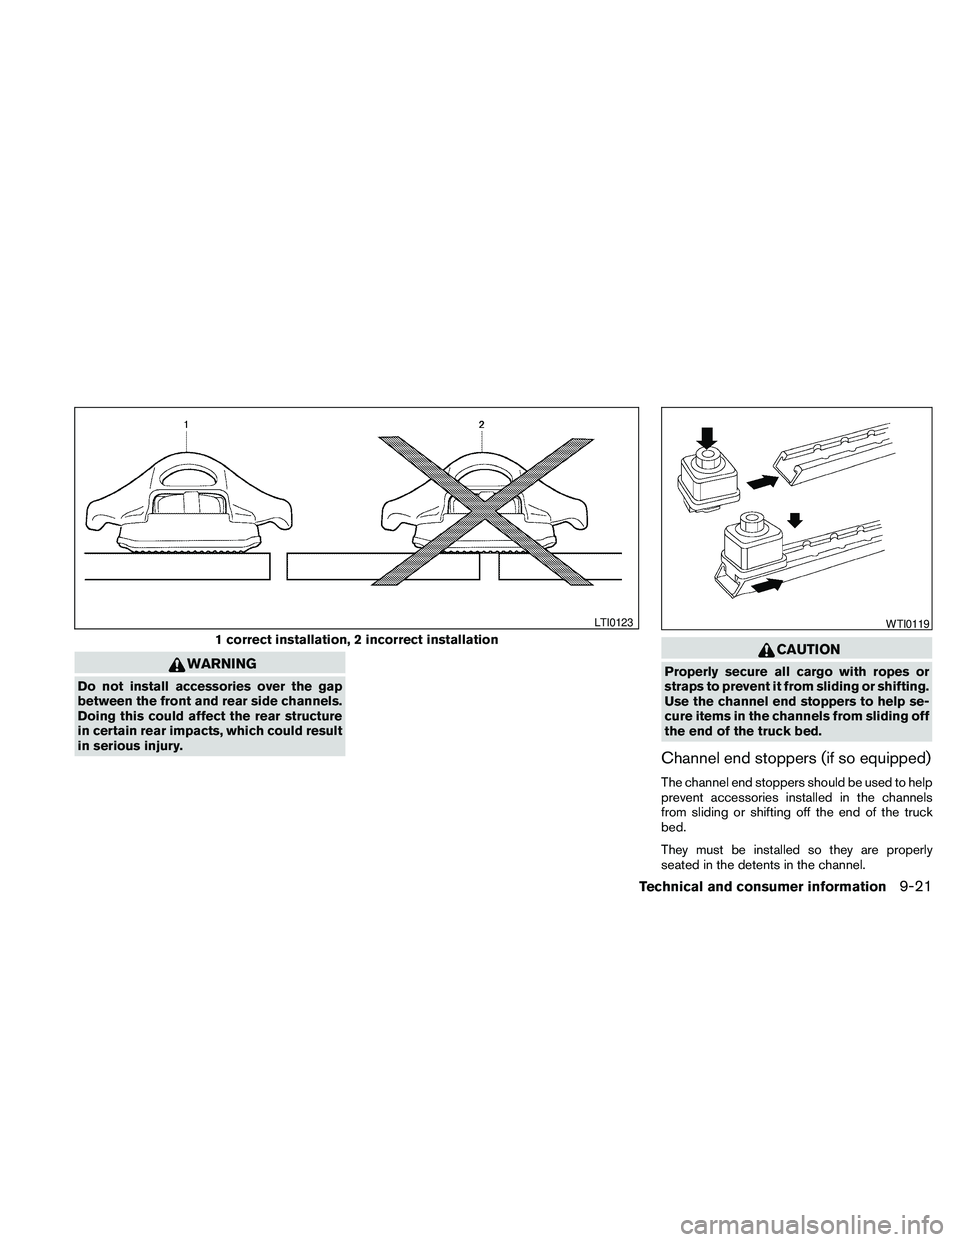
WARNING
Do not install accessories over the gap
between the front and rear side channels.
Doing this could affect the rear structure
in certain rear impacts, which could result
in serious injury.
CAUTION
Properly secure all cargo with ropes or
straps to prevent it from sliding or shifting.
Use the channel end stoppers to help se-
cure items in the channels from sliding off
the end of the truck bed.
Channel end stoppers (if so equipped)
The channel end stoppers should be used to help
prevent accessories installed in the channels
from sliding or shifting off the end of the truck
bed.
They must be installed so they are properly
seated in the detents in the channel.
1 correct installation, 2 incorrect installation
LTI0123WTI0119
Technical and consumer information9-21