2010 NISSAN FRONTIER ECO mode
[x] Cancel search: ECO modePage 215 of 373

5. Press thebutton.
For information on selecting a different lan-
guage, see “Choosing a language” in this
section.
6. Voice memory A or memory B is selected
automatically. If both memory locations are
already in use, the system will prompt you to
overwrite one. Follow the instructions pro-
vided by the system.
7. When preparation is complete and you are
ready to begin, press the
button.
8. The SA mode will be explained. Follow the
instructions provided by the system.
9. When training is finished, the system will tell
you an adequate number of phrases have
been recorded.
10. The system will announce that speaker ad-
aptation has been completed and the sys-
tem is ready.
The SA mode will stop if:
cThe
button is pressed for more than 5
seconds in SA mode.
cThe vehicle begins moving during SA mode.
cThe ignition switch is placed in the OFF or
LOCK position.
Training phrases
During the SA mode, the system instructs the
trainer to say the following phrases. (The system
will prompt you for each phrase.)
cphonebook transfer entry
cdial three oh four two nine
cdelete call back number
cincoming
ctransfer entry
ceight pause nine three two pause seven
cdelete all entries
ccall seven two four zero nine
cphonebook delete entry
cnext entry
cdial star two one seven oh
cyes
cno
cselect
cmissed
cdial eight five six nine two
cBluetooth on
coutgoingccall three one nine oh two
cnine seven pause pause three oh eight
ccancel
ccall back number
ccall star two zero nine five
cdelete phone
cdial eight three zero five one
crecord name
cfour three pause two nine pause zero
cdelete redial number
cphonebook list names
ccall eight oh five four one
ccorrection
cconnect phone
cdial seven four oh one eight
cprevious entry
cdelete
cdial nine seven two six six
ccall seven six three oh one
cgo back
ccall five six two eight zero
cdial six six four three seven
Heater, air conditioner, audio and phone systems4-49
Page 216 of 373

MANUAL CONTROL
While using the voice recognition system, it is
possible to select menu options by using the
steering wheel controls instead of speaking voice
commands. The manual control mode does not
allow dialing a phone number by digits. The user
may select an entry from the Phonebook or Re-
cent Calls lists. To re-activate voice recognition,
exit the manual control mode by pressing and
holding the PHONE/END (
) button. At that
time, pressing the PHONE/SEND (
) button
will start the Hands Free Phone System.
Operating tips
cTo enter manual control mode, start the
voice recognition system and tilt the tuning
(
) switch up or down. The system will
speak9Showing Manual Options9when
manual controls are initially activated.cTo browse the menu options, tilt the tuning
(
) switch up or down. The system will
always speak the current menu option. De-
pending on the audio display, it will also
show the current menu option.
cTo select the current menu option, press the
PHONE/SEND (
) button.
cTo go back to the previous menu, press the
PHONE/END (
) button. If the current
menu is the Main Menu, pressing the
PHONE/END (
) button will exit the
Phone system.
cTo exit the manual control mode, press and
hold the PHONE/END (
) button for 5
seconds.
4-50Heater, air conditioner, audio and phone systems
Page 217 of 373

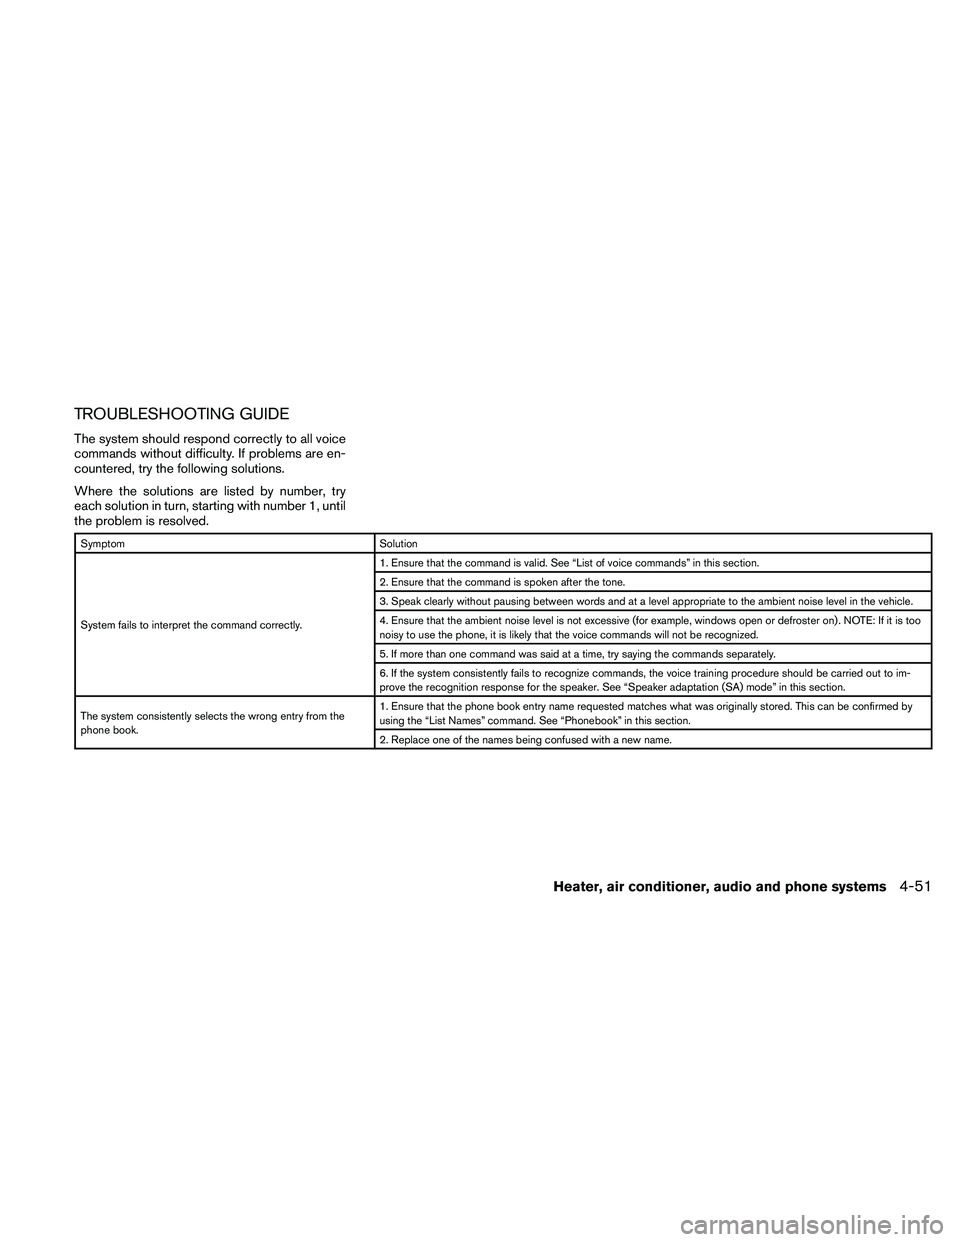
TROUBLESHOOTING GUIDE
The system should respond correctly to all voice
commands without difficulty. If problems are en-
countered, try the following solutions.
Where the solutions are listed by number, try
each solution in turn, starting with number 1, until
the problem is resolved.
Symptom Solution
System fails to interpret the command correctly.1. Ensure that the command is valid. See “List of voice commands” in this section.
2. Ensure that the command is spoken after the tone.
3. Speak clearly without pausing between words and at a level appropriate to the ambient noise level in the vehicle.
4. Ensure that the ambient noise level is not excessive (for example, windows open or defroster on) . NOTE: If it is too
noisy to use the phone, it is likely that the voice commands will not be recognized.
5. If more than one command was said at a time, try saying the commands separately.
6. If the system consistently fails to recognize commands, the voice training procedure should be carried out to im-
prove the recognition response for the speaker. See “Speaker adaptation (SA) mode” in this section.
The system consistently selects the wrong entry from the
phone book.1. Ensure that the phone book entry name requested matches what was originally stored. This can be confirmed by
using the “List Names” command. See “Phonebook” in this section.
2. Replace one of the names being confused with a new name.
Heater, air conditioner, audio and phone systems4-51
Page 229 of 373

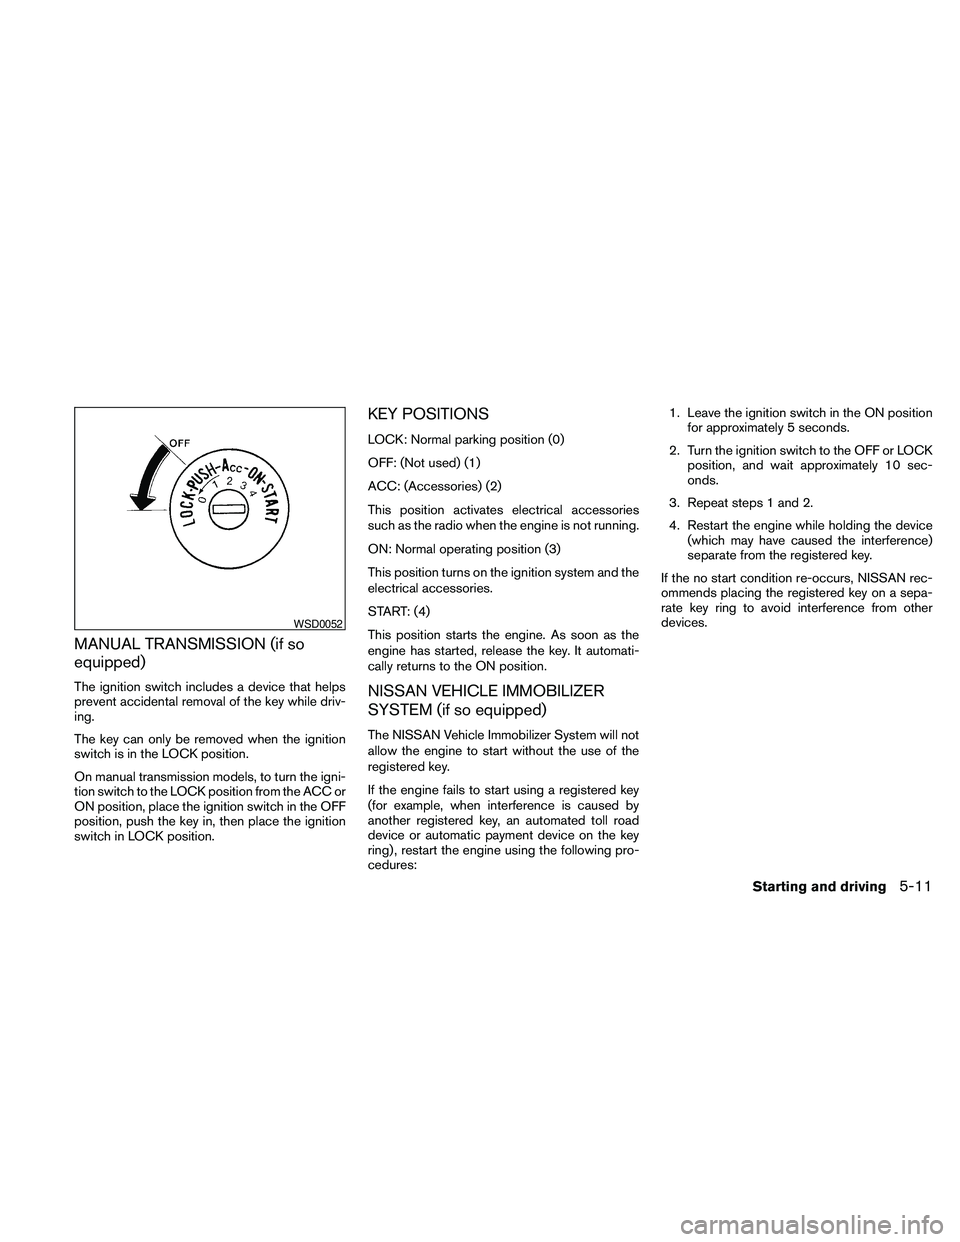
MANUAL TRANSMISSION (if so
equipped)
The ignition switch includes a device that helps
prevent accidental removal of the key while driv-
ing.
The key can only be removed when the ignition
switch is in the LOCK position.
On manual transmission models, to turn the igni-
tion switch to the LOCK position from the ACC or
ON position, place the ignition switch in the OFF
position, push the key in, then place the ignition
switch in LOCK position.
KEY POSITIONS
LOCK: Normal parking position (0)
OFF: (Not used) (1)
ACC: (Accessories) (2)
This position activates electrical accessories
such as the radio when the engine is not running.
ON: Normal operating position (3)
This position turns on the ignition system and the
electrical accessories.
START: (4)
This position starts the engine. As soon as the
engine has started, release the key. It automati-
cally returns to the ON position.
NISSAN VEHICLE IMMOBILIZER
SYSTEM (if so equipped)
The NISSAN Vehicle Immobilizer System will not
allow the engine to start without the use of the
registered key.
If the engine fails to start using a registered key
(for example, when interference is caused by
another registered key, an automated toll road
device or automatic payment device on the key
ring) , restart the engine using the following pro-
cedures:1. Leave the ignition switch in the ON position
for approximately 5 seconds.
2. Turn the ignition switch to the OFF or LOCK
position, and wait approximately 10 sec-
onds.
3. Repeat steps 1 and 2.
4. Restart the engine while holding the device
(which may have caused the interference)
separate from the registered key.
If the no start condition re-occurs, NISSAN rec-
ommends placing the registered key on a sepa-
rate key ring to avoid interference from other
devices.
WSD0052
Starting and driving5-11
Page 230 of 373

cMake sure the area around the vehicle is
clear.
cCheck fluid levels such as engine oil, cool-
ant, brake fluid, and window washer fluid as
frequently as possible, or at least whenever
you refuel.
cCheck that all windows and lights are clean.
cVisually inspect tires for their appearance
and condition. Also check tires for proper
inflation.
cCheck that all doors are closed.
cPosition seat and adjust head restraint and
headrests (if so equipped) .
cAdjust inside and outside mirrors.
cFasten seat belts and ask all passengers to
do likewise.
cCheck the operation of warning lights when
the ignition switch is placed in the ON
sD
position. See “Warning/indicator lights and
audible reminders” in the “Instruments and
controls” section of this manual.1. Apply the parking brake.
2.Automatic transmission:
Move the shift selector to P (Park) or N
(Neutral) . P (Park) is recommended.
The shift selector cannot be moved out
of the P (Park) position and into any of
the other gear positions if the ignition
switch is placed in the OFF position or
if the key is removed from the ignition
switch.
The starter is designed not to operate if
the shift selector is in any of the driving
positions.
Manual transmission:
Move the shift selector to N (Neutral) . De-
press the clutch pedal to the floor while
cranking the engine.
The starter is designed not to operate
unless the clutch pedal is fully de-
pressed.
3. Crank the enginewith your foot off the
accelerator pedalby placing the ignition
switch in the START position. Release the
key when the engine starts. If the engine
starts, but fails to run, repeat the above
procedure.c
If the engine is very hard to start in extremely
cold weather or when restarting, depress
the accelerator pedal a little (approximately
1/3 to the floor) and hold it and then crank
the engine. Release the key and the accel-
erator pedal when the engine starts.
cIf the engine is very hard to start because
it is flooded, depress the accelerator
pedal all the way to the floor and hold it.
Crank the engine for 5-6 seconds. After
cranking the engine, release the accel-
erator pedal. Crank the enginewith your
foot off the accelerator pedalby plac-
ing the ignition in the START position.
Release the key when the engine starts. If
the engine starts, but fails to run, repeat
the above procedure.
CAUTION
Do not operate the starter for more than
15 seconds at a time. If the engine does
not start, turn the key off and wait 10
seconds before cranking again, otherwise
the starter could be damaged.
4. Allow the engine to idle for at least 30 sec-
onds after starting. Do not race the engine
while warming it up. Drive at moderate
speed for a short distance first, especially in
cold weather.
BEFORE STARTING THE ENGINE STARTING THE ENGINE
5-12Starting and driving
Page 236 of 373

If your vehicle is equipped with 4-wheel drive, see
“Transfer case shifting procedures” later in this
section.
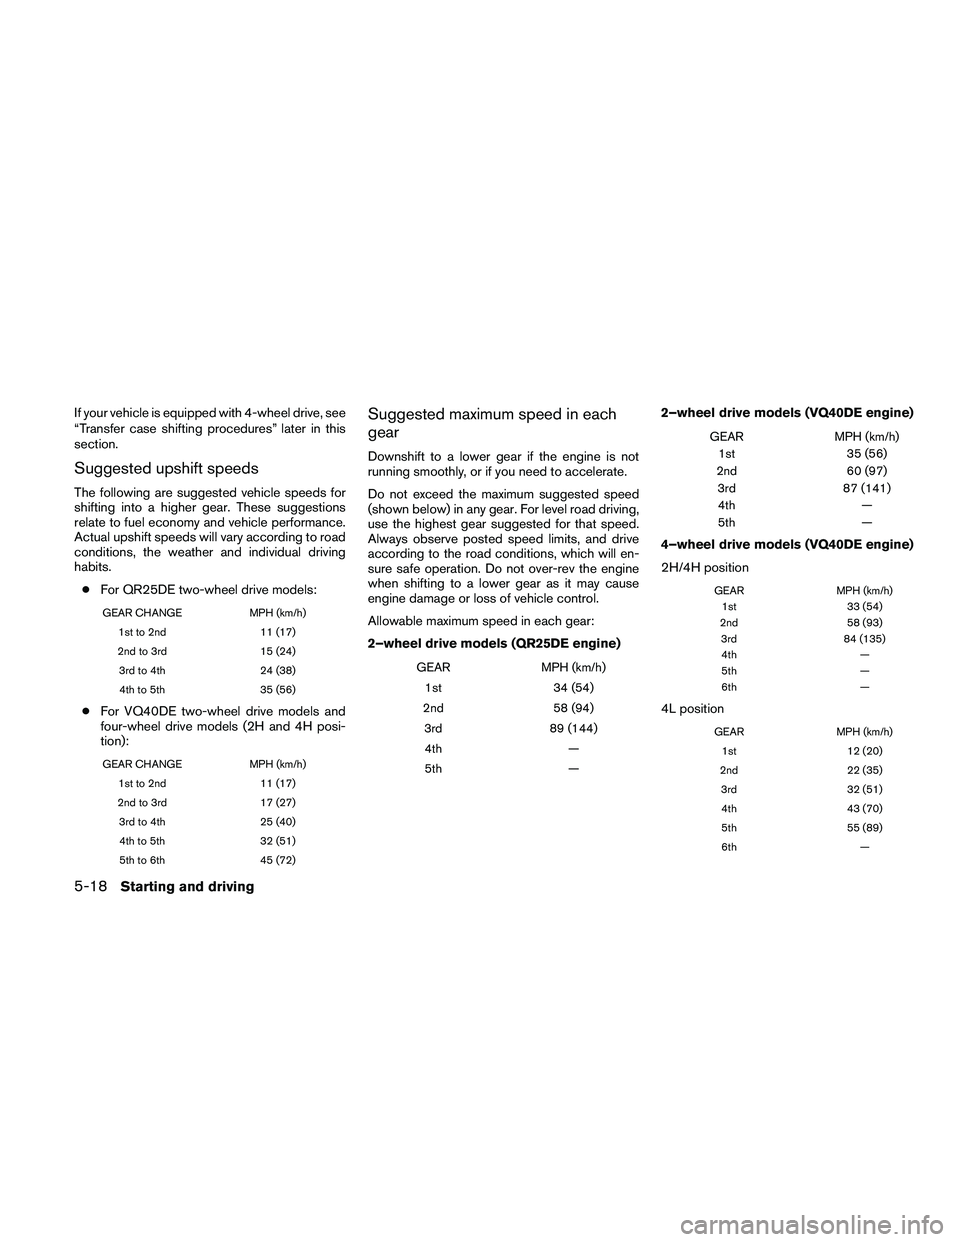
Suggested upshift speeds
The following are suggested vehicle speeds for
shifting into a higher gear. These suggestions
relate to fuel economy and vehicle performance.
Actual upshift speeds will vary according to road
conditions, the weather and individual driving
habits.
cFor QR25DE two-wheel drive models:
GEAR CHANGE MPH (km/h)
1st to 2nd 11 (17)
2nd to 3rd 15 (24)
3rd to 4th 24 (38)
4th to 5th 35 (56)
cFor VQ40DE two-wheel drive models and
four-wheel drive models (2H and 4H posi-
tion):
GEAR CHANGE MPH (km/h)
1st to 2nd 11 (17)
2nd to 3rd 17 (27)
3rd to 4th 25 (40)
4th to 5th 32 (51)
5th to 6th 45 (72)
Suggested maximum speed in each
gear
Downshift to a lower gear if the engine is not
running smoothly, or if you need to accelerate.
Do not exceed the maximum suggested speed
(shown below) in any gear. For level road driving,
use the highest gear suggested for that speed.
Always observe posted speed limits, and drive
according to the road conditions, which will en-
sure safe operation. Do not over-rev the engine
when shifting to a lower gear as it may cause
engine damage or loss of vehicle control.
Allowable maximum speed in each gear:
2–wheel drive models (QR25DE engine)
GEAR MPH (km/h)
1st 34 (54)
2nd 58 (94)
3rd 89 (144)
4th —
5th —
2–wheel drive models (VQ40DE engine)
GEAR MPH (km/h)
1st 35 (56)
2nd 60 (97)
3rd 87 (141)
4th —
5th —
4–wheel drive models (VQ40DE engine)
2H/4H position
GEAR MPH (km/h)
1st 33 (54)
2nd 58 (93)
3rd 84 (135)
4th —
5th —
6th —
4L position
GEAR MPH (km/h)
1st 12 (20)
2nd 22 (35)
3rd 32 (51)
4th 43 (70)
5th 55 (89)
6th —
5-18Starting and driving
Page 240 of 373

cAccelerate slowly and smoothly. Maintain
cruising speeds with a constant accelerator
position.
cDrive at moderate speeds on the highway.
Driving at high speed lowers fuel economy.
cAvoid unnecessary stopping and braking.
Maintain a safe distance behind other ve-
hicles.
cUse a proper gear range which suits road
conditions. On level roads, shift into high
gear as soon as possible.
cAvoid unnecessary engine idling.
cKeep your engine tuned up.
cFollow the recommended periodic mainte-
nance schedule.
cKeep the tires inflated to the correct pres-
sure. Low tire pressure increases tire wear
and lowers fuel economy.
cKeep the front wheels in correct alignment.
Improper alignment increases tire wear and
lowers fuel economy.
cAir conditioner operation lowers fuel
economy. Use the air conditioner only when
necessary.cWhen cruising at highway speeds, it is more
economical to use the air conditioner and
leave the windows closed to reduce drag.
cFor vehicles equipped with
, use 4H
or 4L position only when necessary. Four-
wheel drive operation lowers fuel economy.
WARNING
cFor 4WD equipped vehicles, do not at-
tempt to raise two wheels off the
ground and shift the transmission to
any drive or reverse position with the
engine running. Doing so may result in
drivetrain damage or unexpected ve-
hicle movement which could result in
serious vehicle damage or personal
injury.
cDo not attempt to test a 4WD equipped
vehicle on a 2-wheel dynamometer
(such as the dynamometers used by
some states for emissions testing) , or
similar equipment even if the other two
wheels are raised off the ground. Make
sure you inform test facility personnel
that your vehicle is equipped with 4WD
before it is placed on a dynamometer.
Using the wrong test equipment may
result in drivetrain damage or unex-
pected vehicle movement which could
result in serious vehicle damage or per-
sonal injury.
INCREASING FUEL ECONOMYUSING FOUR WHEEL DRIVE
(4WD)
5-22Starting and driving
Page 244 of 373

The transfer case 4WD shift switch is used to
select either 2WD or 4WD depending on the
driving conditions. There are three types of drive
modes available, 2WD, 4H and 4LO.
The 4WD shift switch electronically controls the
transfer case operation. Rotate the switch to
move between each mode, 2WD, 4H and 4LO.
To change into or out of 4LO, the vehicle
MUST be stationary, shift the shift selector
to Neutral (N) , and for automatic transmis-
sion vehicles depress the brake pedal or
for manual transmission vehicles depress
the clutch pedal. The switch must be de-
pressed and turned when changing into or
out of 4LO.
WARNING
cWhen parking, apply the parking brake
before stopping the engine and make
sure that the 4WD shift indicator light is
on and the ATP warning light goes off.
Otherwise, the vehicle could unexpect-
edly move even if the automatic trans-
mission is in the P position.cThe 4LO indicator light must stop blink-
ing and remain illuminated or turn off
before shifting the transmission into
gear. If the shift selector is shifted from
the (N) position to any other gear when
the 4LO indicator light is blinking, the
vehicle may move unexpectedly.
CAUTION
cNever shift the 4WD shift switch be-
tween 4LO and 4H while driving.
cThe 4H position provides greater trac-
tion. Avoid excessive speed, as it will
cause increased fuel consumption and
higher oil temperatures, and could
damage drivetrain components.
Speeds over 62 MPH (100 km/h) in 4H is
not recommended
cThe 4LO position provides maximum
power and traction. Avoid raising ve-
hicle speed excessively, as the maxi-
mum speed is approximately 31 MPH
(50 km/h) .
cWhen driving straight, shift the 4WD
shift switch to the 2WD or 4H position.
Do not move the 4WD shift switch when
making a turn or reversing.cDo not shift the 4WD shift switch (be-
tween 2WD and 4H) while driving on
steep downhill grades. Use the engine
brake and low automatic transmission
gears (D1 or D2) or manual transmis-
sion (1st gear or 2nd gear) for engine
braking.
cDo not operate the 4WD shift switch
(between 2WD and 4H) with the rear
wheels spinning.
cDo not drive on dry hard surface roads
in the 4H or 4LO position. Driving on dry
hard surfaces in 4H or 4LO may cause
unnecessary noise and tire wear.
NISSAN recommends driving in the
2WD position under these conditions.
cThe 4WD transfer case may not be
shifted between 4H and 4LO at low am-
bient temperatures and the transfer
4LO position indicator light may blink
even when the 4WD shift switch is
shifted. After driving for a while you can
change the 4WD transfer case between
4H and 4LO.
When driving on rough roads,
cSet the 4WD shift switch to 4H or 4LO.
cDrive carefully according to the road surface
conditions.
5-26Starting and driving