2010 NISSAN FRONTIER instrument panel
[x] Cancel search: instrument panelPage 156 of 373

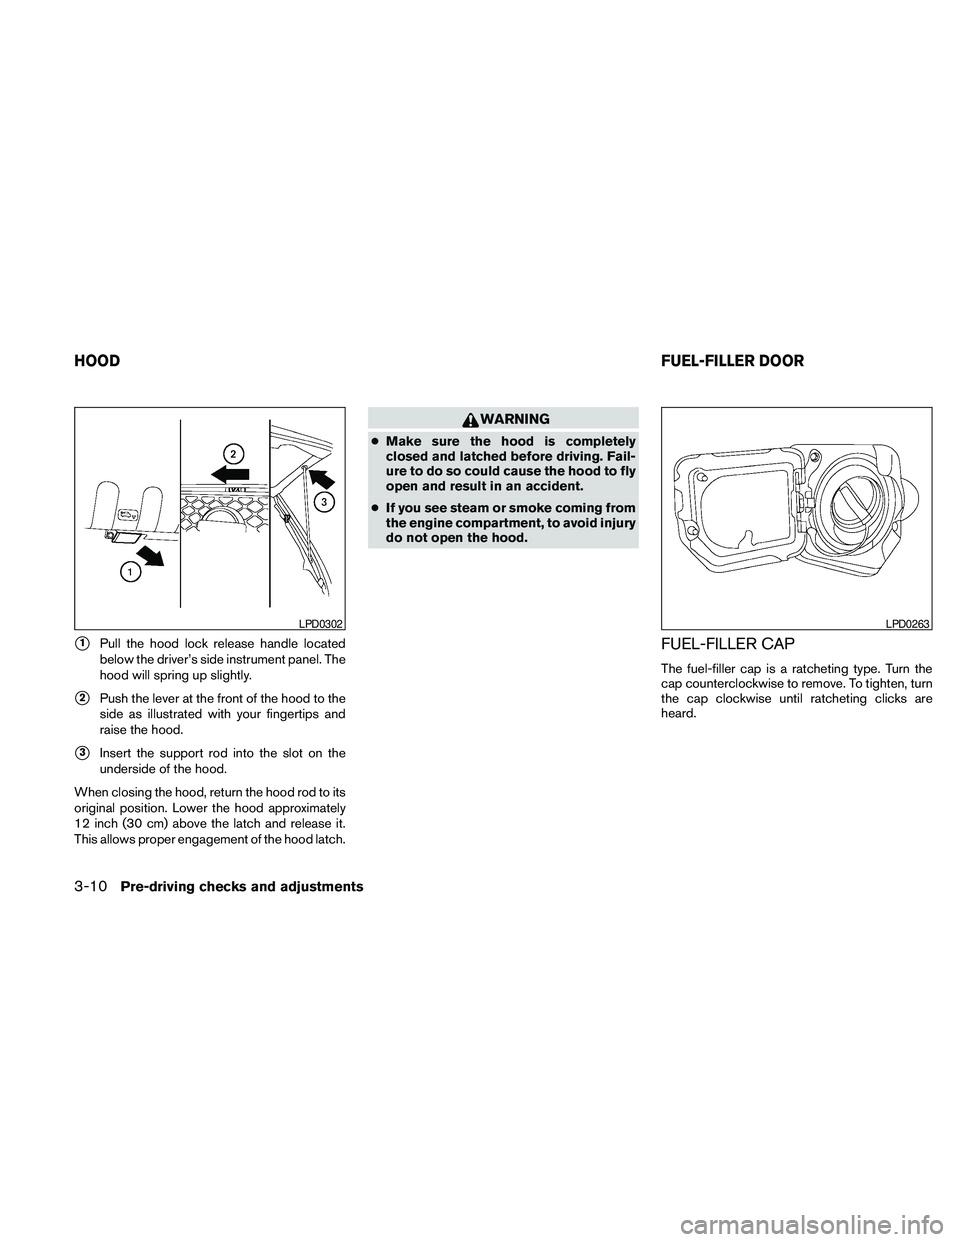
s1Pull the hood lock release handle located
below the driver’s side instrument panel. The
hood will spring up slightly.
s2Push the lever at the front of the hood to the
side as illustrated with your fingertips and
raise the hood.
s3Insert the support rod into the slot on the
underside of the hood.
When closing the hood, return the hood rod to its
original position. Lower the hood approximately
12 inch (30 cm) above the latch and release it.
This allows proper engagement of the hood latch.
WARNING
cMake sure the hood is completely
closed and latched before driving. Fail-
ure to do so could cause the hood to fly
open and result in an accident.
cIf you see steam or smoke coming from
the engine compartment, to avoid injury
do not open the hood.
FUEL-FILLER CAP
The fuel-filler cap is a ratcheting type. Turn the
cap counterclockwise to remove. To tighten, turn
the cap clockwise until ratcheting clicks are
heard.
LPD0302LPD0263
HOODFUEL-FILLER DOOR
3-10Pre-driving checks and adjustments
Page 234 of 373

WARNING
If the shift selector cannot be moved from
the P (Park) position while the engine is
running and the brake pedal is depressed,
the stop lights may not work. Malfunction-
ing stop lights could cause an accident
injuring yourself and others.
Accelerator downshift
— in D position —
For passing or hill climbing, depress the accel-
erator pedal to the floor. This shifts the transmis-
sion down into a lower gear, depending on the
vehicle speed.
Overdrive switch
Each time your vehicle is started, the transmis-
sion is automatically “reset” to overdrive ON.
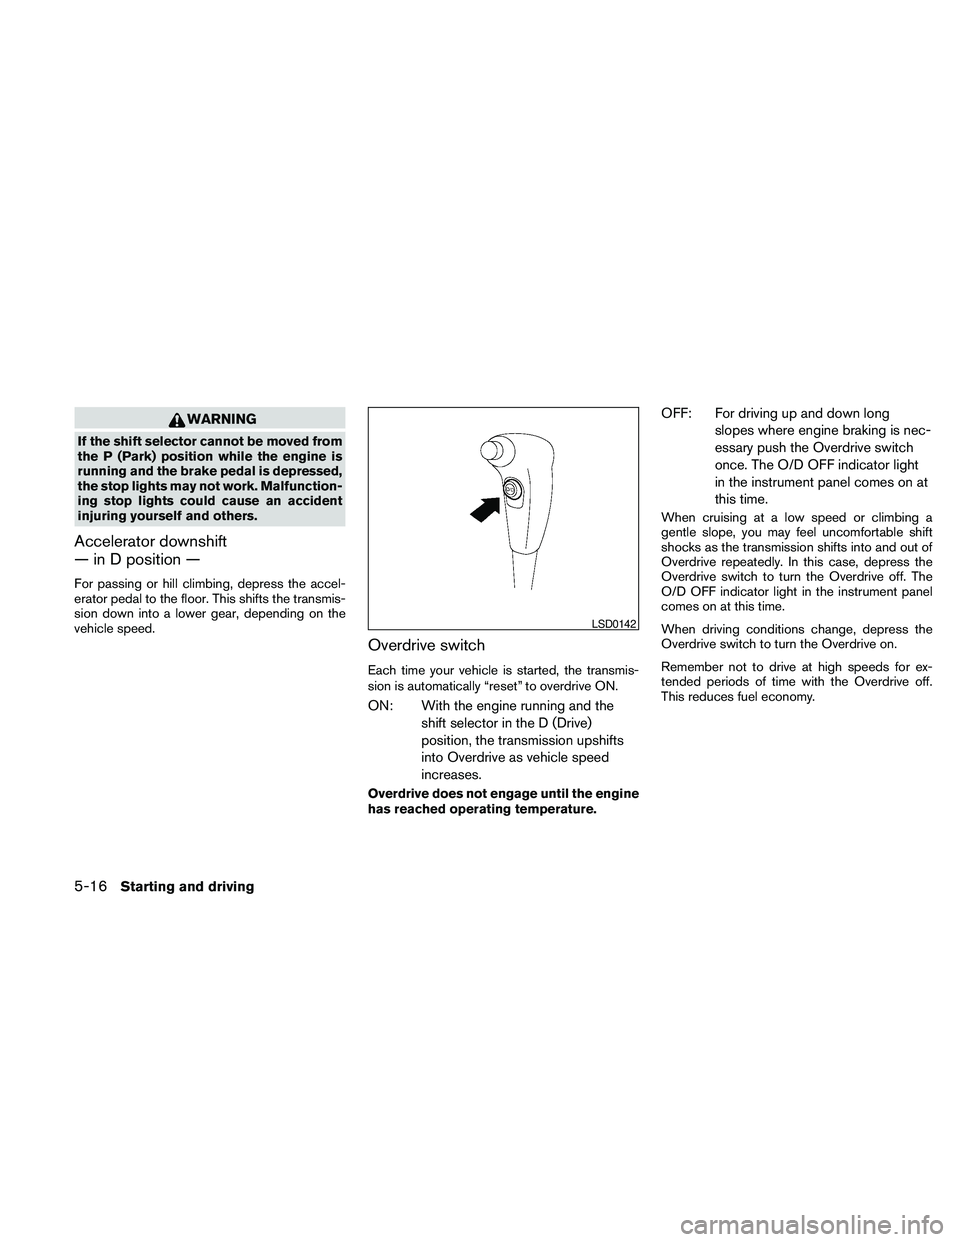
ON: With the engine running and the
shift selector in the D (Drive)
position, the transmission upshifts
into Overdrive as vehicle speed
increases.
Overdrive does not engage until the engine
has reached operating temperature.
OFF: For driving up and down long
slopes where engine braking is nec-
essary push the Overdrive switch
once. The O/D OFF indicator light
in the instrument panel comes on at
this time.
When cruising at a low speed or climbing a
gentle slope, you may feel uncomfortable shift
shocks as the transmission shifts into and out of
Overdrive repeatedly. In this case, depress the
Overdrive switch to turn the Overdrive off. The
O/D OFF indicator light in the instrument panel
comes on at this time.
When driving conditions change, depress the
Overdrive switch to turn the Overdrive on.
Remember not to drive at high speeds for ex-
tended periods of time with the Overdrive off.
This reduces fuel economy.
LSD0142
5-16Starting and driving
Page 238 of 373

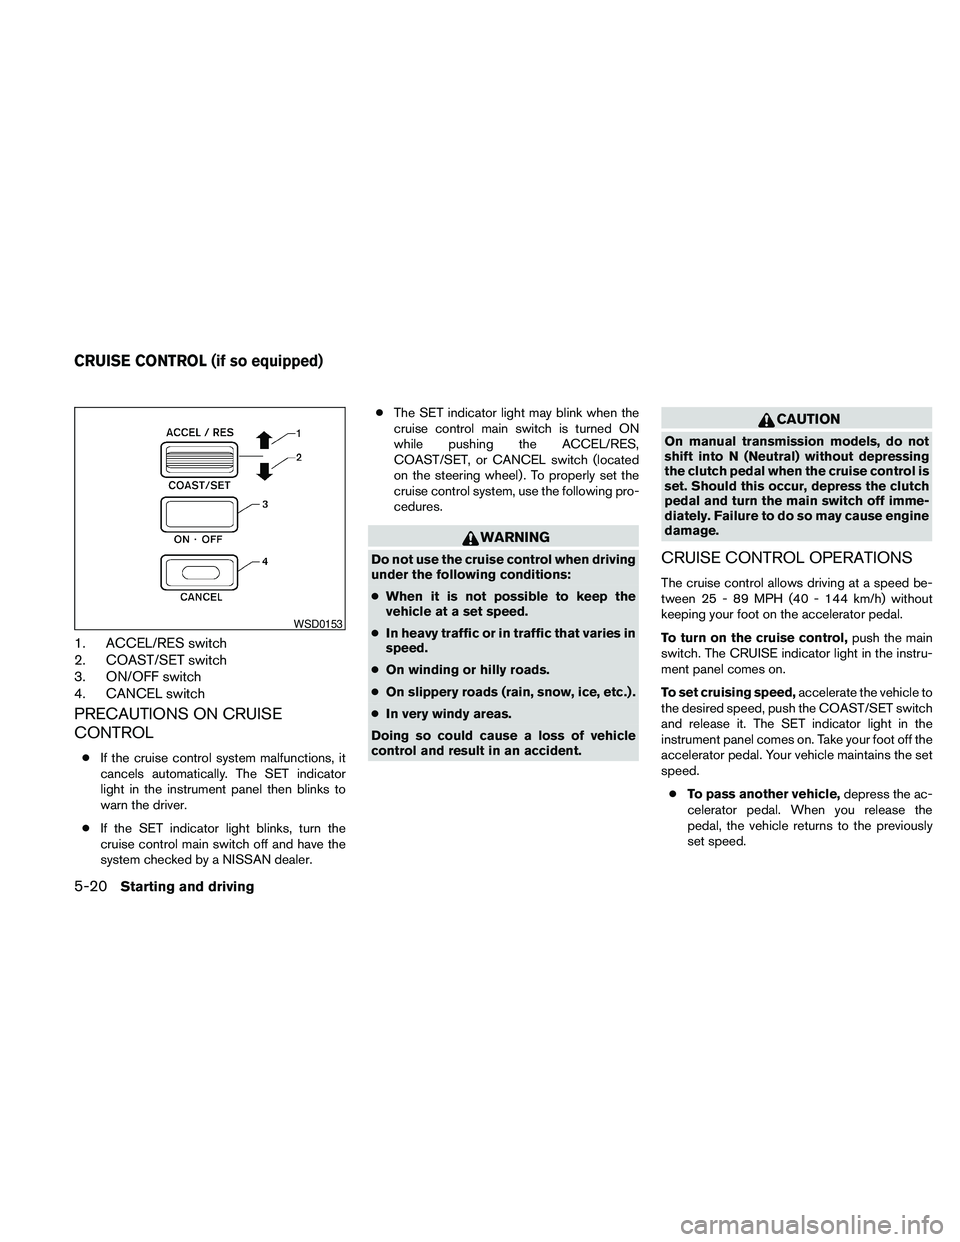
1. ACCEL/RES switch
2. COAST/SET switch
3. ON/OFF switch
4. CANCEL switch
PRECAUTIONS ON CRUISE
CONTROL
cIf the cruise control system malfunctions, it
cancels automatically. The SET indicator
light in the instrument panel then blinks to
warn the driver.
cIf the SET indicator light blinks, turn the
cruise control main switch off and have the
system checked by a NISSAN dealer.cThe SET indicator light may blink when the
cruise control main switch is turned ON
while pushing the ACCEL/RES,
COAST/SET, or CANCEL switch (located
on the steering wheel) . To properly set the
cruise control system, use the following pro-
cedures.
WARNING
Do not use the cruise control when driving
under the following conditions:
cWhen it is not possible to keep the
vehicle at a set speed.
cIn heavy traffic or in traffic that varies in
speed.
cOn winding or hilly roads.
cOn slippery roads (rain, snow, ice, etc.) .
cIn very windy areas.
Doing so could cause a loss of vehicle
control and result in an accident.
CAUTION
On manual transmission models, do not
shift into N (Neutral) without depressing
the clutch pedal when the cruise control is
set. Should this occur, depress the clutch
pedal and turn the main switch off imme-
diately. Failure to do so may cause engine
damage.
CRUISE CONTROL OPERATIONS
The cruise control allows driving at a speed be-
tween 25 - 89 MPH (40 - 144 km/h) without
keeping your foot on the accelerator pedal.
To turn on the cruise control,push the main
switch. The CRUISE indicator light in the instru-
ment panel comes on.
To set cruising speed,accelerate the vehicle to
the desired speed, push the COAST/SET switch
and release it. The SET indicator light in the
instrument panel comes on. Take your foot off the
accelerator pedal. Your vehicle maintains the set
speed.
cTo pass another vehicle,depress the ac-
celerator pedal. When you release the
pedal, the vehicle returns to the previously
set speed.
WSD0153
CRUISE CONTROL (if so equipped)
5-20Starting and driving
Page 239 of 373

cThe vehicle may not maintain the set speed
when going up or down steep hills. If this
happens, drive without the cruise control.
To cancel the preset speed,use one of the
following three methods.
cPush the CANCEL button; the SET indicator
light in the instrument panel goes out.
cTap the brake pedal; the SET indicator light
goes out.
cTurn the main switch off. Both the CRUISE
indicator light and SET indicator light in the
instrument panel go out.
The cruise control is automatically canceled and
the SET light in the instrument panel goes out if:
cyou depress the brake or clutch pedal while
pushing the ACCEL/RES or COAST/SET
switch. The preset speed is deleted from
memory.
cthe vehicle slows down more than 8 MPH
(13 km/h) below the set speed.
cyou depress the clutch pedal (manual trans-
mission) , or move the shift selector to N
(Neutral) (automatic transmission) .To reset at a faster cruising speed,use one
of the following three methods.
cDepress the accelerator pedal. When the
vehicle attains the desired speed, push and
release the COAST/SET switch.
cPush and hold the ACCEL/RES switch.
When the vehicle attains the speed you de-
sire, release the switch.
cPush and release the ACCEL/RES switch.
Each time you do this, the set speed in-
creases by about 1 MPH (1.6 km/h) .
To reset at a slower cruising speed,use one
of the following three methods.
cLightly tap the brake pedal. When the ve-
hicle attains the desired speed, push the
COAST/SET switch and release it.
cPush and hold the COAST/SET switch. Re-
lease the switch when the vehicle slows to
the desired speed.
cPush and release the COAST/SET switch.
Each time you do this, the set speed de-
creases by about 1 MPH (1.6 km/h) .
To resume the preset speed,push and re-
lease the ACCEL/RES switch. The vehicle re-
turns to the last set cruising speed when the
vehicle speed is over 25 MPH (40 km/h) .CAUTION
During the first 1,200 miles (2,000 km) ,
follow these recommendations to obtain
maximum engine performance and en-
sure the future reliability and economy of
your new vehicle. Failure to follow these
recommendations may result in short-
ened engine life and reduced engine
performance.
cAvoid driving for long periods at constant
speed, either fast or slow, and do not run the
engine over 4,000 rpm.
cDo not accelerate at full throttle in any gear.
cAvoid quick starts.
cAvoid hard braking as much as possible.
cDo not tow a trailer for the first 500 miles
(800 km) . Your engine, axle or other parts
could be damaged.
BREAK-IN SCHEDULE
Starting and driving5-21
Page 248 of 373

The E-Lock system can provide additional trac-
tion and should only be used when a vehicle has
become or is becoming stuck. This system oper-
ates by electronically “locking” the two rear drive
wheels together, allowing them to turn at the
same speed. The system is used when it is not
possible to free a stuck vehicle even when using
the 4LO position (4 wheel drive vehicles) .
When added traction is required, activate the
E-Lock system by pushing the switch ON. See
“Electronic locking rear differential (E-Lock) sys-
tem switch” in the “Instruments and Controls”
section. Once the system fully engages, the indi-
cator light in the instrument panel will remain ON.
When the system is activated, both rear wheels
will engage, providing added traction.
The rear wheels may momentarily slip or move to
engage the system, and the system will only
engage up to approximately 4 MPH (7 km/h) .
Once the vehicle is free, the system should be
turned OFF and driving resumed.
The Anti-Lock Brake (ABS) system is disabled
and the ABS light illuminates when the E-Lock
system is ON. Also, the Vehicle Dynamic Control
(VDC) system is disabled and the VDC light
illuminates when the E-Lock system is ON.WARNING
cNever leave the E-Lock system ON
when driving on paved or hard-surfaced
roads. Turning the vehicle may result in
the rear wheels slipping and result in an
accident and personal injury. After us-
ing the E-Lock system to free the ve-
hicle, turn the system OFF.
cUse the E-Lock system only when free-
ing a stuck vehicle. Try the 4LO position
before using the E-Lock system. Never
use the E-Lock system on a slippery
road surface such as snow or ice sur-
face. Using the E-Lock system when
driving in these road conditions may
cause unexpected movement of the ve-
hicle during engine braking, accelerat-
ing or turning, which may result in an
accident and serious personal injury.
CAUTION
cAfter using the E-Lock system, turn the
switch OFF to prevent possible damage
to driveline components from extended
use.
cDo not drive the vehicle at speeds faster
than 12 mph (20 km/h) when the system
is engaged. Doing so could damage
drivetrain components.
cDo not turn on the E-lock system while
the tires are spinning. Doing so could
damage drivetrain components.
ELECTRONIC LOCKING REAR
DIFFERENTIAL (E-Lock) SYSTEM (if
so equipped)
5-30Starting and driving
Page 251 of 373

This procedure is described in the vehicle service
manual and can be performed by a NISSAN
dealer.
ANTI-LOCK BRAKING SYSTEM
(ABS)
WARNING
cThe Anti-lock Braking System (ABS) is a
sophisticated device, but it cannot pre-
vent accidents resulting from careless
or dangerous driving techniques. It can
help maintain vehicle control during
braking on slippery surfaces. Remem-
ber that stopping distances on slippery
surfaces will be longer than on normal
surfaces even with ABS. Stopping dis-
tances may also be longer on rough,
gravel or snow covered roads, or if you
are using tire chains. Always maintain a
safe distance from the vehicle in front
of you. Ultimately, the driver is respon-
sible for safety.
cTire type and condition may also affect
braking effectiveness.
– When replacing tires, install the
specified size of tires on all four
wheels.– When installing a spare tire, make
sure that it is the proper size and type
as specified on the Tire and Loading
Information label. See “Tire and
Loading Information label” in the
“Technical and consumer informa-
tion” section of this manual.
– For detailed information, see
“Wheels and tires” in the “Mainte-
nance and do-it-yourself” section of
this manual.
The Anti-lock Braking System (ABS) controls the
brakes so the wheels do not lock during hard
braking or when braking on slippery surfaces.
The system detects the rotation speed at each
wheel and varies the brake fluid pressure to pre-
vent each wheel from locking and sliding. By
preventing each wheel from locking, the system
helps the driver maintain steering control and
helps to minimize swerving and spinning on slip-
pery surfaces.
Using the system
Depress the brake pedal and hold it down. De-
press the brake pedal with firm steady pressure,
but do not pump the brakes. The ABS will oper-
ate to prevent the wheels from locking up. Steer
the vehicle to avoid obstacles.
WARNING
Do not pump the brake pedal. Doing so
may result in increased stopping
distances.
Self-test feature
The ABS includes electronic sensors, electric
pumps, hydraulic solenoids and a computer. The
computer has a built-in diagnostic feature that
tests the system each time you start the engine
and move the vehicle at a low speed in forward or
reverse. When the self-test occurs, you may hear
a “clunk” noise and/or feel a pulsation in the brake
pedal. This is normal and does not indicate a
malfunction. If the computer senses a malfunc-
tion, it switches the ABS off and illuminates the
ABS warning light on the instrument panel. The
brake system then operates normally, but without
anti-lock assistance.
If the ABS warning light illuminates during the
self-test or while driving, have the vehicle
checked by a NISSAN dealer.
Normal operation
The ABS operates at speeds above3-6MPH(5
- 10 km/h) . The speed varies according to road
conditions.
Starting and driving5-33
Page 252 of 373

When the ABS senses that 1 or more wheels are
close to locking up, the actuator rapidly applies
and releases hydraulic pressure. This action is
similar to pumping the brakes very quickly. You
may feel a pulsation in the brake pedal and hear a
noise from under the hood or feel a vibration from
the actuator when it is operating. This is normal
and indicates that the ABS is operating properly.
However, the pulsation may indicate that road
conditions are hazardous and extra care is re-
quired while driving.cABLS is a form of traction control using
sensors from the Anti-lock Brake System
(ABS) to transfer power from a slipping drive
wheel to a wheel with more traction. The
ABLS system applies braking to the slipping
wheel, which helps redirect power to an-
other wheel.
cOn 4WD models the ABLS system operates
in both 4H and 4LO modes. If 4WD mode is
engaged, the ABLS system will operate for
both drive axles. On 2WD vehicles, the
ABLS system operates on the drive axle
only.
cThe ABLS system is always ON unless the
system detects brake pad overheating. If
high brake pad temperature is detected, it
will turn OFF, but normal brake function will
continue. ABLS will function even when the
VDC system (if so equipped) is turned OFF.
WARNING
The ABLS system provides increased trac-
tion, but will not prevent accidents due to
abrupt steering operation or by careless
driving or dangerous driving practices.
Reduce vehicle speed and be especially
careful when driving and cornering on
slippery surfaces, and always drive
carefully.The Vehicle Dynamic Control (VDC) system uses
various sensors to monitor driver inputs and ve-
hicle motion. Under certain driving situations, the
system will control braking and engine output to
help keep the vehicle on its steered path.
cWhen the Vehicle Dynamic Control (VDC)
system is operating, the SLIP indicator in the
instrument panel blinks.
cIf the 4WD transfer case is shifted into 4LO
the
indicator light will come on and
the VDC system will be turned off. See
“Transfer case shifting procedures” earlier in
this section.
cIf the SLIP indicator blinks, the road condi-
tions may be slippery. Be sure to adjust your
speed and driving to these conditions. See
“Slip indicator light”, and “Vehicle Dynamic
Control (VDC) off indicator light” in the “In-
struments and controls” section.
If the battery is removed or discharged, the trac-
tion control system may be disabled and the
SLIPand
indicator lights will not turn off
after 2 seconds when the ignition switch is turned
to the ON position. Perform the following proce-
dure to reset the system:
cStart the engine and set the steering wheel
in the straight forward position.
ACTIVE BRAKE LIMITED SLIP (ABLS)
SYSTEM (if so equipped)VEHICLE DYNAMIC CONTROL (VDC)
SYSTEM (if so equipped)
5-34Starting and driving
Page 253 of 373

cDrive the vehicle at speeds above 10 mph
(15 km/h) for at least 10 minutes.
cThe VDC OFF indicator light should go off
indicating the traction control system is op-
erational.
cIf you interrupt the reset procedure by turn-
ing the ignition off, you will need to restart
the reset procedure.
If after driving the vehicle for more than 10 min-
utes and theSLIPand
lights remain illumi-
nated in the instrument panel, have the Vehicle
Dynamic Control system checked by a NISSAN
dealer.
If the vehicle is operated with the Vehicle Dy-
namic Control system off using the VDC OFF
switch, most VDC and Traction Control System
(TCS) functions will be turned off. TheSLIP
indicator will flash if wheel spin is detected. The
ABS will still operate with the VDC system off.
When the VDC system is operating, you may feel
a pulsation in the brake pedal and hear a noise or
vibration from under the hood. This is not a mal-
function and indicates that the VDC system is
working properly.The computer has a built in diagnostic feature
that tests the system each time you start the
engine and move the vehicle forward or in reverse
at a slow speed. When the self-test occurs, you
may hear a clunk noise and/or feel a pulsation in
the brake pedal. This is normal and is not an
indication of a malfunction.
WARNING
cThe Vehicle Dynamic Control system is
designed to help improve driving stabil-
ity but does not prevent accidents due
to abrupt steering operation at high
speeds or by careless or dangerous
driving techniques. Reduce vehicle
speed and be especially careful when
driving and cornering on slippery sur-
faces and always drive carefully.
cDo not modify the vehicle’s suspension.
If suspension parts such as shock ab-
sorbers, struts, springs, stabilizer bars,
bushings and wheels are not NISSAN
approved for your vehicle or are ex-
tremely deteriorated the Vehicle Dy-
namic Control system may not operate
properly. This could adversely affect ve-
hicle handling performance, and the
VDC OFF indicator light may come on.cIf brake related parts such as brake
pads, rotors and calipers are not stan-
dard equipment or are extremely dete-
riorated, the Vehicle Dynamic Control
system may not operate properly and
the Vehicle Dynamic Control OFF indi-
cator light may come on.
cIf engine related parts such as muffler
are not standard equipment or are ex-
tremely deteriorated, the “VDC OFF” in-
dicator or “SLIP” indicator or both indi-
cator lights may illuminate.
cWhen driving on extremely inclined sur-
faces such as higher banked corners,
the Vehicle Dynamic Control system
may not operate properly and the VDC
OFF indicator light may come on. Do
not drive on these types of roads.
cWhen driving on an unstable surface
such as a turntable, ferry, elevator or
ramp, the Vehicle Dynamic Control off
indicator light may illuminate. This is
not a malfunction. Restart the engine
after driving onto a stable surface.
Starting and driving5-35