2010 NISSAN CUBE check engine
[x] Cancel search: check enginePage 260 of 329
Black plate (264,1)
Model "Z12-D" EDITED: 2009/ 9/ 17
Your new NISSAN has been designed to have
minimum maintenance requirements with long
service intervals to save you both time and
money. However, some day-to-day and regular
maintenance is essential to maintain your
NISSAN’s fine mechanical condition, as well
as its emission and engine performance.
It is the owner’s responsibility to make sure that
the scheduled maintenance, as well as general
maintenance, is performed.
As the vehicle owner, you are the only one who
can ensure that your vehicle receives the proper
maintenance care. You are a vital link in the
maintenance chain.SCHEDULED MAINTENANCEFor your convenience, both required and op-
tional scheduled maintenance items are de-
scribed and listed in your “NISSAN Service and
Maintenance Guide”. You must refer to that
guide to ensure that necessary maintenance is
performed on your NISSAN at regular intervals.GENERAL MAINTENANCEGeneral maintenance includes those items
which should be checked during normal day-
to-day operation. They are essential for proper
vehicle operation. It is your responsibility to
perform these procedures regularly as pre-
scribed.Performing general maintenance checks re-
quires minimal mechanical skill and only a few
general automotive tools.
These checks or inspections can be done by
yourself, a qualified technician or, if you prefer, a
NISSAN dealer.
WHERE TO GO FOR SERVICEIf maintenance service is required or your vehicle
appears to malfunction, have the systems
checked and serviced by a NISSAN dealer.
NISSAN technicians are well-trained specialists
and are kept up-to-date with the latest service
information through technical bulletins, service
tips, and in-dealership information systems.
They are completely qualified to work on
NISSAN vehicles
beforework begins.
You can be confident that a NISSAN dealer’s
service department performs the best job to
meet the maintenance requirements on your
vehicle — in a reliable and economical way. During the normal day-to-day operation of the
vehicle, general maintenance should be per-
formed regularly as prescribed in this section. If
you detect any unusual sounds, vibrations or
smell, be sure to check for the cause or have a
NISSAN dealer do it promptly. In addition, you
should notify a NISSAN dealer if you think that
repairs are required.
When performing any checks or maintenance
work, see “MAINTENANCE PRECAUTIONS”
later in this section.
EXPLANATION OF MAINTENANCE
ITEMSAdditional information on the following
items with “*” is found later in this section.Outside the vehicleThe maintenance items listed here should be
performed from time to time, unless otherwise
specified.
Doors and engine hood:
Check that all doors
and the engine hood operate properly. Also
ensure that all latches lock securely. Lubricate
hinges, latches, latch pins, rollers and links if
necessary. Make sure that the secondary latch
keeps the hood from opening when the primary
latch is released.
When driving in areas using road salt or other
corrosive materials, check lubrication frequently.
MAINTENANCE REQUIREMENT GENERAL MAINTENANCE8-2
Maintenance and do-it-yourself
Page 262 of 329
Black plate (266,1)
Model "Z12-D" EDITED: 2009/ 9/ 17
Windshield defroster:Check that the air
comes out of the defroster outlets properly and
in sufficient quantity when operating the heater
or air conditioner.
Windshield wiper and washer*: Check that
the wipers and washers operate properly and
that the wipers do not streak.Under the hood and vehicleThe maintenance items listed here should be
checked periodically (for example, each time you
check the engine oil or refuel) .
Battery*: Check the fluid level in each cell.
It should be between the MAX and MIN lines.
Vehicles operated in high temperatures or under
severe condition require frequent checks of the
battery fluid level.
Brake and clutch fluid level*: Make sure that
the brake and clutch fluid level is between the
MAX and MIN lines on the reservoir.
Engine coolant level*: Check the coolant level
when the engine is cold.
Engine drive belt*: Make sure that the drive
belt is not frayed, worn, cracked or oily.
Engine oil level*: Check the level after parking
the vehicle on a level surface and turning off the
engine. Wait more than 10 minutes for the oil to
drain back into the oil pan. Exhaust system:
Make sure there are no loose
supports, cracks or holes. If the sound of the
exhaust seems unusual or there is a smell of
exhaust fumes, immediately have the exhaust
system inspected by a NISSAN dealer. (See
“PRECAUTIONS WHEN STARTING AND
DRIVING” in the “5. St arting and driving”
section for exhaust gas (carbon monoxide) .)
Fluid leaks: Check under the vehicle for fuel,
oil, water or other fluid leaks after the vehicle has
been parked for a while. Water dripping from the
air conditioner after use is normal. If you should
notice any leaks or if gasoline fumes are evident,
check for the cause and have it corrected
immediately.
Radiator and hoses: Check the front of the
radiator and clean off any dirt, insects, leaves,
etc., that may have accumulated. Make sure the
hoses have no cracks, deformation, rot or loose
connections.
Underbody: The underbody is frequently ex-
posed to corrosive substances such as those
used on icy roads or to control dust. It is very
important to remove these substances, other-
wise rust will form on the floor pan, frame, fuel
lines and around the exhaust system. At the end
of winter, the underbody should be thoroughly
flushed with plain water, being careful to clean
those areas where mud and dirt may accumu-
late. For additional information, see “CLEANING
EXTERIOR” in the “7. Appearance and care” section.
Windshield washer fluid*:
Check that there is
adequate fluid in the reservoir.8-4
Maintenance and do-it-yourself
Page 264 of 329
Black plate (268,1)
Model "Z12-D" EDITED: 2009/ 9/ 17
difficulties or excessive emissions, and could
affect your warranty coverage.If in doubt
about any servicing, we recommend that
it be done by a NISSAN dealer.
SSI0564
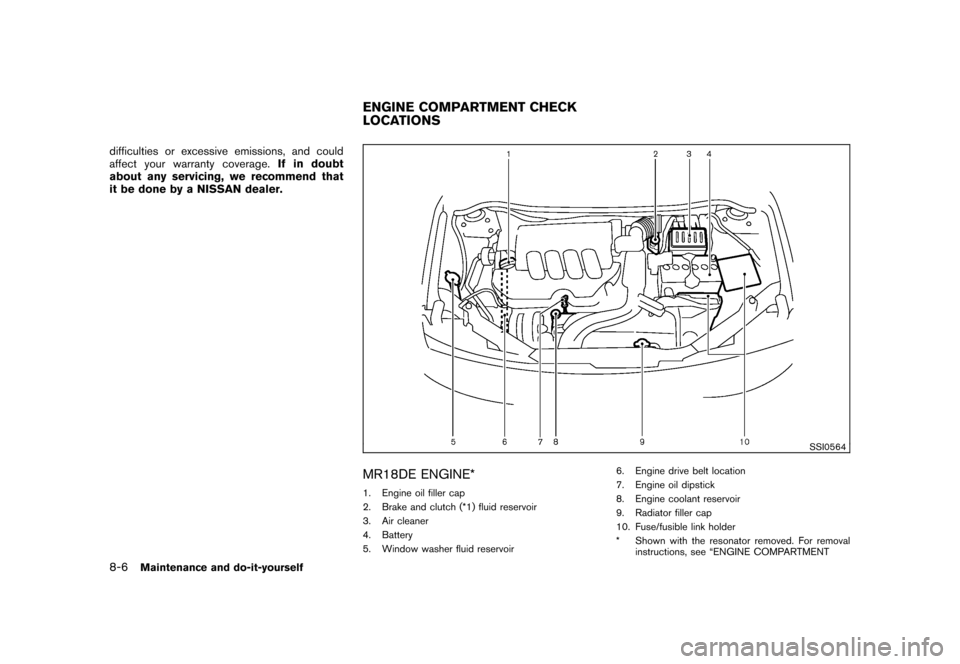
MR18DE ENGINE*1. Engine oil filler cap
2. Brake and clutch (*1) fluid reservoir
3. Air cleaner
4. Battery
5. Window washer fluid reservoir 6. Engine drive belt location
7. Engine oil dipstick
8. Engine coolant reservoir
9. Radiator filler cap
10. Fuse/fusible link holder
* Shown with the resonator removed. For removal
instructions, see “ENGINE COMPARTMENTENGINE COMPARTMENT CHECK
LOCATIONS
8-6
Maintenance and do-it-yourself
Page 265 of 329
Black plate (269,1)
Model "Z12-D" EDITED: 2009/ 9/ 17
CHECK LOCATIONS” in the “8. Maintenance and
do-it-yourself” section.
*1: for Manual Transmission (MT) models
SDI2394
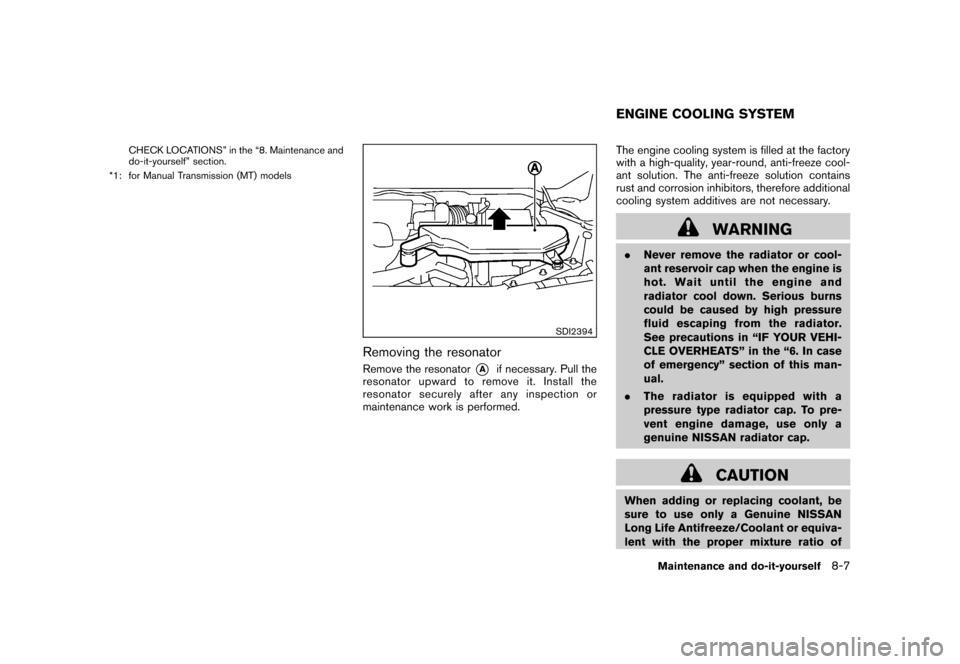
Removing the resonatorRemove the resonator
*A
if necessary. Pull the
resonator upward to remove it. Install the
resonator securely after any inspection or
maintenance work is performed. The engine cooling system is filled at the factory
with a high-quality, year-round, anti-freeze cool-
ant solution. The anti-freeze solution contains
rust and corrosion inhibitors, therefore additional
cooling system additives are not necessary.
WARNING
.
Never remove the radiator or cool-
ant reservoir cap when the engine is
hot. Wait until the engine and
radiator cool down. Serious burns
could be caused by high pressure
fluid escaping from the radiator.
See precautions in “IF YOUR VEHI-
CLE OVERHEATS” in the “6. In case
of emergency” section of this man-
ual.
. The radiator is equipped with a
pressure type radiator cap. To pre-
vent engine damage, use only a
genuine NISSAN radiator cap.
CAUTION
When adding or replacing coolant, be
sure to use only a Genuine NISSAN
Long Life Antifreeze/Coolant or equiva-
lent with the proper mixture ratio ofENGINE COOLING SYSTEM
Maintenance and do-it-yourself
8-7
Page 266 of 329
Black plate (270,1)
Model "Z12-D" EDITED: 2009/ 9/ 17
50% anti-freeze and 50% demineralized
or distilled water. The use of other
types of coolant solutions may damage
the engine cooling system.
Outside
temperature down to Anti-freezeDeminera-
lized water
or distilled water
8 F 8C
� 29.2 �34 50%
50%
SDI2385
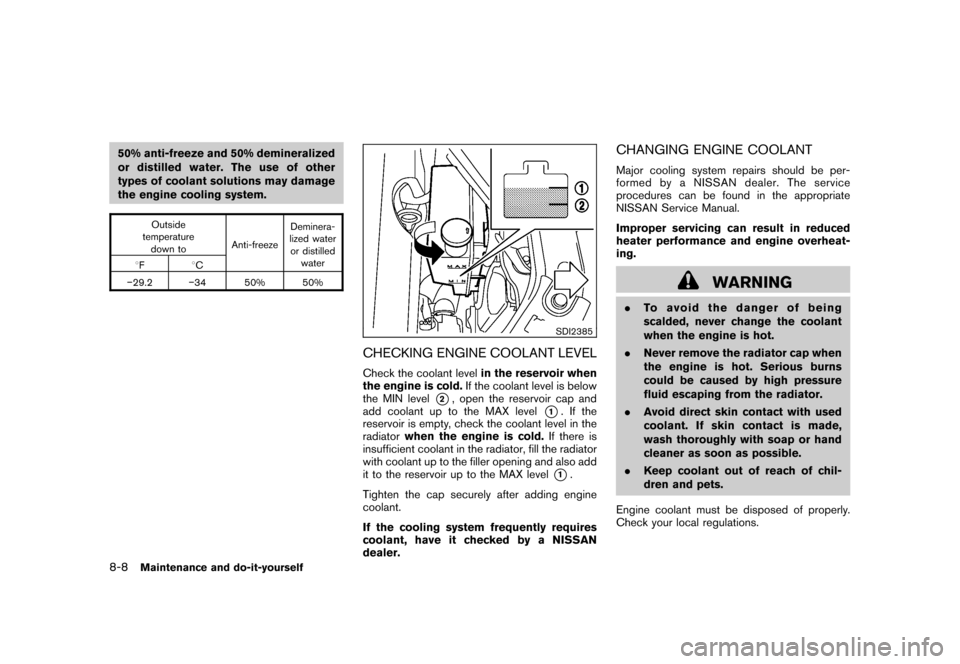
CHECKING ENGINE COOLANT LEVELCheck the coolant levelin the reservoir when
the engine is cold. If the coolant level is below
the MIN level
*2, open the reservoir cap and
add coolant up to the MAX level
*1. If the
reservoir is empty, check the coolant level in the
radiator when the engine is cold. If there is
insufficient coolant in the radiator, fill the radiator
with coolant up to the filler opening and also add
it to the reservoir up to the MAX level*1.
Tighten the cap securely after adding engine
coolant.
If the cooling system frequently requires
coolant, have it checked by a NISSAN
dealer.
CHANGING ENGINE COOLANTMajor cooling system repairs should be per-
formed by a NISSAN dealer. The service
procedures can be found in the appropriate
NISSAN Service Manual.
Improper servicing can result in reduced
heater performance and engine overheat-
ing.
WARNING
. To avoid the danger of being
scalded, never change the coolant
when the engine is hot.
. Never remove the radiator cap when
the engine is hot. Serious burns
could be caused by high pressure
fluid escaping from the radiator.
. Avoid direct skin contact with used
coolant. If skin contact is made,
wash thoroughly with soap or hand
cleaner as soon as possible.
. Keep coolant out of reach of chil-
dren and pets.
Engine coolant must be disposed of properly.
Check your local regulations.
8-8
Maintenance and do-it-yourself
Page 267 of 329
Black plate (271,1)
Model "Z12-D" EDITED: 2009/ 9/ 17
SDI2386
CHECKING ENGINE OIL LEVEL1. Park the vehicle on a level surface and applythe parking brake.
2. Run the engine until it reaches operating temperature.
3. Turn off the engine. Wait more than 10
minutes for the oil to drain back into
the oil pan.
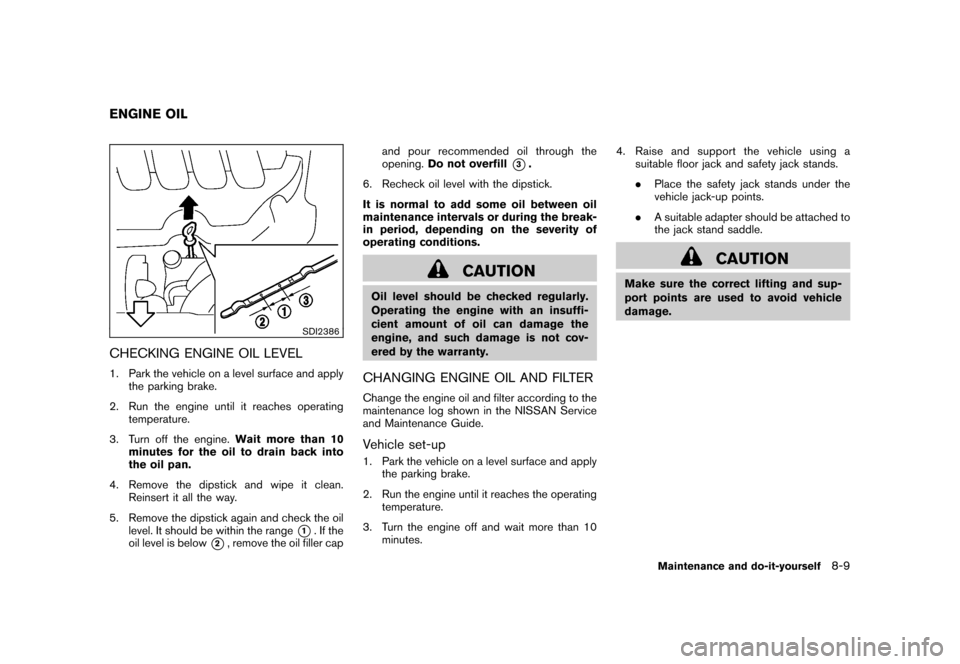
4. Remove the dipstick and wipe it clean. Reinsert it all the way.
5. Remove the dipstick again and check the oil level. It should be within the range
*1. If the
oil level is below
*2, remove the oil filler cap and pour recommended oil through the
opening.
Do not overfill
*3.
6. Recheck oil level with the dipstick.
It is normal to add some oil between oil
maintenance intervals or during the break-
in period, depending on the severity of
operating conditions.
CAUTION
Oil level should be checked regularly.
Operating the engine with an insuffi-
cient amount of oil can damage the
engine, and such damage is not cov-
ered by the warranty.CHANGING ENGINE OIL AND FILTERChange the engine oil and filter according to the
maintenance log shown in the NISSAN Service
and Maintenance Guide.Vehicle set-up1. Park the vehicle on a level surface and apply the parking brake.
2. Run the engine until it reaches the operating temperature.
3. Turn the engine off and wait more than 10 minutes. 4. Raise and support the vehicle using a
suitable floor jack and safety jack stands.
.Place the safety jack stands under the
vehicle jack-up points.
. A suitable adapter should be attached to
the jack stand saddle.
CAUTION
Make sure the correct lifting and sup-
port points are used to avoid vehicle
damage.
ENGINE OIL
Maintenance and do-it-yourself
8-9
Page 268 of 329
Black plate (272,1)
Model "Z12-D" EDITED: 2009/ 9/ 17
SDI1978
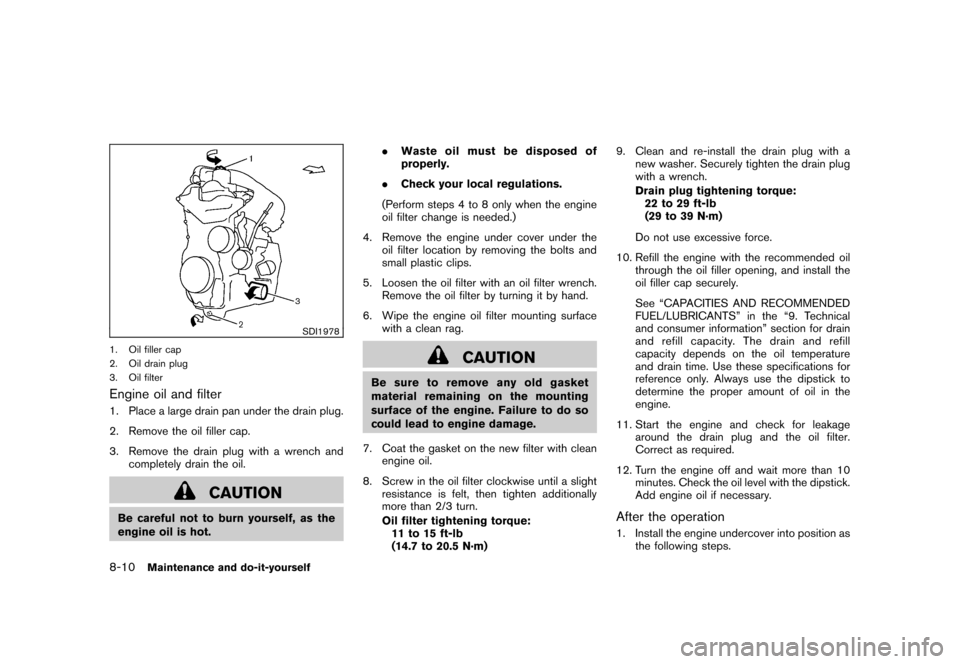
1. Oil filler cap
2. Oil drain plug
3. Oil filterEngine oil and filter1. Place a large drain pan under the drain plug.
2. Remove the oil filler cap.
3. Remove the drain plug with a wrench andcompletely drain the oil.
CAUTION
Be careful not to burn yourself, as the
engine oil is hot. .
Waste oil must be disposed of
properly.
. Check your local regulations.
(Perform steps 4 to 8 only when the engine
oil filter change is needed.)
4. Remove the engine under cover under the oil filter location by removing the bolts and
small plastic clips.
5. Loosen the oil filter with an oil filter wrench. Remove the oil filter by turning it by hand.
6. Wipe the engine oil filter mounting surface with a clean rag.
CAUTION
Be sure to remove any old gasket
material remaining on the mounting
surface of the engine. Failure to do so
could lead to engine damage.
7. Coat the gasket on the new filter with clean engine oil.
8. Screw in the oil filter clockwise until a slight resistance is felt, then tighten additionally
more than 2/3 turn.
Oil filter tightening torque:11 to 15 ft-lb
(14.7 to 20.5 N·m) 9. Clean and re-install the drain plug with a
new washer. Securely tighten the drain plug
with a wrench.
Drain plug tightening torque:22 to 29 ft-lb
(29 to 39 N·m)
Do not use excessive force.
10. Refill the engine with the recommended oil through the oil filler opening, and install the
oil filler cap securely.
See “CAPACITIES AND RECOMMENDED
FUEL/LUBRICANTS” in the “9. Technical
and consumer information” section for drain
and refill capacity. The drain and refill
capacity depends on the oil temperature
and drain time. Use these specifications for
reference only. Always use the dipstick to
determine the proper amount of oil in the
engine.
11. Start the engine and check for leakage around the drain plug and the oil filter.
Correct as required.
12. Turn the engine off and wait more than 10 minutes. Check the oil level with the dipstick.
Add engine oil if necessary.
After the operation1. Install the engine undercover into position asthe following steps.
8-10
Maintenance and do-it-yourself
Page 269 of 329
Black plate (273,1)
Model "Z12-D" EDITED: 2009/ 9/ 17
a. Pull the center of the small plastic clipsout.
b. Hold the engine undercover into posi- tion.
c. Insert the clips through the undercover into the holes in the frame, then push the
center of the clips in to lock the clips in
place.
d. Install the bolts that hold the undercover in place. Be careful not to strip the bolts
or over-tighten them.
2. Lower the vehicle carefully to the ground.
3. Dispose of waste oil and filter properly.
WARNING
. Prolonged and repeated contact
with used engine oil may cause skin
cancer.
. Try to avoid direct skin contact with
used oil. If skin contact is made,
wash thoroughly with soap or hand
cleaner as soon as possible.
. Keep used engine oil out of reach of
children. When checking or replacement is required, we
recommend a NISSAN dealer for servicing.
CAUTION
.
Use only Genuine NISSAN CVT Fluid
NS-2. Do not mix with other fluids.
. Using transmission fluid other than
Genuine NISSAN CVT Fluid NS-2
will damage the CVT, which is not
covered by the NISSAN new vehicle
limited warranty. For additional brake and clutch fluid information,
see “CAPACITIES AND RECOMMENDED
FUEL/LUBRICANTS” in the “9. Technical and
consumer information” section of this manual.
WARNING
.
Use only new fluid from a sealed
container. Old, inferior or contami-
nated fluid may damage the brake
andclutchsystems.Theuseof
improper fluids can damage the
brake and clutch systems, and affect
the vehicle’s stopping ability.
. Clean the filler cap before removing.
. Brake and clutch fluid is poisonous
and should be stored carefully in
marked containers out of the reach
of children.
CAUTION
Do not spill the fluid on any painted
surfaces. This will damage the paint. If
fluid is spilled, immediately wash the
surface with water.
CONTINUOUSLY VARIABLE
TRANSMISSION (CVT) FLUID BRAKE AND CLUTCH FLUID
Maintenance and do-it-yourself
8-11