2010 NISSAN CUBE mirror
[x] Cancel search: mirrorPage 115 of 329
Black plate (10,1)
3 Pre-driving checks and adjustments
Model "Z12-D" EDITED: 2009/ 9/ 17
Keys ............................................................... 3-2NISSAN Vehicle Immobilizer System keys ............ 3-2
Intelligent Keys (if so equipped) ......................... 3-3
Doors .............................................................. 3-4
Locking with key ............................................ 3-4
Locking with inside lock knob ........................... 3-5
Locking with power door lock switch .................. 3-5
Automatic door locks ...................................... 3-5
Child safety rear door lock ............................... 3-6
Remote keyless entry system (if so equipped) ........... 3-6
How to use remote keyless entry system ............. 3-7
Intelligent Key system (if so equipped) .................. 3-10
Intelligent Key operating range ........................ 3-12
Door locks/unlocks precaution ........................ 3-12
Intelligent Key operation ................................. 3-13
Battery saver system ..................................... 3-14 Warning lights and audible reminders
............... 3-14
Troubleshooting guide ................................... 3-15
How to use remote keyless entry function .......... 3-17
Hood ............................................................ 3-21
Back door ...................................................... 3-22
Bumpers and side sill extensions (Kro ¯
m models) . .... 3-23
Fuel-filler door ................................................. 3-24
Opening the fuel-filler door ............................. 3-24
Fuel-filler cap .............................................. 3-24
Tilt steering column .......................................... 3-25
Tilt operation ............................................... 3-26
Sun visors ...................................................... 3-26
Mirrors ........................................................... 3-26
Inside mirror ................................................ 3-26
Outside mirrors ............................................ 3-27
Page 140 of 329
Black plate (142,1)
Model "Z12-D" EDITED: 2009/ 9/ 17
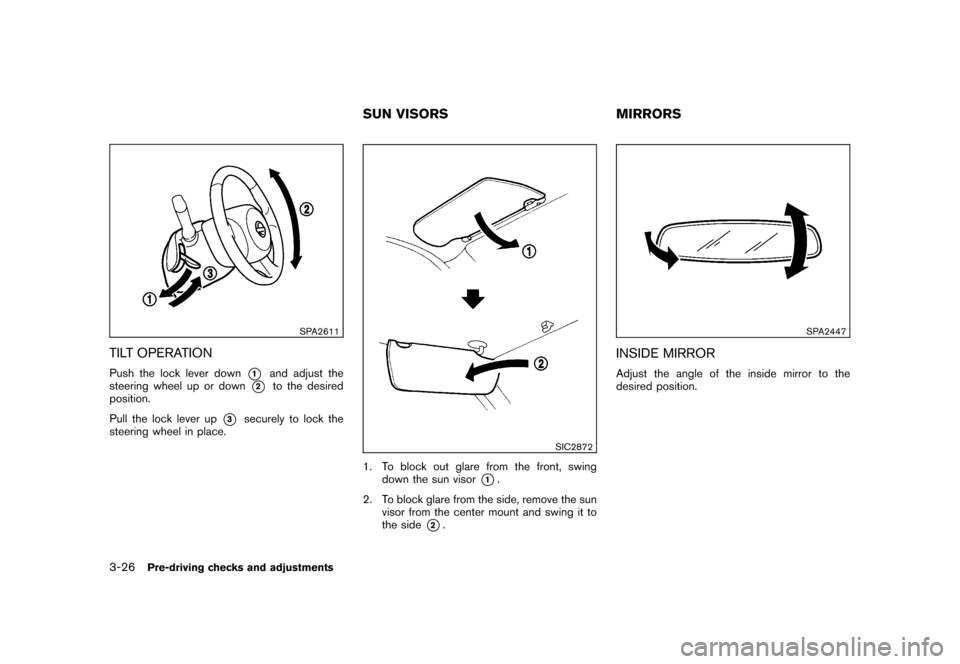
SPA2611
TILT OPERATIONPush the lock lever down
*1
and adjust the
steering wheel up or down
*2
to the desired
position.
Pull the lock lever up
*3
securely to lock the
steering wheel in place.
SIC2872
1. To block out glare from the front, swing down the sun visor
*1.
2. To block glare from the side, remove the sun visor from the center mount and swing it to
the side
*2.
SPA2447
INSIDE MIRRORAdjust the angle of the inside mirror to the
desired position.
SUN VISORS MIRRORS
3-26
Pre-driving checks and adjustments
Page 141 of 329
Black plate (143,1)
Model "Z12-D" EDITED: 2009/ 9/ 17
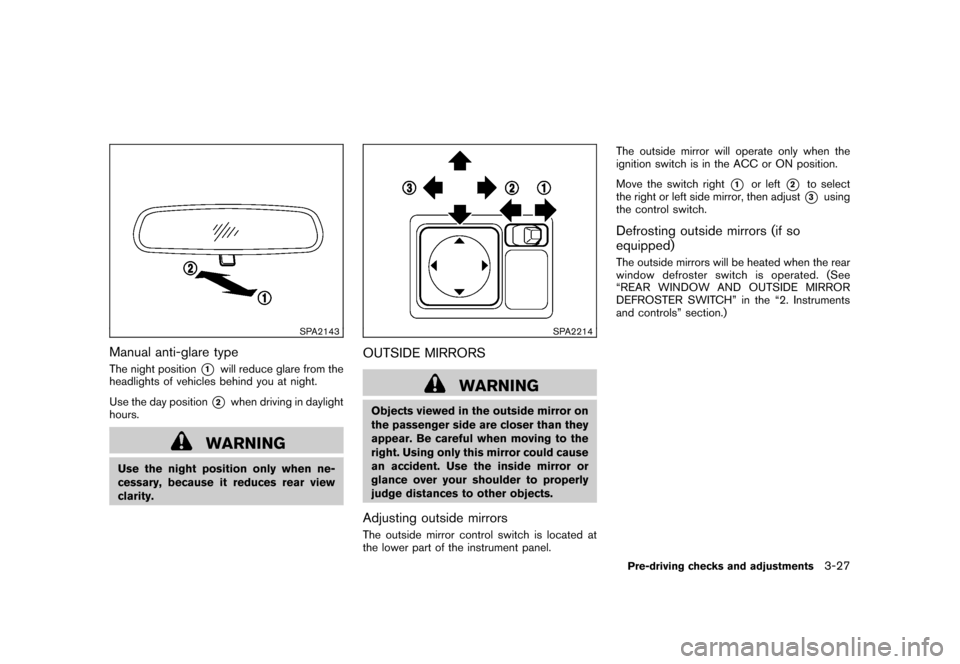
SPA2143
Manual anti-glare typeThe night position
*1
will reduce glare from the
headlights of vehicles behind you at night.
Use the day position*2
when driving in daylight
hours.
WARNING
Use the night position only when ne-
cessary, because it reduces rear view
clarity.
SPA2214
OUTSIDE MIRRORS
WARNING
Objects viewed in the outside mirror on
the passenger side are closer than they
appear. Be careful when moving to the
right. Using only this mirror could cause
an accident. Use the inside mirror or
glance over your shoulder to properly
judge distances to other objects.Adjusting outside mirrorsThe outside mirror control switch is located at
the lower part of the instrument panel. The outside mirror will operate only when the
ignition switch is in the ACC or ON position.
Move the switch right
*1
or left
*2
to select
the right or left side mirror, then adjust*3
using
the control switch.
Defrosting outside mirrors (if so
equipped)The outside mirrors will be heated when the rear
window defroster swi tch is operated. (See
“REAR WINDOW AND OUTSIDE MIRROR
DEFROSTER SWITCH” in the “2. Instruments
and controls” section.)Pre-driving checks and adjustments
3-27
Page 142 of 329
Black plate (144,1)
Model "Z12-D" EDITED: 2009/ 9/ 17
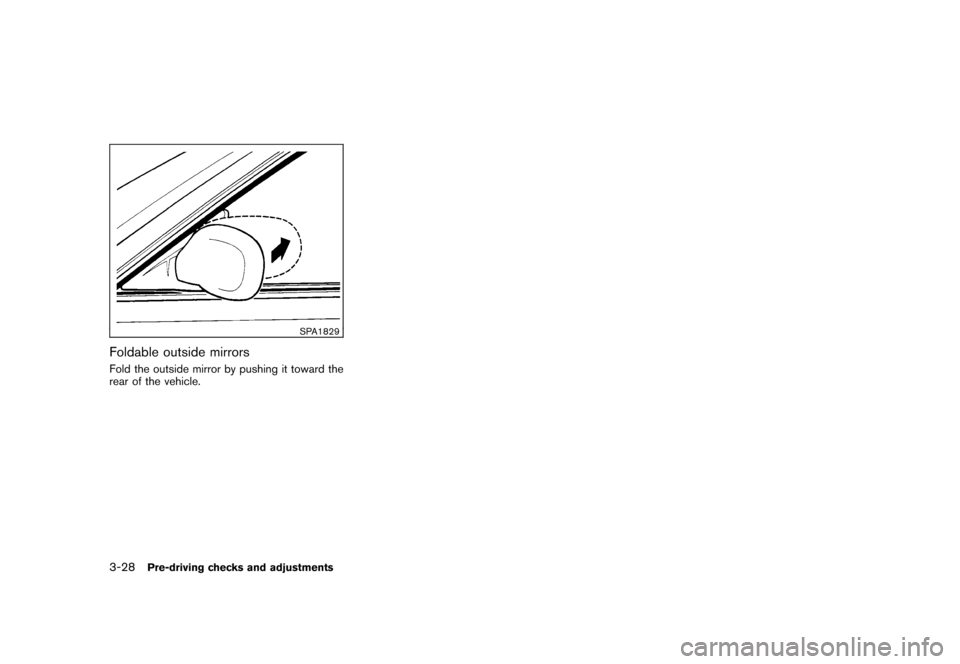
SPA1829
Foldable outside mirrorsFold the outside mirror by pushing it toward the
rear of the vehicle.3-28
Pre-driving checks and adjustments
Page 144 of 329
Black plate (148,1)
Model "Z12-D" EDITED: 2009/ 9/ 17
WARNING
.Do not disassemble or modify this
system. If you do, it may result in
accidents, fire, or electric shock.
. Do not use this system if you notice
any abnormality, such as a frozen
screen or lack of sound. Continued
use of the system may result in
accident, fire or electric shock.
. In case you notice any foreign
object in the system hardware, spill
liquid on it, or notice smoke or smell
coming from it, stop using the
system immediately and contact
your nearest NISSAN dealer. Ignor-
ing such conditions may lead to
accidents, fire, or electric shock.
Do not attempt to operate the system in
extreme temperature conditions [below
� 48F( �208 C) and above 158 8F(70 8C)].
Operating this system under these condi-
tions may result in system malfunctions. When the selector lever is shifted into the R
(Reverse) position, the monitor display shows
the view to the rear of the vehicle.
The system is designed as an aid to the driver in
detecting large stationary objects to help avoid
damaging the vehicle. The system will not detect
small objects below the bumper and may not
detect objects close to the bumper or on the
ground.
WARNING
.
The rear view camera is a conve-
nience but it is not a substitute for
proper backing up. Always turn and
check that it is safe to do so before
backing up. Always back up slowly.
. Objects viewed in the RearView
Monitor differ from actual distance
because a wide-angle lens is used.
Objects in the RearView Monitor
will appear visually opposite than
when viewed in the rear view and
outside mirrors.
. Make sure that the back door is
securely closed when backing up.
. Underneath the bumper and the
corner areas of the bumper cannot
be viewed on the RearView Monitor because of its monitoring range
limitation.
. Do not put anything on the rear view
camera.
. When washing the vehicle with
high-pressure water, be sure not to
spray it around the camera. Other-
wise, water may enter the camera
unit causing water condensation on
the lens, a malfunction, fire or an
electric shock.
. Do not strike the camera. It is a
precision instrument. Otherwise, it
may malfunction or cause damage
resulting in a fire or an electric
shock.
CAUTION
Do not scratch the camera lens when
cleaning dirt or snow from the lens.
SAFETY NOTE REARVIEW MONITOR (if so
equipped)4-2
Heater, air conditioner, audio and phone systems
Page 148 of 329
Black plate (152,1)
Model "Z12-D" EDITED: 2009/ 9/ 17
WARNING
.The air conditioner cooling function
operates only when the engine is
running.
. Do not leave children or adults who
would normally require the support
of others alone in your vehicle. Pets
should not be left alone either. On
hot, sunny days, temperatures in a
closed vehicle could quickly become
high enough to cause severe or
possibly fatal injuries to people or
animals.
. Do not use the recirculation mode
for long periods as it may cause the
interior air to become stale and the
windows to fog up.
Start the engine and operate the heater and the
air conditioner system.
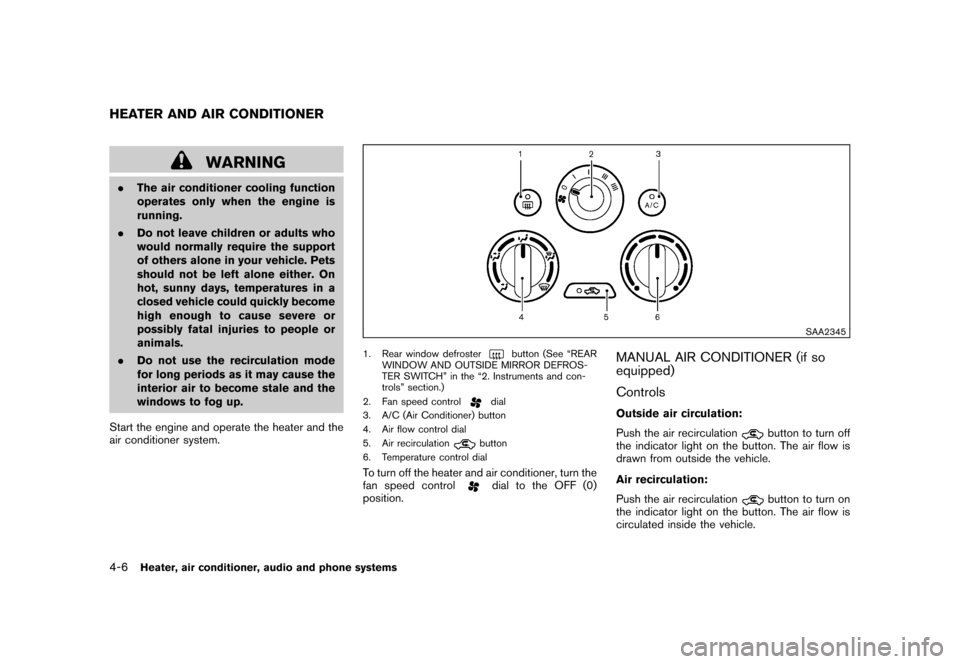
SAA2345
1. Rear window defroster
button (See “REAR
WINDOW AND OUTSIDE MIRROR DEFROS-
TER SWITCH” in the “2. Instruments and con-
trols” section.)
2. Fan speed control
dial
3. A/C (Air Conditioner) button
4. Air flow control dial
5. Air recirculationbutton
6. Temperature control dial
To turn off the heater and air conditioner, turn the
fan speed control
dial to the OFF (0)
position.
MANUAL AIR CONDITIONER (if so
equipped)
ControlsOutside air circulation:
Push the air recirculation
button to turn off
the indicator light on the button. The air flow is
drawn from outside the vehicle.
Air recirculation:
Push the air recirculationbutton to turn on
the indicator light on the button. The air flow is
circulated inside the vehicle.
HEATER AND AIR CONDITIONER4-6
Heater, air conditioner, audio and phone systems
Page 152 of 329
Black plate (156,1)
Model "Z12-D" EDITED: 2009/ 9/ 17
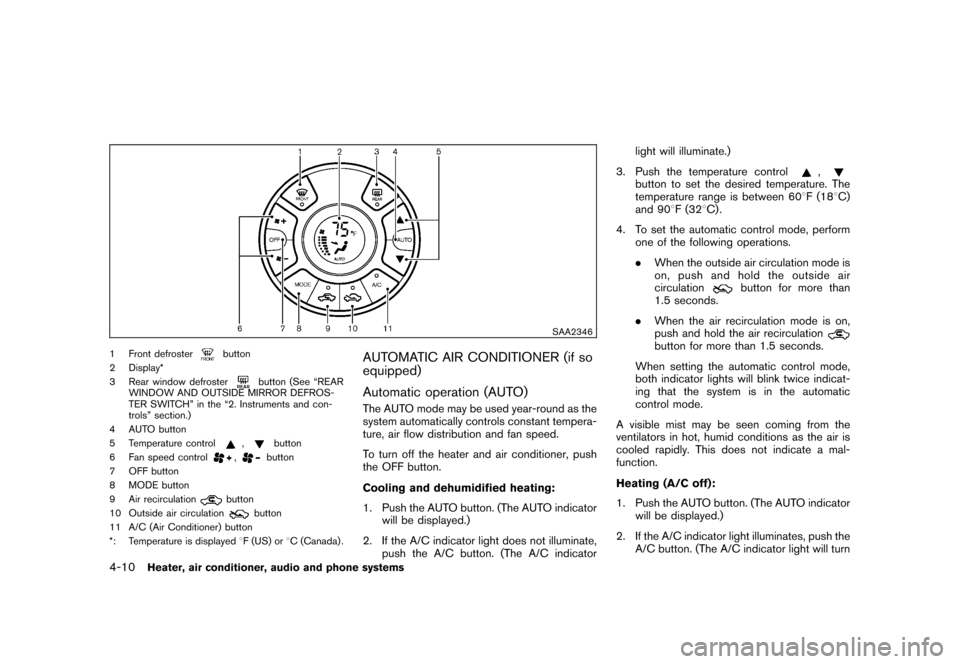
SAA2346
1 Front defroster
button
2 Display*
3 Rear window defroster
button (See “REAR
WINDOW AND OUTSIDE MIRROR DEFROS-
TER SWITCH” in the “2. Instruments and con-
trols” section.)
4 AUTO button
5 Temperature control
,
button
6 Fan speed control
,
button
7 OFF button
8 MODE button
9 Air recirculation
button
10 Outside air circulation
button
11 A/C (Air Conditioner) button
*: Temperature is displayed 8F (US) or 8C (Canada) .
AUTOMATIC AIR CONDITIONER (if so
equipped)
Automatic operation (AUTO)The AUTO mode may be used year-round as the
system automatically controls constant tempera-
ture, air flow distribution and fan speed.
To turn off the heater and air conditioner, push
the OFF button.
Cooling and dehumidified heating:
1. Push the AUTO button. (The AUTO indicator
will be displayed.)
2. If the A/C indicator light does not illuminate, push the A/C button. (The A/C indicator light will illuminate.)
3. Push the temperature control
,
button to set the desired temperature. The
temperature range is between 60 8F (18 8C)
and 90 8F (32 8C) .
4. To set the automatic control mode, perform one of the following operations.
.When the outside air circulation mode is
on, push and hold the outside air
circulation
button for more than
1.5 seconds.
. When the air recirculation mode is on,
push and hold the air recirculation
button for more than 1.5 seconds.
When setting the automatic control mode,
both indicator lights will blink twice indicat-
ing that the system is in the automatic
control mode.
A visible mist may be seen coming from the
ventilators in hot, humid conditions as the air is
cooled rapidly. This does not indicate a mal-
function.
Heating (A/C off):
1. Push the AUTO button. (The AUTO indicator will be displayed.)
2. If the A/C indicator light illuminates, push the A/C button. (The A/C indicator light will turn
4-10
Heater, air conditioner, audio and phone systems
Page 212 of 329
Black plate (216,1)
Model "Z12-D" EDITED: 2009/ 9/ 17
.Make sure the area around the vehicle is
clear.
. Check fluid levels such as engine oil, cool-
ant, brake fluid, and window washer fluid as
frequently as possible, or at least whenever
you refuel.
. Check that all windows and lights are clean.
. Visually inspect tires for their appearance
and condition. Also check tires for proper
inflation.
. Lock all doors.
. Position seat and adjust head restraints.
. Adjust inside and outside mirrors.
. Fasten seat belts and ask all passengers to
do likewise.
. Check the operation of warning lights when
the ignition switch is placed in the ON
position. (See “WA RNING/INDICATOR
LIGHTS AND AUDIBLE REMINDERS” in
the “2. Instruments and controls” section.)
MODELS WITHOUT INTELLIGENT KEY
SYSTEM1. Apply the parking brake.
2. Continuously Variable Transmission
(CVT) models:
Move the selector lever to the P (Park) or N
(Neutral) position. (P is recommended.)
The starter is designed so that it does not
operate unless the selector lever is in either
of the above positions.
Manual Transmission (MT) models:
Move the shift lever to the N (Neutral)
position. Depress the clutch pedal fully to
the floor.
The starter is designed not to operate unless
the clutch pedal is fully depressed.
3. Crank the engine with your foot off the
accelerator pedal by turning the ignition
switch to START. Release the switch when
the engine starts. If the engine starts, but
fails to run, repeat the above procedure.
. If the engine is very hard to start in
extremely cold weather or when restart-
ing, depress the accelerator pedal a little
(approximately 1/3 to the floor) and hold
it and then crank the engine. Release the
accelerator pedal when the engine starts.
. If the engine is very hard to start
because it is flooded, depress the
accelerator pedal all the way to the floor
and hold it. Crank the engine for 5 - 6
seconds. After cranking the engine,
release the accelerator pedal. Crank
the engine with your foot off the
accelerator pedal by turning the igni-
tion switch to START. Release the
ignition switch when the engine starts.
If the engine starts, but fails to run,
repeat the above procedure.
CAUTION
Do not operate the starter for more
than 15 seconds at a time. If the engine
does not start, turn the ignition switch
off and wait 10 seconds before cranking
again, otherwise the starter could be
damaged.
4. Warm-up
Allow the engine to idle for at least 30
seconds after starting. Do not race the
engine while warming it up. Drive at
moderate speed for a short distance first,
especially in cold weather. In cold weather,
keep the engine running for a minimum of 2 -
BEFORE STARTING THE ENGINE STARTING THE ENGINE5-12
Starting and driving