2010 NISSAN CUBE child lock
[x] Cancel search: child lockPage 57 of 329
Black plate (55,1)
Model "Z12-D" EDITED: 2009/ 9/ 17
LRS0453
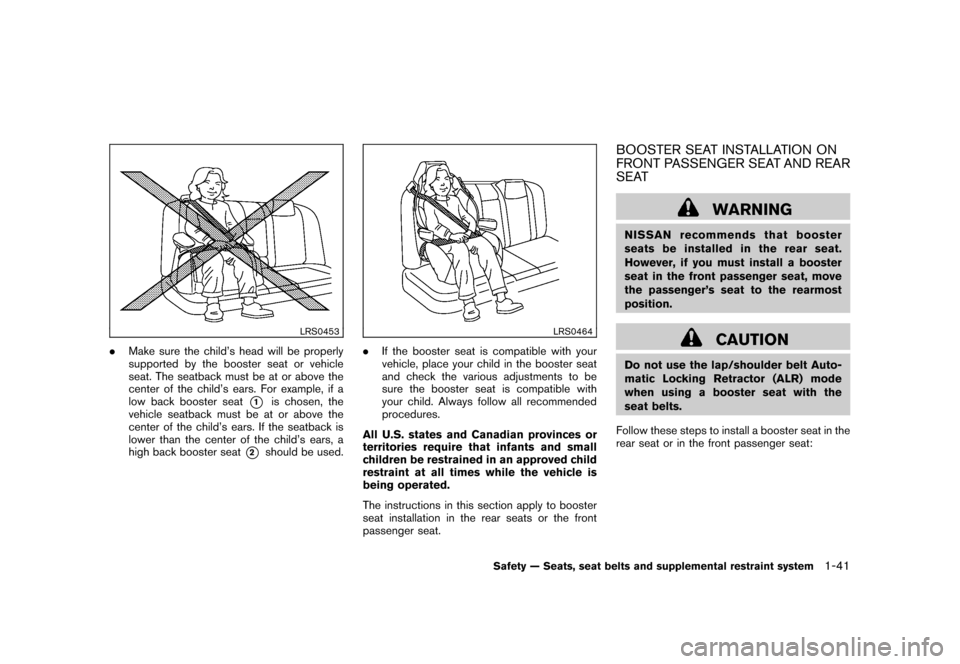
.Make sure the child’s head will be properly
supported by the booster seat or vehicle
seat. The seatback must be at or above the
center of the child’s ears. For example, if a
low back booster seat
*1
is chosen, the
vehicle seatback must be at or above the
center of the child’s ears. If the seatback is
lower than the center of the child’s ears, a
high back booster seat
*2
should be used.
LRS0464
. If the booster seat is compatible with your
vehicle, place your child in the booster seat
and check the various adjustments to be
sure the booster seat is compatible with
your child. Always follow all recommended
procedures.
All U.S. states and Canadian provinces or
territories require that infants and small
children be restrained in an approved child
restraint at all times while the vehicle is
being operated.
The instructions in this section apply to booster
seat installation in the rear seats or the front
passenger seat.
BOOSTER SEAT INSTALLATION ON
FRONT PASSENGER SEAT AND REAR
SEAT
WARNING
NISSAN recommends that booster
seats be installed in the rear seat.
However, if you must install a booster
seat in the front passenger seat, move
the passenger’s seat to the rearmost
position.
CAUTION
Do not use the lap/shoulder belt Auto-
matic Locking Retractor (ALR) mode
when using a booster seat with the
seat belts.
Follow these steps to install a booster seat in the
rear seat or in the front passenger seat:
Safety — Seats, seat belts and supplemental restraint system
1-41
Page 68 of 329
Black plate (66,1)
Model "Z12-D" EDITED: 2009/ 9/ 17
as children, by requiring the air bag to be
automatically turned OFF.
The occupant classification sensors (weight
sensors) are on the seat cushion frame under
the front passenger seat and are designed to
detect an occupant and objects on the seat. For
example, if a child is in the front passenger seat,
the Advanced Air Bag System is designed to
turn the passenger air bag OFF in accordance
with the regulations. Also, if a child restraint of
the type specified in the regulations is on the
seat, the occupant classification sensors can
detect it and cause the air bag to turn OFF.
Front passenger seat adult occupants who are
properly seated and using the seat belt as
outlined in this manual should not cause the
passenger air bag to be automatically turned
OFF. For small adults it may be turned OFF,
however, if the occupant does not sit in the seat
properly (for example, by not sitting upright, by
sitting on an edge of the seat, or by otherwise
being out of position) , this could cause the
sensors to turn the air bag OFF. Always be sure
to be seated and wearing the seat belt properly
for the most effective protection by the seat belt
and supplemental air bag.
NISSAN recommends that pre-teens and chil-
dren be properly restrained in a rear seat.
NISSAN also recommends that appropriate
child restraints and booster seats be properly
installed in a rear seat. If this is not possible, theoccupant classification sensors are designed to
operate as described above to turn the front
passenger air bag OFF for specified child
restraints. Failing to properly secure child
restrains and to use the Automatic Locking
Retractor (ALR) mode (child restraint mode)
may allow the restraint to tip or move in an
accident or sudden stop. This can also result in
the passenger air bag inflating in a crash instead
of being OFF. (See “CHILD RESTRAINTS”
earlierinthissectionforproperuseand
installation.)
If the front passenger seat is not occupied, the
passenger air bag is designed not to inflate in a
crash. However, heavy objects placed on the
seat could result in air bag inflation, because of
the object being detected by the occupant
classification sensors. Other conditions could
also result in air bag inflation, such as if a child is
standing on the seat, or if two children are on the
seat, contrary to the instructions in this manual.
Always be sure that you and all vehicle
occupants are seated and restrained properly.
Using the passenger air bag status light, you can
monitor when the front passenger air bag is
automatically turned OFF with the seat occu-
pied. The light will not illuminate when the front
passenger seat is unoccupied.
If an adult occupant is in the seat but the
passenger air bag status light is illuminated
(indicating that the air bag is OFF) , it could bethat the person is a small adult, or is not sitting
on the seat properly.
If a child restraint must be used in the front seat,
the passenger air bag status light may or may
not be illuminated, depending on the size of the
child and the type of child restraint being used. If
the air bag status light is not illuminated
(indicating that the air bag might inflate in a
crash) , it could be that the child restraint or seat
belt is not being used properly. Make sure that
the child restraint is installed properly, the seat
belt is used properly and the occupant is
positioned properly. If the air bag status light is
not illuminated, reposition the occupant or child
restraint in a rear seat.
If the passenger air bag status light will not
illuminate even though you believe that the child
restraint, the seat belts and the occupant are
properly positioned, the system may be sensing
an unoccupied seat (in which case the air bag is
OFF) . Your NISSAN dealer can check that the
system is OFF by using a special tool. However,
until you have confirmed with your dealer that
your air bag is working properly, reposition the
occupant or child restraint in a rear seat.
The air bag system and passenger air bag status
light will take a few seconds to register a change
in the passenger seat status. However, if the
seat becomes unoccupied, the air bag status
light will remain off.1-52
Safety — Seats, seat belts and supplemental restraint system
Page 110 of 329
Black plate (110,1)
Model "Z12-D" EDITED: 2009/ 9/ 17
POWER WINDOWS
WARNING
.Make sure that all passengers have
their hands, etc. inside the vehicle
while it is in motion and before
closing the windows. Use the win-
dow lock switch to prevent unex-
pected use of the power windows.
. Do not leave children unattended
inside the vehicle. They could un-
knowingly activate switches or con-
trols and become trapped in the
window. Unattended children could
become involved in serious acci-
dents.
The power windows operate when the ignition
switch is in the ON position, or for about 45
seconds after the ignition switch is placed in the
OFF position. If the driver’s or front passenger’s
door is opened during this period of about 45
seconds, power to the windows is canceled.
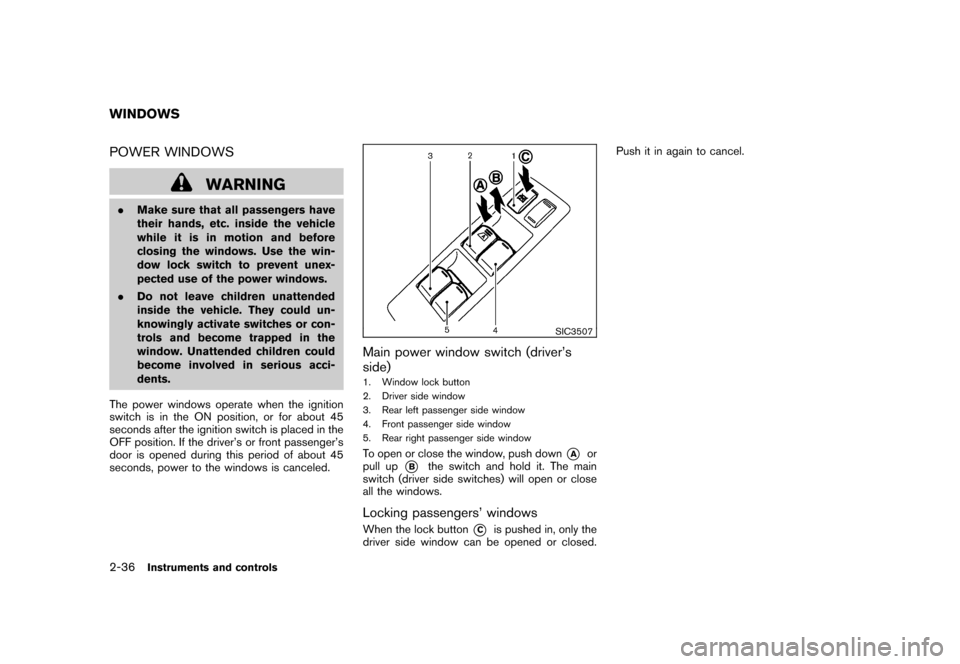
SIC3507
Main power window switch (driver’s
side)1. Window lock button
2. Driver side window
3. Rear left passenger side window
4. Front passenger side window
5. Rear right passenger side windowTo open or close the window, push down
*A
or
pull up
*B
the switch and hold it. The main
switch (driver side switches) will open or close
all the windows.
Locking passengers’ windowsWhen the lock button
*C
is pushed in, only the
driver side window can be opened or closed. Push it in again to cancel.
WINDOWS2-36
Instruments and controls
Page 115 of 329
Black plate (10,1)
3 Pre-driving checks and adjustments
Model "Z12-D" EDITED: 2009/ 9/ 17
Keys ............................................................... 3-2NISSAN Vehicle Immobilizer System keys ............ 3-2
Intelligent Keys (if so equipped) ......................... 3-3
Doors .............................................................. 3-4
Locking with key ............................................ 3-4
Locking with inside lock knob ........................... 3-5
Locking with power door lock switch .................. 3-5
Automatic door locks ...................................... 3-5
Child safety rear door lock ............................... 3-6
Remote keyless entry system (if so equipped) ........... 3-6
How to use remote keyless entry system ............. 3-7
Intelligent Key system (if so equipped) .................. 3-10
Intelligent Key operating range ........................ 3-12
Door locks/unlocks precaution ........................ 3-12
Intelligent Key operation ................................. 3-13
Battery saver system ..................................... 3-14 Warning lights and audible reminders
............... 3-14
Troubleshooting guide ................................... 3-15
How to use remote keyless entry function .......... 3-17
Hood ............................................................ 3-21
Back door ...................................................... 3-22
Bumpers and side sill extensions (Kro ¯
m models) . .... 3-23
Fuel-filler door ................................................. 3-24
Opening the fuel-filler door ............................. 3-24
Fuel-filler cap .............................................. 3-24
Tilt steering column .......................................... 3-25
Tilt operation ............................................... 3-26
Sun visors ...................................................... 3-26
Mirrors ........................................................... 3-26
Inside mirror ................................................ 3-26
Outside mirrors ............................................ 3-27
Page 118 of 329
Black plate (120,1)
Model "Z12-D" EDITED: 2009/ 9/ 17
SPA2033
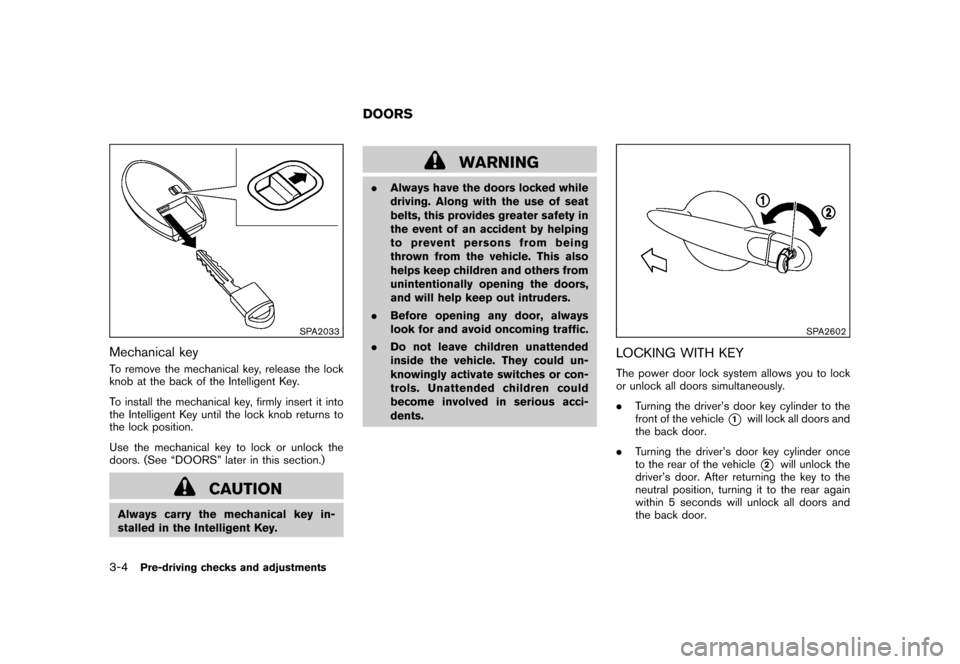
Mechanical keyTo remove the mechanical key, release the lock
knob at the back of the Intelligent Key.
To install the mechanical key, firmly insert it into
the Intelligent Key until the lock knob returns to
the lock position.
Use the mechanical key to lock or unlock the
doors. (See “DOORS” later in this section.)
CAUTION
Always carry the mechanical key in-
stalled in the Intelligent Key.
WARNING
.Always have the doors locked while
driving. Along with the use of seat
belts, this provides greater safety in
the event of an accident by helping
to prevent persons from being
thrown from the vehicle. This also
helps keep children and others from
unintentionally opening the doors,
and will help keep out intruders.
. Before opening any door, always
look for and avoid oncoming traffic.
. Do not leave children unattended
inside the vehicle. They could un-
knowingly activate switches or con-
trols. Unattended children could
become involved in serious acci-
dents.
SPA2602
LOCKING WITH KEYThe power door lock system allows you to lock
or unlock all doors simultaneously.
.Turning the driver’s door key cylinder to the
front of the vehicle
*1
will lock all doors and
the back door.
. Turning the driver’s door key cylinder once
to the rear of the vehicle*2
will unlock the
driver’s door. After returning the key to the
neutral position, turning it to the rear again
within 5 seconds will unlock all doors and
the back door.
DOORS
3-4
Pre-driving checks and adjustments
Page 120 of 329
Black plate (122,1)
Model "Z12-D" EDITED: 2009/ 9/ 17
.All doors unlock automatically when the key
is removed from the ignition switch (models
without Intelligent Key system) .
The automatic unlock function can be
deactivated or activated.
To deactivate or activate the automatic door
unlock system, perform the following procedure.
1. Close all doors.
2. Place the ignition switch in the ON position.
3. Within 20 seconds of performing step 2. .Push and hold the power door lock
switch to the
(UNLOCK) position
for more than 5 seconds.
4. When activated, the hazard warning lights will flash twice. When deactivated, the
hazard warning lights will flash once.
5. The ignition switch must be placed in the OFF and ON position again between each
setting change.
When the automatic door unlock system is
deactivated, the doors do not unlock when the
ignition is placed in the OFF position. To unlock
the door manually, use the inside lock knob or
the power door lock switch (driver’s or front
passenger’s side) .
SPA2604
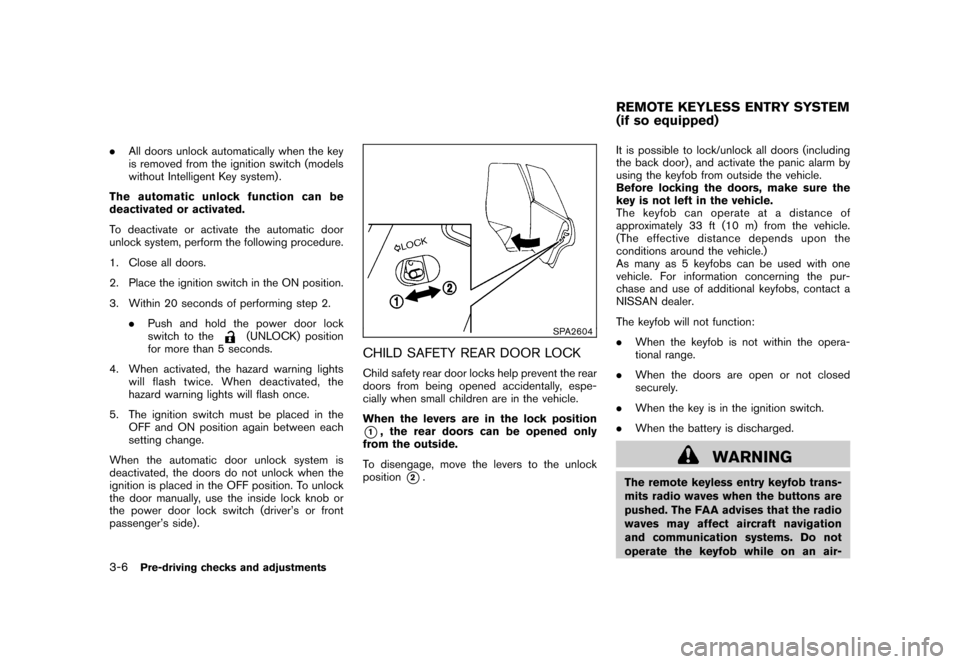
CHILD SAFETY REAR DOOR LOCKChild safety rear door locks help prevent the rear
doors from being opened accidentally, espe-
cially when small children are in the vehicle.
When the levers are in the lock position*1, the rear doors can be opened only
from the outside.
To disengage, move the levers to the unlock
position
*2. It is possible to lock/unlock all doors (including
the back door) , and activate the panic alarm by
using the keyfob from outside the vehicle.
Before locking the doors, make sure the
key is not left in the vehicle.
The keyfob can operate at a distance of
approximately 33 ft (10 m) from the vehicle.
(The effective distance depends upon the
conditions around the vehicle.)
As many as 5 keyfobs can be used with one
vehicle. For information concerning the pur-
chase and use of additional keyfobs, contact a
NISSAN dealer.
The keyfob will not function:
.
When the keyfob is not within the opera-
tional range.
. When the doors are open or not closed
securely.
. When the key is in the ignition switch.
. When the battery is discharged.
WARNING
The remote keyless entry keyfob trans-
mits radio waves when the buttons are
pushed. The FAA advises that the radio
waves may affect aircraft navigation
and communication systems. Do not
operate the keyfob while on an air-REMOTE KEYLESS ENTRY SYSTEM
(if so equipped)
3-6
Pre-driving checks and adjustments
Page 269 of 329
Black plate (273,1)
Model "Z12-D" EDITED: 2009/ 9/ 17
a. Pull the center of the small plastic clipsout.
b. Hold the engine undercover into posi- tion.
c. Insert the clips through the undercover into the holes in the frame, then push the
center of the clips in to lock the clips in
place.
d. Install the bolts that hold the undercover in place. Be careful not to strip the bolts
or over-tighten them.
2. Lower the vehicle carefully to the ground.
3. Dispose of waste oil and filter properly.
WARNING
. Prolonged and repeated contact
with used engine oil may cause skin
cancer.
. Try to avoid direct skin contact with
used oil. If skin contact is made,
wash thoroughly with soap or hand
cleaner as soon as possible.
. Keep used engine oil out of reach of
children. When checking or replacement is required, we
recommend a NISSAN dealer for servicing.
CAUTION
.
Use only Genuine NISSAN CVT Fluid
NS-2. Do not mix with other fluids.
. Using transmission fluid other than
Genuine NISSAN CVT Fluid NS-2
will damage the CVT, which is not
covered by the NISSAN new vehicle
limited warranty. For additional brake and clutch fluid information,
see “CAPACITIES AND RECOMMENDED
FUEL/LUBRICANTS” in the “9. Technical and
consumer information” section of this manual.
WARNING
.
Use only new fluid from a sealed
container. Old, inferior or contami-
nated fluid may damage the brake
andclutchsystems.Theuseof
improper fluids can damage the
brake and clutch systems, and affect
the vehicle’s stopping ability.
. Clean the filler cap before removing.
. Brake and clutch fluid is poisonous
and should be stored carefully in
marked containers out of the reach
of children.
CAUTION
Do not spill the fluid on any painted
surfaces. This will damage the paint. If
fluid is spilled, immediately wash the
surface with water.
CONTINUOUSLY VARIABLE
TRANSMISSION (CVT) FLUID BRAKE AND CLUTCH FLUID
Maintenance and do-it-yourself
8-11
Page 321 of 329
Black plate (1,1)
10 Index
A
ABS (Anti-lock Braking System) .................. 5-26
Advanced air bag system ......................... 1-50
Air bag system Advanced air bag system ..................... 1-50
Front passenger air bag and status light .... 1-51
Front-seat mounted side-impact
supplemental air bag system .................. 1-54
Roof-mounted curtain side-impact
supplemental air bag system .................. 1-54
Air bag warning labels ............................. 1-57
Air bag warning light ....................... 1-57, 2-14
Air cleaner housing filter .......................... 8-16
Air conditioner Air conditioner operation ........................ 4-6
Air conditioner service ......................... 4-12
Air conditioner specification label ............ 9-10
Air conditioning system refrigerant and
lubricant recommendations .............. 4-12, 9-6
In-cabin microfilter ............................. 4-12
Alarm, How to stop alarm
(see vehicle security system) ..................... 2-19
Alcohol, drugs and driving .......................... 5-6
Antenna ............................................. 4-42
Anti-lock Braking System (ABS) .................. 5-26
Anti-lock braking system (ABS) warning light . . . 2-10
Appearance care Exterior appearance care ........................ 7-2
Interior appearance care ........................ 7-5
Armrest ............................................. 1-12
Audible reminders ................................. 2-17
Audio operation precautions ...................... 4-13 Audio system
....................................... 4-13
Steering wheel audio controls ................ 4-41
Autolight system ................................... 2-24
Automatic Air conditioner. ................................. 4-10
Door locks ........................................ 3-5
Average fuel consumption ........................... 2-9
Average speed ....................................... 2-9
Avoiding collision and rollover ...................... 5-5
B
Back door .......................................... 3-22
Battery .............................................. 8-13
Battery replacement, Intelligent Key .......... 8-23
Battery replacement, Keyfob .................. 8-22
Battery saver system .......................... 2-25
Variable voltage control system ............... 8-15
Before starting the engine ........................ 5-12
Bluetooth
®Hands-Free Phone System .......... 4-44
Booster seats ...................................... 1-39
Brake Anti-lock Braking System (ABS) .............. 5-26
Brake and clutch fluid ......................... 8-11
Brake system ................................... 5-26
Parking brake operation ....................... 5-20
Warning light ................................... 2-11
Break-in schedule .................................. 5-22
Brightness control, Instrument panel ............. 2-26
Bulb check/instrument panel ...................... 2-10
Bulb replacement .................................. 8-25 C
Cabin air filter ...................................... 4-12
Capacities and recommended fuel/lubricants ..... 9-2
Car phone or CB radio ............................ 4-44
Cargo light ......................................... 2-40
Catalytic converter, Three way catalyst ............ 5-2
CD care and cleaning ............................. 4-41
Ceiling light ......................................... 2-39
Child restraints ..................................... 1-23
Booster seats .................................. 1-39
Installation using LATCH ...................... 1-28
Installation using the seat belts ............... 1-33
Precautions on child restraints ................ 1-23
Top tether strap ................................ 1-26
Child safety ......................................... 1-15
Child safety rear door lock .......................... 3-6
Chimes, Audible reminders ....................... 2-17
Circuit breaker, Fusible link ....................... 8-21
Cleaning exterior and interior ................. 7-2, 7-5
Clock ............................................... 2-28
Clutch fluid ......................................... 8-11
Cockpit ............................................... 2-2
Cold weather driving .............................. 5-29
Command
(See Bluetooth
®Hands-Free Phone System) . . . 4-50
Compact Disc (CD) player
(See audio system) .................. 4-26, 4-31, 4-37
Continuously Variable Transmission (CVT)
fluid ................................................. 8-11
Controls, Steering wheel audio controls ......... 4-41
Model "Z12-D" EDITED: 2009/ 9/ 17