Page 347 of 472

4H:62 MPH (100 km/h)
4LO: 31 MPH (50 km/h)
3 (Third gear):
Use this position for driving up and down long
slopes where engine braking would be advanta-
geous.
2 (Second gear):
Use this position for hill climbing or engine brak-
ing on downhill grades.
Do not downshift into the 2 position at speeds
over the following and do not exceed the follow-
ing speeds in the 2 position. 2WD and AUTO:71 MPH (115 km/h) w/o tow mode
62 MPH (100 km/h) w/tow mode
4H: 71 MPH (115 km/h) w/o tow mode
62 MPH (100 km/h) w/tow mode
4LO: 31 MPH (50 km/h) w/o tow mode 27 MPH (44 km/h) w/tow mode
1 (Low gear):
Use this position when climbing steep hills slowly
or slow driving through deep snow, sand or mud,
or for maximum engine braking on steep downhill
grades.
Do not downshift into the 1 position at speeds
over the following and do not exceed the follow-
ing speeds in the 1 position. 2WD and AUTO:43 MPH (70 km/h) w/o tow mode
37 MPH (60 km/h) w/tow mode
4H: 43 MPH (70 km/h) w/o tow mode
37 MPH (60 km/h) w/tow mode
4LO: 19 MPH (30 km/h) w/o tow mode
16 MPH (27 km/h) w/tow mode
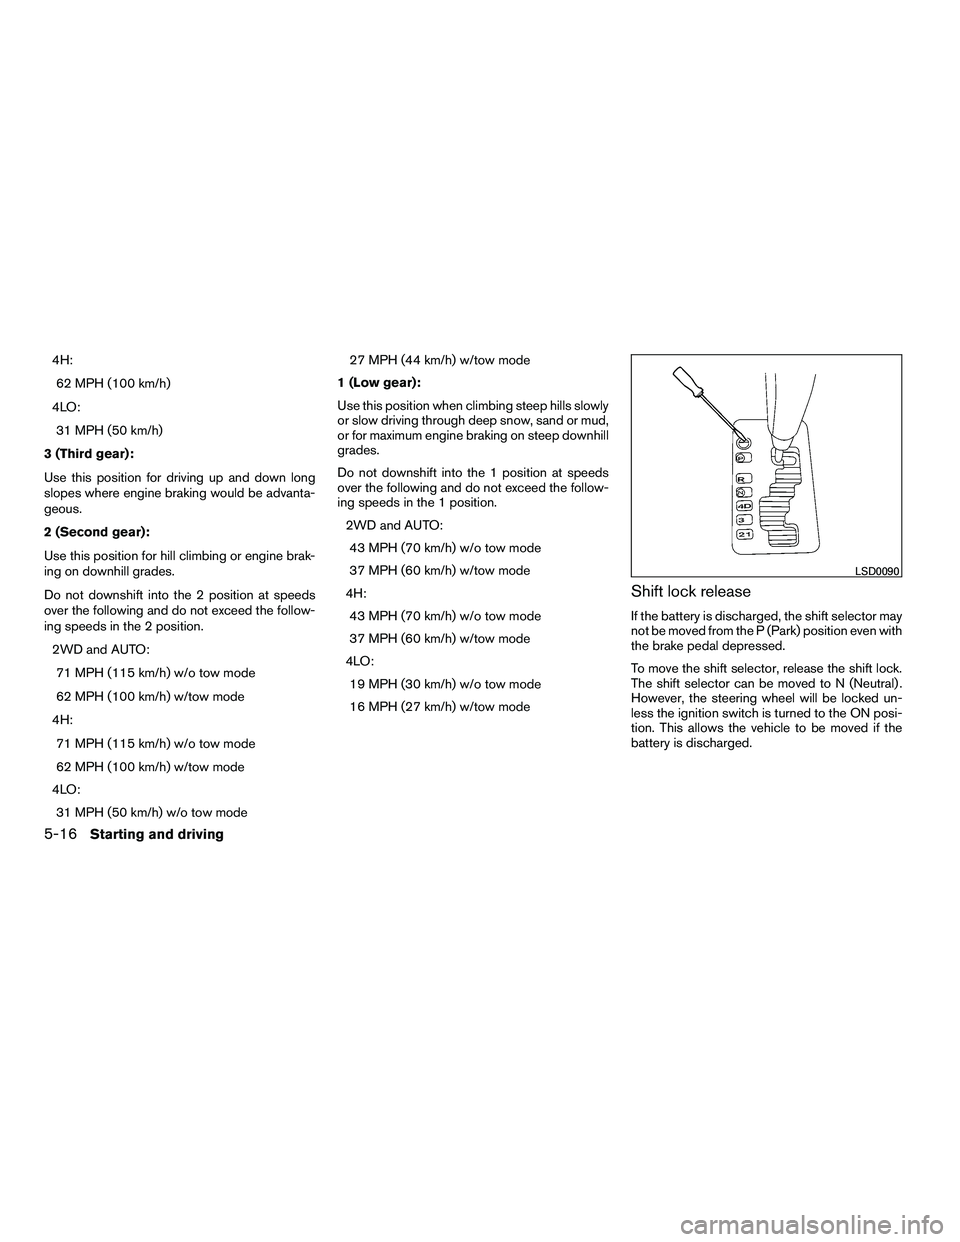
Shift lock release
If the battery is discharged, the shift selector may
not be moved from the P (Park) position even with
the brake pedal depressed.
To move the shift selector, release the shift lock.
The shift selector can be moved to N (Neutral) .
However, the steering wheel will be locked un-
less the ignition switch is turned to the ON posi-
tion. This allows the vehicle to be moved if the
battery is discharged.
Page 348 of 472
To push the shift lock release, complete the fol-
lowing procedure:1. Turn the ignition switch to the LOCK posi- tion and remove the key
2. Apply the parking brake.
3. Remove the shift lock release cover as shown.
4. Insert a small screwdriver in the shift lock release slot and push down.
5. Move the shift selector to the N (Neutral) position while holding down the shift lock
release.
6. Turn the ignition switch to the ON position to unlock the steering wheel. Now the vehicle
may be moved to the desired location.
If the shift selector cannot be moved out of P
(Park) , have a NISSAN dealer check the auto-
matic transmission system as soon as possible.
Page 356 of 472
●Engine idling speed is high while warm-
ing up the engine. Be especially careful
when starting or driving on slippery sur-
faces with the 4WD shift switch set in
AUTO.
4WD shift indicator light
The 4WD shift indicator light is located in the
vehicle information display.
The light should turn off within 1 second after
turning the ignition switch to the ON position.
While the engine is running, the 4WD shift indi-
cator light will illuminate the position selected by
the 4WD shift switch.
● The 4WD shift indicator light may blink
while shifting from one drive mode to
the other. When the shifting is com-
pleted, the 4WD shift indicator light
will come on. If the indicator light does
not come on immediately, make sure
the area around the vehicle is safe, and drive the vehicle straight, accelerate or
decelerate or move the vehicle in re-
verse, then shift the 4WD shift switch.
● If the 4WD warning light comes on, the
4WD indicator light goes out.
Page 358 of 472

WARNING
●Do not stop or park the vehicle over
flammable materials such as dry grass,
waste paper or rags. They may ignite
and cause a fire.
●
Safe parking procedures require that
both the parking brake be set and the
transmission placed into P (Park) . Fail-
ure to do so could cause the vehicle to
move unexpectedly or roll away and re-
sult in an accident. Make sure the shift
selector has been pushed as far forward
as it can go and cannot be moved without
depressing the foot brake pedal
● Never leave the engine running while
the vehicle is unattended.
● Do not leave children unattended inside
the vehicle. They could unknowingly ac-
tivate switches or controls. Unattended
children could become involved in seri-
ous accidents.
1. Firmly apply the parking brake.
2. Move the shift selector to the P (Park) position.
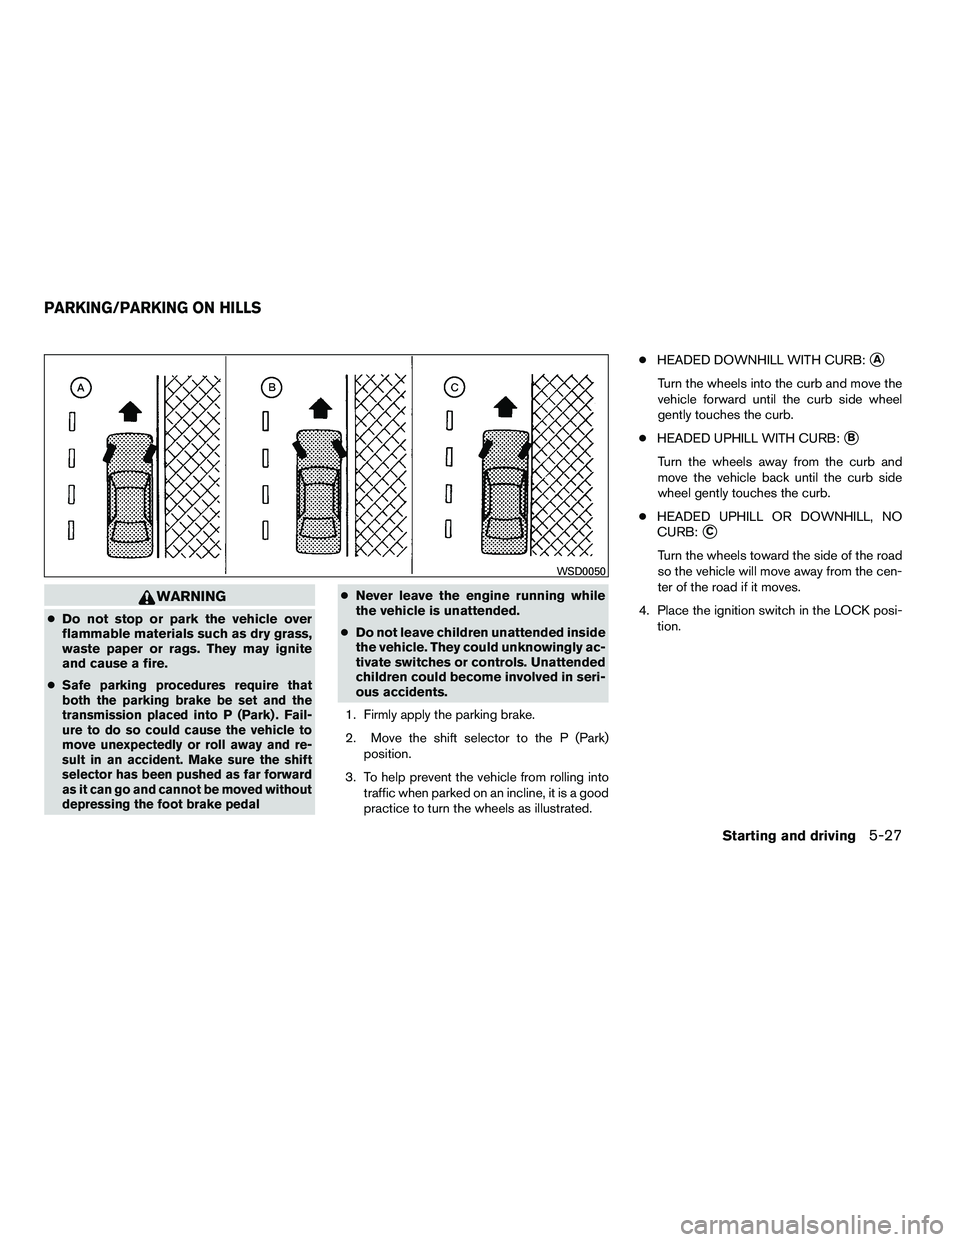
3. To help prevent the vehicle from rolling into traffic when parked on an incline, it is a good
practice to turn the wheels as illustrated. ●
HEADED DOWNHILL WITH CURB:
�A
Turn the wheels into the curb and move the
vehicle forward until the curb side wheel
gently touches the curb.
● HEADED UPHILL WITH CURB:
�B
Turn the wheels away from the curb and
move the vehicle back until the curb side
wheel gently touches the curb.
● HEADED UPHILL OR DOWNHILL, NO
CURB:
�C
Turn the wheels toward the side of the road
so the vehicle will move away from the cen-
ter of the road if it moves.
4. Place the ignition switch in the LOCK posi- tion.
Page 363 of 472

●The system is designed as an aid to the
driver in detecting large stationary ob-
jects to help avoid damaging the ve-
hicle. The system will not detect small
objects below the bumper, and may not
detect objects close to the bumper or
on the ground.
● If your vehicle sustains damage to the
rear bumper fascia, leaving it mis-
aligned or bent, the sensing zone may
be altered causing inaccurate measure-
ment of obstacles or false alarms.
The Rear Sonar System (RSS) sounds a tone to
warn the driver of obstacles near the rear bumper
when the shift selector is in R (Reverse) . The
system may not detect objects at speeds above 3
mph (5 km/h) and may not detect certain angular
or moving objects.
The RSS detects obstacles up to 3 ft (1.0 m)
from the rear bumper with a decreased coverage
area at the outer corners of the bumper, (refer to
the illustration for approximate zone coverage
areas) . As you move closer to the obstacle, the
rate of the tone increases. When the obstacle is
less than 12 in (30.0 cm) away, the tone will
sound continuously. If the RSS detects a station-
ary or receding object further than 12 in (30.0
cm) from the side of the vehicle, the tone will sound for only 3 seconds. Once the system de-
tects an object approaching, the tone will sound
again.
The RSS automatically turns on when the shift
selector is placed in R (Reverse) and the ignition
switch is ON. The front and rear sonar system off
switch on the instrument panel allows the driver
to turn the RSS on and off. To turn the RSS off,
the ignition switch must be ON, and the shift
selector in R (Reverse) . An indicator light on the
switch will illuminate when the system is turned
off. If the indicator light illuminates when the RSS
is not turned off, it may indicate a malfunction in
the RSS.
Keep the RSS sensors (located on the rear
bumper fascia) free from snow, ice and large
accumulations of dirt (do not clean the sensors
with sharp objects) . If the sensors are covered, it
will affect the accuracy of the RSS.
Page 364 of 472

●The system is designed as an aid to the
driver in detecting large stationary ob-
jects to help avoid damaging the ve-
hicle. The system will not detect small
objects below the bumper, and may not
detect objects close to the bumper or
on the ground.
● If your vehicle sustains damage to the
front bumper fascia, leaving it mis-
aligned or bent, the sensing zone may
be altered causing inaccurate measure-
ment of obstacles or false alarms.
The Front Sonar System (FSS) sounds a tone to
warn the driver of obstacles near the front
bumper when the shift selector is in a forward
gear. The system may not detect objects at
speeds above 3 mph (5 km/h) and may not detect
certain angular or moving objects.
The FSS detects obstacles up to 3 ft (1.0 m) from
the front bumper with a decreased coverage area
at the outer corners of the bumper, (refer to the
illustration for approximate zone coverage areas) .
As you move closer to the obstacle, the rate of the
tone increases. When the obstacle is less than
12 in (30.0 cm) away, the tone will sound con-
tinuously. If the FSS detects a stationary or re-
ceding object further than 12 in (30.0 cm) from
the side of the vehicle, the tone will sound for only 3 seconds. Once the system detects an object
approaching, the tone will sound again.
The FSS automatically turns on when the shift
selector is placed in a forward gear and the
ignition switch is ON. The front and rear sonar
system off switch on the instrument panel allows
the driver to turn the FSS on and off. To turn the
FSS off, the ignition switch must be ON, and the
shift selector in D (Drive) . An indicator light on the
switch will illuminate when the system is turned
off. If the indicator light illuminates when the FSS
is not turned off, it may indicate a malfunction in
the FSS.
Keep the FSS sensors (located on the front
bumper fascia) free from snow, ice and large
accumulations of dirt (do not clean the sensors
with sharp objects) . If the sensors are covered, it
will affect the accuracy of the FSS.FREEING A FROZEN DOOR LOCK
To prevent a door lock from freezing, apply de-
icer through the key hole. If the lock becomes
frozen, heat the key before inserting it into the key
hole or use the remote keyless entry keyfob.
ANTI-FREEZE
In the winter when it is anticipated that the tem-
perature will drop below 32°F (0°C) , check the
anti-freeze to assure proper winter protection.
For details, see “Engine cooling system” in the
“Maintenance and do-it-yourself” section of this
manual.
BATTERY
If the battery is not fully charged during extremely
cold weather conditions, the battery fluid may
freeze and damage the battery. To maintain maxi-
mum efficiency, the battery should be checked
regularly. For details, see “Battery” in the “Main-
tenance and do-it-yourself” section of this
manual.
DRAINING OF COOLANT WATER
If the vehicle is to be left outside without anti-
freeze, drain the cooling system, including the
engine block. Refill before operating the vehicle.
COLD WEATHER DRIVING
Starting and driving5-33
�REVIEW COPY—2010 Armada
(wzw)
Owners Manual (owners)—USA_English (nna)
02/17/09—debbie
�
Page 373 of 472
WARNING
●Always make sure that the spare tire
and jacking equipment are properly se-
cured after use. Such items can become
dangerous projectiles in an accident or
sudden stop.
● The spare tire is designed for emer-
gency use. See specific instructions un-
der the heading “Wheels and tires” in
the “Maintenance and do-it-yourself”
section of this manual. To start your engine with a booster battery, the
instructions and precautions below must be fol-
lowed.
If the battery of a vehicle equipped with the
NISSAN Intelligent Key ™ is discharged, the
ignition switch cannot be moved from the
LOCK position, even when using the me-
chanical key or the valet key. Connect the
jumper cables to another vehicle, as in the
case of a discharged battery, and then the
ignition switch can be moved from the
LOCK position. Then, jump start the ve-
hicle.
Page 402 of 472
WARNING
Be sure the engine and ignition switch are
off and that the parking brake is engaged
securely.