Page 154 of 438
To open the trunk from the inside, pull the illumi-
nated release handle until the lock releases and
push up on the trunk lid. The release handle is
made of a material that glows in the dark after a
brief exposure to ambient light.
The handle is located inside the trunk compart-
ment on the interior of the trunk lid.
OPENER OPERATION
The fuel-filler door release is located on the floor
to the left of the driver’s seat. To open the fuel-
filler door, pull up the release. To lock, close the
fuel-filler door securely.FUEL-FILLER CAP
The fuel-filler cap is a ratcheting type. Turn the
cap counterclockwise to remove. To tighten, turn
the cap clockwise until ratcheting clicks are
heard.
For the Coupe model, put the fuel-filler cap on the
cap holder
�1while refueling.
For the Sedan model, loop the tether strap
around the hook
�1while refueling.
Page 170 of 438
Clock Format (24h):
When this item is enabled (indicator light illumi-
nated) , the clock format will change from the
default 12-hour display to a 24-hour display.
Offset (hour):
Adjust the time by increasing or decreasing the
hours.
Offset (minute):
Adjust the time by increasing or decreasing the
minutes.
Daylight Savings Time:
When this item is enabled (indicator light illumi-
nated) , daylight savings time is on. To turn off the
daylight savings time, touch the “ON” key; the
amber indicator light will go out.Time Zone:
Select the “Time Zone” key; the Time Zone
screen will appear.
Select one of the following zones, depending on
the current location, by selecting the correct time
zone key to enable that time zone (indicator light
will illuminate for that location) .
● Pacific
● Mountain
● Central
● Eastern
● Atlantic ●
Newfoundland
● Hawaii
● Alaska
After selection/settings, select the “Back” key or
any other mode button to accept the changes.
Page 211 of 438
 for audio. When thi")
To turn the system off, press the VOL/ON·OFF
control knob.
Turn the VOL/ON·OFF control knob to adjust the
volume.
This vehicle may be equipped with Speed Sen-
sitive Volume (SSV) for audio. When this feature
is active, the audio volume changes as the driving
speed changes.
Setting control knob (Audio, Display and
Clock):
Press the SETTING button to adjust the audio,
display and clock settings as follows:
Bass→Treble →Fade →Balance →Speed
Sensitive Volume (SSV) (if so equipped) →
Brightness →Contrast →On-screen Clock →
Clock Adjust →Bass
Once the desired setting is displayed on the
screen, turn the SCROLL/TUNE knob left or right
to adjust the chosen setting. Press the SETTING
button to move to the next setting or wait approxi-
mately five seconds to exit the setting adjustment
mode. Audio settings:
Adjust the bass, treble, fade and balance by
selecting the desired setting with the SETTING
button and then adjusting the level with the
SCROLL/TUNE knob. Balance adjusts the
sound between the left and right speakers. Fade
adjusts the sound between the front and rear
speakers.
Speed Sensitive Volume (if so equipped):
To change the Speed Sensitive Volume (SSV)
level from 1 to 5, or to turn the feature off entirely,
choose the Speed Sensitive Volume (SSV) set-
ting with the SETTING button and then adjust the
level with the SCROLL/TUNE knob. Speed Sen-
sitive Volume (SSV) adjusts the volume of the
audio system as the vehicle’s driving speed
changes.
Page 212 of 438
Display settings:
To adjust the brightness or contrast of the display
screen, press the SETTING button until the cho-
sen setting is displayed. Use the SCROLL/TUNE
knob to adjust the display to the desired level.On-screen Clock:
The clock is shown in the upper right corner of
the screen. To turn this feature off or to re-enable
the clock display after it has been turned off,
press the SETTING button until the On-screen
Clock mode is displayed. Use the
SCROLL/TUNE knob to toggle the feature on or
off.Clock adjust:
To adjust the time, perform the following steps:
1. Press the SETTING button repeatedly until the Clock Adjust mode is displayed on the
screen.
2. The hours will begin blinking. Adjust the hours by turning the SCROLL/TUNE knob
left or right and press the ENTER button.
3. The minutes will begin blinking. Adjust the minutes by turning the SCROLL/TUNE knob
left or right and press the ENTER button.
Page 338 of 438

Always refer to the proper illustrations for the
correct placement and jack-up points for your
specific vehicle model and jack type.
Carefully read the caution label attached to
the jack body and the following instruc-
tions.1. Loosen each wheel nut one or two turns by turning counterclockwise with the wheel nut
wrench. Do not remove the wheel nuts
until the tire is off the ground.
2. Place the jack directly under the jack-up point as illustrated so the top of the jack
contacts the vehicle at the jack-up point.
Align the jack head between the two notches in the front or the rear as shown.
Also fit the groove of the jack head between
the notches as shown.
The jack should be used on firm and
level ground.
3. To lift the vehicle, securely hold the jack lever and rod with both hands. Carefully raise the
vehicle until the tire clears the ground. Re-
move the wheel nuts, and then remove the
tire.Installing the spare tire
The spare tire is designed for emergency
use. See specific instructions under the
heading “Wheels and tires” in the “Mainte-
nance and do-it-yourself” section of this
manual.
1. Clean any mud or dirt from the surface be- tween the wheel and hub.
2. Carefully put the spare tire on and tighten the wheel nuts finger tight.
3. With the wheel nut wrench, tighten wheel nuts alternately and evenly as illustrated until
they are tight.
Page 364 of 438
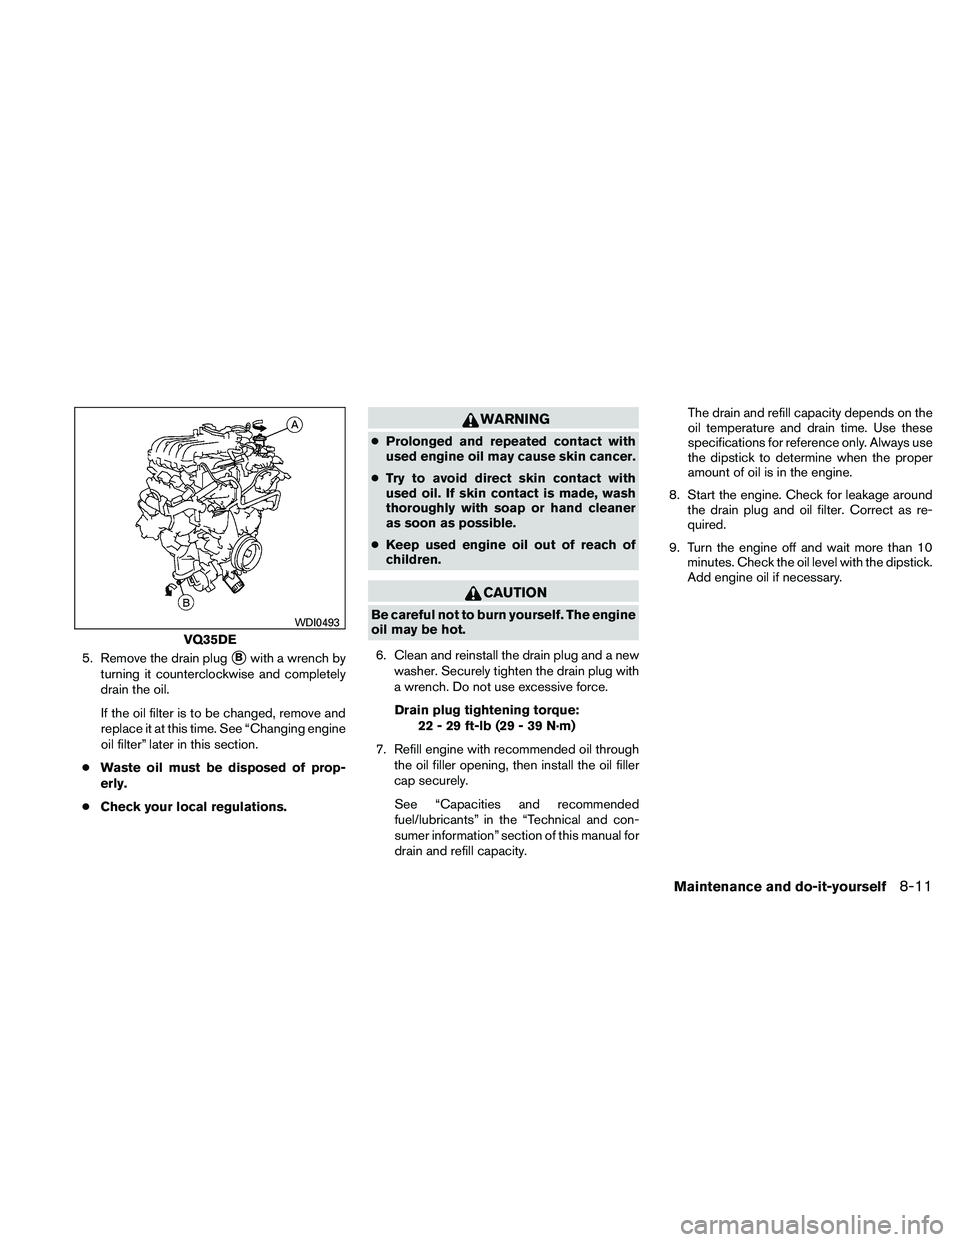
5. Remove the drain plug�Bwith a wrench by
turning it counterclockwise and completely
drain the oil.
If the oil filter is to be changed, remove and
replace it at this time. See “Changing engine
oil filter” later in this section.
● Waste oil must be disposed of prop-
erly.
● Check your local regulations.
Page 365 of 438
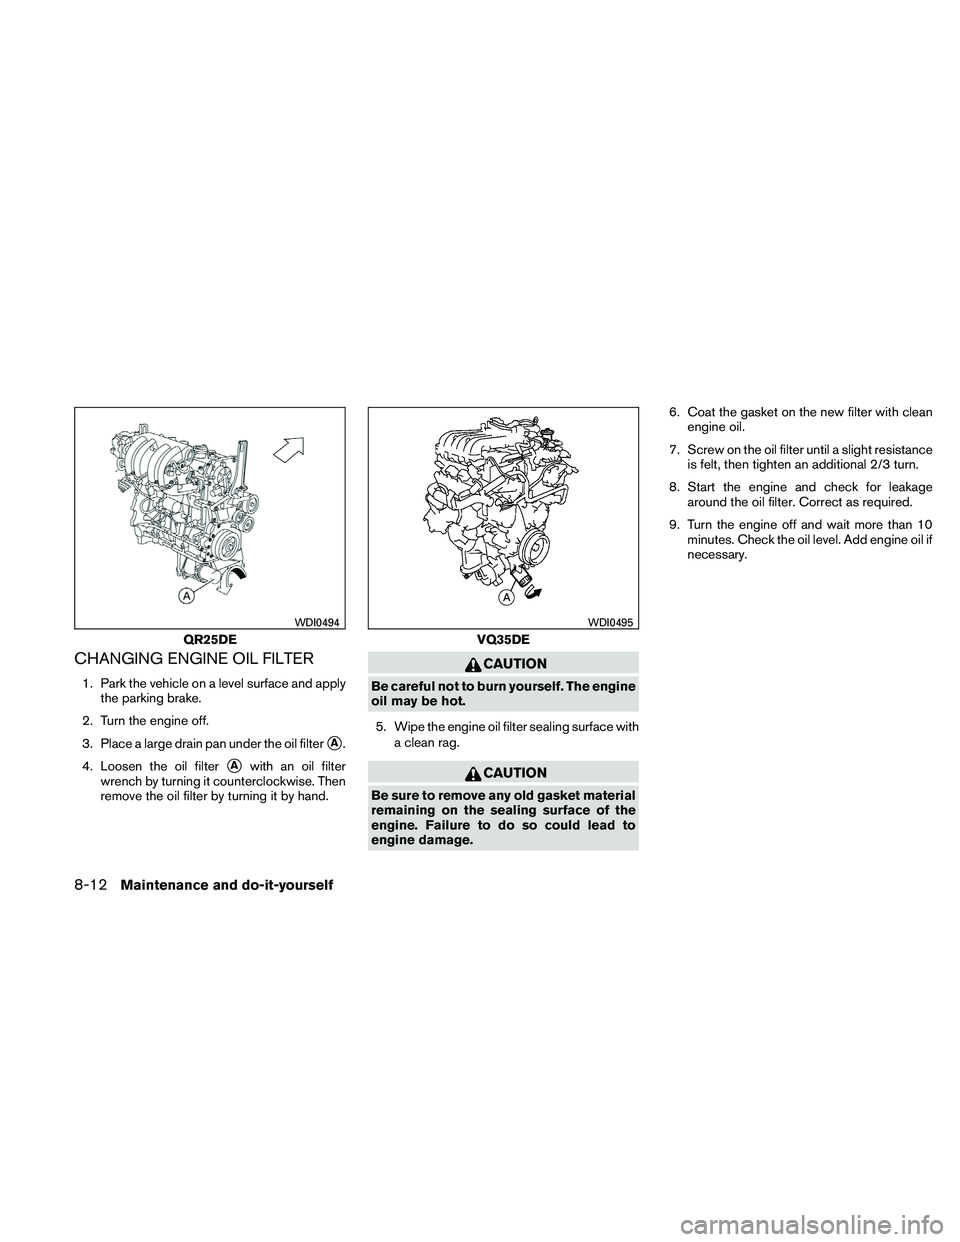
CHANGING ENGINE OIL FILTER
1. Park the vehicle on a level surface and applythe parking brake.
2. Turn the engine off.
3. Place a large drain pan under the oil filter
�A.
4. Loosen the oil filter
�Awith an oil filter
wrench by turning it counterclockwise. Then
remove the oil filter by turning it by hand.
Page 386 of 438
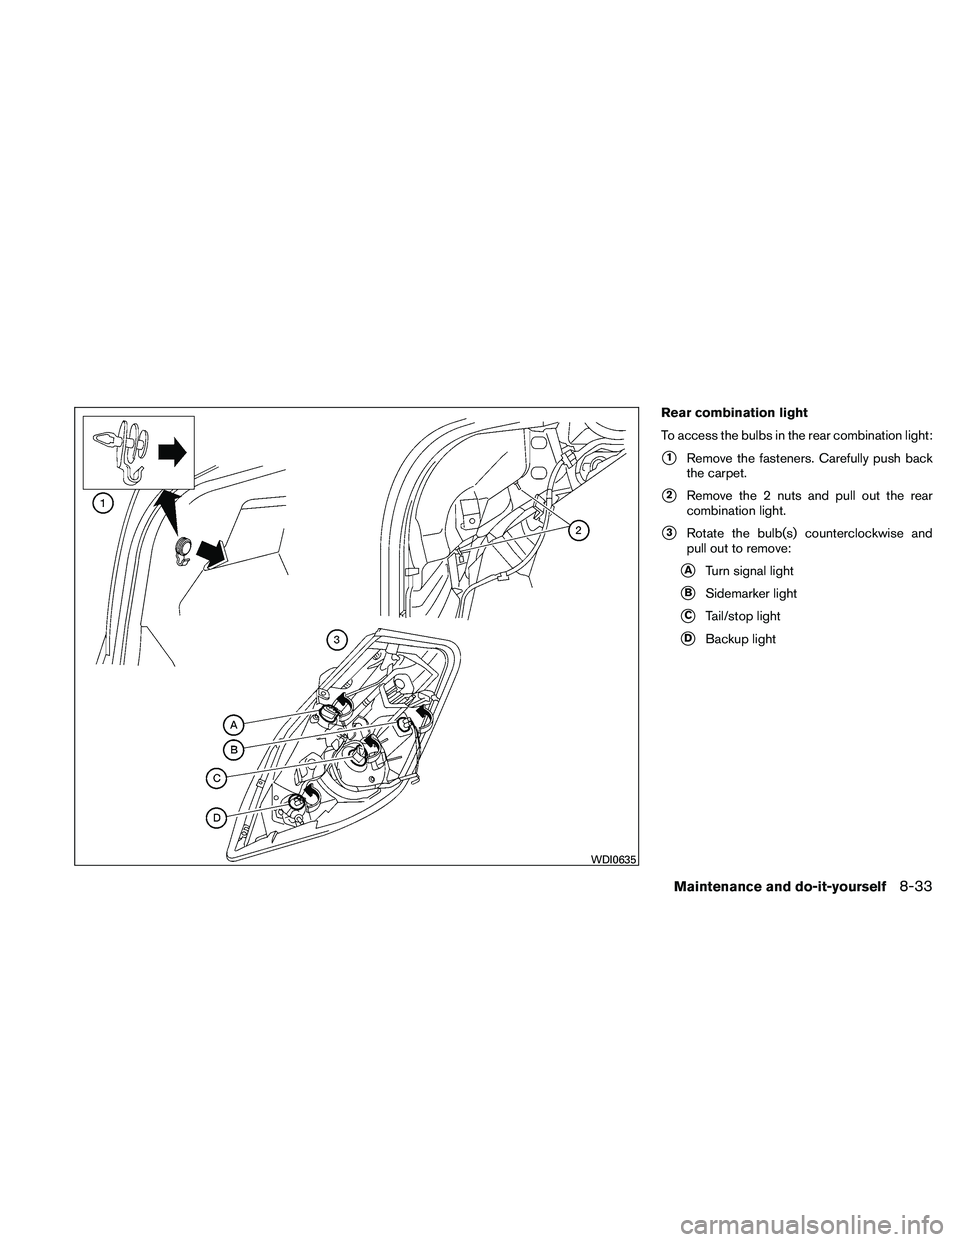
Rear combination light
To access the bulbs in the rear combination light:
�1Remove the fasteners. Carefully push back
the carpet.
�2Remove the 2 nuts and pull out the rear
combination light.
�3Rotate the bulb(s) counterclockwise and
pull out to remove:
�ATurn signal light
�BSidemarker light
�CTail/stop light
�DBackup light

:
When this item is enabled (indicator light illumi-
nated) , the clock format will change from the
default 12-hour display to a 24-hour display.
Offset (hour):
Adjust the time by in")