Page 227 of 422

Connecting iPod�
To connect an iPod�to the vehicle so that the
iPod� can be controlled with the audio system
controls and display screen")
iPod�* PLAYER OPERATION WITH
NAVIGATION SYSTEM (if so
equipped)
Connecting iPod�
To connect an iPod�to the vehicle so that the
iPod� can be controlled with the audio system
controls and display screen, use the USB jack
located in the center console. Open the protec-
tive cover
�1on the USB jack in the center
console. Then connect the iPod�-specific end of
the cable to the iPod� and the USB end of the
cable to the USB jack on the vehicle. If your iPod�
supports charging via a USB connection, its bat- tery will be charged while connected to the ve-
hicle with the ignition switch in the ACC or ON
position.
While connected to the vehicle, the iPod�
can
only be operated by the vehicle audio controls.
To disconnect the iPod� from the vehicle, remove
the USB end of the cable from the USB jack on
the vehicle, then remove the cable from the
iPod�.
*iPod �is a trademark of Apple Inc., registered in
the U.S. and other countries.
Compatibility
The following models are available:
● iPod� 5th Generation version 1.2.1
● iPod� Classic - version 1.1.1
● iPod� Touch - version 2.0.0
● iPod� Nano - 1st generation version 1.3.1
● iPod� Nano - 2nd generation version 1.1.3
● iPod� Nano - 3rd generation version 1.1
● iPod� Nano - 4thgeneration version 1.0.2
Make sure that your iPod� firmware is updated.Audio main operation
Place the ignition switch in the ACC or ON
position. Press the DISC·AUX button repeatedly
to switch to the iPod�mode.
If the system has been turned off while the iPod�
was playing, pressing the VOL/ON·OFF control
knob will start the iPod�.
LHA1357LHA1397
4-68Monitor, climate, audio, phone and voice recognition systems
Page 228 of 422
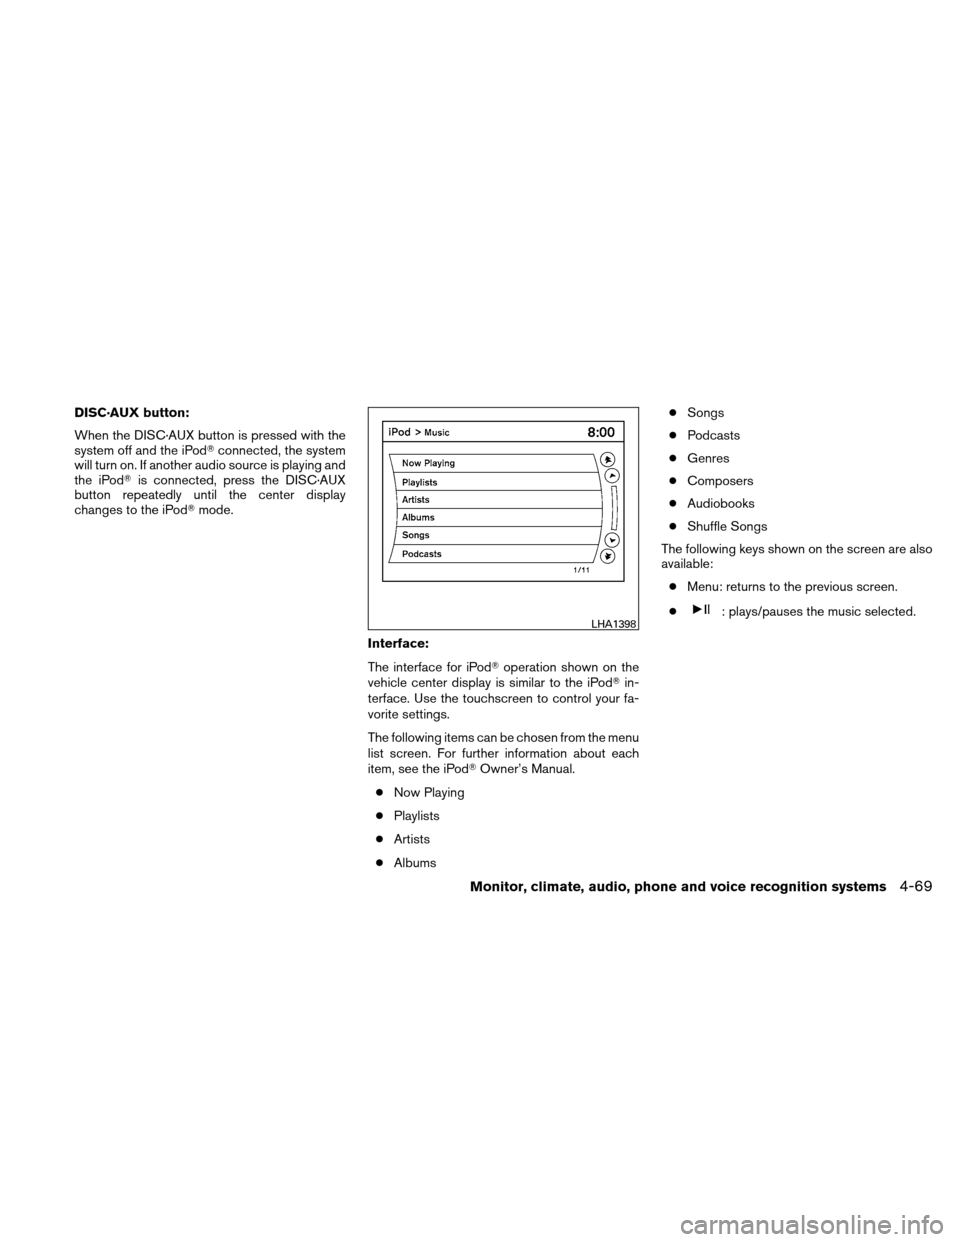
DISC·AUX button:
When the DISC·AUX button is pressed with the
system off and the iPod�connected, the system
will turn on. If another audio source is playing and
the iPod� is connected, press the DISC·AUX
button repeatedly until the center display
changes to the iPod� mode.
Interface:
The interface for iPod�operation shown on the
vehicle center display is similar to the iPod� in-
terface. Use the touchscreen to control your fa-
vorite settings.
The following items can be chosen from the menu
list screen. For further information about each
item, see the iPod� Owner’s Manual.
● Now Playing
● Playlists
● Artists
● Albums ●
Songs
● Podcasts
● Genres
● Composers
● Audiobooks
● Shuffle Songs
The following keys shown on the screen are also
available: ● Menu: returns to the previous screen.
●
: plays/pauses the music selected.LHA1398
Monitor, climate, audio, phone and voice recognition systems4-69
Page 229 of 422

Play mode:
While the iPod�is playing, touch the “Menu” key
to display the iPod� menu. Touch the “Play
Mode” key to display the Play Mode screen and
adjust the settings for Shuffle, Repeat and Audio-
books. For further information about each item,
see the iPod� Owner’s Manual.
Seeking button:
When the
orside of the seeking
button is pressed for less than 1.5 seconds while
the iPod� is playing, the next track or the begin-
ning of the current track on the iPod� will be
played. When the
orside of the seeking
button is pressed for more than 1.5 seconds
while the iPod� is playing, the iPod� will play
while fast forwarding or rewinding. When the
button is released, the iPod� will return to the
normal play speed.
Scrolling menus:
While navigating long lists of artists, albums or
songs in the music menu, it is possible to scroll
the list by the first letter. To activate letter index-
ing, touch and hold the page up/down arrows on
the touchscreen.
To exit the scrolling by letter mode, perform one of
the following:● Push the ENTER switch on the steering
wheel.
● Do not touch the controls for 2 seconds.
LHA1315LHA1399
4-70Monitor, climate, audio, phone and voice recognition systems
Page 231 of 422

If the title information of the track being recorded
is stored either in the hard drive or in the CD, the
title is automatically displayed on the screen. For
title acquisition from the hard drive, music recog-
nition technology and related data are provided
by Gracenote�.
To view the details of the track, touch the “Text”
key on the screen. The track name and album title
are displayed on the screen.
If a track is not recorded successfully due to
skipping sounds, the
symbol is displayed
behind the track number.
The Music Box audio system cannot perform
recording under the following conditions:
● There is not enough space in the hard drive.
● The number of albums reaches the maximum
of 500.
● The number of tracks reaches the maximum
of 3,000.
Automatic recording:
If the “Automatic Recording” function is turned to
ON, recording starts when a CD is inserted. For
more information, see “Music Box settings” in this
section. Stopping recording:
To stop the recording, touch the “Stop REC” key
on the screen. If the CD is ejected, the audio
system is turned off or the ignition switch is
placed in the OFF position, the recording also
stops.
Playing recorded songs
Select the Music Box audio system by using one
of the following methods:
● Press the SOURCE select switch on the
steering wheel.
For information, see “Steering wheel switch
for audio control” in this section.
● Press the DISC·AUX button repeatedly until
the center display changes to the Music Box
mode.
LHA1283
4-72Monitor, climate, audio, phone and voice recognition systems
Page 238 of 422
4. A screen will appear asking if you are con-necting the device to use with the hands-
free phone system. Select the “No” key. 5. Enter a PIN of your choice. It will be needed
by your Bluetooth� audio device to com-
plete the connection process. See the
Bluetooth� audio device’s owner’s manual
for more information.Audio main operation
To switch to the Bluetooth� audio mode, press
the DISC-AUX button repeatedly until the
Bluetooth� audio mode is displayed on the
screen.
The controls for the Bluetooth� audio are dis-
played on the screen.
LHA1317LHA1351LHA1299
Monitor, climate, audio, phone and voice recognition systems4-79
Page 241 of 422
1. Source select and Power on switch
2. Tuning switch
3. Volume control switch1. Source select and Power on switch
2. Tuning switch
3. Volume control switch1. Source select and Power on switch
2. Menu control switch/ENTER button
3. Volume control switch
STEERING WHEEL SWITCH FOR
AUDIO CONTROL (if so equipped)
POWER on switch
With the ignition switch in the ACC or ON posi-
tion, push the SOURCE switch to turn the audio
system on.
Type A
LHA0752
Type B
LHA0753
Type C
LHA0754
4-82Monitor, climate, audio, phone and voice recognition systems
Page 242 of 422

SOURCE select switch
Push the source select switch to change the
mode in the following sequence:
Type A Switch:
PRESET BANK A→PRESET BANK B →PRE-
SET BANK C →CD* →AUX* →PRESET BANK
A.
* These modes are only available when compat-
ible media storage is inserted into the device.
While in one of the preset radio station banks (A,
B or C) , use the tuning switch
orto
select one of the preset radio stations (1 – 6) .
Type B Switch:
AM →FM* →XM* (satellite radio, if so equipped)
→ CD** →USB/iPod** →AUX** →AM
* When using the SOURCE switch, the audio
mode switches to the FM preset bank (FM1 or
FM2) or XM preset bank (XM1 or XM2) that was
last active. To switch between the FM1 and FM2
preset banks or the XM1 and XM2 preset banks,
use the controls on the audio system.
** These modes are only available when compat-
ible media is connected to the system. Type C Switch:
AM
→FM1 →FM2 →XM1 →XM2 →XM3
(satellite radio, if so equipped) →CD/DVD*→
Music Box** →USB/iPod�* →Bluetooth� Au-
dio* →AUX* →AM.
* These modes are only available when compat-
ible media storage is inserted into the device.
** This mode is only available when music has
been downloaded into the Music Box system.
Volume control switch
Push the volume control switch to increase or
decrease the volume.
Tuning (Type A and Type B switches only)
Memory change (radio):
While in one of the preset radio station banks,
push the tuning switch
orfor less
than 1.5 seconds to change to the next preset
station in memory.
Seek tuning (radio):
Push the tuning switch
orfor more
than 1.5 seconds to seek the next or previous
radio station. Next/Previous track (CD):
Push the tuning switch
orfor less
than 1.5 seconds to return to the beginning of the
present track or skip to the next track. Push
several times to skip back or skip through tracks.
Menu control
switch/ENTER button
(Type C switch only)
While the display is showing a map or audio
screen, tilt the Menu Control switch upward or
downward to select a station, track, CD or folder.
For most audio sources, tilting the switch
up/down for more than 1.5 seconds provides a
different function than a tilting up/down for less
than 1.5 seconds.
AM and FM:
● Tilt up/down for less than 1.5 seconds to
increase or decrease the preset station.
● Tilt up/down for more than 1.5 seconds to
seek up or down to the next station.
● Press the ENTER button to show the list of
preset stations.
Monitor, climate, audio, phone and voice recognition systems4-83
Page 243 of 422
:● Tilt up/down for less than 1.5 seconds to
increase or decrease the preset station.
● Tilt up/down for more than 1.5 seconds to
go to the next or previous category.
● Press")
XM (if so equipped):● Tilt up/down for less than 1.5 seconds to
increase or decrease the preset station.
● Tilt up/down for more than 1.5 seconds to
go to the next or previous category.
● Press the ENTER button to show the XM
Menu.
iPod�: ● Tilt up/down for less than 1.5 seconds to
increase or decrease the track number.
● Press the ENTER button to show the iPod
Menu.
CD: ● Tilt up/down for less than 1.5 seconds to
increase or decrease the track number.
● Tilt up/down for more than 1.5 seconds to
increase or decrease the folder number (if
playing compressed audio files) .
● Press the ENTER button to show the CD
Menu. DVD:
● Tilt up/down for less than 1.5 seconds to
increase or decrease the track number.
● Tilt up/down for more than 1.5 seconds to
increase or decrease the title number.
● Press the ENTER button to select an item
from the DVD display.
● When the transparent operation menu ap-
pears, the switch will control the menu.
USB: ● Tilt up/down for less than 1.5 seconds to
increase or decrease the track number.
● Tilt up/down for more than 1.5 seconds to
increase or decrease the folder number.
● Press the ENTER button to show the USB
Menu.
Music Box: ● Tilt up/down for less than 1.5 seconds to
increase or decrease the track number.
● Tilt up/down for more than 1.5 seconds to
increase or decrease the album (folder)
number (if playing compressed audio files) .
● Press the ENTER button to show the Music
Box Menu. Bluetooth�
Audio:
● Tilt up/down for less than 1.5 seconds to
increase or decrease the track number.
AUX: ● Press the ENTER button to show the AUX
Menu.
4-84Monitor, climate, audio, phone and voice recognition systems