Page 239 of 422
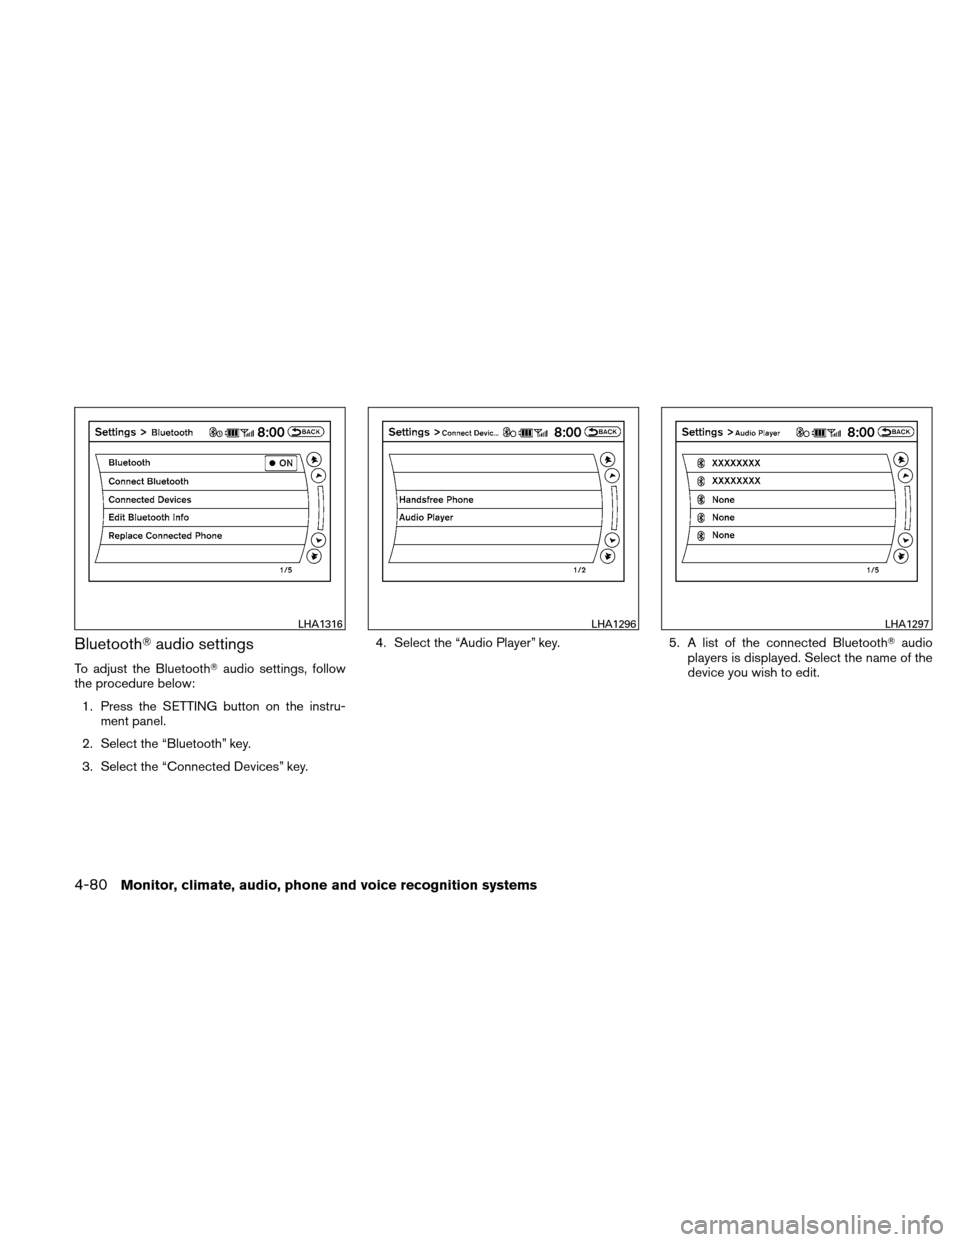
Bluetooth�audio settings
To adjust the Bluetooth� audio settings, follow
the procedure below:
1. Press the SETTING button on the instru- ment panel.
2. Select the “Bluetooth” key.
3. Select the “Connected Devices” key. 4. Select the “Audio Player” key.
5. A list of the connected Bluetooth�audio
players is displayed. Select the name of the
device you wish to edit.
LHA1316LHA1296LHA1297
4-80Monitor, climate, audio, phone and voice recognition systems
Page 240 of 422
6. The Device Name and Device Address aredisplayed on the screen. Select the “Select”
key to make this device the active
Bluetooth� audio player. Select the “Edit”
key to edit the details of the player, such as
Device Name. Select the “Delete” key to
delete the device.CD CARE AND CLEANING
● Handle a CD by its edges. Do not bend the
disc. Never touch the surface of the disc.
● Always place the discs in the storage case
when they are not being used.
● To clean a disc, wipe the surface from the
center to the outer edge using a clean, soft
cloth. Do not wipe the disc using a circular
motion.
● Do not use a conventional record cleaner or
alcohol intended for industrial use. ●
A new disc may be rough on the inner and
outer edges. Remove the rough edges by
rubbing the inner and outer edges with the
side of a pen or pencil as illustrated.
LHA1298LHA0049
Monitor, climate, audio, phone and voice recognition systems4-81
Page 241 of 422
1. Source select and Power on switch
2. Tuning switch
3. Volume control switch1. Source select and Power on switch
2. Tuning switch
3. Volume control switch1. Source select and Power on switch
2. Menu control switch/ENTER button
3. Volume control switch
STEERING WHEEL SWITCH FOR
AUDIO CONTROL (if so equipped)
POWER on switch
With the ignition switch in the ACC or ON posi-
tion, push the SOURCE switch to turn the audio
system on.
Type A
LHA0752
Type B
LHA0753
Type C
LHA0754
4-82Monitor, climate, audio, phone and voice recognition systems
Page 242 of 422

SOURCE select switch
Push the source select switch to change the
mode in the following sequence:
Type A Switch:
PRESET BANK A→PRESET BANK B →PRE-
SET BANK C →CD* →AUX* →PRESET BANK
A.
* These modes are only available when compat-
ible media storage is inserted into the device.
While in one of the preset radio station banks (A,
B or C) , use the tuning switch
orto
select one of the preset radio stations (1 – 6) .
Type B Switch:
AM →FM* →XM* (satellite radio, if so equipped)
→ CD** →USB/iPod** →AUX** →AM
* When using the SOURCE switch, the audio
mode switches to the FM preset bank (FM1 or
FM2) or XM preset bank (XM1 or XM2) that was
last active. To switch between the FM1 and FM2
preset banks or the XM1 and XM2 preset banks,
use the controls on the audio system.
** These modes are only available when compat-
ible media is connected to the system. Type C Switch:
AM
→FM1 →FM2 →XM1 →XM2 →XM3
(satellite radio, if so equipped) →CD/DVD*→
Music Box** →USB/iPod�* →Bluetooth� Au-
dio* →AUX* →AM.
* These modes are only available when compat-
ible media storage is inserted into the device.
** This mode is only available when music has
been downloaded into the Music Box system.
Volume control switch
Push the volume control switch to increase or
decrease the volume.
Tuning (Type A and Type B switches only)
Memory change (radio):
While in one of the preset radio station banks,
push the tuning switch
orfor less
than 1.5 seconds to change to the next preset
station in memory.
Seek tuning (radio):
Push the tuning switch
orfor more
than 1.5 seconds to seek the next or previous
radio station. Next/Previous track (CD):
Push the tuning switch
orfor less
than 1.5 seconds to return to the beginning of the
present track or skip to the next track. Push
several times to skip back or skip through tracks.
Menu control
switch/ENTER button
(Type C switch only)
While the display is showing a map or audio
screen, tilt the Menu Control switch upward or
downward to select a station, track, CD or folder.
For most audio sources, tilting the switch
up/down for more than 1.5 seconds provides a
different function than a tilting up/down for less
than 1.5 seconds.
AM and FM:
● Tilt up/down for less than 1.5 seconds to
increase or decrease the preset station.
● Tilt up/down for more than 1.5 seconds to
seek up or down to the next station.
● Press the ENTER button to show the list of
preset stations.
Monitor, climate, audio, phone and voice recognition systems4-83
Page 243 of 422
:● Tilt up/down for less than 1.5 seconds to
increase or decrease the preset station.
● Tilt up/down for more than 1.5 seconds to
go to the next or previous category.
● Press")
XM (if so equipped):● Tilt up/down for less than 1.5 seconds to
increase or decrease the preset station.
● Tilt up/down for more than 1.5 seconds to
go to the next or previous category.
● Press the ENTER button to show the XM
Menu.
iPod�: ● Tilt up/down for less than 1.5 seconds to
increase or decrease the track number.
● Press the ENTER button to show the iPod
Menu.
CD: ● Tilt up/down for less than 1.5 seconds to
increase or decrease the track number.
● Tilt up/down for more than 1.5 seconds to
increase or decrease the folder number (if
playing compressed audio files) .
● Press the ENTER button to show the CD
Menu. DVD:
● Tilt up/down for less than 1.5 seconds to
increase or decrease the track number.
● Tilt up/down for more than 1.5 seconds to
increase or decrease the title number.
● Press the ENTER button to select an item
from the DVD display.
● When the transparent operation menu ap-
pears, the switch will control the menu.
USB: ● Tilt up/down for less than 1.5 seconds to
increase or decrease the track number.
● Tilt up/down for more than 1.5 seconds to
increase or decrease the folder number.
● Press the ENTER button to show the USB
Menu.
Music Box: ● Tilt up/down for less than 1.5 seconds to
increase or decrease the track number.
● Tilt up/down for more than 1.5 seconds to
increase or decrease the album (folder)
number (if playing compressed audio files) .
● Press the ENTER button to show the Music
Box Menu. Bluetooth�
Audio:
● Tilt up/down for less than 1.5 seconds to
increase or decrease the track number.
AUX: ● Press the ENTER button to show the AUX
Menu.
4-84Monitor, climate, audio, phone and voice recognition systems
Page 244 of 422

ANTENNA
The antenna cannot be shortened, but can be
removed. When you need to remove the antenna,
turn the antenna rod counterclockwise
�B.
To install the antenna rod, turn the antenna rod
clockwise
�Aand hand tighten.
CAUTION
Always properly tighten the antenna rod
during installation or the antenna rod may
break during vehicle operation.
Window antenna
The antenna pattern is printed inside the rear
window.
CAUTION
● Do not place metalized film near the
rear window glass or attach any metal
parts to it. This may cause poor recep-
tion or noise.
● When cleaning the inside of the rear
window, be careful not to scratch or
damage the rear window antenna.
Lightly wipe along the antenna with a
dampened soft cloth. When installing a CB, ham radio or car phone in
your NISSAN, be sure to observe the following
precautions; otherwise, the new equipment may
adversely affect the engine control system and
other electronic parts.WARNING
●
A cellular telephone should not be used
while driving so full attention may be
given to vehicle operation. Some juris-
dictions prohibit the use of cellular tele-
phones while driving.
● If you must make a call while your ve-
hicle is in motion, the hands free cellu-
lar phone operational mode (if so
equipped) is highly recommended. Ex-
ercise extreme caution at all times so
full attention may be given to vehicle
operation.
● If you are unable to devote full attention
to vehicle operation while talking on
the phone, pull off the road to a safe
location and stop your vehicle.
WHA0790
CAR PHONE OR CB RADIO
Monitor, climate, audio, phone and voice recognition systems4-85
Page 245 of 422
 away from the electronic con-
trol system harnesses. Do not")
CAUTION
●Keep the antenna as far away as pos-
sible from the electronic control
modules.
● Keep the antenna wire more than 8 in
(20 cm) away from the electronic con-
trol system harnesses. Do not route the
antenna wire next to any harness.
● Adjust the antenna standing-wave ratio
as recommended by the manufacturer.
● Connect the ground wire from the CB
radio chassis to the body.
● For details, consult a NISSAN dealer.
WARNING
●Use a phone after stopping your vehicle
in a safe location. If you have to use a
phone while driving, exercise extreme
caution at all times so full attention may
be given to vehicle operation.
● If you are unable to devote full attention
to vehicle operation while talking on
the phone, pull off the road to a safe
location and stop your vehicle.
CAUTION
To avoid discharging the 12-volt battery,
use a phone when the Hybrid System is in
the READY mode.
BLUETOOTH� HANDS-FREE PHONE
SYSTEM WITHOUT NAVIGATION
SYSTEM (if so equipped)
4-86Monitor, climate, audio, phone and voice recognition systems
Page 246 of 422

Your NISSAN is equipped with the Bluetooth�
Hands-Free Phone System. If you have an ap-
proved Bluetooth�enabled cellular phone, you
can set up the wireless connection between your
cellular phone and the in-vehicle phone module.
With Bluetooth� wireless technology, you can make or receive a hands-free telephone call with
your cellular phone in the vehicle.
Once your cellular phone is connected to the in-
vehicle phone module, no other phone connecting
procedure is required. Your phone is automatically
connected with the in-vehicle phone module when the ignition switch is pushed to the ON position
with the previously connected cellular phone
turned on and carried in the vehicle.
You can connect up to 5 different Bluetooth
�
cellular phones to the in-vehicle phone module.
However, you can talk on only one cellular phone
at a time.
Before using the Bluetooth� Hands-Free Phone
System, refer to the following notes.
● Set up the wireless connection between a
cellular phone and the in-vehicle phone
module before using the hands-free phone
system.
●
Some Bluetooth� enabled cellular phones may
not be recognized by the in-vehicle phone mod-
ule. Please visit www.nissanusa.com/bluetooth
for a recommended phone list and connecting
instructions.
● You will not be able to use a hands-free
phone under the following conditions:
– Your vehicle is outside of the cellular ser- vice area.
– Your vehicle is in an area where it is difficult to receive cellular signal; such as
in a tunnel, in an underground parking
garage, near a tall building or in a moun-
tainous area.
WHA1042
Monitor, climate, audio, phone and voice recognition systems4-87