Page 367 of 440
 and
L (Low) marks
�B. This is the normal oper-
ating oil level range. If the oil level is below
the L (Low) mark")
5. Remove the dipstick again and check the oillevel. It should be between the H (High) and
L (Low) marks
�B. This is the normal oper-
ating oil level range. If the oil level is below
the L (Low) mark
�A, remove the oil filler cap
and pour recommended oil through the
opening. Do not overfill
�C.
6. Recheck oil level with the dipstick.
It is normal to add some oil between oil
maintenance intervals or during the
break-in period, depending on the severity
of operating conditions.
CAUTION
Oil level should be checked regularly. Op-
erating the engine with an insufficient
amount of oil can damage the engine, and
such damage is not covered by warranty.
CHANGING ENGINE OIL
1. Park the vehicle on a level surface and apply the parking brake.
2. Start the engine and let it idle until it reaches operating temperature, then turn it off.
3. Remove the oil filler
�Acap by turning it
counterclockwise.
4. Place a large drain pan under the drain plug
�B.
WDI0214
QR25DE
WDI0492
8-10Maintenance and do-it-yourself
Page 368 of 440

5. Remove the drain plug�Bwith a wrench by
turning it counterclockwise and completely
drain the oil.
If the oil filter is to be changed, remove and
replace it at this time. See “Changing engine
oil filter” later in this section.
● Waste oil must be disposed of prop-
erly.
● Check your local regulations.
WARNING
●Prolonged and repeated contact with
used engine oil may cause skin cancer.
● Try to avoid direct skin contact with
used oil. If skin contact is made, wash
thoroughly with soap or hand cleaner
as soon as possible.
● Keep used engine oil out of reach of
children.
CAUTION
Be careful not to burn yourself. The engine
oil may be hot.
6. Clean and reinstall the drain plug and a new washer. Securely tighten the drain plug with
a wrench. Do not use excessive force.
Drain plug tightening torque: 22 - 29 ft-lb (29 - 39 N·m)
7. Refill engine with recommended oil through the oil filler opening, then install the oil filler
cap securely.
See “Capacities and recommended
fuel/lubricants” in the “Technical and con-
sumer information” section of this manual for
drain and refill capacity. The drain and refill capacity depends on the
oil temperature and drain time. Use these
specifications for reference only. Always use
the dipstick to determine when the proper
amount of oil is in the engine.
8. Start the engine. Check for leakage around the drain plug and oil filter. Correct as re-
quired.
9. Turn the engine off and wait more than 10 minutes. Check the oil level with the dipstick.
Add engine oil if necessary.
VQ35DE
WDI0493
Maintenance and do-it-yourself8-11
Page 369 of 440

CHANGING ENGINE OIL FILTER
1. Park the vehicle on a level surface and applythe parking brake.
2. Turn the engine off.
3. Place a large drain pan under the oil filter
�A.
4. Loosen the oil filter
�Awith an oil filter
wrench by turning it counterclockwise. Then
remove the oil filter by turning it by hand.
CAUTION
Be careful not to burn yourself. The engine
oil may be hot.
5. Wipe the engine oil filter sealing surface with a clean rag.
CAUTION
Be sure to remove any old gasket material
remaining on the sealing surface of the
engine. Failure to do so could lead to
engine damage. 6. Coat the gasket on the new filter with clean
engine oil.
7. Screw on the oil filter until a slight resistance is felt, then tighten an additional 2/3 turn.
8. Start the engine and check for leakage around the oil filter. Correct as required.
9. Turn the engine off and wait more than 10 minutes. Check the oil level. Add engine oil if
necessary.
QR25DE
WDI0494
VQ35DE
WDI0495
8-12Maintenance and do-it-yourself
Page 390 of 440
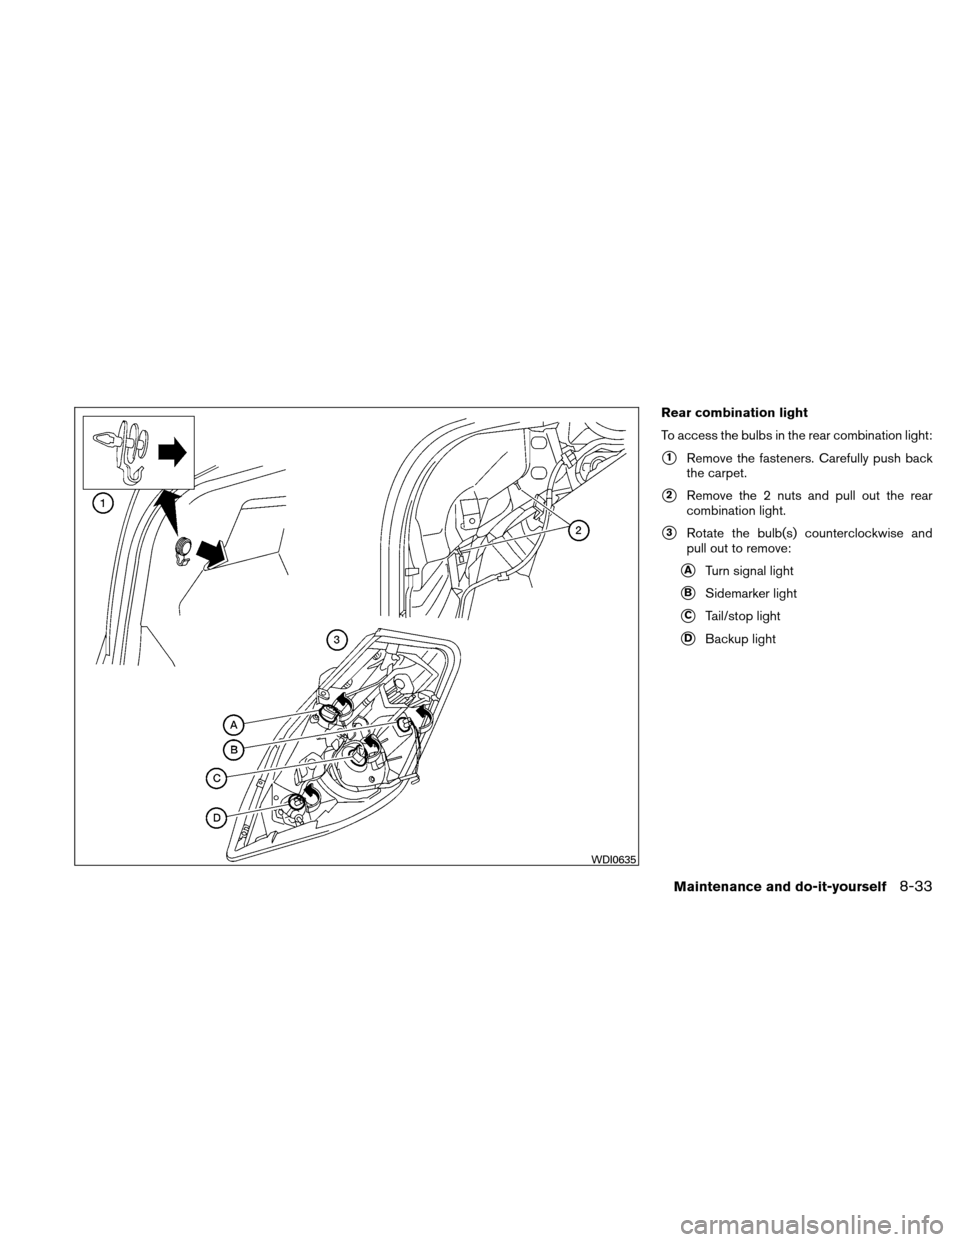
Rear combination light
To access the bulbs in the rear combination light:
�1Remove the fasteners. Carefully push back
the carpet.
�2Remove the 2 nuts and pull out the rear
combination light.
�3Rotate the bulb(s) counterclockwise and
pull out to remove:
�ATurn signal light
�BSidemarker light
�CTail/stop light
�DBackup light
WDI0635
Maintenance and do-it-yourself8-33
Page 433 of 440

Precautions on child
restraints.........1-24, 1-30, 1-35, 1-39
Top tether strap anchor point locations . .1-28
Child safety rear door lock ............3-6
Chimes, audible reminders ...........2-16
Cleaning exterior and interior ...........7-2
Clock ...................4-45, 4-50
(models with navigation system) .......4-8
(models without navigation system) . . . .4-45
Clock set ..................4-8, 4-45
Clutch Clutch fluid ..................8-14
C.M.V.S.S. certification label ..........9-10
Cold weather driving ..............5-27
Compact disc (CD)
player ............4-46, 4-52, 4-58, 4-64
Compass display .................2-6
Console box ...................2-39
Console light ...................2-47
Continuously Variable Transmission (CVT). . .5-11 Continuously Variable Transmission
(CVT) fluid ..................8-13
Driving with Continuously Variable
Transmission (CVT) .............5-11
Transmission shift selector lock release . .5-15
Control panel buttons ...............4-2
Brightness/contrast button .........4-12
Enter button ..................4-2
Setting button .................4-6
Controls Heater and air conditioner
controls ................4-19, 4-26
Coolant Capacities and recommended
fuel/lubricants .................9-2
Changing engine coolant ...........8-9 Checking engine coolant level
........8-8
Engine coolant temperature gauge .....2-5
Corrosion protection ...............7-6
Cruise control ..................5-20
Cup holders ................2-38, 2-39
D
Daytime running light system (Canada only) . .2-31
Defroster switch Rear window and outside mirror defroster
switch .....................2-27
Digital Versatile Disc (DVD) player .......4-63
Dimensions
and weights .............9-8
Dimmer switch for instrument panel ......2-32
Display controls (see control panel buttons) . .4-2
Door locks .....................3-4
Drive belt .....................8-18
Driving Cold weather driving ............5-27
Driving with Continuously Variable
Transmission (CVT) .............5-11
Driving with manual transmission ......5-17
Precautions when starting and driving . . . .5-2
E
Economy - fuel ..................5-22
Emission control information label .......9-11
Emission control system warranty .......9-25
Engine Before starting the engine ..........5-9
Block heater .................5-29 Capacities and recommended
fuel/lubricants
.................9-2
Changing engine coolant ...........8-9
Changing engine oil .............8-10
Changing engine oil filter ..........8-12
Checking engine coolant level ........8-8
Checking engine oil level ...........8-9
Engine compartment check locations . . . .8-6
Engine coolant temperature gauge .....2-5
Engine cooling system ............8-8
Engine oil ...................8-9
Engine oil and oil filter recommendation . . .9-5
Engine oil pressure warning light ......2-12
Engine oil viscosity ..............9-5
Engine serial number ............9-10
Engine specifications .............9-7
Starting the engine .............5-10
Enter button ....................4-2
Event data recorders ..............9-27
Exhaust gas (Carbon monoxide) .........5-2
Eyeglass case ..................2-37
F
Flashers
(See hazard warning flasher switch) ......2-33
Flat
tire.......................6-2
Floor mat positioning aid .............7-5
Fluid Brake fluid ..................8-14
Capacities and recommended
fuel/lubricants .................9-2
Clutch fluid ..................8-14
Continuously Variable Transmission
(CVT) fluid ..................8-13
10-2