2010 NISSAN 370Z COUPE trunk release
[x] Cancel search: trunk releasePage 12 of 409
Black plate (8,1)
Model "Z34-D" EDITED: 2009/ 9/ 10
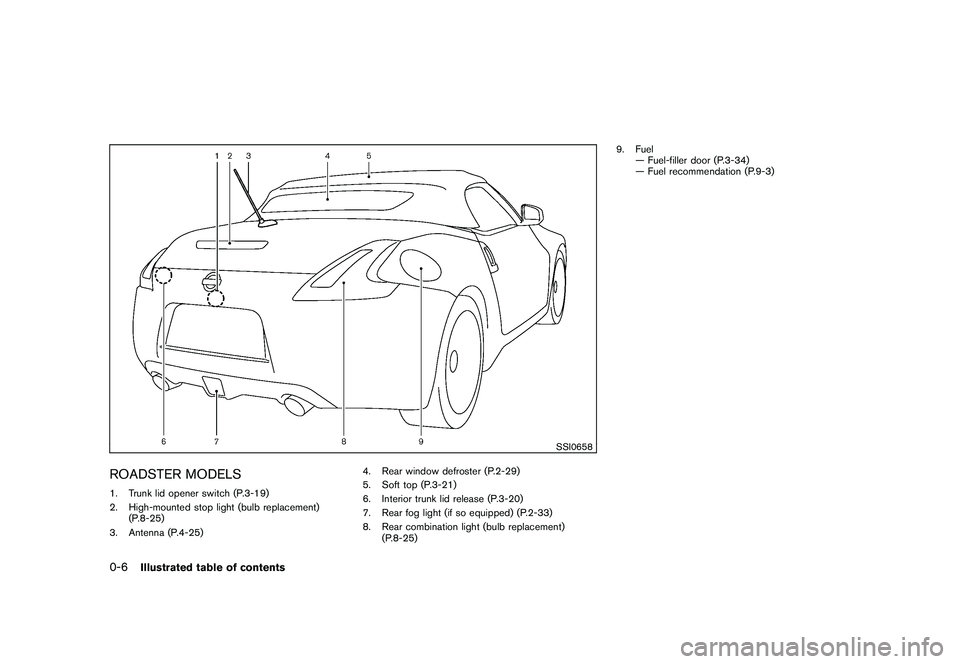
SSI0658
ROADSTER MODELS1. Trunk lid opener switch (P.3-19)
2. High-mounted stop light (bulb replacement)(P.8-25)
3. Antenna (P.4-25) 4. Rear window defroster (P.2-29)
5. Soft top (P.3-21)
6. Interior trunk lid release (P.3-20)
7. Rear fog light (if so equipped) (P.2-33)
8. Rear combination light (bulb replacement)
(P.8-25) 9. Fuel
— Fuel-filler door (P.3-34)
— Fuel recommendation (P.9-3)0-6
Illustrated table of contents
Page 15 of 409
Black plate (11,1)
Model "Z34-D" EDITED: 2009/ 9/ 10
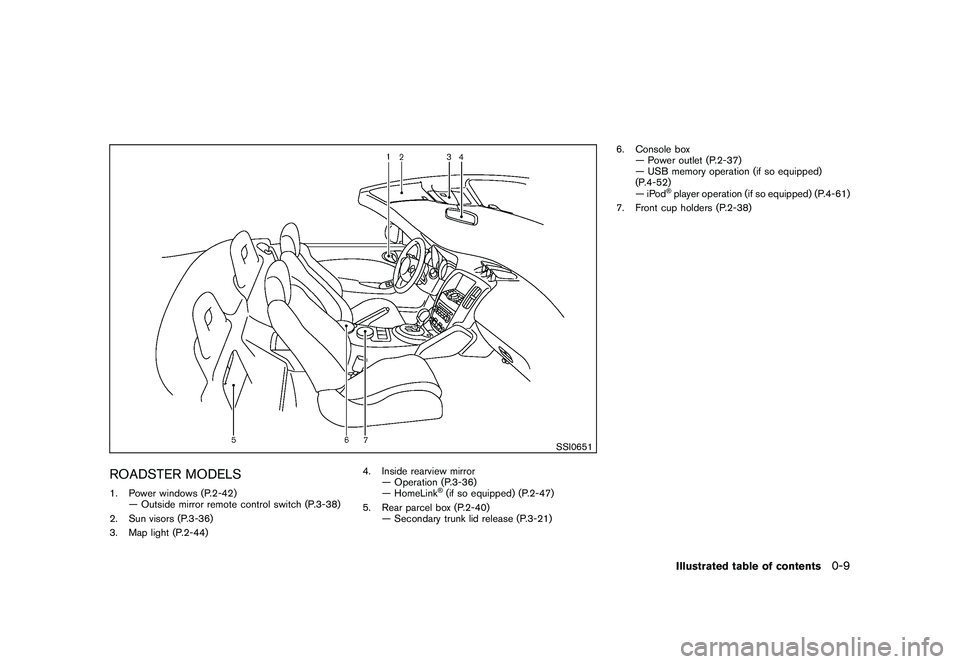
SSI0651
ROADSTER MODELS1. Power windows (P.2-42)— Outside mirror remote control switch (P.3-38)
2. Sun visors (P.3-36)
3. Map light (P.2-44) 4. Inside rearview mirror
— Operation (P.3-36)
— HomeLink
®(if so equipped) (P.2-47)
5. Rear parcel box (P.2-40) — Secondary trunk lid release (P.3-21) 6. Console box
— Power outlet (P.2-37)
— USB memory operation (if so equipped)
(P.4-52)
—iPod
®player operation (if so equipped) (P.4-61)
7. Front cup holders (P.2-38)Illustrated table of contents
0-9
Page 76 of 409

Black plate (74,1)
Model "Z34-D" EDITED: 2009/ 9/ 10
Rear fog light indicator light (if so
equipped)
The rear fog light indicator light illuminates when
the rear fog light is on. (See “FOG LIGHT
SWITCH” later in this section.)
Security indicator light
The light blinks when the ignition switch is in the
ACC, OFF or LOCK position. This function
indicates the security system equipped on the
vehicle is operational.
If the security system is malfunctioning, this light
will remain on while the ignition switch is in the
ON position. For additional information, see
“SECURITY SYSTEMS” later in this section.
Slip indicator light
This indicator will blink when the VDC system or
the traction control system is operating, thus
alerting the driver that the vehicle is nearing its
traction limits. The road surface may be slippery.
Small light indicator light
The light illuminates when the headlight switch is
turned to the
position.
Soft top indicator light (Roadster
models)
This light illuminates when the soft top is being
operated or it is stopped before reaching a full
open/close state. When the top is fully opened
or closed, the light will turn off.
The light blinks while the soft top is not fully
opened or closed under the following condi-
tions:
.When the vehicle is driven.
. When the selector lever or shift lever is in
the R (Reverse) position.
Be sure to fully open or close the soft top when
driving the vehicle.
The soft top can be moved with the soft top
operating switch only under all of the following
conditions:
. When the vehicle is stopped.
. When the ignition switch is ON.
. When the trunk is closed.
. When the selector lever or shift lever is in a
position other than the R (Reverse) position.
CAUTION
Operate the soft top with the engine
running to prevent a discharged battery.
When the soft top is operating, if any of the
above conditions are discontinued or any of the
following conditions are met, the top will stop
operating.
. When the selector lever or shift lever is in
the R (Reverse) position.
. When the vehicle moves at a speed of 3
MPH (5 km/h) or more.
. When the battery voltage is extremely low.
. When the temperature of the soft top
system becomes extremely high.
Release the operating switch, and push it again
under the above conditions until the top is fully
opened or closed. The soft top indicator light will
turn off when the top operation is completely
finished.
If the soft top indicator light illuminates with the
ignition switch ON, it may indicate the electric
soft top control unit is not functioning properly.
Have your vehicle checked by a NISSAN dealer
as soon as possible.
2-14
Instruments and controls
Page 80 of 409

Black plate (78,1)
Model "Z34-D" EDITED: 2009/ 9/ 10
SIC4027
WARNINGS AND ALERTS
1. Parking brake release warningThis warning appears when the vehicle speed is
above 4 MPH (7 km/h) and the parking brake is
applied.
2. Low fuel warningThis warning appears when the fuel level in the
tank is getting low. Refuel as soon as it is
convenient, preferably before the fuel gauge
reaches the empty (E) position.There is a small reserve of fuel remaining
in the tank when the fuel gauge reaches
the empty (E) position.
3. Low washer fluid warningThis warning appears when the washer tank fluid
is at a low level. Add washer fluid as necessary.
(See “WINDOW WASHER FLUID” in the “8.
Maintenance and do-it-yourself” section.)4. Door/rear hatch/trunk open warning
(ignition switch is in the ON position)This warning appears if any of the doors and/or
the rear hatch/trunk are open or not closed
securely. The vehicle icon indicates which door
is open on the display.5. “Time to rest” indicatorThis indicator appears when the set “time to
rest” indicator activates. You can set the time for
up to 6 hours. (See “TRIP COMPUTER” later in
this section.)6. Low outside temperature warningThis warning appears if the outside temperature
is below 37
8F(3 8C) . The warning can be set not
to be displayed. (See “TRIP COMPUTER” later
in this section.)7. SynchroRev Match mode (S-MODE)
warningThis warning appears if a system malfunction
2-18
Instruments and controls
Page 113 of 409
Black plate (10,1)
3 Pre-driving checks and adjustments
Model "Z34-D" EDITED: 2009/ 9/ 10
Keys ............................................................... 3-2Intelligent Key ................................................ 3-2
Valet hand-off ................................................ 3-3
Doors .............................................................. 3-4
Locking with mechanical key ............................. 3-4
Opening and closing windows with the
mechanical key .............................................. 3-4
Locking with inside lock knob ........................... 3-5
Locking with power door lock switch .................. 3-5
Automatic door locks ...................................... 3-5
Intelligent Key system .......................................... 3-6
Intelligent Key operating range .......................... 3-8
Door locks/unlocks precaution .......................... 3-8
Intelligent Key operation ................................... 3-9
Battery saver system ..................................... 3-11
Warning signals ........................................... 3-11
Troubleshooting guide ................................... 3-12
Remote keyless entry system .............................. 3-13
How to use remote keyless entry system ........... 3-13
Hood ............................................................ 3-16
Rear hatch (Coupe models) ................................ 3-17
Rear hatch opener switch .............................. 3-17
Secondary rear hatch release .......................... 3-18
Trunk lid (Roadster models) ................................ 3-19
Trunk lid opener switch .................................. 3-19 Trunk release power cancel switch
................... 3-19
Interior trunk lid release ................................. 3-20
Secondary trunk lid release ............................ 3-21
Soft top (Roadster models) ................................ 3-21
Before operating the top ................................ 3-21
When operating the top ................................. 3-23
Opening the top .......................................... 3-25
Closing the top ............................................ 3-26
Opening the top using the Intelligent Key ........... 3-26
Troubleshooting guide ................................... 3-27
If the top does not open or close electrically . . .... 3-28
Care of the soft top and the vehicle body .......... 3-32
Front, side and rear unique parts
(NISMO models) .............................................. 3-32
Fuel-filler door ................................................. 3-34
Opening the fuel-filler door ............................. 3-34
Fuel-filler cap .............................................. 3-34
Tilt steering ..................................................... 3-35
Manual operation ......................................... 3-36
Sun visors ...................................................... 3-36
Mirrors ........................................................... 3-36
Inside mirror ................................................ 3-36
Outside mirrors ............................................ 3-38
Vanity mirror ................................................ 3-39
Page 115 of 409
Black plate (115,1)
Model "Z34-D" EDITED: 2009/ 9/ 10
near an electric appliance such
as a television set, personal
computer or cellular phone.
— Do not allow the Intelligent Key to come into contact with water
or salt water, and do not wash it
in a washing machine. This
could affect the system function.
. If an Intelligent Key is lost or stolen,
NISSAN recommends erasing the ID
code of that Intelligent Key. This will
prevent the Intelligent Key from
unauthorized use to unlock the
vehicle. For information regarding
the erasing procedure, please con-
tact a NISSAN dealer.
SPA2033
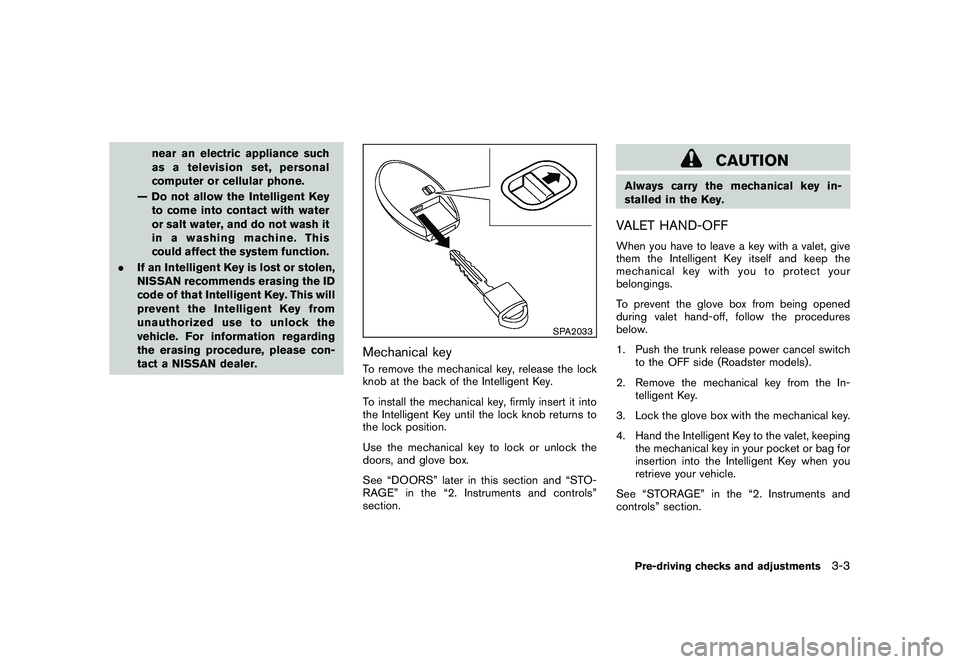
Mechanical keyTo remove the mechanical key, release the lock
knob at the back of the Intelligent Key.
To install the mechanical key, firmly insert it into
the Intelligent Key until the lock knob returns to
the lock position.
Use the mechanical key to lock or unlock the
doors, and glove box.
See “DOORS” later in this section and “STO-
RAGE” in the “2. Instruments and controls”
section.
CAUTION
Always carry the mechanical key in-
stalled in the Key.VALET HAND-OFFWhen you have to leave a key with a valet, give
them the Intelligent Key itself and keep the
mechanical key with you to protect your
belongings.
To prevent the glove box from being opened
during valet hand-off, follow the procedures
below.
1. Push the trunk release power cancel switch
to the OFF side (Roadster models) .
2. Remove the mechanical key from the In- telligent Key.
3. Lock the glove box with the mechanical key.
4. Hand the Intelligent Key to the valet, keeping the mechanical key in your pocket or bag for
insertion into the Intelligent Key when you
retrieve your vehicle.
See “STORAGE” in the “2. Instruments and
controls” section.
Pre-driving checks and adjustments
3-3
Page 126 of 409
Black plate (126,1)
Model "Z34-D" EDITED: 2009/ 9/ 10
Locking doors, rear hatch/trunk lid and
fuel-filler door1. Push the ignition switch to the OFF positionand make sure you carry the Intelligent Key
with you.*1
2. Close all the doors and the rear hatch/trunk lid.*2
3. Push the LOCK
button
*1
on the
Intelligent Key.
4. All the doors, the rear hatch/trunk lid and fuel-filler door will lock.
5. The hazard indicator flashes twice and the horn chirps once.
*1: Doors and the rear hatch/trunk lid will lock with the Intelligent Key while the ignition
switch is in the ACC or ON position.
*2: Doors and the rear hatch/trunk lid will not lock with the Intelligent Key while any door
or the rear hatch/trunk lid is open.
Unlocking doors, rear hatch/trunk lid and
fuel-filler door1. Push the UNLOCK
button
*2
on the
Intelligent Key once.
2. The hazard indicator flashes once. The driver’s door and fuel-filler door will unlock. 3. Push the UNLOCK
button on the
Intelligent Key again within 60 seconds.
4. The hazard indicator flashes once again. All the doors and the rear hatch/trunk lid will
unlock.
All doors and the rear hatch/trunk lid will be
locked automatically unless one of the following
operations is performed within 1 minute after
pushing the UNLOCKbutton on the
Intelligent Key while the doors are locked. If
during this 1-minute time period, the UNLOCK
button on the Intelligent Key is pushed, all
doors and the rear hatch/trunk lid will be locked
automatically after another 1 minute.
. Opening any door
. Pushing the ignition switch
. Inserting the Intelligent Key into the Intelli-
gent Key port
Opening windowsThe UNLOCK
button operation also allows
you to open a window that is equipped with the
automatic open/close function. (See “POWER
WINDOWS” in the “2. Instruments and con-
trols” section.)
To open the window, push the door UNLOCK
button
*2
on the Intelligent Key for about
3 seconds after the door is unlocked. To stop opening, release the UNLOCK
button.
Window cannot be closed using the Intelligent
Key.
The door window can be opened or closed by
turning the metal key in a door lock. (See
“DOORS” earlier in this section.)Using panic alarmIf you are near your vehicle and feel threatened,
you may activate the alarm to call attention as
follows:
1. Push the PANIC
button
*3
on the Key
for more than 1 second.
2. The theft warning alarm and headlights will stay on for 25 seconds.
3. The panic alarm stops when: .It has run for 25 seconds, or
. Any of the buttons on the Intelligent Key
are pushed. (Note: Panic button should
be pushed for more than 1 second.)
Setting hazard indicator and horn modeThis vehicle is set in hazard indicator and horn
mode when you first receive the vehicle.
In hazard indicator and horn mode, when the
LOCK
button
*1
is pushed, the hazard
3-14
Pre-driving checks and adjustments
Page 131 of 409
Black plate (131,1)
Model "Z34-D" EDITED: 2009/ 9/ 10
WARNING
.Do not drive with the trunk lid open.
This could allow dangerous exhaust
gases to be drawn into the vehicle.
See “EXHAUST GAS (carbon mon-
oxide)” in the “5. Starting and driv-
ing” section of this manual.
. Closely supervise children when
they are around cars to prevent
them from playing and becoming
locked in the trunk where they could
be seriously injured. Keep the car
locked, with the trunk closed, when
not in use, and prevent children’s
access to Intelligent Keys.
SPA2692
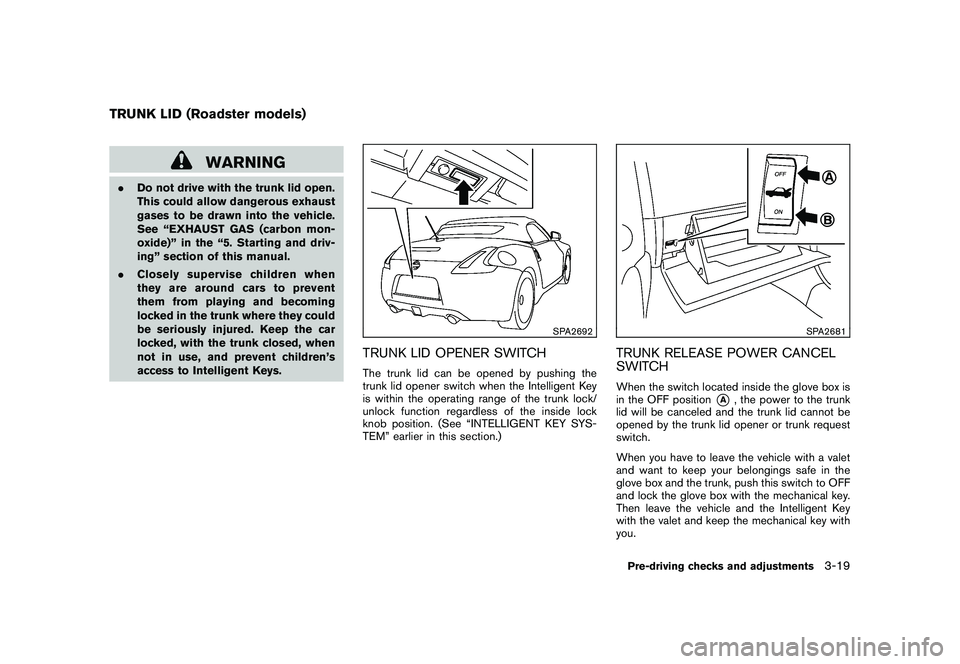
TRUNK LID OPENER SWITCHThe trunk lid can be opened by pushing the
trunk lid opener switch when the Intelligent Key
is within the operating range of the trunk lock/
unlock function regardless of the inside lock
knob position. (See “INTELLIGENT KEY SYS-
TEM” earlier in this section.)
SPA2681
TRUNK RELEASE POWER CANCEL
SWITCHWhen the switch located inside the glove box is
in the OFF position
*A
, the power to the trunk
lid will be canceled and the trunk lid cannot be
opened by the trunk lid opener or trunk request
switch.
When you have to leave the vehicle with a valet
and want to keep your belongings safe in the
glove box and the trunk, push this switch to OFF
and lock the glove box with the mechanical key.
Then leave the vehicle and the Intelligent Key
with the valet and keep the mechanical key with
you.
TRUNK LID (Roadster models)
Pre-driving checks and adjustments
3-19