2010 NISSAN 370Z COUPE run flat
[x] Cancel search: run flatPage 72 of 409

Black plate (70,1)
Model "Z34-D" EDITED: 2009/ 9/ 10
Charge warning light
If the light comes on while the engine is running,
it may indicate the charging system is not
functioning properly. Turn the engine off and
check the alternator belt. If the belt is loose,
broken, missing or if the light remains on, see a
NISSAN dealer immediately.
CAUTION
Do not continue driving if the alternator
belt is loose, broken or missing.
Engine oil pressure warning light
This light warns of low engine oil pressure. If the
light flickers or comes on during normal driving,
pull off the road in a safe area, stop the engine
immediatelyand call a NISSAN dealer or other
authorized repair shop.
The engine oil pressure warning light is
not designed to indicate a low oil level.
Use the dipstick to check the oil level. (See
“ENGINE OIL” in the “8. Maintenance and do-it-
yourself” section.)
CAUTION
Running the engine with the engine oil pressure warning light on could cause
serious damage to the engine almost
immediately. Such damage is not cov-
ered by warranty. Turn off the engine as
soon as it is safe to do so.
Intelligent Key system warning light
After the ignition switch is pushed to the ON
position, this light comes on for about 2 seconds
and then turns off.
This light warns of a malfunction with the
electrical steering lock system or the Intelligent
Key system.
If the light comes on while the engine is
stopped, it may be impossible to free the
steering lock or to start the engine. If the light
comes on while the engine is running, you can
drive the vehicle. However in these cases,
contact a NISSAN dealer for repair as soon as
possible.
Low tire pressure warning light
Your vehicle is equipped with a Tire Pressure
Monitoring System (TPMS) that monitors the tire
pressure of all tires except the spare.
The low tire pressure warning light warns of low
tire pressure or indicates that the TPMS is notfunctioning properly.
After the ignition switch is pushed ON, this light
illuminates for about 1 second and turns off.
Low tire pressure warning:
If the vehicle is being driven with low tire
pressure, the warning light will illuminate.
When the low tire pressure warning light
illuminates, you should stop and adjust the tire
pressure to the recommended COLD tire
pressure shown on the Tire and Loading
Information label. The low tire pressure warning
light does not automatically turn off when the tire
pressure is adjusted. After the tire is inflated to
the recommended pressure, the vehicle must be
driven at speeds above 16 MPH (25 km/h) to
activate the TPMS and turn off the low tire
pressure warning light. Use a tire pressure
gauge to check the tire pressure.
For additional information, see “TIRE PRES-
SURE MONITORING SYSTEM (TPMS)” in the
“5. Starting and driving” section and “TIRE
PRESSURE MONITORING SYSTEM (TPMS)”
in the “6. In case of emergency” section.
TPMS malfunction:
If the TPMS is not functioning properly, the low
tire pressure warning light will flash for approxi-
mately 1 minute when the ignition switch is
pushed ON. The light will remain on after the 1
2-10
Instruments and controls
Page 277 of 409
Black plate (277,1)
Model "Z34-D" EDITED: 2009/ 9/ 10
high temperatures to help reduce pollutants.
WARNING
.The exhaust gas and the exhaust
system are very hot. Keep people,
animals or flammable materials
away from the exhaust system com-
ponents.
. Do not stop or park the vehicle over
flammable materials such as dry
grass, waste paper or rags. They
may ignite and cause a fire.
CAUTION
.Do not use leaded gasoline. Depos-
its from leaded gasoline seriously
reduce the three-way catalyst’s abil-
ity to help reduce exhaust pollu-
tants.
. Keep your engine tuned up. Mal-
functions in the ignition, fuel injec-
tion, or electrical systems can cause
overrich fuel flow into the three-way
catalyst, causing it to overheat. Do
not keep driving if the engine mis-
fires, or if noticeable loss of perfor-
mance or other unusual operating conditions are detected. Have the
vehicle inspected promptly by a
NISSAN dealer.
. Avoid driving with an extremely low
fuel level. Running out of fuel could
cause the engine to misfire, dama-
ging the three-way catalyst.
. Do not race the engine while warm-
ing it up.
. Do not push or tow your vehicle to
start the engine.
TIRE PRESSURE MONITORING SYS-
TEM (TPMS)Each tire, including the spare (if provided) ,
should be checked monthly when cold and
inflated to the inflation pressure recommended
by the vehicle manufacturer on the vehicle
placard or tire inflation pressure label. (If your
vehicle has tires of a different size than the size
indicated on the vehicle placard or tire inflation
pressure label, you should determine the proper
tire inflation pressure for those tires.)
As an added safety feature, your vehicle has
been equipped with a Tire Pressure Monitoring
System (TPMS) that illuminates a low tire
pressure telltale when one or more of your tires
is significantly under-inflated. Accordingly, when
the low tire pressure telltale illuminates, you should stop and check your tires as soon as
possible, and inflate them to the proper pres-
sure. Driving on a significantly under-inflated tire
causes the tire to overheat and can lead to tire
failure. Under-inflation also reduces fuel effi-
ciency and tire tread life, and may affect the
vehicle’s handling and stopping ability.
Please note that the TPMS is not a substitute for
proper tire maintenance, and it is the driver’s
responsibility to maintain correct tire pressure,
even if under-inflation has not reached the level
to trigger illumination of the TPMS low tire
pressure telltale.
Your vehicle has also been equipped with a
TPMS malfunction indicator to indicate when the
system is not operating properly. The TPMS
malfunction indicator is combined with the low
tire pressure telltale. When the system detects a
malfunction, the telltale will flash for approxi-
mately one minute and then remain continuously
illuminated. This sequence will continue upon
subsequent vehicle start-ups as long as the
malfunction exists. When the malfunction indi-
cator is illuminated, the system may not be able
to detect or signal low tire pressure as intended.
TPMS malfunctions may occur for a variety of
reasons, including the installation of replace-
ment or alternate tires or wheels on the vehicle
that prevent the TPMS from functioning properly.
Always check the TPMS malfunction telltale
after replacing one or more tires or wheels on
Starting and driving
5-3
Page 297 of 409

Black plate (297,1)
Model "Z34-D" EDITED: 2009/ 9/ 10
.Accelerate slowly and smoothly. Maintain
cruising speeds with a constant accelerator
position.
. Drive at moderate speeds on the highway.
. Avoid unnecessary stopping and braking.
Keep a safe distance behind other vehicles.
. Select a gear range suitable to road condi-
tions.
. Avoid unnecessary prolonged engine idling.
. Keep your engine tuned up.
. Follow the recommended periodic mainte-
nance schedule.
. Keep the tires inflated at the correct
pressure. Improper tire pressure will in-
crease wear and waste fuel.
. Make sure the front wheels are properly
aligned. Improper alignment will cause pre-
mature tire wear and lower fuel economy.
. Air conditioner operation lowers fuel econ-
omy. Use the air conditioner only when
necessary.
. When cruising at highway speeds, it is more
economical to use the air conditioner and
leave the windows closed to reduce drag.
SD1006MA
WARNING
.Do not stop or park the vehicle over
flammable materials such as dry
grass, waste paper or rags. They
may ignite and cause a fire.
. Never leave the engine running
while the vehicle is unattended.
. Do not leave children unattended
inside the vehicle. They could un-
knowingly activate switches or con-
trols. Unattended children could
become involved in serious acci- dents.
. Safe parking procedures require
that both the parking brake be
applied and the transmission placed
into P (Park) for Automatic Trans-
mission (AT) model or in an appro-
priate gear for Manual Transmission
(MT) model. Failure to do so could
cause the vehicle to move unexpect-
edly or roll away and result in an
accident.
. Make sure the automatic transmis-
sion selector lever has been pushed
as far forward as it can go and
INCREASING FUEL ECONOMY PARKING/PARKING ON HILLS
Starting and driving
5-23
Page 310 of 409
Black plate (310,1)
Model "Z34-D" EDITED: 2009/ 9/ 10
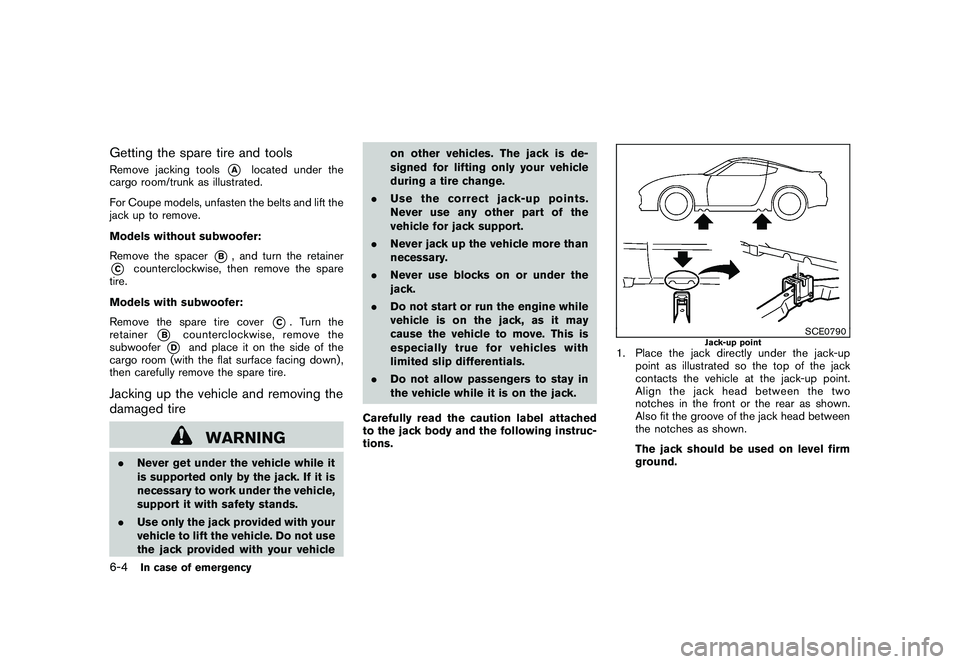
Getting the spare tire and toolsRemove jacking tools
*A
located under the
cargo room/trunk as illustrated.
For Coupe models, unfasten the belts and lift the
jack up to remove.
Models without subwoofer:
Remove the spacer
*B, and turn the retainer
*C
counterclockwise, then remove the spare
tire.
Models with subwoofer:
Remove the spare tire cover
*C. Turn the
retainer
*B
counterclockwise, remove the
subwoofer
*D
and place it on the side of the
cargo room (with the flat surface facing down) ,
then carefully remove the spare tire.
Jacking up the vehicle and removing the
damaged tire
WARNING
. Never get under the vehicle while it
is supported only by the jack. If it is
necessary to work under the vehicle,
support it with safety stands.
. Use only the jack provided with your
vehicle to lift the vehicle. Do not use
the jack provided with your vehicle on other vehicles. The jack is de-
signed for lifting only your vehicle
during a tire change.
. Use the correct jack-up points.
Never use any other part of the
vehicle for jack support.
. Never jack up the vehicle more than
necessary.
. Never use blocks on or under the
jack.
. Do not start or run the engine while
vehicle is on the jack, as it may
cause the vehicle to move. This is
especially true for vehicles with
limited slip differentials.
. Do not allow passengers to stay in
the vehicle while it is on the jack.
Carefully read the caution label attached
to the jack body and the following instruc-
tions.
SCE0790
Jack-up point
1. Place the jack directly under the jack-up point as illustrated so the top of the jack
contacts the vehicle at the jack-up point.
Align the jack head between the two
notches in the front or the rear as shown.
Also fit the groove of the jack head between
the notches as shown.
The jack should be used on level firm
ground.
6-4
In case of emergency
Page 312 of 409
Black plate (312,1)
Model "Z34-D" EDITED: 2009/ 9/ 10
Models equipped with different sized
tires in the front and rear:
When replacing a front tire, make sure that
the hole in the spare tire wheel is aligned
with the pin on the brake rotor.
3. With the wheel nut wrench, tighten wheel nuts alternately and evenly in the sequence
as illustrated (
*1,*2,*3,*4,*5) until
they are tight.
4. Lower the vehicle slowly until the tire touches the ground. Then, with the wheel
nut wrench, tighten the wheel nuts securely
in the sequence as illustrated. Lower the
vehicle completely.
WARNING
.Incorrect wheel nuts or improperly
tightened wheel nuts can cause the
wheel to become loose or come off.
This could cause an accident.
. Do not use oil or grease on the
wheel studs or nuts. This could
cause the nuts to become loose.
. Retighten the wheel nuts when the
vehicle has been driven for 600
miles (1,000 km) (also in cases of a
flat tire, etc.) . .
As soon as possible, tighten the
wheel nuts to the specified torque
with a torque wrench.
Wheel nut tightening torque: 80 ft-lb (108 N·m)
The wheel nuts must be kept tightened
to specification at all times. It is
recommended that wheel nuts be tigh-
tened to specifications at each lubrica-
tion interval.
. Adjust tire pressure to the COLD
pressure.
COLD pressure:
After the vehicle has been parked for
three hours or more or driven less than
1 mile (1.6 km) .
COLD tire pressures are shown on the
Tire and Loading Information label
affixed to the driver side center pillar.
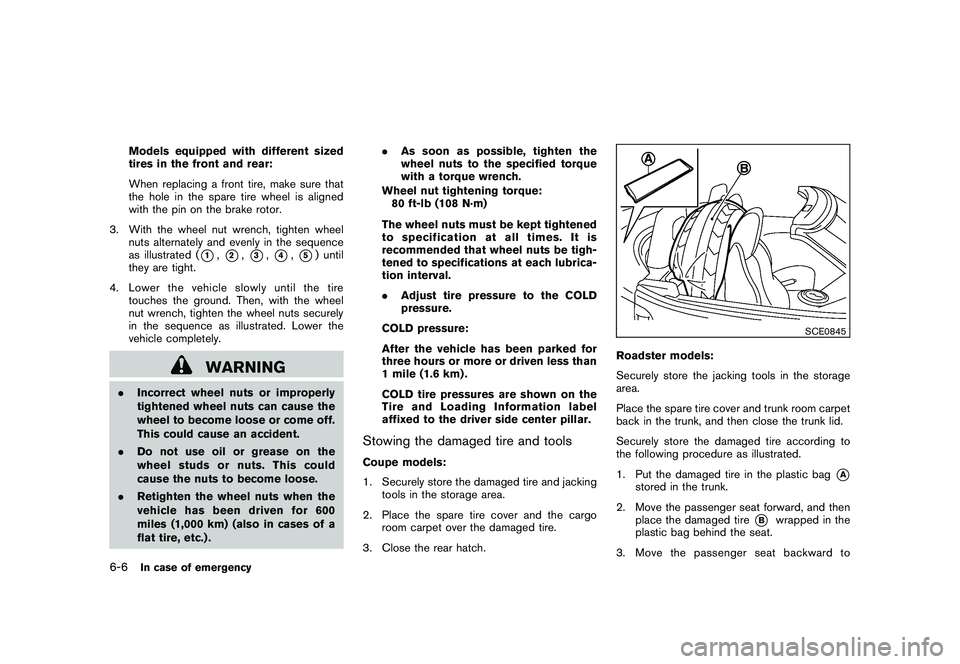
Stowing the damaged tire and toolsCoupe models:
1. Securely store the damaged tire and jacking tools in the storage area.
2. Place the spare tire cover and the cargo room carpet over the damaged tire.
3. Close the rear hatch.
SCE0845
Roadster models:
Securely store the jacking tools in the storage
area.
Place the spare tire cover and trunk room carpet
back in the trunk, and then close the trunk lid.
Securely store the damaged tire according to
the following procedure as illustrated.
1. Put the damaged tire in the plastic bag
*A
stored in the trunk.
2. Move the passenger seat forward, and then place the damaged tire
*B
wrapped in the
plastic bag behind the seat.
3. Move the passenger seat backward to
6-6
In case of emergency
Page 315 of 409
Black plate (315,1)
Model "Z34-D" EDITED: 2009/ 9/ 10
SCE0866
Type B
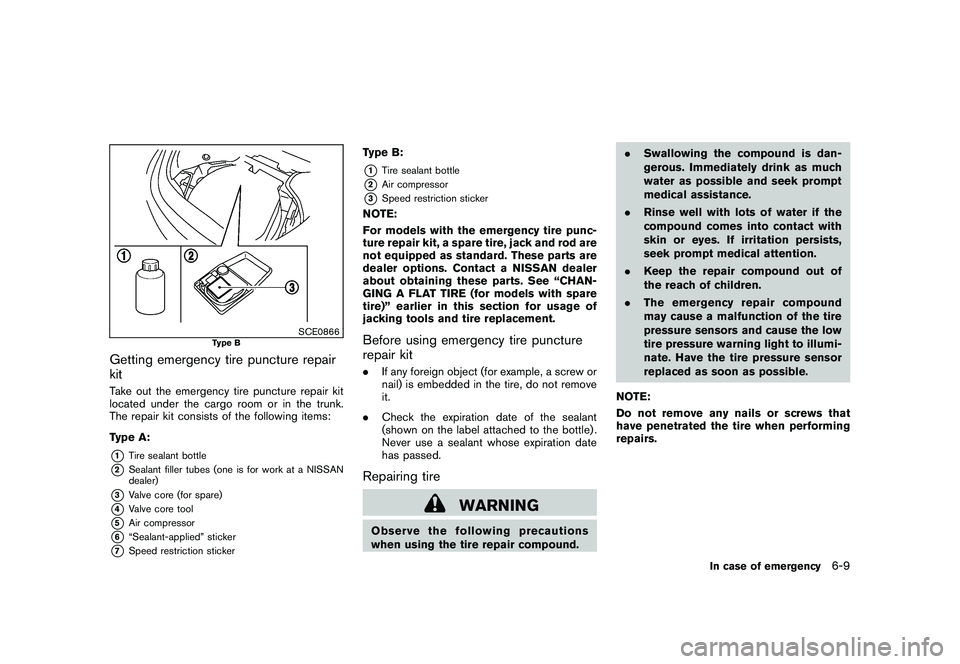
Getting emergency tire puncture repair
kitTake out the emergency tire puncture repair kit
located under the cargo room or in the trunk.
The repair kit consists of the following items:
Type A:*1
Tire sealant bottle
*2
Sealant filler tubes (one is for work at a NISSAN
dealer)
*3
Valve core (for spare)
*4
Valve core tool
*5
Air compressor
*6
“Sealant-applied” sticker
*7
Speed restriction sticker
Type B:*1
Tire sealant bottle
*2
Air compressor
*3
Speed restriction sticker
NOTE:
For models with the emergency tire punc-
ture repair kit, a spare tire, jack and rod are
not equipped as standard. These parts are
dealer options. Contact a NISSAN dealer
about obtaining these parts. See “CHAN-
GING A FLAT TIRE (for models with spare
tire)” earlier in this section for usage of
jacking tools and tire replacement.Before using emergency tire puncture
repair kit.If any foreign object (for example, a screw or
nail) is embedded in the tire, do not remove
it.
. Check the expiration date of the sealant
(shown on the label attached to the bottle) .
Never use a sealant whose expiration date
has passed.Repairing tire
WARNING
Observe the following precautions
when using the tire repair compound. .
Swallowing the compound is dan-
gerous. Immediately drink as much
water as possible and seek prompt
medical assistance.
. Rinse well with lots of water if the
compound comes into contact with
skin or eyes. If irritation persists,
seek prompt medical attention.
. Keep the repair compound out of
the reach of children.
. The emergency re pair compound
may cause a malfunction of the tire
pressure sensors and cause the low
tire pressure warning light to illumi-
nate. Have the tire pressure sensor
replaced as soon as possible.
NOTE:
Do not remove any nails or screws that
have penetrated the tire when performing
repairs.
In case of emergency
6-9
Page 318 of 409
Black plate (318,1)
Model "Z34-D" EDITED: 2009/ 9/ 10
CAUTION
Operating the air compressor for an
extended period of time can result in
damage to the compressor and will not
allow you to fill the tire to the required
air pressure. Avoid continuous opera-
tion of the compressor exceeding 10
minutes.NOTE:
If the tire does not inflate to the proper
air pressure within 10 minutes, the tire
may have sustained serious damage
and cannot be repaired using the
emergency tire puncture repair kit.
You will need to contact a professional
towing service or your NISSAN dealer.
12. Remove the air compressor from the tire valve. Properly stow the emergency tire
puncture repair kit in the trunk. Immediately
drive the vehicle at a speed of 50 MPH (80
km/h) or less.
NOTE:
Driving at speeds above 50 MPH (80
km/h) can cause the vehicle to vibrate.
13. After a 10-minute or 3-mile (5-km) drive, check the tire pressure. The temporary
repair is completed if the tire pressure does
not drop. If the tire pressure is lower than specified,
repeat the steps from 11 to 13. If the
pressure drops again or is under 19 psi
(130 kPa),
the tire cannot be repaired
with this tire repair kit . Call a NISSAN
dealer.
CAUTION
If tire pressure falls below 19 psi (130
kPa) and remains low, even after re-
peating steps 11 to 13, the tire is not
repairable using the emergency tire
puncture repair kit. Stop driving the
vehicle and contact your NISSAN dealer
or a professional towing service.
SCE0867
Type B:
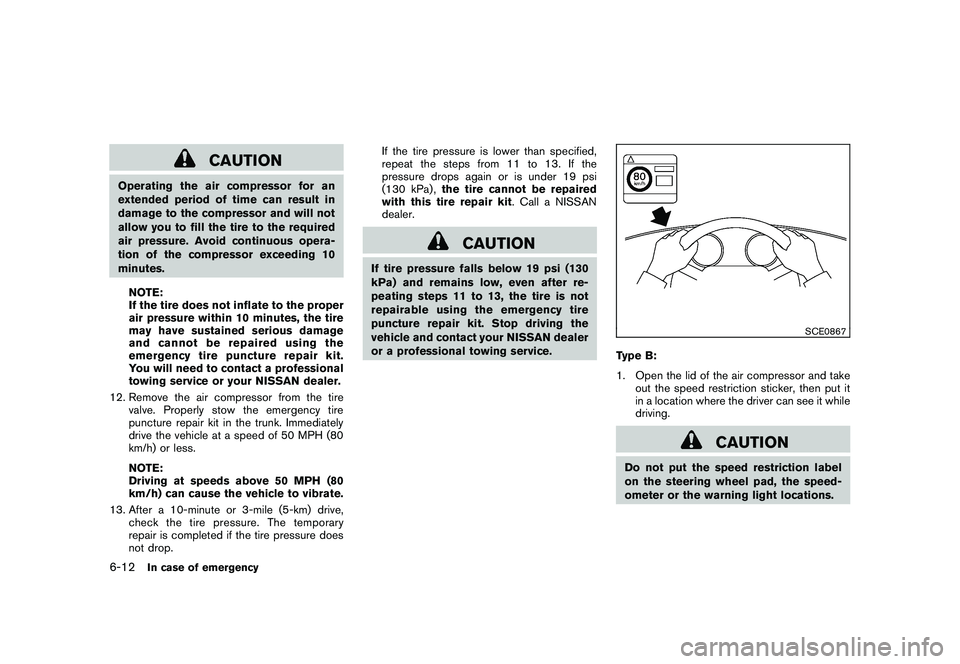
1. Open the lid of the air compressor and take out the speed restriction sticker, then put it
in a location where the driver can see it while
driving.
CAUTION
Do not put the speed restriction label
on the steering wheel pad, the speed-
ometer or the warning light locations.
6-12
In case of emergency
Page 320 of 409
Black plate (320,1)
Model "Z34-D" EDITED: 2009/ 9/ 10
SCE0871
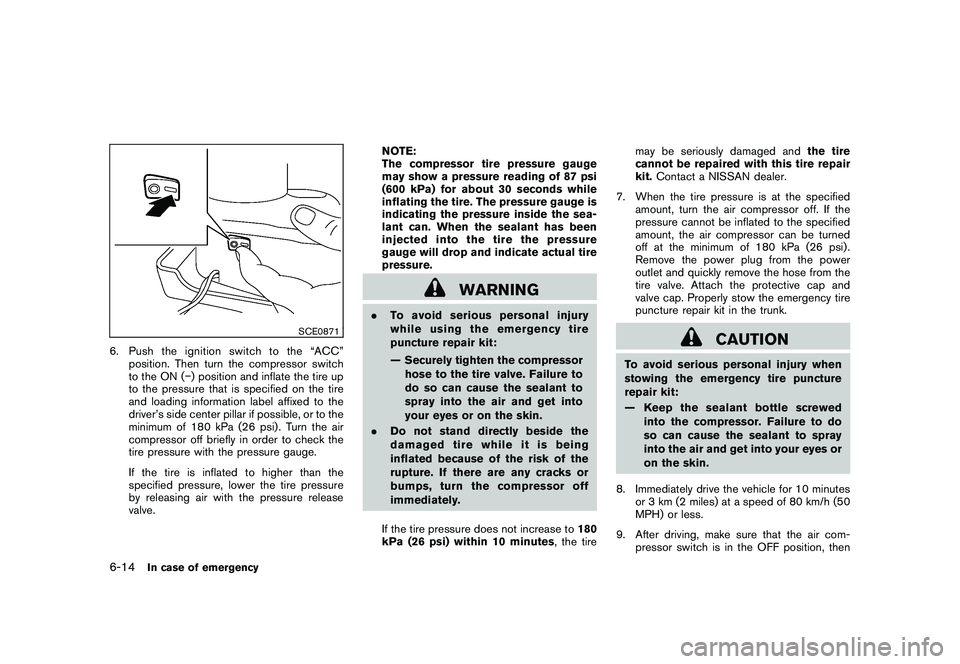
6. Pushtheignitionswitchtothe“ACC”position. Then turn the compressor switch
to the ON ( �) position and inflate the tire up
to the pressure that is specified on the tire
and loading information label affixed to the
driver’s side center pillar if possible, or to the
minimum of 180 kPa (26 psi) . Turn the air
compressor off briefly in order to check the
tire pressure with the pressure gauge.
If the tire is inflated to higher than the
specified pressure, lower the tire pressure
by releasing air with the pressure release
valve. NOTE:
The compressor tire pressure gauge
may show a pressure reading of 87 psi
(600 kPa) for about 30 seconds while
inflating the tire. The pressure gauge is
indicating the pressure inside the sea-
lant can. When the sealant has been
injected into the tire the pressure
gauge will drop and indicate actual tire
pressure.
WARNING
.
To avoid serious personal injury
while using the emergency tire
puncture repair kit:
— Securely tighten the compressor
hose to the tire valve. Failure to
do so can cause the sealant to
spray into the air and get into
your eyes or on the skin.
. Do not stand directly beside the
damaged tire while it is being
inflated because of the risk of the
rupture. If there are any cracks or
bumps, turn the compressor off
immediately.
If the tire pressure does not increase to 180
kPa (26 psi) within 10 minutes , the tiremay be seriously damaged and
the tire
cannot be repaired with this tire repair
kit. Contact a NISSAN dealer.
7. When the tire pressure is at the specified amount, turn the air compressor off. If the
pressure cannot be inflated to the specified
amount, the air compressor can be turned
off at the minimum of 180 kPa (26 psi) .
Remove the power plug from the power
outlet and quickly remove the hose from the
tire valve. Attach the protective cap and
valve cap. Properly stow the emergency tire
puncture repair kit in the trunk.
CAUTION
To avoid serious personal injury when
stowing the emergency tire puncture
repair kit:
— Keep the sealant bottle screwed
into the compressor. Failure to do
so can cause the sealant to spray
into the air and get into your eyes or
on the skin.
8. Immediately drive the vehicle for 10 minutes or 3 km (2 miles) at a speed of 80 km/h (50
MPH) or less.
9. After driving, make sure that the air com- pressor switch is in the OFF position, then
6-14
In case of emergency