Page 602 of 670
Vehicle care and maintenance
7-59
7
Inside
N00950400460
Headlights (low beam, except for vehicles with
high intensity discharge headlights)
N00943100830
1. For vehicles equipped with turbocharger, when replacing
the bulb on the driver’s side, remove the bolt (A) holding
down the relay box and move the relay box toward the
rear of the vehicle.
Description
Wa t t a g e
1- Trunk area light 5 W
2- Dome light (rear) (if so equipped) 8 W
3-Dome light (front)/
Reading light (if so equipped)8 W
*- Front of the vehicle
BK0102103US.book 59 ページ 2009年10月26日 月曜日 午後1時38分
Page 604 of 670
Vehicle care and maintenance
7-61
7
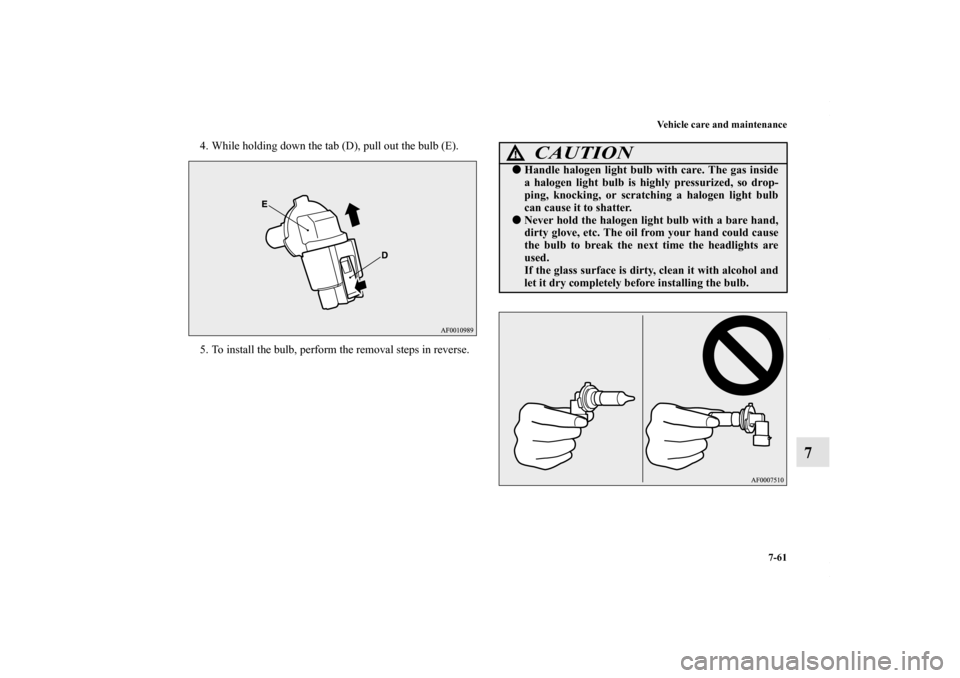
4. While holding down the tab (D), pull out the bulb (E).
5. To install the bulb, perform the removal steps in reverse.
CAUTION
!�Handle halogen light bulb with care. The gas inside
a halogen light bulb is highly pressurized, so drop-
ping, knocking, or scratching a halogen light bulb
can cause it to shatter.�Never hold the halogen light bulb with a bare hand,
dirty glove, etc. The oil from your hand could cause
the bulb to break the next time the headlights are
used.
If the glass surface is dirty, clean it with alcohol and
let it dry completely before installing the bulb.
BK0102103US.book 61 ページ 2009年10月26日 月曜日 午後1時38分
Page 605 of 670
7-62 Vehicle care and maintenance
7
Headlights (high beam, except for vehicles with
high intensity discharge headlights)
N00943100843
1. When replacing the bulb on the front passenger’s side,
remove the bolt (A) holding down the washer tank spout
and move the spout toward the rear of the vehicle.2. Turn the cap (B) counterclockwise to remove it.*- Front of the vehicle
*- Front of the vehicle
BK0102103US.book 62 ページ 2009年10月26日 月曜日 午後1時38分
Page 607 of 670
7-64 Vehicle care and maintenance
7
Daytime running lights (for vehicles with high
intensity discharge headlights)
N00900300060
1. When replacing the bulb on the front passenger’s side,
remove the bolt (A) holding down the washer tank spout
and move the spout toward the rear of the vehicle.
CAUTION
!�Handle halogen light bulb with care. The gas inside
a halogen light bulb is highly pressurized, so drop-
ping, knocking, or scratching a halogen light bulb
can cause it to shatter.�Never hold the halogen light bulb with a bare hand,
dirty glove, etc.
The oil from your hand could cause the bulb to
break the next time the headlights are used.
If the glass surface is dirty, clean it with alcohol and
let it dry completely before installing the bulb.
*- Front of the vehicle
BK0102103US.book 64 ページ 2009年10月26日 月曜日 午後1時38分
Page 609 of 670
7-66 Vehicle care and maintenance
7
4. Turn the bulb counterclockwise while pressing it and pull
it out of the socket.
5. To install a bulb, perform the removal steps in reverse.
Headlights (low/high beam, for vehicles with high
intensity discharge lights)
N00943100625
Do not attempt to disassemble or repair headlights, and do not
attempt to replace their bulbs.Adjustment of headlight aim
N00943200121
The alignment of the headlights should be checked by an
authorized Mitsubishi Motors dealer or a repair facility of your
choice.
WARNING
!�A high voltage is present in the power circuit and in
the bulbs and bulb terminals. To avoid the risk of an
electric shock, contact an authorized Mitsubishi
dealer whenever repair or replacement is necessary.
BK0102103US.book 66 ページ 2009年10月26日 月曜日 午後1時38分
Page 610 of 670
Vehicle care and maintenance
7-67
7
Parking and side-marker lights (except for vehi-
cles with high intensity discharge headlights)
N00917300394
1. For vehicles equipped with turbocharger, when replacing
the bulb on the driver’s side, remove the bolt (A) holding
down the relay box and move the relay box toward the
rear of the vehicle.2. For vehicles equipped with turbocharger, when replacing
the bulb on the passenger’s side, lift up the engine coolant
reservoir (B).*- Front of the vehicle
*- Front of the vehicle
BK0102103US.book 67 ページ 2009年10月26日 月曜日 午後1時38分
Page 612 of 670
Vehicle care and maintenance
7-69
7
Parking and side-marker lights (for vehicles with
high intensity discharge headlights)
N00917300437
1. To create enough work space, turn the steering wheel all
the way in the direction opposite to the side you wish to
replace.
2. Remove the clips (A), and screw (B) or bolts (B) to turn
up the cover (C).Except for vehicles
with turbocharger
Vehicles with
turbocharger
BK0102103US.book 69 ページ 2009年10月26日 月曜日 午後1時38分
Page 659 of 670

Alphabetical index
2Brake
Anti-lock braking system 3-134
Braking 4-6
Fluid 7-21
,9-11
Hose 7-43
Parking brake 3-74
Parking brake lever stroke 7-39
Pedal 3-131
Pedal free play 7-38
Power brakes 3-132
Service brake 3-131
Break-in recommendations 3-2
Bulb capacity 7-56
C
California Perchlorate Materials Requirements 1-10
Capacities 9-11
Card holder 3-269
Cargo loads 4-12
Catalytic converter 7-3
Certification label 9-5
Charging system warning light 3-213
Chassis number 9-3
Child restraint 2-24
Child safety locks for rear door 3-58
Cigarette lighter 3-271
Cleaning
Inside of your vehicle 7-90
Outside of your vehicle 7-91Clutch
Fluid 7-21
,9-11
Pedal free play 7-38
Coat hooks 3-284
Combination headlights and dimmer switch 3-217
Coming home light 3-223
Consumer information 8-2
Continuously variable transmission (CVT) 3-93
Fluid 7-18,9-11
Selector lever operation 3-94
Sports mode 3-101
Coolant (engine) 7-12
,9-11
Cruise control 3-143
Indicator 3-144
Cup holder 3-282
D
Daytime running lights
Bulb capacity 7-56
Replacement 7-64
Defogger (rear window) 3-235
Defrosting or defogging (windshield, door windows)
5-20
,5-29
,5-39
,5-49
Dimensions 9-6
Dimmer (high/low beam change) 3-221
Disc brake pads 7-43
Dome light
Bulb capacity 7-59
Replacement 7-87
Switch 3-276
BK0102103US.book 2 ページ 2009年10月26日 月曜日 午後1時38分

N00943100830
1. For vehicles equipped with turbocharger, wh")

N00943100843
1. When replacing the bulb on the front passenger’s side,
remov")

N00900300060
1. When replacing the bulb on the front passenger’s side,
remove the")


N00917300394
1. For vehicles equipped with turbocharger, when replac")

N00917300437
1. To create enough work space, turn the steering wheel all
the")