Page 544 of 594
Vehicle care and maintenance
7-55
7
Daytime running lights (for vehicles with high
intensity discharge headlights)
N00900300044
1. Turn the cap (A) counterclockwise to remove it.2. Turn the socket (B) counterclockwise to remove it.*- Front of the vehicle
*- Front of the vehicle
BK0105501US.book 55 ページ 2009年8月10日 月曜日 午前10時32分
Page 545 of 594
7-56 Vehicle care and maintenance
7
3. Turn the bulb counterclockwise while pressing it and pull
it out of the socket.
4. To install the bulb, perform the removal steps in reverse.
Front side-marker and parking lights (except for
vehicles with high intensity discharge headlights)
N00917300411
1. When replacing the bulb on the driver’s side, remove the
bolt (A) holding down the relay box and move the relay
box toward the rear of the vehicle.*- Front of the vehicle
BK0105501US.book 56 ページ 2009年8月10日 月曜日 午前10時32分
Page 547 of 594
7-58 Vehicle care and maintenance
7
4. Pull the bulb out of the socket.
5. To install the bulb, perform the removal steps in reverse.
Front side-marker and parking lights (for vehi-
cles with high intensity discharge headlights)
N00917300466
1. To create enough work space, turn the steering wheel all
the way in the direction opposite to the side you wish to
replace.
2. Remove the clips (A), clip (B) and screw (C) to turn up
the cover (D).
BK0105501US.book 58 ページ 2009年8月10日 月曜日 午前10時32分
Page 549 of 594
7-60 Vehicle care and maintenance
7
Front turn signal lights
N00943400253
1. Remove the clips (A) and clips (B), then remove the duct
(C) and the upper cover (D).2. Remove the entire socket and bulb assembly (E) by turn-
ing it counterclockwise.
*- Front of the vehicle
BK0105501US.book 60 ページ 2009年8月10日 月曜日 午前10時32分
Page 550 of 594
Vehicle care and maintenance
7-61
7
3. Remove the bulb by pulling it out.
4. To install the bulb, perform the removal steps in reverse.
Front fog lights
N00943600646
1. Remove the clips (A) and clips (B), then turn up the cover
(C).
BK0105501US.book 61 ページ 2009年8月10日 月曜日 午前10時32分
Page 551 of 594
7-62 Vehicle care and maintenance
7
2. While pressing the tab (D), pull out the socket (E).
3. Turn the bulb (F) counterclockwise to remove it.4. To install the bulb, perform the removal steps in reverse.
CAUTION
!�
Handle halogen light bulbs with care. The gas inside
a halogen light bulb is highly pressurized, so drop-
ping, knocking, or scratching a halogen light bulb
can cause it to shatter.
�
Never hold the halogen lights bulb with a bare hand,
dirty glove, etc. The oil from your hand could cause
the bulb to break the next time the fog lights are
used.
If the glass surface is dirty, clean it with alcohol and
let it dry completely before installing the bulb.
BK0105501US.book 62 ページ 2009年8月10日 月曜日 午前10時32分
Page 552 of 594
Vehicle care and maintenance
7-63
7
Rear combination lights
N00943700399
Tail and stop lights, rear turn signal lights and rear
side-marker lights1. Remove the screws (A) from the light unit.2. Remove the light unit in the rear direction.
BK0105501US.book 63 ページ 2009年8月10日 月曜日 午前10時32分
Page 554 of 594
Vehicle care and maintenance
7-65
7
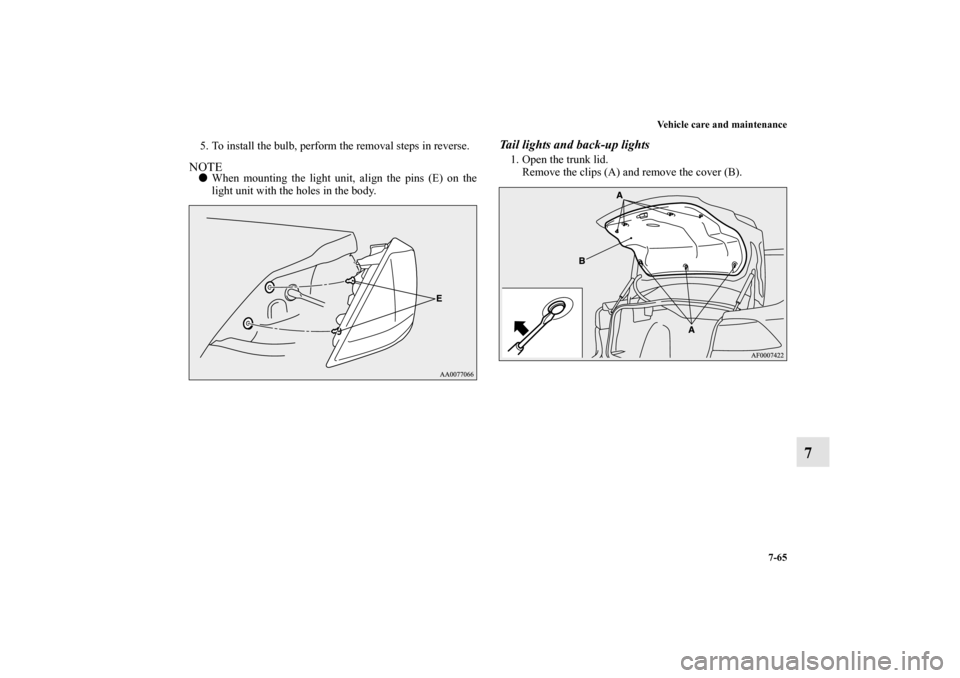
5. To install the bulb, perform the removal steps in reverse.NOTE�
When mounting the light unit, align the pins (E) on the
light unit with the holes in the body.
Tail lights and back-up lights1. Open the trunk lid.
Remove the clips (A) and remove the cover (B).
BK0105501US.book 65 ページ 2009年8月10日 月曜日 午前10時32分

N00900300044
1. Turn the cap (A) counterclockwise to remove it.2. Turn the socket (B")


 and clips (B), then remove the duct
(C) and the upper cover (D).2. Remove the entire socket and bulb a")
 and clips")
, pull out the socket (E).
3. Turn the bulb (F) counterclockwise to remove it.4. To install the bulb, perform the removal steps in rev")
 from the light unit.2. Remov")