Page 251 of 369

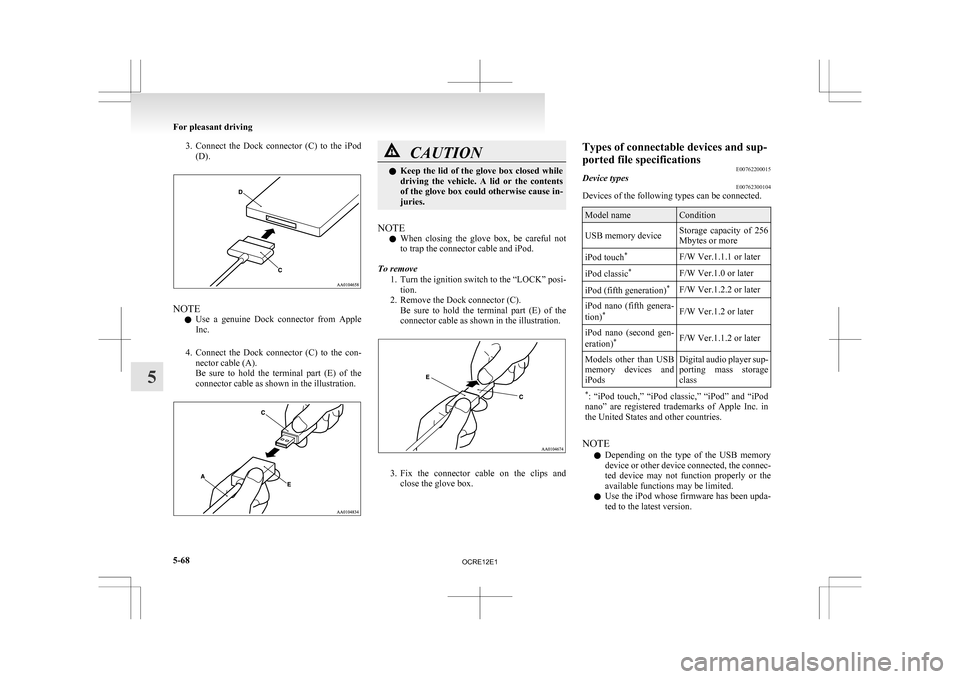
3. Connect the Dock connector (C) to the iPod
(D). NOTE
l Use
a genuine Dock connector from Apple
Inc.
4. Connect the Dock connector (C) to the con- nector cable (A).
Be sure to hold the terminal part (E) of the
connector cable as shown in the illustration. CAUTION
l
Keep
the lid of the glove box closed while
driving the vehicle. A lid or the contents
of the glove box could otherwise cause in-
juries.
NOTE l When
closing the glove box, be careful not
to trap the connector cable and iPod.
To remove 1. Turn the ignition switch to the “LOCK” posi-tion.
2. Remove the Dock connector (C). Be sure to hold the terminal part (E) of the
connector cable as shown in the illustration. 3. Fix
the connector cable on the clips and
close the glove box. Types of connectable devices and sup-
ported file specifications
E00762200015
Device types E00762300104
Devices of the following types can be connected. Model name Condition
USB memory device Storage capacity of 256
Mbytes or more
iPod touch *
F/W Ver.1.1.1 or later
iPod classic *
F/W Ver.1.0 or later
iPod (fifth generation) *
F/W Ver.1.2.2 or later
iPod nano (fifth genera-
tion) *
F/W Ver.1.2 or later
iPod nano (second gen-
eration) *
F/W Ver.1.1.2 or later
Models other than USB
memory
devices and
iPods Digital audio player sup-
porting
mass storage
class
* :
“iPod touch,” “iPod classic,” “iPod” and “iPod
nano” are registered trademarks of Apple Inc. in
the United States and other countries. NOTE
l Depending
on the type of the USB memory
device or other device connected, the connec-
ted device may not function properly or the
available functions may be limited.
l Use the iPod whose firmware has been upda-
ted to the latest version. For pleasant driving
5-68
5
OCRE12E1
Page 259 of 369
1- Utility box*
2-
Glove box
3- Sunglasses holder*
4- Seat under tray*
5- Front console box*
6- Floor console box*
7- Secret box (Club cab)
Glove box E00717601478
NOTE l When
the lamp switch is in the “ ”
or
“ ” position, the glove box lamp illumi-
nates.
Refer to “Combination headlamps and dip-
per switch” on page 3-30.
l The USB input terminal (if so equipped) is lo-
cated in the glove box.
For details, refer to “USB input terminal” on
page 5-67. Type 1
To open, pull the lever (A).
Type 2
The
glove box can be locked and unlocked using
the key. 1- To lock
2-
To unlock
3- To open, pull the lever Front console box*
E00733400161
To open, pull up the knob (A). Floor console box*
E00723300633
Type 1
To open, raise the lid. Type 2
Upper
and lower boxes are located inside the floor
console box. For pleasant driving
5-76
5
OCRE12E1
Page 321 of 369

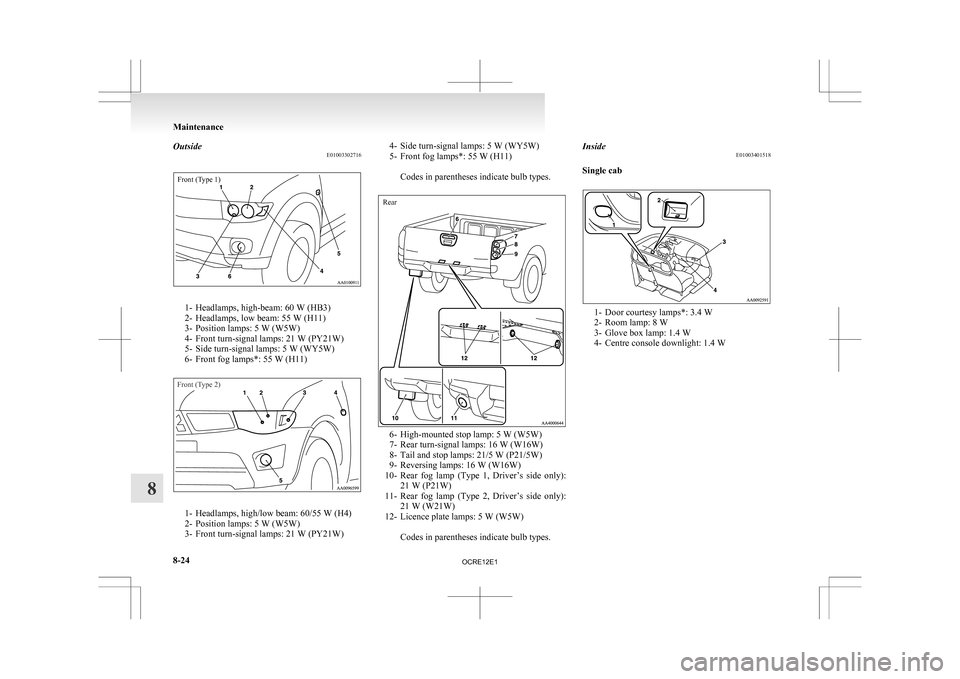
Outside
E01003302716Front (Type 1)1- Headlamps, high-beam: 60 W (HB3)
2-
Headlamps, low beam: 55 W (H11)
3- Position lamps: 5 W (W5W)
4- Front turn-signal lamps: 21 W (PY21W)
5- Side turn-signal lamps: 5 W (WY5W)
6- Front fog lamps*: 55 W (H11)
Front (Type 2) 1- Headlamps, high/low beam: 60/55 W (H4)
2-
Position lamps: 5 W (W5W)
3- Front turn-signal lamps: 21 W (PY21W) 4- Side turn-signal lamps: 5 W (WY5W)
5-
Front fog lamps*: 55 W (H11)
Codes in parentheses indicate bulb types.
Rear 6- High-mounted stop lamp: 5 W (W5W)
7-
Rear turn-signal lamps: 16 W (W16W)
8- Tail and stop lamps: 21/5 W (P21/5W)
9- Reversing lamps: 16 W (W16W)
10- Rear fog lamp (Type 1, Driver’s side only): 21 W (P21W)
11- Rear fog lamp (Type 2, Driver’s side only): 21 W (W21W)
12- Licence plate lamps: 5 W (W5W)
Codes in parentheses indicate bulb types. Inside
E01003401518
Single cab 1- Door courtesy lamps*: 3.4 W
2-
Room lamp: 8 W
3- Glove box lamp: 1.4 W
4- Centre console downlight: 1.4 W Maintenance
8-24
8
OCRE12E1
Page 322 of 369

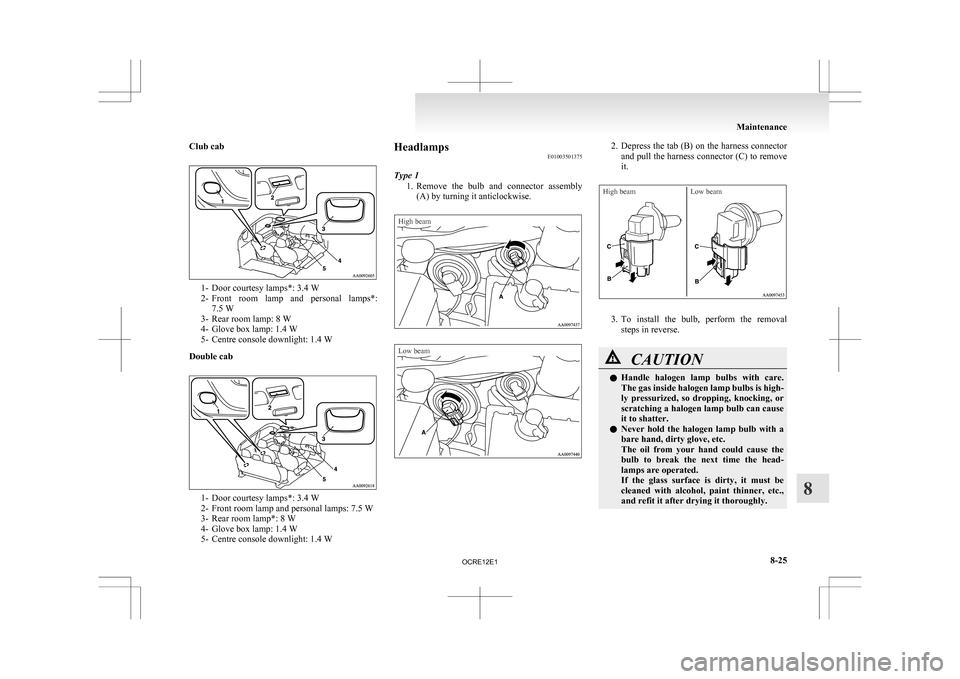
Club cab
1- Door courtesy lamps*: 3.4 W
2- Front
room lamp and personal lamps*:
7.5 W
3- Rear room lamp: 8 W
4- Glove box lamp: 1.4 W
5- Centre console downlight: 1.4 W
Double cab 1- Door courtesy lamps*: 3.4 W
2-
Front room lamp and personal lamps: 7.5 W
3- Rear room lamp*: 8 W
4- Glove box lamp: 1.4 W
5- Centre console downlight: 1.4 W Headlamps
E01003501375
Type 1 1. Remove
the bulb and connector assembly
(A) by turning it anticlockwise.
High beam
Low beam 2. Depress
the tab (B) on the harness connector
and pull the harness connector (C) to remove
it.
High beam Low beam 3. To
install the bulb, perform the removal
steps in reverse. CAUTION
l
Handle
halogen lamp bulbs with care.
The gas inside halogen lamp bulbs is high-
ly pressurized, so dropping, knocking, or
scratching a halogen lamp bulb can cause
it to shatter.
l Never hold the halogen lamp bulb with a
bare hand, dirty glove, etc.
The oil from your hand could cause the
bulb to break the next time the head-
lamps are operated.
If the glass surface is dirty, it must be
cleaned with alcohol, paint thinner, etc.,
and refit it after drying it thoroughly. Maintenance
8-25 8
OCRE12E1
Page 331 of 369
NOTE
l Wrap
a piece of cloth around the tip of the
screwdriver in order to avoid scratching the
lens.
2. To install the bulb, perform the removal steps in reverse.
NOTE l When installing the lens, align the 2 tabs on
the lens with the holes on the vehicle side. Glove box lamp
E01006100069
We recommend you to have the glove box lamp re-
placed by a specialist. Centre console downlight
E01008700144
Type 1Type 2 Type 1
We
recommend you to have the centre console
downlight replaced by a specialist.
Type 2
1. Insert a straight blade (or minus) screwdriverwith a cloth over its tip at edge of the garnish
(A) and pry gently to remove it. 2. Turn
the bulb socket (B) anticlockwise to re-
move it. 3. Remove the bulb by pulling out.
4. To
install the bulb, perform the removal
steps in reverse. Maintenance
8-34
8
OCRE12E1
Page 357 of 369

E
Easy select 4WD 4-26
Economical driving
4-02
Electric window control 1-08 Switch 1-08
Electrical system 9-17
Electronic immobilizer (Anti-theft starting sys-
tem) 1-03
Emergency starting 6-02
Engine specifications 9-15
Engine Coolant 8-06,9-22
Number 9-02
Oil 8-04,9-22
Overheating 6-04
Specifications 9-15
Used engine oils safety instructions and disposal
information 05
Water temperature gauge 3-05
Error codes 5-42
Exterior and interior lamp operation 8-18
FFirst-aid kit and warning triangle band for secur-
ing 5-80
Floor console box 5-76
Fluid
Automatic transmission fluid
8-07,9-22
Brake fluid 8-08,9-22
Clutch fluid 8-09,9-22
Engine coolant 8-06,9-22
Power steering fluid 8-09,9-22
Washer fluid 8-08,9-22
For cold and snowy weather 8-19
Front console box 5-76
Front fog lamps Bulb capacity 8-24
Indication lamp
3-07
Replacement 8-28
Switch 3-34
Front room lamp Bulb capacity 8-25
Replacement 8-32
Front seat 2-03
Front turn-signal lamps Bulb capacity 8-24
Replacement 8-27
Fuel consumption 9-20
Fuel Filling the fuel tank 02
Fuel filter indication lamp 3-07
Fuel gauge 3-04
Fuel selection 02
Low fuel warning lamp 3-04
Modification/alterations to the electrical or fuel
systems 04
Tank capacity 02
Fuses 8-20
Fusible links 8-19
G Gauges 3-02
General maintenance
8-18
General vehicle data 9-03
Genuine parts 05
Glove box 5-76
Glove box lamp Bulb capacity 8-24
Replacement 8-34
H Handling of compact discs 5-48
Hazard warning flasher switch 3-34Hazard warning indication lamps 3-07
Head restraints 2-08
Headlamp levelling switch
3-32
Headlamps Bulb capacity 8-24
Headlamp flasher 3-31
Replacement 8-25
Switch 3-30
Washer switch 3-39
Heated mirror 4-11
Heated seats 2-06
Heater 5-03
High-mounted stop lamp Bulb capacity 8-24
Replacement 8-31
Hinges and latches lubrication 8-19
Hooks Coat hook 5-80
Convenient hook 5-80
Horn switch 3-40
I If the vehicle breaks down 6-02
Ignition switch 4-11
Indication and warning lamps
3-06
Indication lamps 3-07
Inside rear-view mirror 4-09
Inspection and maintenance following rough road
operation 4-41
Installation of accessories 04
Instruments 3-02
Interior lamps 5-73
J Jack handle 6-12
Storage 6-07
Jacking up the vehicle
6-13Alphabetical index
2
OCRE12E1