2010 MITSUBISHI L200 buttons
[x] Cancel search: buttonsPage 200 of 369
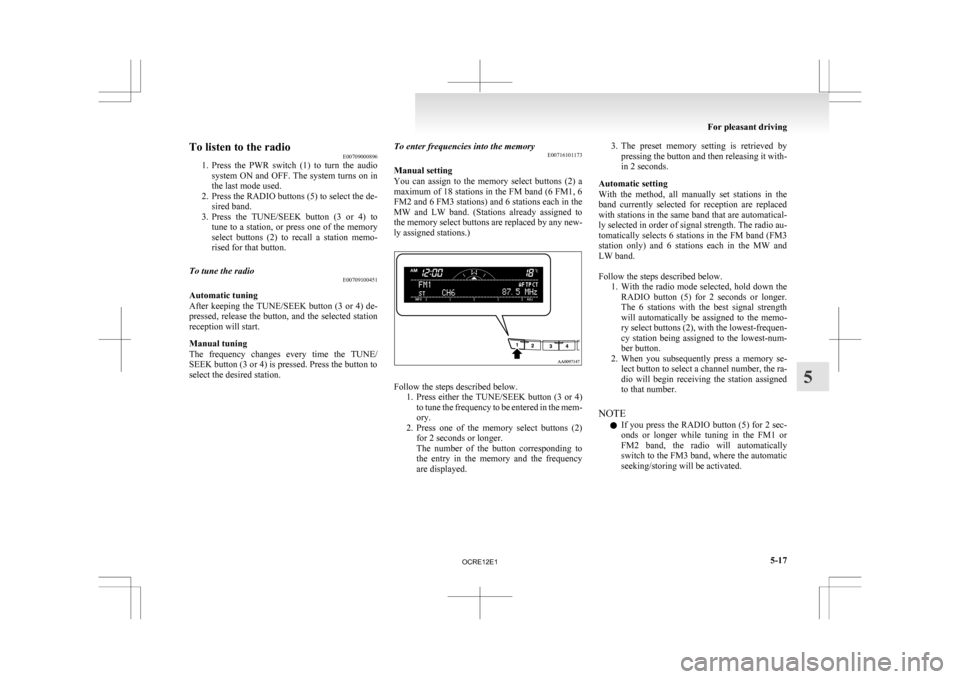
To listen to the radio
E00709000896
1. Press
the PWR switch (1) to turn the audio
system ON and OFF. The system turns on in
the last mode used.
2. Press the RADIO buttons (5) to select the de- sired band.
3. Press the TUNE/SEEK button (3 or 4) to tune to a station, or press one of the memory
select buttons (2) to recall a station memo-
rised for that button.
To tune the radio E00709100451
Automatic tuning
After
keeping the TUNE/SEEK button (3 or 4) de-
pressed, release the button, and the selected station
reception will start.
Manual tuning
The frequency changes every time the TUNE/
SEEK button (3 or 4) is pressed. Press the button to
select the desired station. To enter frequencies into the memory
E00716101173
Manual setting
You
can assign to the memory select buttons (2) a
maximum of 18 stations in the FM band (6 FM1, 6
FM2 and 6 FM3 stations) and 6 stations each in the
MW and LW band. (Stations already assigned to
the memory select buttons are replaced by any new-
ly assigned stations.) Follow the steps described below.
1. Press
either the TUNE/SEEK button (3 or 4)
to tune the frequency to be entered in the mem-
ory.
2. Press one of the memory select buttons (2) for 2 seconds or longer.
The number of the button corresponding to
the entry in the memory and the frequency
are displayed. 3. The
preset memory setting is retrieved by
pressing the button and then releasing it with-
in 2 seconds.
Automatic setting
With the method, all manually set stations in the
band currently selected for reception are replaced
with stations in the same band that are automatical-
ly selected in order of signal strength. The radio au-
tomatically selects 6 stations in the FM band (FM3
station only) and 6 stations each in the MW and
LW band.
Follow the steps described below. 1. With the radio mode selected, hold down theRADIO button (5) for 2 seconds or longer.
The 6 stations with the best signal strength
will automatically be assigned to the memo-
ry select buttons (2), with the lowest-frequen-
cy station being assigned to the lowest-num-
ber button.
2. When you subsequently press a memory se- lect button to select a channel number, the ra-
dio will begin receiving the station assigned
to that number.
NOTE l If you press the RADIO button (5) for 2 sec-
onds or longer while tuning in the FM1 or
FM2 band, the radio will automatically
switch to the FM3 band, where the automatic
seeking/storing will be activated. For pleasant driving
5-17 5
OCRE12E1
Page 201 of 369
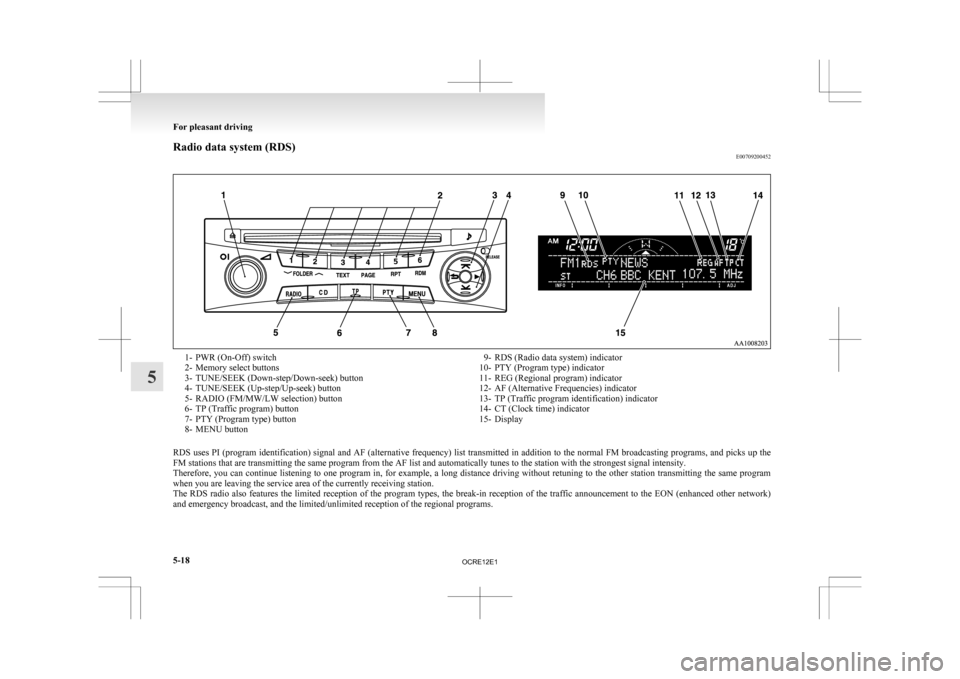
Radio data system (RDS)
E007092004521- PWR (On-Off) switch
2-
Memory select buttons
3- TUNE/SEEK (Down-step/Down-seek) button
4- TUNE/SEEK (Up-step/Up-seek) button
5- RADIO (FM/MW/LW selection) button
6- TP (Traffic program) button
7- PTY (Program type) button
8- MENU button 9- RDS (Radio data system) indicator
10- PTY (Program type) indicator
11- REG (Regional program) indicator
12- AF (Alternative Frequencies) indicator
13- TP (Traffic program identification) indicator
14- CT (Clock time) indicator
15- Display
RDS uses PI (program identification) signal and AF (alternative frequency) list transmitted in addition to the normal FM broadcasting programs, and picks up the
FM stations that are transmitting the same program from the AF list and automatically tunes to the station with the strongest signal intensity.
Therefore,
you can continue listening to one program in, for example, a long distance driving without retuning to the other station transmitting the same program
when you are leaving the service area of the currently receiving station.
The RDS radio also features the limited reception of the program types, the break-in reception of the traffic announcement to the EON (enhanced other network)
and emergency broadcast, and the limited/unlimited reception of the regional programs. For pleasant driving
5-18
5
OCRE12E1
Page 203 of 369
NOTE
l If
the TUNE/SEEK button (3 or 4) is pressed
for more than 1 second, the radio will try to
find out another broadcast of the same pro-
gram type as currently selected.
l If no station is found with your desired PTY,
the display will show “EMPTY” for about
5 seconds and the radio will return to the pre-
vious station.
How to enter PTYs in the memory E00721400135
As many as 6 PTYs can be entered in the memory.
Follow the steps described below.
1. Press
either the TUNE/SEEK button (3 or 4)
to tune the PTY to be entered in the memory.
2. Press one of the memory select buttons (2) for 2 seconds or longer. The number of the
button corresponding to the entry into the
memory and the PTY are displayed.
3. The preset memory setting is retrieved by pressing the button and then releasing it with-
in about 2 seconds.
Traffic information E00721600254
The radio will automatically tune in to traffic infor-
mation
broadcasts while receiving FM broadcasts
or playing compact discs etc.
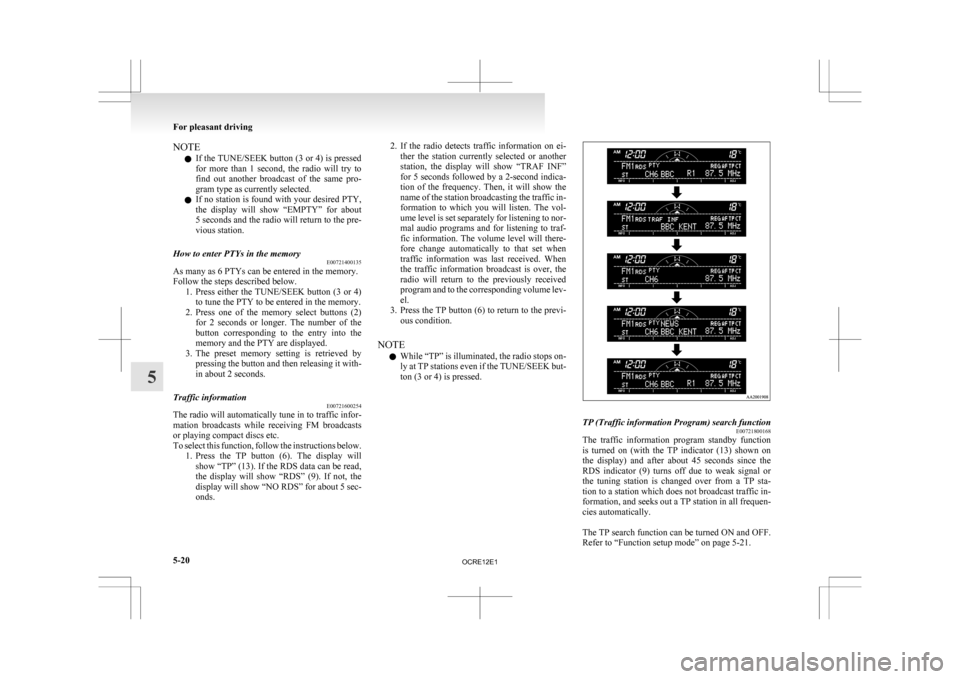
To select this function, follow the instructions below. 1. Press the TP button (6). The display willshow “TP” (13). If the RDS data can be read,
the display will show “RDS” (9). If not, the
display will show “NO RDS” for about 5 sec-
onds. 2. If
the radio detects traffic information on ei-
ther the station currently selected or another
station, the display will show “TRAF INF”
for 5 seconds followed by a 2-second indica-
tion of the frequency. Then, it will show the
name of the station broadcasting the traffic in-
formation to which you will listen. The vol-
ume level is set separately for listening to nor-
mal audio programs and for listening to traf-
fic information. The volume level will there-
fore change automatically to that set when
traffic information was last received. When
the traffic information broadcast is over, the
radio will return to the previously received
program and to the corresponding volume lev-
el.
3. Press the TP button (6) to return to the previ- ous condition.
NOTE l While “TP” is illuminated, the radio stops on-
ly at TP stations even if the TUNE/SEEK but-
ton (3 or 4) is pressed. TP (Traffic information Program) search function
E00721800168
The traffic information program standby function
is
turned on (with the TP indicator (13) shown on
the display) and after about 45 seconds since the
RDS indicator (9) turns off due to weak signal or
the tuning station is changed over from a TP sta-
tion to a station which does not broadcast traffic in-
formation, and seeks out a TP station in all frequen-
cies automatically.
The TP search function can be turned ON and OFF.
Refer to “Function setup mode” on page 5-21. For pleasant driving
5-20
5
OCRE12E1
Page 208 of 369
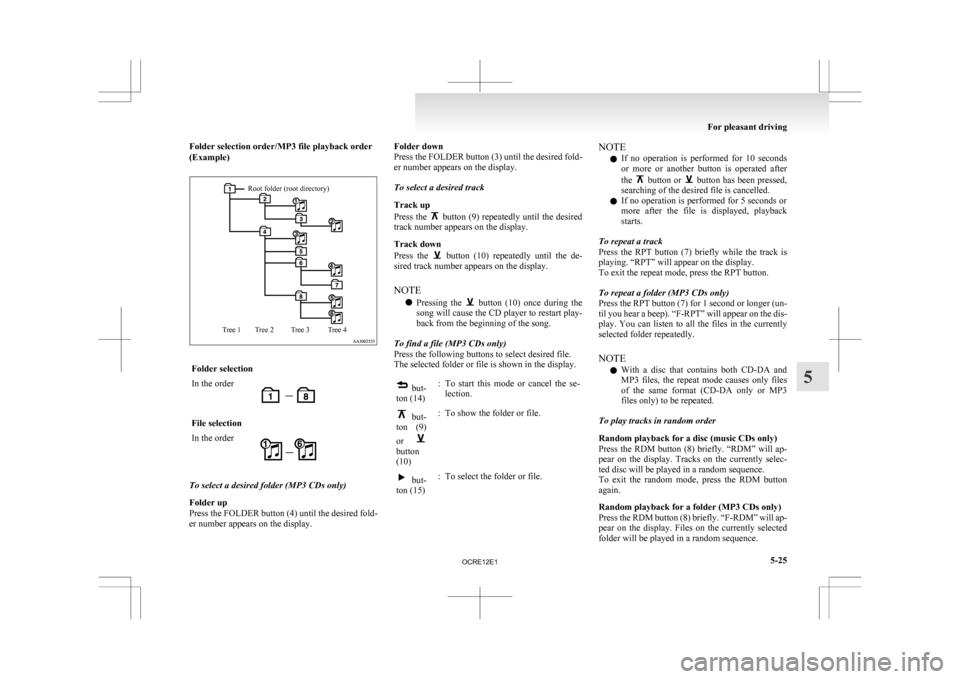
Folder selection order/MP3 file playback order
(Example)Root folder (root directory)
Tree 4
Tree 3
Tree 2
Tree 1 Folder selection
In the order
File selection
In the order
To select a desired folder (MP3 CDs only)
Folder up
Press
the FOLDER button (4) until the desired fold-
er number appears on the display. Folder down
Press
the FOLDER button (3) until the desired fold-
er number appears on the display.
To select a desired track
Track up
Press the button (9) repeatedly until the desired
track number appears on the display.
Track down
Press
the button (10) repeatedly until the de-
sired track number appears on the display.
NOTE
l Pressing
the button (10) once during the
song
will cause the CD player to restart play-
back from the beginning of the song.
To find a file (MP3 CDs only)
Press the following buttons to select desired file.
The selected folder or file is shown in the display. but-
ton (14) : To start this mode or cancel the se-
lection. but-
ton
(9)
or button
(10)
: To show the folder or file. but-
ton (15) : To select the folder or file. NOTE
l If
no operation is performed for 10 seconds
or more or another button is operated after
the button or button has been pressed,
searching of the desired file is cancelled.
l If
no operation is performed for 5 seconds or
more after the file is displayed, playback
starts.
To repeat a track
Press the RPT button (7) briefly while the track is
playing. “RPT” will appear on the display.
To exit the repeat mode, press the RPT button.
To repeat a folder (MP3 CDs only)
Press the RPT button (7) for 1 second or longer (un-
til you hear a beep). “F-RPT” will appear on the dis-
play. You can listen to all the files in the currently
selected folder repeatedly.
NOTE l With a disc that contains both CD-DA and
MP3 files, the repeat mode causes only files
of the same format (CD-DA only or MP3
files only) to be repeated.
To play tracks in random order
Random playback for a disc (music CDs only)
Press the RDM button (8) briefly. “RDM” will ap-
pear on the display. Tracks on the currently selec-
ted disc will be played in a random sequence.
To exit the random mode, press the RDM button
again.
Random playback for a folder (MP3 CDs only)
Press the RDM button (8) briefly. “F-RDM” will ap-
pear on the display. Files on the currently selected
folder will be played in a random sequence. For pleasant driving
5-25 5
OCRE12E1
Page 212 of 369
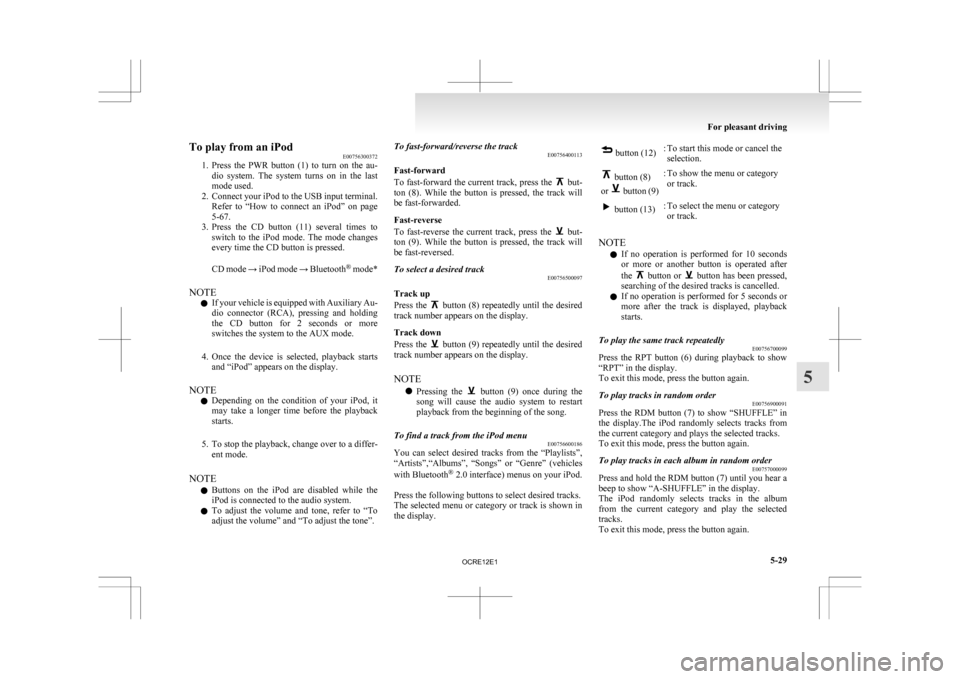
To play from an iPod
E00756300372
1. Press
the PWR button (1) to turn on the au-
dio system. The system turns on in the last
mode used.
2. Connect your iPod to the USB input terminal. Refer to “How to connect an iPod” on page
5-67.
3. Press the CD button (11) several times to switch to the iPod mode. The mode changes
every time the CD button is pressed.
CD mode → iPod mode → Bluetooth ®
mode*
NOTE l If your vehicle is equipped with Auxiliary Au-
dio connector (RCA), pressing and holding
the CD button for 2 seconds or more
switches the system to the AUX mode.
4. Once the device is selected, playback starts and “iPod” appears on the display.
NOTE l Depending on the condition of your iPod, it
may take a longer time before the playback
starts.
5. To stop the playback, change over to a differ- ent mode.
NOTE l Buttons on the iPod are disabled while the
iPod is connected to the audio system.
l To adjust the volume and tone, refer to “To
adjust the volume” and “To adjust the tone”. To fast-forward/reverse the track
E00756400113
Fast-forward
To
fast-forward the current track, press the but-
ton
(8). While the button is pressed, the track will
be fast-forwarded.
Fast-reverse
To fast-reverse the current track, press the but-
ton
(9). While the button is pressed, the track will
be fast-reversed.
To select a desired track E00756500097
Track up
Press
the button (8) repeatedly until the desired
track number appears on the display.
Track down
Press
the button (9) repeatedly until the desired
track number appears on the display.
NOTE
l Pressing
the button (9) once during the
song
will cause the audio system to restart
playback from the beginning of the song.
To find a track from the iPod menu E00756600186
You can select desired tracks from the “Playlists”,
“Artists”,“Albums”,
“Songs” or “Genre” (vehicles
with Bluetooth ®
2.0 interface) menus on your iPod.
Press the following buttons to select desired tracks.
The selected menu or category or track is shown in
the display. button (12)
: To start this mode or cancel the
selection. button (8)
or button (9)
: To show the menu or category
or track. button (13)
: To select the menu or category
or track.
NOTE l If
no operation is performed for 10 seconds
or more or another button is operated after
the button or button has been pressed,
searching of the desired tracks is cancelled.
l If
no operation is performed for 5 seconds or
more after the track is displayed, playback
starts.
To play the same track repeatedly E00756700099
Press the RPT button (6) during playback to show
“RPT” in the display.
To exit this mode, press the button again.
To play tracks in random order E00756900091
Press the RDM button (7) to show “SHUFFLE” in
the
display.The iPod randomly selects tracks from
the current category and plays the selected tracks.
To exit this mode, press the button again.
To play tracks in each album in random order E00757000099
Press and hold the RDM button (7) until you hear a
beep to show “A-SHUFFLE” in the display.
The
iPod randomly selects tracks in the album
from the current category and play the selected
tracks.
To exit this mode, press the button again. For pleasant driving
5-29 5
OCRE12E1
Page 217 of 369
To play from a USB memory device
E00762500366
1. Press
the PWR button (1) to turn on the au-
dio system. The system turns on in the last
mode used.
2. Connect your USB memory device to the USB input terminal.
Refer to “How to connect a USB memory de-
vice” on page 5-67.
3. Press the CD button (11) several times to switch to the USB mode. The mode changes
as follows every time the CD button is pressed.
CD mode → USB mode → Bluetooth ®
mode*
NOTE l If your vehicle is equipped with Auxiliary Au-
dio connector (RCA), pressing and holding
the CD button for 2 seconds or more
switches the system to the AUX mode.
4. Once the device is selected, playback starts and “USB” appears on the display.
NOTE l Depending on the condition of your USB de-
vice, it may take a longer time before the play-
back starts.
5. To stop the playback, change over to a differ- ent mode.
NOTE l To adjust the volume and tone, refer to “To
adjust the volume” and “To adjust the tone”. Supported compressed music files
E00758300305
This
audio can play MP3, WMA, AAC and WAV
files recorded in a USB memory device. This audio
supports up to 65,535 files in 700 folders on 8 levels.
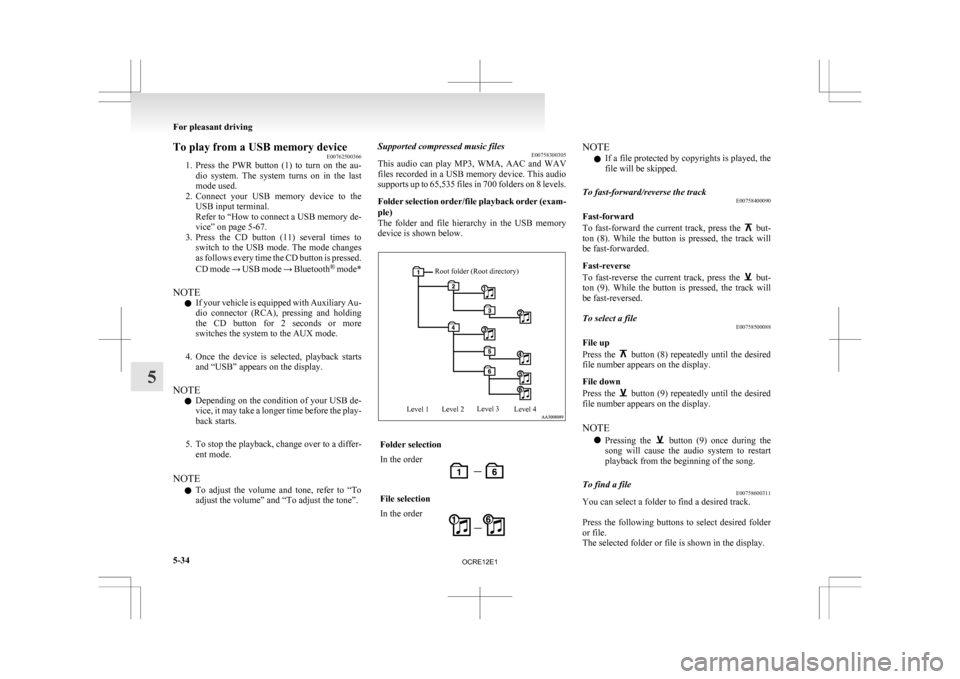
Folder selection order/file playback order (exam-
ple)
The folder and file hierarchy in the USB memory
device is shown below.
Root folder (Root directory)
Level 1 Level 2 Level 3
Level 4 Folder selection
In the order
File selection
In the order NOTE
l If a file protected by copyrights is played, the
file will be skipped.
To fast-forward/reverse the track E00758400090
Fast-forward
To
fast-forward the current track, press the but-
ton
(8). While the button is pressed, the track will
be fast-forwarded.
Fast-reverse
To fast-reverse the current track, press the but-
ton
(9). While the button is pressed, the track will
be fast-reversed.
To select a file E00758500088
File up
Press
the button (8) repeatedly until the desired
file number appears on the display.
File down
Press
the button (9) repeatedly until the desired
file number appears on the display.
NOTE
l Pressing
the button (9) once during the
song
will cause the audio system to restart
playback from the beginning of the song.
To find a file E00758600311
You can select a folder to find a desired track.
Press
the following buttons to select desired folder
or file.
The selected folder or file is shown in the display. For pleasant driving
5-34
5
OCRE12E1
Page 223 of 369
CAUTION
l
Do not operate the connected audio equip-
ment while driving.
This could distract you and an accident
might occur.
NOTE l The
connected audio equipment cannot be op-
erated with the vehicle’s audio system.
l Depending on the connected audio equip-
ment, it may produce noise from the speakers.
l Use the connected audio equipment’s own
power source, such as its battery.
Noise may be produced from the speakers if
the connected audio equipment is used while
charging it using the accessory socket of the
vehicle.
l Do not activate the external audio input
mode when no audio equipment is connected.
Otherwise, noise may be produced from the
speakers.
l Connect audio equipment when the external
audio input mode is deactivated or lower the
vehicle’s speaker volume before connecting it.
Noise may be produced from the speakers if
audio equipment is connected after the exter-
nal audio input mode is activated.
l For information on how to connect and oper-
ate the audio equipment, refer to the owner’s
manual for the equipment. Steering wheel remote control
switch* E00710000955
The
remote control switches are located on the left
side of the steering wheel.
These switches can be used when the ignition
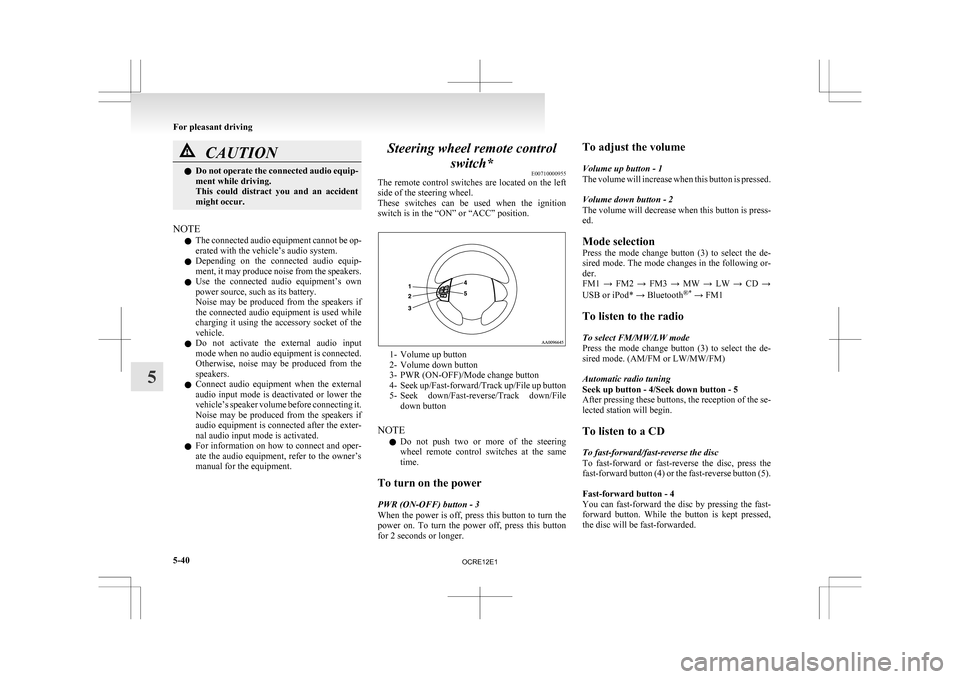
switch is in the “ON” or “ACC” position. 1- Volume up button
2-
Volume down button
3- PWR (ON-OFF)/Mode change button
4- Seek up/Fast-forward/Track up/File up button
5- Seek down/Fast-reverse/Track down/File down button
NOTE l Do not push two or more of the steering
wheel remote control switches at the same
time.
To turn on the power
PWR (ON-OFF) button - 3
When the power is off, press this button to turn the
power on. To turn the power off, press this button
for 2 seconds or longer. To adjust the volume
Volume up button - 1
The
volume will increase when this button is pressed.
Volume down button - 2
The volume will decrease when this button is press-
ed.
Mode selection
Press the mode change button (3) to select the de-
sired mode. The mode changes in the following or-
der.
FM1 → FM2 → FM3 → MW → LW → CD →
USB or iPod* → Bluetooth ®*
→ FM1
To listen to the radio
To select FM/MW/LW mode
Press the mode change button (3) to select the de-
sired mode. (AM/FM or LW/MW/FM)
Automatic radio tuning
Seek up button - 4/Seek down button - 5
After pressing these buttons, the reception of the se-
lected station will begin.
To listen to a CD
To fast-forward/fast-reverse the disc
To fast-forward or fast-reverse the disc, press the
fast-forward button (4) or the fast-reverse button (5).
Fast-forward button - 4
You can fast-forward the disc by pressing the fast-
forward button. While the button is kept pressed,
the disc will be fast-forwarded.
For pleasant driving
5-40
5
OCRE12E1
Page 256 of 369
Digital clock*
E00711700193
The
digital clock indicates the time with the igni-
tion switch in either “ON” or “ACC” position.
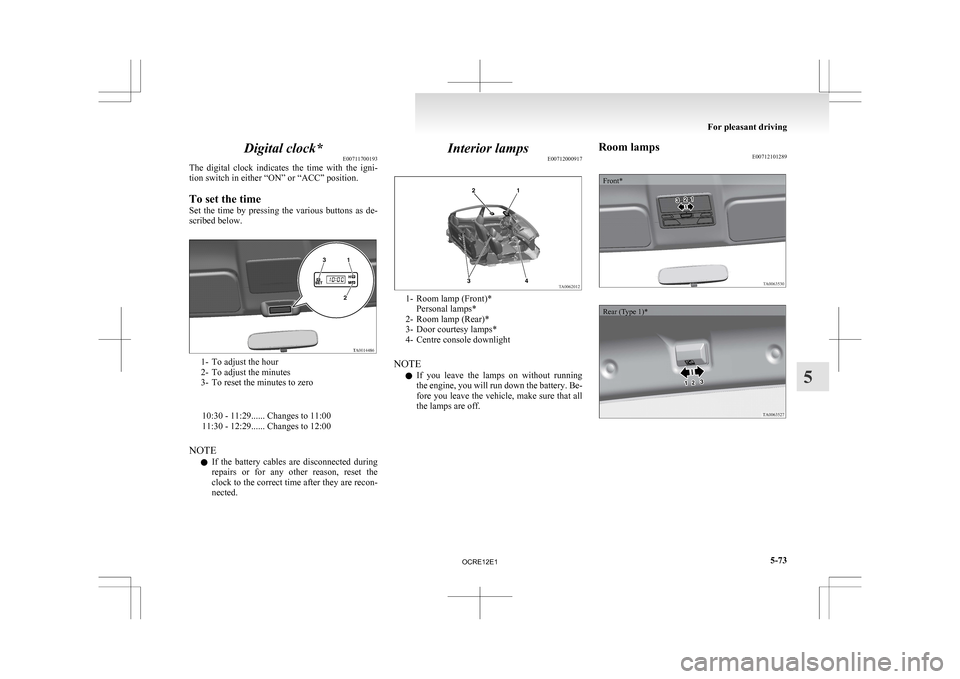
To set the time
Set the time by pressing the various buttons as de-
scribed below. 1- To adjust the hour
2-
To adjust the minutes
3- To reset the minutes to zero
10:30 - 11:29...... Changes to 11:00
11:30 - 12:29...... Changes to 12:00
NOTE l If the battery cables are disconnected during
repairs or for any other reason, reset the
clock to the correct time after they are recon-
nected. Interior lamps
E00712000917 1- Room lamp (Front)*
Personal lamps*
2-
Room lamp (Rear)*
3- Door courtesy lamps*
4- Centre console downlight
NOTE l If you leave the lamps on without running
the engine, you will run down the battery. Be-
fore you leave the vehicle, make sure that all
the lamps are off. Room lamps
E00712101289
Front*
Rear (Type 1)* For pleasant driving
5-73 5
OCRE12E1