2010 MITSUBISHI L200 USB
[x] Cancel search: USBPage 221 of 369
To listen to tracks from a device con-
nected via Bluetooth
®
E00762700225
1. Press
the PWR button (1) to turn on the au-
dio system. The system turns on in the last
mode used.
2. Press the CD button (8) several times to
switch to the BT-A (Bluetooth ®
) mode. The
mode changes as follows every time the CD
button is pressed.
CD mode → USB (iPod) mode → Blue-
tooth ®
mode
NOTE l For vehicles equipped with Auxiliary Audio
connector (RCA), pressing and holding the
CD button for 2 seconds or more switches
the system to the AUX mode.
3. Connect your Bluetooth ®
device.
Refer to “Connecting the Bluetooth® 2.0 in-
terface and Bluetooth® device” on page
5-55.
4. Playback starts automatically.
NOTE l Depending on the connected device, the play-
back may not start automatically.
In this case, operate the connected device to
start the playback.
To stop the playback (if supported by the device) E00762800079
To stop the playback, press and hold the button
(9) until you hear a beep.
To restart the playback, press the button (10).To pause the playback (if supported by the device)
E00762900083
To pause the playback, press the button (9).
To restart the playback, press the button (10).
To fast-forward/reverse the track (if supported by
the device) E00765600010
Fast-forward
To
fast-forward the current track, press the but-
ton
(6). While the button is pressed, the track will
be fast-forwarded.
Fast-reverse
To fast-reverse the current track, press the but-
ton
(7). While the button is pressed, the track will
be fast-reversed.
To select a track (if supported by the device) E00763000094
Track up
Press
the button (6) repeatedly until the desired
track number appears on the display.
Track down
Press
the button (7) repeatedly until the desired
track number appears on the display.
NOTE
l Pressing
the button (7) once during the
song
will cause the audio system to restart
playback from the beginning of the song.
To play the same track or all tracks repeatedly (if
supported by the device) E00763100079
Press the RPT button (4) several times to show
“1-RPT”
(same track repeat mode) or “A-RPT” (all
tracks repeat mode) in the display. The mode changes as follows every time the RPT
button is pressed.
1-RPT mode → A-RPT mode → mode off
To
exit these mode, press the RPT button several
times until the 1-RPT indicator or the A-RPT indi-
cator goes off.
To play tracks in random order (if supported by
the device) E00763200070
Press the RDM button (5) to show “RDM” in the
display.
The
system randomly selects and plays tracks from
all tracks in the Bluetooth ®
device.
To exit this mode, press the button again.
To switch the display (if supported by the device) E00763400072
The display changes as follows every time the
TEXT button (2) is pressed briefly.
Album
title → Title name → Artist name → Genre
→ Normal display
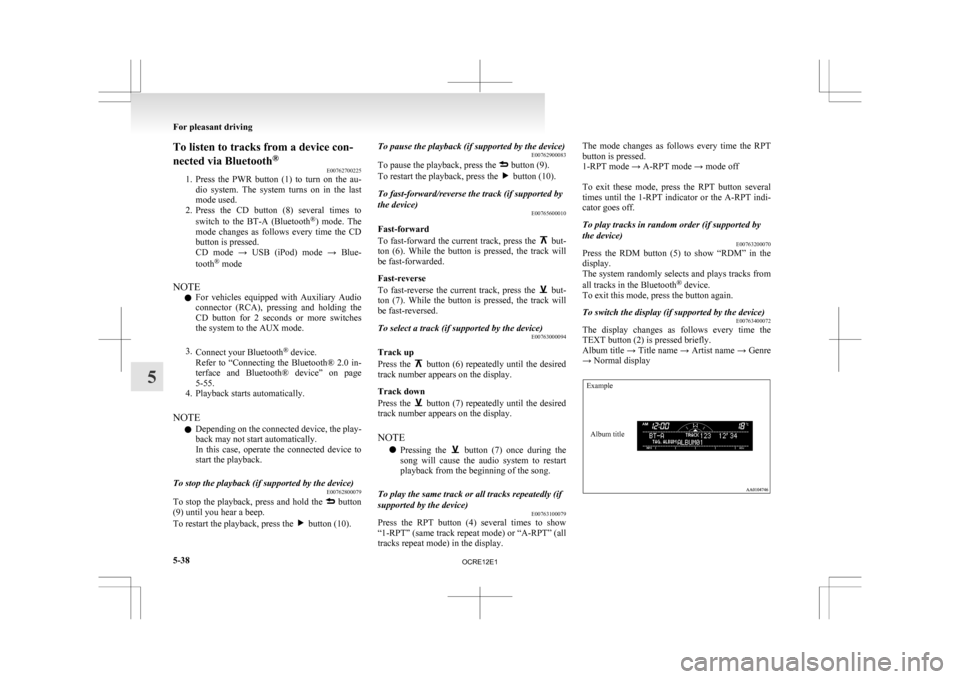
Example
Album title For pleasant driving
5-38
5
OCRE12E1
Page 223 of 369
CAUTION
l
Do not operate the connected audio equip-
ment while driving.
This could distract you and an accident
might occur.
NOTE l The
connected audio equipment cannot be op-
erated with the vehicle’s audio system.
l Depending on the connected audio equip-
ment, it may produce noise from the speakers.
l Use the connected audio equipment’s own
power source, such as its battery.
Noise may be produced from the speakers if
the connected audio equipment is used while
charging it using the accessory socket of the
vehicle.
l Do not activate the external audio input
mode when no audio equipment is connected.
Otherwise, noise may be produced from the
speakers.
l Connect audio equipment when the external
audio input mode is deactivated or lower the
vehicle’s speaker volume before connecting it.
Noise may be produced from the speakers if
audio equipment is connected after the exter-
nal audio input mode is activated.
l For information on how to connect and oper-
ate the audio equipment, refer to the owner’s
manual for the equipment. Steering wheel remote control
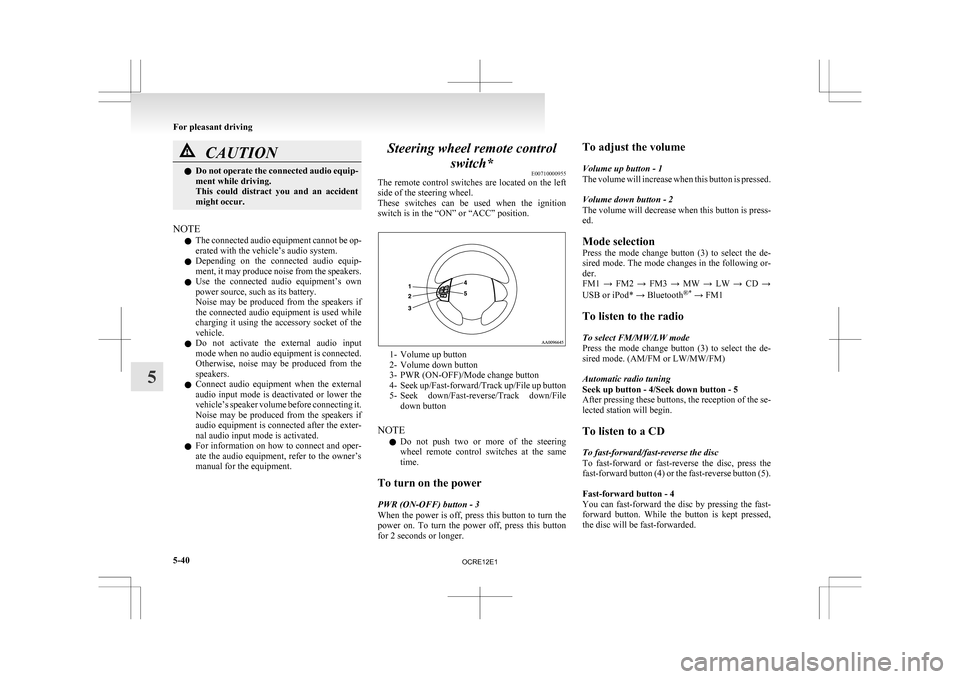
switch* E00710000955
The
remote control switches are located on the left
side of the steering wheel.
These switches can be used when the ignition
switch is in the “ON” or “ACC” position. 1- Volume up button
2-
Volume down button
3- PWR (ON-OFF)/Mode change button
4- Seek up/Fast-forward/Track up/File up button
5- Seek down/Fast-reverse/Track down/File down button
NOTE l Do not push two or more of the steering
wheel remote control switches at the same
time.
To turn on the power
PWR (ON-OFF) button - 3
When the power is off, press this button to turn the
power on. To turn the power off, press this button
for 2 seconds or longer. To adjust the volume
Volume up button - 1
The
volume will increase when this button is pressed.
Volume down button - 2
The volume will decrease when this button is press-
ed.
Mode selection
Press the mode change button (3) to select the de-
sired mode. The mode changes in the following or-
der.
FM1 → FM2 → FM3 → MW → LW → CD →
USB or iPod* → Bluetooth ®*
→ FM1
To listen to the radio
To select FM/MW/LW mode
Press the mode change button (3) to select the de-
sired mode. (AM/FM or LW/MW/FM)
Automatic radio tuning
Seek up button - 4/Seek down button - 5
After pressing these buttons, the reception of the se-
lected station will begin.
To listen to a CD
To fast-forward/fast-reverse the disc
To fast-forward or fast-reverse the disc, press the
fast-forward button (4) or the fast-reverse button (5).
Fast-forward button - 4
You can fast-forward the disc by pressing the fast-
forward button. While the button is kept pressed,
the disc will be fast-forwarded.
For pleasant driving
5-40
5
OCRE12E1
Page 224 of 369
Fast-reverse button - 5
You
can fast-reverse the disc by pressing the fast-
reverse button. While the button is kept pressed,
the disc will be fastreversed.
NOTE
l In the case of an MP3 CD, you can fast-for-
ward and fast-reverse tracks in the same fold-
er.
To select a desired track
Track up button - 4
Press the button repeatedly until the desired track
number appears on the display.
Track down button - 5
Press the button repeatedly until the desired track
number appears on the display.
To listen to an iPod
Press the mode change button (3) and select iPod
mode.
To select a desired track
Track up button - 4
Press the button repeatedly until the desired track
number appears on the display.
NOTE l The track number increases continuously
while the button is pressed.
Track down button - 5
Press the button repeatedly until the desired track
number appears on the display. NOTE
l The
track number decreases continuously
while the button is pressed.
To listen to a USB memory device
Press the mode change button (3) and select USB
mode.
To select a desired file
File up button — 4
Press the button repeatedly until the desired track
number appears on the display.
NOTE l The track number increases continuously
while the button is pressed.
File down button — 5
Press the button repeatedly until the desired track
number appears on the display.
NOTE l The track number decreases continuously
while the button is pressed. For pleasant driving
5-41 5
OCRE12E1
Page 228 of 369
Error display Item Repair
NO SONG There are no playable music files. Record music files in the iPod.
VERSION ERROR (Blink) The iPod or its software cannot be recognized. Connect a supported iPod.
USB BUS PWR (Blink) An overcurrent or other power-supply error has occurred. Remove the iPod.
Have
the vehicle inspected at a MITSUBISHI MOTORS
Authorized Service Point.
USB LSI ERROR (Blink) Internal device errors Have the vehicle inspected at a MITSUBISHI MOTORS
Authorized Service Point.
CONNECT RETRY (Blink) If the iPod indicator illuminates, the iPod cannot be authen-
ticated.
Reconnect the iPod.
If the iPod indicator goes out, it shows the USB communi-
cation error. Reconnect the iPod correctly.
If
this error is displayed again, have the vehicle inspected at
a MITSUBISHI MOTORS Authorized Service Point. For pleasant driving
5-45 5
OCRE12E1
Page 229 of 369
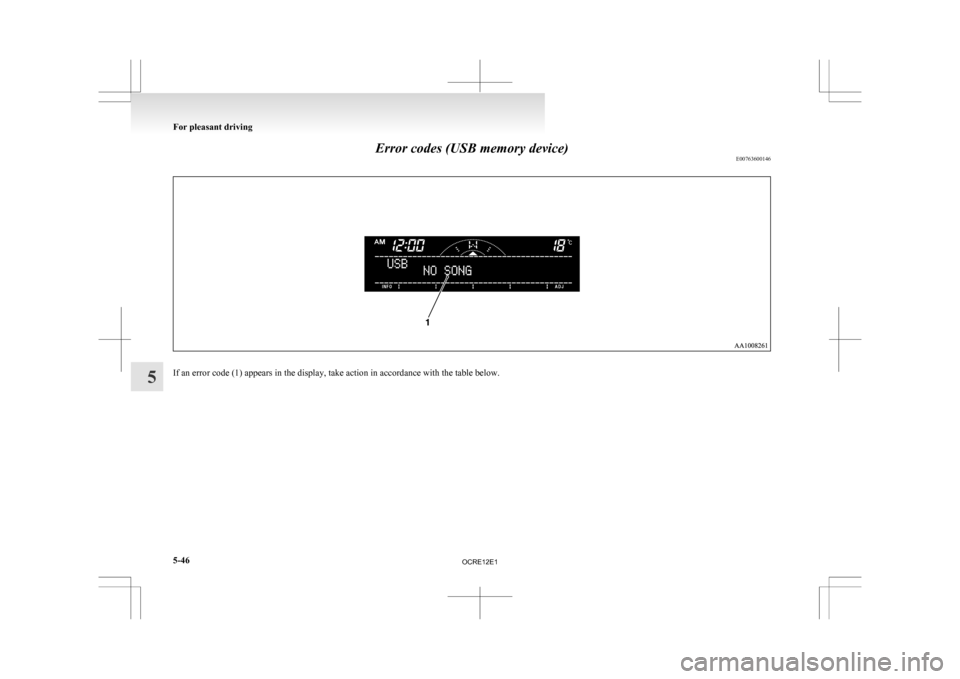
Error codes (USB memory device)
E00763600146If an error code (1) appears in the display, take action in accordance with the table below.For pleasant driving
5-46
5
OCRE12E1
Page 230 of 369
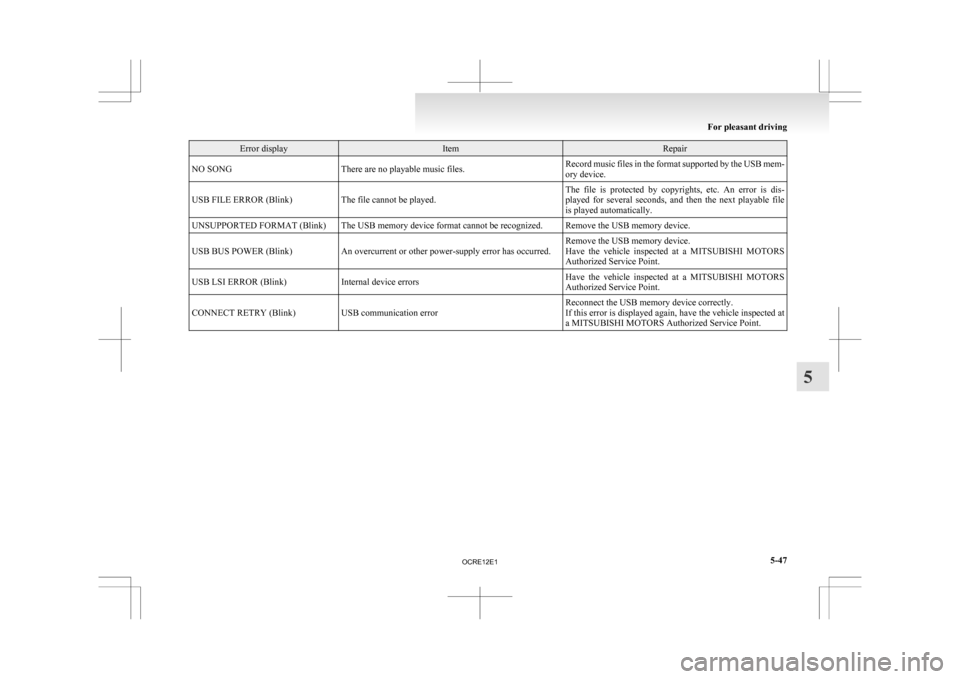
Error display Item Repair
NO SONG There are no playable music files. Record music files in the format supported by the USB mem-
ory device.
USB FILE ERROR (Blink) The file cannot be played. The file is protected by copyrights, etc. An error is dis-
played
for several seconds, and then the next playable file
is played automatically.
UNSUPPORTED FORMAT (Blink) The USB memory device format cannot be recognized. Remove the USB memory device.
USB BUS POWER (Blink) An overcurrent or other power-supply error has occurred. Remove the USB memory device.
Have
the vehicle inspected at a MITSUBISHI MOTORS
Authorized Service Point.
USB LSI ERROR (Blink) Internal device errors Have the vehicle inspected at a MITSUBISHI MOTORS
Authorized Service Point.
CONNECT RETRY (Blink) USB communication error Reconnect the USB memory device correctly.
If
this error is displayed again, have the vehicle inspected at
a MITSUBISHI MOTORS Authorized Service Point. For pleasant driving
5-47 5
OCRE12E1
Page 234 of 369
NOTE
l Be
sure to remove the roof antenna in the fol-
lowing cases: • When using an automatic car wash.
• When placing a car cover over the vehicle.
l Before driving into a structure that has a low
ceiling, fold down the antenna to prevent it
from hitting the ceiling. Link System*
E00764500012
The
Link System takes overall control of the devi-
ces connected via the USB input terminal or the
Bluetooth ®
2.0 interface allowing the connected de-
vices to be operated by using the switches in the ve-
hicle or voice commands.
See the following section for details on how to op-
erate.
Refer to “Bluetooth ®
2.0 interface” on page 5-51.
Refer to “USB input terminal” on page 5-67.
Refer to “To play tracks from USB device” on
page 5-27.
Refer to “To play tracks from a Bluetooth ®
device”
on page 5-36.
Refer to “To use the external audio input function”
on page 5-39.
Bluetooth ®
is a registered trademark of BLUE-
TOOTH SIG, INC.
Link System End User Licence Agree-
ment E00764600013
You have acquired a device that includes software
licensed
by MITSUBISHI MOTORS CORPORA-
TION from JOHNSON CONTROLS Inc (the auto-
motive experience business unit), and their subse-
quent 3 rd
party suppliers. For a complete list of
these 3 rd
party products and their end user licence
agreements, please go to the following website.
http://www.jciblueconnect.com/faq/fulldisclo-
sure.pdf Bluetooth
®
2.0 interface*
E00726000556
The Bluetooth ®
2.0 interface allows for making/re-
ceiving hands-free calls in the vehicle using a Blue-
tooth ®
compatible cellular phone based on the wire-
less communication technology commonly known
as Bluetooth ®
. It also allows the user to play mu-
sic, saved in a Bluetooth ®
music player, from the
vehicle’s speakers.
The system is equipped with a voice recognition
function, which allows you to make hands-free
calls by simple switch operations and voice com-
mand operations using a defined voice tree.
The Bluetooth ®
2.0 interface can be used when the
ignition switch is in the “ON” or “ACC” position.
Before you can use the Bluetooth ®
2.0 interface,
you must pair the Bluetooth ®
device and Blue-
tooth ®
2.0 interface. Refer to “Connecting the Blue-
tooth® 2.0 interface and Bluetooth® device” on
page 5-55.
Bluetooth ®
is a registered trademark of BLUE-
TOOTH SIG, INC. For pleasant driving
5-51 5
OCRE12E1
Page 250 of 369

USB input terminal*
E00761900015
You
can connect your USB memory device or
iPod* to play music files stored in the USB memo-
ry device or iPod.
The following explains how to connect and remove
a USB memory device or iPod.
Refer to the following sections for details on how
to play music files:
Refer to “To play tracks from USB device” on
page 5-27.
*: “iPod” is a registered trademark of Apple Inc. in
the United States and other countries.
How to connect a USB memory device E00762000202
To connect 1. Park
your vehicle in a safe place and turn the
ignition switch to the “LOCK” position.
2. Open the glove box and remove the connec- tor cable (A) from clips (B). 3. Connect
the USB memory device (C) to the
connector cable (A). Be sure to hold the terminal part (D) of the
connector cable as shown in the illustration.
CAUTION
l
Keep
the lid of the glove box closed while
driving the vehicle. A lid or the contents
of the glove box could otherwise cause in-
juries.
NOTE l When
closing the glove box, be careful not
to trap the connector cable and USB memory
device.
To remove 1. Turn the ignition switch to the “LOCK” posi-tion.
2. Remove the USB memory device (C). Be sure to hold the terminal part (D) of the
connector cable as shown in the illustration.
3. Fix
the connector cable on the clips and
close the glove box.
How to connect an iPod E00762100186
To connect 1. Park
your vehicle in a safe place and turn the
ignition switch to the “LOCK” position.
2. Open the glove box and remove the connec- tor cable (A) from clips (B). For pleasant driving
5-67 5
OCRE12E1