Page 179 of 514
3-90 Features and controls
3
Change of display brightness modeWhen the light switch is in the “ ” or “ ” position, press-
ing the “BRIGHT” function button causes the brightness to
change to that seen when the headlight switch is “OFF”.
To return the brightness to the original level, press the
“BRIGHT” function button again.NOTE�When the light switch is “OFF”, the “BRIGHT” function
button is not displayed.
Digital clock/Calendar
N00522200049
The digital clock (A) is shown with all displays.
The calendar (B) is shown only with the calendar and digital
clock display.NOTE�Disconnecting the battery cable causes the time and date
memory to be erased. If it has been disconnected, readjust
the date and time by following the procedure.
BK0102600US.book 90 ページ 2009年3月30日 月曜日 午後2時2分
Page 180 of 514

Features and controls
3-91
3
Adjusting the timeNOTE�Every time the “DISP” button is pressed lightly, the moni-
tor will return to the previous display.
1. Press the “HOUR” function button to adjust the hour set-
ting. Press the “MIN” function button to adjust the minute
setting.2. Press the “HOUR+/MIN+” or “HOUR-/MIN-” function
button to change to the desired number. Pressing
“HOUR+/MIN+” or “HOUR-/MIN-” function button for
more than 2 seconds will fast forward to the desired
change. To change AM to PM, keep pressing to advance
the time.
When the hour has been adjusted, press the “SET” func-
tion button. The display will return to its previous display.
NOTE�Seconds are not displayed, but the count begins from 0
seconds when the “SET” function button is pressed.Adjusting the calendarRefer to “Date setting” on page 3-130.
CAUTION
!�It is dangerous to adjust the time while driving the
vehicle. Adjust the time when the vehicle is safely
parked.
Display for adjustment of minute setting
BK0102600US.book 91 ページ 2009年3月30日 月曜日 午後2時2分
Page 185 of 514
3-96 Features and controls
3
Audio (For vehicles with AM/FM electronically
tuned radio with CD autochanger)
N00533400100
This display shows the condition of the audio. For instruction
on how to use the audio, refer to “Audio system” on page 5-30.NOTE�If an audio system adjustment is made when an indication
other than that for the audio is shown, the display gives
the audio indication momentarily then returns to previous
display.
Trip computer
N00500200010
The trip computer shows driving information and environmen-
tal information. It can also be used as a stopwatch and as a
timer.Change of trip computer display
N00500400025
Every time the “NEXT” function button is pressed lightly, the
display can be changed.
Combined display → Average speed → Average fuel economy
→ Stopwatch → Countdown timer → Elevation/Barometer →
Outside temperature
BK0102600US.book 96 ページ 2009年3月30日 月曜日 午後2時2分
Page 187 of 514
 that can be
driven on the fuel remaining in the fuel tank.NOTE�If the driving range drops below 3")
3-98 Features and controls
3
Driving range
N00500700028
This value shows the distance (in miles or km) that can be
driven on the fuel remaining in the fuel tank.NOTE�If the driving range drops below 30 miles (50 km) while
the driving range is displayed, the display shows “--”.
When this occurs, replenish the fuel tank as soon as possi-
ble.
�When the system cannot provide a definite value for the
driving range, the display shows “---”.
�The driving range varies depending on road conditions,
the manner of driving and other related factors. Conse-
quently, the display should be used only as a guide. It is
recommended to add fuel as soon as the low-fuel warning
light in the instrument cluster illuminates.
(Refer to “Low-fuel warning light” on page 3-80.)
�Refueling will update the driving range indication.
�The driving range displayed is based on previous fuel
economy data. Disconnecting the battery cable will result
in the deletion of existing fuel consumption data, which
will affect the unit’s calculations.
�The driving range figure can occasionally increase if the
vehicle is stopped on an incline. This is normal, as the fuel
has moved in the tank because of the incline.
Average speed
N00500800029
The average speed (B) from the time when the display was last
reset to the present moment is shown with a graph. For instruc-
tions on resetting the display, refer to “To reset the display” on
page 3-105.NOTE�The range (A) for which historical data are shown in the
graph can be changed. Refer to “Graph indication” on
page 3-106.
�The unit for the average speed can be set to mph or km/h.
Refer to “Display unit selection” on page 3-106 or “Units
customization” on page 3-120.
�When the system cannot provide a definite value for aver-
age speed, it is displayed as “--”.
BK0102600US.book 98 ページ 2009年3月30日 月曜日 午後2時2分
Page 191 of 514

3-102 Features and controls
3
3. Press the “START” function button to start the timer. To
stop the timer before it has reached 0:00:00, press the
“STOP” function button.NOTE�If the timer reaches 0:00:00 while another display is
showing, a tone sounds once and the display changes to
the countdown timer for seven seconds.
If the “DISP” function button is pressed at this time, the
countdown timer disappears and the previous display
appears again.
�When the countdown timer has started, the “START”
function button becomes the “STOP” function button.
�Even if the ignition switch is turned to the “OFF” position
while the countdown timer is running, the countdown
timer continues counting down to 0:00:00.�Normally, a tone sounds to indicate that the countdown
timer has reached 0:00:00. It is possible to make a setting
so that the tone does not sound at this time. For details,
refer to “Timer buzzer setting” on page 3-126.
4. To reset the countdown timer, press the “SET” function
button for at least 2 seconds. The display will return to
0:00:00.
NOTE�Even if the “SET” function button is pressed while the
countdown timer is running, the countdown timer will not
be reset.
�If the “SET” function button is pressed lightly one time,
the previously set timer duration will be shown. To
change the timer duration setting, perform the procedure
again from step 1.
BK0102600US.book 102 ページ 2009年3月30日 月曜日 午後2時2分
Page 195 of 514

3-106 Features and controls
3
Graph indication
N00501800039
The average speed, average fuel economy, elevation, and out-
side temperature are each shown as a graph at the same time as
being shown numerically.
The range for which historical data are shown in the graphs
changes each time the “RANGE” function button is pressed
lightly.
�-3 hours: The average value is added to the graph every 6
minutes. Data for a maximum of three hours are shown in
the graph.
�-12 hours: The average value is added to the graph every
24 minutes. Data for a maximum of twelve hours are
shown in the graph.
NOTE�When the range for which historical data are shown is
changed for one graph, it also changes for the other
graphs.Display unit selection
N00501900027
When you want to select the other unit, pressing the function
button (A) for more than 3 seconds changes the unit as follows.
Mode
Unit
Driving range miles
→km
→milesAverage speed mph
→km/h
→mph
Average fuel economy mpg
→L/100km
→mpg
Elevation feet (ft)
→m
→feet (ft)
BK0102600US.book 106 ページ 2009年3月30日 月曜日 午後2時2分
Page 197 of 514

3-108 Features and controls
3
Setting and customization
N00533500055
It is possible to adjust/set/customize the specifications and dis-
plays of the items shown in the table below.
Condition
Item
Condition
Reference
page
DisplayDisplay brightness adjust-
ment*
1
P. 3 - 1 1 2
Turn off display
*
1
P. 3 - 1 1 4
Record maintenance
*
1, *3
P. 3 - 1 1 5
Display settings
*
1, *3
P. 3 - 1 1 8
Units
*
1, *3
P.3-120
Door open warning
*
1, *3
P.3-123
Rheostat synchronization
*
1, *3
P.3-125
Timer buzzer setting
*
1, *3
P.3-126
History
*
1, *3
P.3-127
Opening display setting
*
1, *3
P.3-128
Calendar Date setting
*
1, *3
P.3-130
CompassZone code setting
*
2, *3
P.3-131
Compass calibration
*
2, *3
P.3-133
Customi-
zationLights
*
1, *3
P.3-135
Wipers
*
1, *3
P.3-139
Keyless entry system &
power door lock system*
1, *3
P.3-142
Buzzers
*
1, *3
P.3-147
Number of keyless entry
registration*
1, *3
P.3-150
Defaults
*
1, *3
P.3-151
*
1Adjustment/setting/customization is possible with the igni-
tion key in the “ACC” or “ON” position.
*2Adjustment/setting is possible with the ignition key in the
“ON” position.
*3Setting/customization is possible when the vehicle speed is
no higher than 1mph (2 km/h).
Item
Condition
Reference
page
BK0102600US.book 108 ページ 2009年3月30日 月曜日 午後2時2分
Page 198 of 514
Features and controls
3-109
3
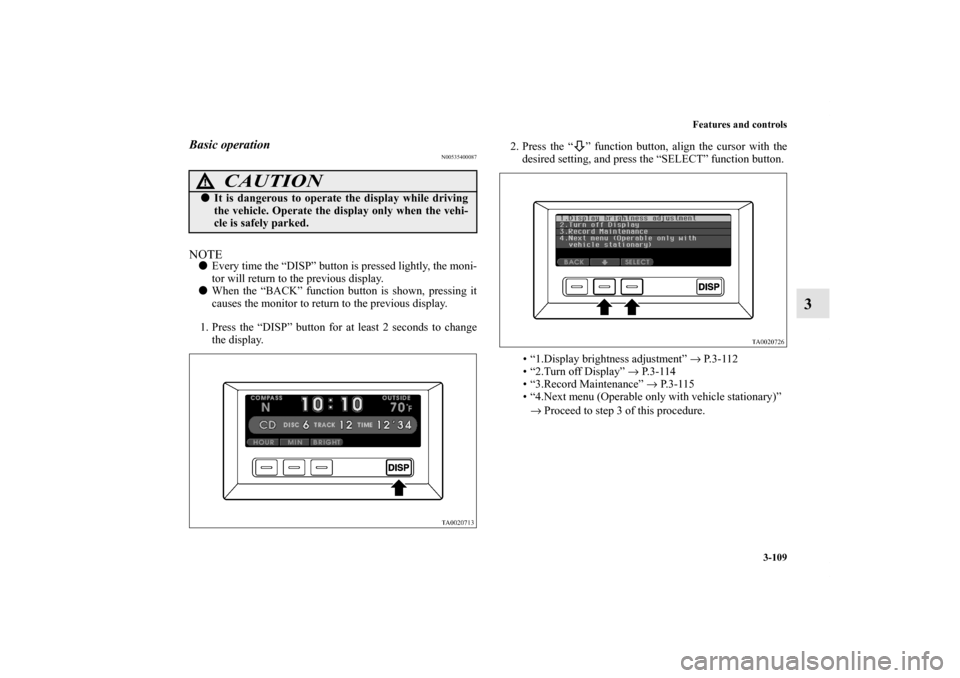
Basic operation
N00535400087
NOTE�Every time the “DISP” button is pressed lightly, the moni-
tor will return to the previous display.
�When the “BACK” function button is shown, pressing it
causes the monitor to return to the previous display.
1. Press the “DISP” button for at least 2 seconds to change
the display.2. Press the “ ” function button, align the cursor with the
desired setting, and press the “SELECT” function button.
• “1.Display brightness adjustment” → P. 3 - 1 1 2
• “2.Turn off Display” → P. 3 - 1 1 4
• “3.Record Maintenance” → P. 3 - 1 1 5
• “4.Next menu (Operable only with vehicle stationary)”
→ Proceed to step 3 of this procedure.
CAUTION
!�It is dangerous to operate the display while driving
the vehicle. Operate the display only when the vehi-
cle is safely parked.
BK0102600US.book 109 ページ 2009年3月30日 月曜日 午後2時2分


N00533400100
This display shows the condition of the audio. For instruction
on how to use t")