Page 325 of 514
5-6 Comfort controls
5Manual air conditioning
(if so equipped)
N00730300113
The air conditioning can only be used while the engine is run-
ning.Control panel
N00730500245
Blower speed selection dial
N00736500090
When the ignition key is in the ON position, select the blower
speed by turning the blower speed selection dial. The blower
speed will gradually increase as the dial is turned to the right.
When the blower speed selection dial is set to the “OFF” posi-
tion, all fan-driven airflow will stop.
1- Temperature control dial
2- Air selection switch
3- Blower speed selection dial
4- Air conditioning switch
5- Electric rear window defogger switch → P.3-163
6- Mode selection dial
BK0102600US.book 6 ページ 2009年3月30日 月曜日 午後2時2分
Page 327 of 514

5-8 Comfort controls
5
Air selection switch
N00736800312
Normally, use the outside position to keep the windshield and
side windows clear and to quickly remove fog or frost from the
windshield.
To change the air selection, simply press the air selection
switch.
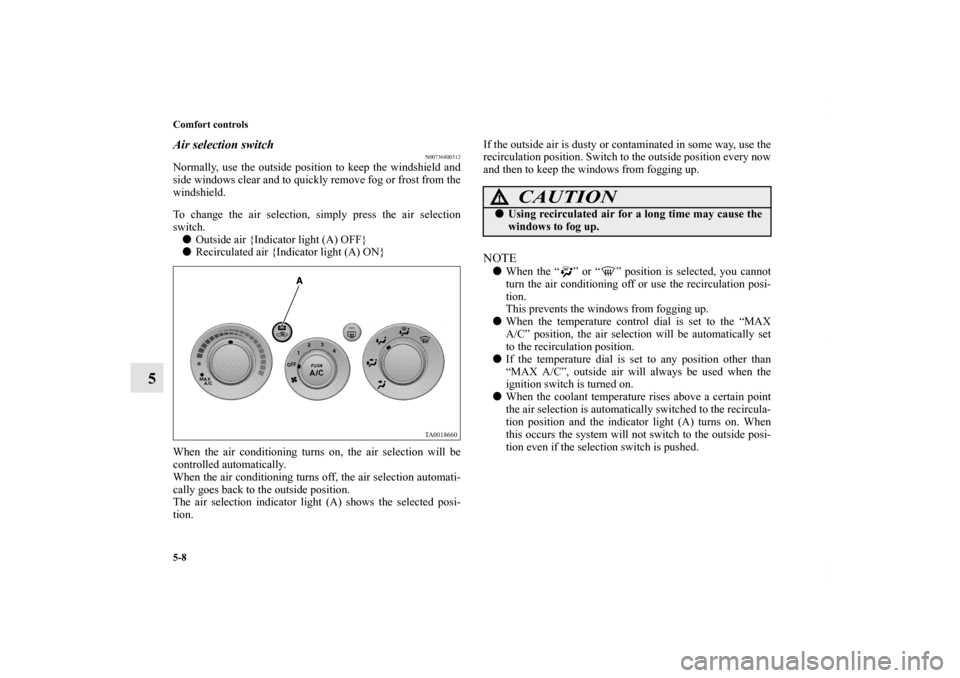
�Outside air {Indicator light (A) OFF}
�Recirculated air {Indicator light (A) ON}
When the air conditioning turns on, the air selection will be
controlled automatically.
When the air conditioning turns off, the air selection automati-
cally goes back to the outside position.
The air selection indicator light (A) shows the selected posi-
tion.If the outside air is dusty or contaminated in some way, use the
recirculation position. Switch to the outside position every now
and then to keep the windows from fogging up.
NOTE�When the “ ” or “ ” position is selected, you cannot
turn the air conditioning off or use the recirculation posi-
tion.
This prevents the windows from fogging up.
�When the temperature control dial is set to the “MAX
A/C” position, the air selection will be automatically set
to the recirculation position.
�If the temperature dial is set to any position other than
“MAX A/C”, outside air will always be used when the
ignition switch is turned on.
�When the coolant temperature rises above a certain point
the air selection is automatically switched to the recircula-
tion position and the indicator light (A) turns on. When
this occurs the system will not switch to the outside posi-
tion even if the selection switch is pushed.
CAUTION
!�Using recirculated air for a long time may cause the
windows to fog up.
BK0102600US.book 8 ページ 2009年3月30日 月曜日 午後2時2分
Page 334 of 514
Comfort controls
5-15
5
NOTE�There is an interior air temperature sensor (A) in the illus-
trated position.
Never place anything over the sensor, since doing so will
prevent it from functioning properly.
�The multi center display automatically switches to an air
conditioning display whenever an air conditioning control
is adjusted manually. The display automatically reverts to
its original display about 10 seconds after the adjustment
is made.
Blower speed selection dial
N00736900010
When the ignition key is in the ON position, select the blower
speed by turning the blower speed selection dial. The blower
speed will gradually increase as the dial is turned to the right.
When the blower speed selection dial is set to the “OFF” posi-
tion, all fan-driven airflow will stop.
BK0102600US.book 15 ページ 2009年3月30日 月曜日 午後2時2分
Page 347 of 514
5-28 Comfort controls
5Audio system
N00734300863
Your vehicle is equipped with the following audio system:
(1) AM/FM electronically tuned radio with CD player-Type 1 → P. 5 - 3 0
(2) AM/FM electronically tuned radio with CD autochanger-Type 2 → P. 5 - 4 3
(3) AM/FM/Satellite electronically tuned radio with CD autochanger-Type 3 → P. 5 - 4 3
The audio system can only be used when the ignition switch is in the “ON” or “ACC” position. Ty p e 1Type 2, Type 3A- Display window
B- Audio system
C- DISP button (if so equipped)
BK0102600US.book 28 ページ 2009年3月30日 月曜日 午後2時2分
Page 348 of 514

Comfort controls
5-29
5
NOTE�In vehicles with AM/FM electronically tuned radio with
CD autochanger-Type 2 or AM/FM/Satellite electroni-
cally tuned radio with CD autochanger-Type 3, the display
automatically switches to an audio indication when an
audio system adjustment is made. The display automati-
cally reverts to its original indication about 10 seconds
after the audio system adjustment is finished. The DISP
button (C) can be used to change the display indication
and to adjust the display brightness and other settings. For
details, refer to “Multi center display” on page 3-86.
�To listen to the audio system while the engine is not run-
ning, turn the ignition key to the “ACC” position.
�If a cellular phone is used inside the vehicle, it may create
noise from the audio equipment. This does not mean that
anything is wrong with your audio equipment. In such a
case, use the cellular phone at a place as far as possible
from the audio equipment.
�If foreign objects or water get into the audio equipment, or
if smoke or a strange odor comes from it, immediately
turn off the audio system and have it checked at an autho-
rized Mitsubishi Motors dealer or a repair facility of your
choice. Never try to repair it yourself. Avoid using the
audio system until it is inspected by a qualified person.
�If the audio system is damaged by foreign objects, water,
or fire, have the system checked by a qualified technician.
Satellite radio
(if so equipped)
Satellite radio uses direct satellite to receiver broadcasting
technology to provide clear digital sound, coast to coast. The
subscription service provider is SIRIUS™ Satellite Radio. This
service offers over 100 channels of music, sports, news, enter-
tainment, and programming for listeners, directly from its sat-
ellites and broadcasting studios.
System activationTo activate your SIRIUS™ Satellite Radio service, call the toll-
free number 888-539-SIRIUS (7474), or visit the Sirius web
site at www.sirius.com. Please have the following information
available when activating your system:
1. The Sirius Identification Number (SIRIUS ID). Refer to
the section “SIRIUS ID indication” on page 5-54.
2. Credit card information.
3. Your Vehicle Identification Number. Refer to “Vehicle
identification number plate” on page 9-2.
“SIRIUS”, the SIRIUS dog logo and channel names and
logos are trademarks of SIRUS Satellite Radio, Inc.
BK0102600US.book 29 ページ 2009年3月30日 月曜日 午後2時2分
Page 387 of 514

5-68 Comfort controls
5Steering wheel remote control switch
(if so
equipped)N00714800338
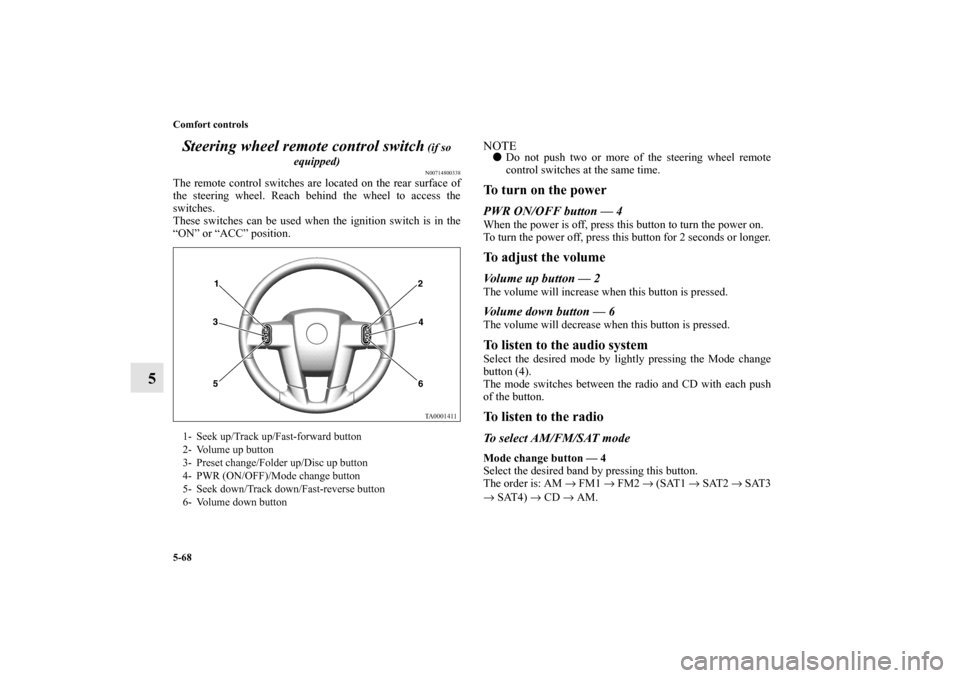
The remote control switches are located on the rear surface of
the steering wheel. Reach behind the wheel to access the
switches.
These switches can be used when the ignition switch is in the
“ON” or “ACC” position.
NOTE�Do not push two or more of the steering wheel remote
control switches at the same time.To turn on the powerPWR ON/OFF button — 4When the power is off, press this button to turn the power on.
To turn the power off, press this button for 2 seconds or longer.To adjust the volumeVolume up button — 2The volume will increase when this button is pressed.Volume down button — 6The volume will decrease when this button is pressed.To listen to the audio systemSelect the desired mode by lightly pressing the Mode change
button (4).
The mode switches between the radio and CD with each push
of the button.To listen to the radioTo select AM/FM/SAT modeMode change button — 4
Select the desired band by pressing this button.
The order is: AM → FM1 → FM2 → (SAT1 → SAT2 → SAT3
→ SAT4) → CD → AM.
1- Seek up/Track up/Fast-forward button
2- Volume up button
3- Preset change/Folder up/Disc up button
4- PWR (ON/OFF)/Mode change button
5- Seek down/Track down/Fast-reverse button
6- Volume down button
BK0102600US.book 68 ページ 2009年3月30日 月曜日 午後2時2分
Page 402 of 514

For emergencies
6-3
6
3. You could be injured if the vehicles move. Set the parking
brake firmly on each vehicle. Put an automatic transaxle
in “P” (PARK) or a manual transaxle in “N” (Neutral).
Turn the ignition key to the “LOCK” position. NOTE�Turn off all lights, heater, and other electrical loads. This
will avoid sparks and help save both batteries.
4. Make sure your battery electrolyte is at the proper level.
(Refer to “Battery” on page 7-16.)5. Connect one end of one jumper cable to the positive (+)
terminal of the discharged battery (A), and the other end
to the positive (+) terminal of the booster battery (B).
NOTE�Open the terminal cover before connecting the jumper
cable to the positive terminal of the battery.
(Refer to “Battery” on page 7-16.)
�Use the proper cables suitable for the battery size.
Otherwise heat damage to the cables could result.
�Check the jumper cables for damage and corrosion before
use.
WA R N I N G
!�Turn the ignition key to the “LOCK” position on
both vehicles. Make sure that the cables or your
clothes cannot be caught by the fan or drive belt.
Personal injury could result.
WA R N I N G
!�If the electrolyte fluid is not visible, or looks frozen,
DO NOT ATTEMPT JUMP STARTING!!
The battery might split open or explode if the tem-
perature is below the freezing point or if it is not
filled to the proper level.
BK0102600US.book 3 ページ 2009年3月30日 月曜日 午後2時2分
Page 411 of 514
6-12 For emergencies
6How to change a tire
N00836900750
Before changing a tire, first stop your vehicle in a safe, flat
location.
1. Park the vehicle on level and stable ground.
2. Set the parking brake firmly, and move the selector lever
to the “P” (PARK) position.
3. Turn on the hazard flashers and turn the ignition key to the
“LOCK” position.
4. Set up a warning triangle, flashing signal light, etc., at an
adequate distance from the vehicle, and have all your pas-
sengers leave the vehicle.5. To prevent the vehicle from rolling when it is raised on the
jack, place chocks or blocks (A) at the tire that is diago-
nally opposite from the tire (B) you are changing.
WA R N I N G
!�Be sure to apply chocks or blocks to the correct tire
when jacking up the vehicle. If the vehicle moves
while jacked up, the jack could slip out of position,
leading to an accident.
BK0102600US.book 12 ページ 2009年3月30日 月曜日 午後2時2分